
Grow mushrooms at home? Absolutely! Imagine harvesting fresh, flavorful mushrooms right from your own kitchen – it’s easier than you think! For centuries, cultivating fungi has been a practice steeped in tradition, particularly in Eastern cultures where mushrooms are revered for their culinary and medicinal properties. From ancient Chinese emperors seeking the “elixir of life” to modern-day foodies craving gourmet flavors, the allure of homegrown mushrooms remains strong.
But why should you embark on this fascinating journey? Well, store-bought mushrooms can be expensive and sometimes lack the vibrant taste of freshly picked ones. Plus, knowing exactly where your food comes from and how it’s grown offers unparalleled peace of mind. This DIY guide will demystify the process, providing you with simple, effective techniques to grow mushrooms at home, even if you have limited space or experience.
Ready to ditch the grocery store and become your own mushroom maestro? Let’s dive in and unlock the secrets to a thriving indoor mushroom garden!
Mushroom Cultivation for Beginners: Creating Your Own Mushroom Paradise at Home
Hello, fellow mushroom lovers! Have you ever wondered what it would be like to grow your own delicious mushrooms at home? I can tell you, it’s easier than you think and incredibly satisfying! In this article, I’ll show you how to create your own little mushroom paradise with simple tools and a bit of patience. Don’t worry, it’s not rocket science!
What You Need to Get Started:
- Mushroom spawn: This is the most important thing! You can buy it online or at garden centers. Make sure the spawn is suitable for your desired mushroom variety (e.g., oyster mushrooms, shiitake, button mushrooms).
- Substrate: This is the food source for your mushrooms. Depending on the mushroom variety, you will need different substrates.
- Oyster mushrooms: Straw, coffee grounds, wood chips
- Shiitake: Hardwood chips (beech, oak)
- Button mushrooms: Compost
- Container: Buckets, plastic bags, or special mushroom growing bags. It’s important that they are clean and have holes for ventilation.
- Spray bottle: To keep the humidity high.
- Gloves: For working cleanly.
- Disinfectant: To avoid contamination.
- Patience: Mushrooms take time to grow!
Preparation: The Key to Successful Mushroom Cultivation
Before we begin, it’s super important that we work cleanly. Contamination is the enemy of all mushroom cultivation!
- Clean your workspace: Choose a quiet, clean place where you can work. Wipe all surfaces with disinfectant.
- Disinfect your hands: Before touching the mushroom spawn or the substrate, disinfect your hands thoroughly.
- Prepare the containers: Clean your containers thoroughly with hot water and disinfectant. Drill small holes for ventilation.
Preparing the Substrate: The Foundation for Your Mushroom Paradise
The preparation of the substrate varies depending on the mushroom variety. Here are the most common methods:
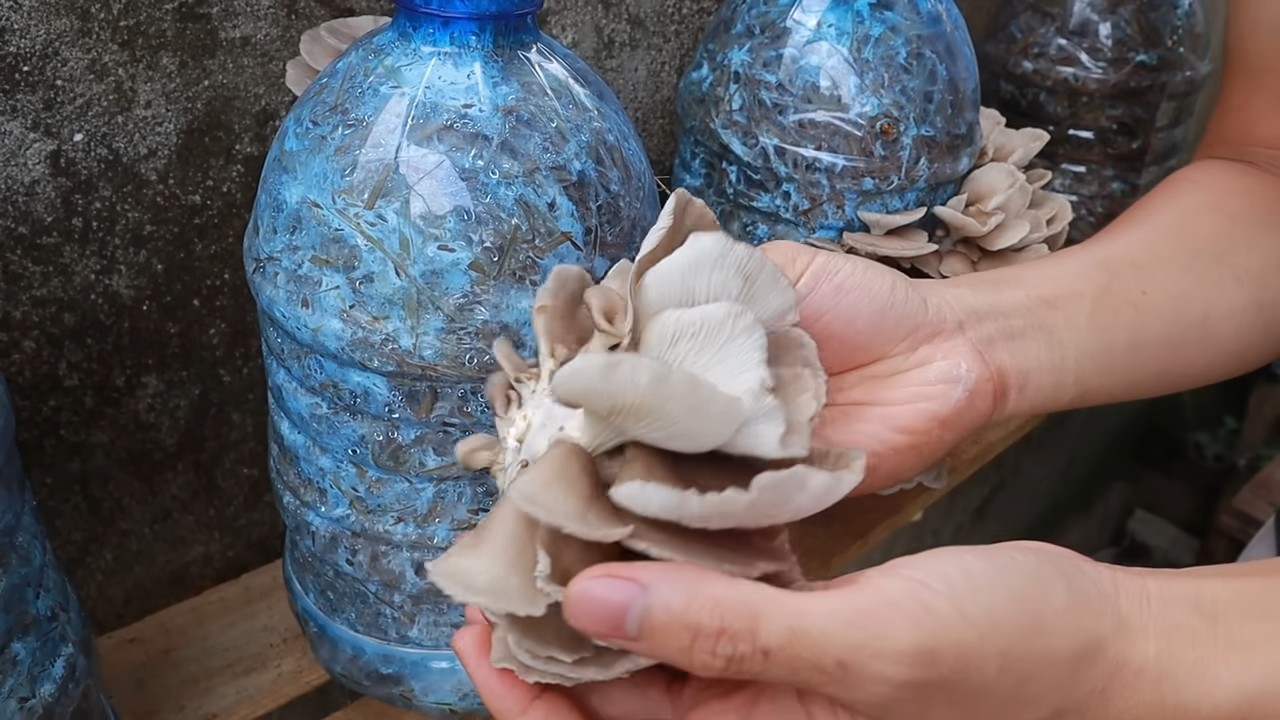
Growing Oyster Mushrooms on Straw:
- Pasteurize the straw: The straw must be pasteurized to kill unwanted microorganisms. The best way to do this is to boil the straw in a large pot of water for 1-2 hours.
- Let the straw cool: Let the straw cool down until it is warm to the touch. It should be moist, but not dripping wet.
- Mix straw with mushroom spawn: Thoroughly mix the pasteurized straw with the mushroom spawn. The ratio should be about 10-20% mushroom spawn to 80-90% straw.
Growing Oyster Mushrooms on Coffee Grounds:
- Collect coffee grounds: Collect your coffee grounds over several days. Make sure they are clean and show no signs of mold.
- Pasteurize the coffee grounds: Put the coffee grounds in a container and pour boiling water over them. Let it cool.
- Mix coffee grounds with mushroom spawn: Mix the cooled coffee grounds with the mushroom spawn. The ratio should be about 20-30% mushroom spawn to 70-80% coffee grounds.
Growing Shiitake on Wood Chips:
- Select wood chips: Use hardwood chips (beech, oak) without bark.
- Pasteurize the wood chips: Soak the wood chips in water for 24 hours. Then, pasteurize them by boiling them in a large pot of water for 1-2 hours.
- Let the wood chips cool: Let the wood chips cool down until they are warm to the touch. They should be moist, but not dripping wet.
- Mix wood chips with mushroom spawn: Thoroughly mix the pasteurized wood chips with the mushroom spawn. The ratio should be about 10-20% mushroom spawn to 80-90% wood chips.
Growing Button Mushrooms on Compost:
Note: Growing button mushrooms is a bit more demanding and requires special compost. You can buy this pre-made.
- Prepare the compost: The compost should be moist and well-aerated.
- Mix compost with mushroom spawn: Thoroughly mix the compost with the mushroom spawn. The ratio should be about 5-10% mushroom spawn to 90-95% compost.
Inoculating the Substrate: The Starting Signal for Your Mushroom Growth
Now comes the exciting part! We are inoculating the substrate with the mushroom spawn.
- Fill the container with substrate: Fill your container with the prepared substrate. Make sure it is loose and not too compacted.
- Distribute the mushroom spawn: Distribute the mushroom spawn evenly throughout the substrate.
- Moisten the substrate: Lightly moisten the substrate with a spray bottle. It should be moist, but not dripping wet.
- Close the container: Close the container with a lid or a plastic bag. Make sure there is still enough air circulation.
The Incubation Phase: Patience is Required!
Now it’s time to wait! The mushroom spawn needs to spread throughout the substrate.
- Store the container: Store the container in a dark, cool place (approx. 18-24°C / 64-75°F).
- Control the humidity: The humidity should be high (approx. 80-90%). Spray the substrate regularly with water to keep it moist.
- Ensure ventilation: Ventilate the container regularly to prevent mold.
- Observe mycelium growth: After a few days or weeks, you should see a white, fluffy mycelium on the substrate. This is a good sign!
The Fruiting Phase: Finally, Harvest Mushrooms!
When the mycelium has completely colonized the substrate, it’s time for the fruiting phase.
- Move the container to a brighter place: Move the container to a brighter spot, but avoid direct sunlight.
- Increase humidity: Increase the humidity even more (approx. 90-95%). Spray the substrate several times a day with water.
- Ensure ventilation: Ventilate the container regularly to prevent mold.
- Observe mushroom formation: After a few days, you should see small mushroom pins.
- Harvest the mushrooms: Harvest the mushrooms when they have reached the desired size. Cut them at the stem or gently twist them out.
After the Harvest: On to the Next Round!
After the harvest, you can moisten the substrate one or two more times and send it back into the fruiting phase. With a little luck, you can achieve several harvests this way.
Important Tips for Successful Mushroom Cultivation:
The right humidity is crucial! Make sure the humidity is high enough, but avoid waterlogging.
Cleanliness is key! Always work cleanly and disinfect your hands and equipment regularly.

Conclusion
So, there you have it! Cultivating your own mushrooms at home isn’t just a fun project; it’s a gateway to fresher, more flavorful ingredients, a deeper connection with nature, and a sustainable way to supplement your diet. We’ve walked you through a simple, effective method that even beginners can master. The satisfaction of harvesting your own bounty, knowing exactly where it came from and how it was grown, is truly unparalleled.
This DIY project offers a unique opportunity to control the quality and variety of mushrooms you consume. Forget the limited selection at the grocery store – imagine enjoying a constant supply of oyster mushrooms, shiitakes, or even lion’s mane, all grown right in your own home!
Beyond the immediate culinary benefits, growing mushrooms at home is an incredibly rewarding experience. It’s a fascinating glimpse into the world of fungi, a chance to learn about decomposition and nutrient cycling, and a tangible way to reduce your carbon footprint. By growing your own food, you’re taking a step towards a more sustainable lifestyle.
Don’t be afraid to experiment! Once you’ve mastered the basic technique, you can explore different substrates, mushroom varieties, and growing environments. Try adding coffee grounds to your substrate for an extra boost of nutrients, or experiment with growing your mushrooms in a greenhouse or even a repurposed container. The possibilities are endless!
We encourage you to take the plunge and try growing mushrooms at home. It’s a surprisingly easy and incredibly rewarding project that will transform the way you think about food. And most importantly, don’t forget to share your experiences with us! We’d love to hear about your successes, your challenges, and any tips or tricks you discover along the way. Post photos of your mushroom harvests, share your favorite recipes, and let’s build a community of home mushroom growers!
Ready to embark on your mushroom-growing adventure? Grab your supplies, follow our guide, and get ready to enjoy the delicious fruits (or rather, fungi) of your labor. Happy growing!
Frequently Asked Questions (FAQ)
What are the easiest types of mushrooms to grow at home for beginners?
Oyster mushrooms are generally considered the easiest type of mushroom to grow at home for beginners. They are fast-growing, relatively forgiving of environmental conditions, and can thrive on a variety of substrates, including straw, coffee grounds, and even cardboard. Shiitake mushrooms are another good option, although they require a bit more patience as they take longer to fruit. Button mushrooms, the kind you typically find in grocery stores, are more challenging to grow at home and are best left to experienced cultivators.
What kind of substrate should I use for growing mushrooms?
The best substrate depends on the type of mushroom you’re growing. Oyster mushrooms do well on straw, coffee grounds, and cardboard. Shiitake mushrooms typically require hardwood logs or sawdust. Make sure the substrate is properly pasteurized or sterilized to eliminate competing organisms before introducing the mushroom spawn.
How do I pasteurize or sterilize the substrate?
Pasteurization involves heating the substrate to a temperature that kills most harmful microorganisms without completely eliminating all life. This can be done by soaking the substrate in hot water (around 160-180°F) for an hour or two. Sterilization, on the other hand, aims to kill all microorganisms and is typically achieved by using an autoclave or pressure cooker. Sterilization is generally recommended for more challenging mushroom species or when using substrates that are prone to contamination.
How long does it take for mushrooms to grow?
The time it takes for mushrooms to grow varies depending on the species, the substrate, and the environmental conditions. Oyster mushrooms can often fruit within a few weeks of inoculation, while shiitake mushrooms may take several months. Patience is key!
What are the ideal environmental conditions for growing mushrooms?
Mushrooms generally prefer cool, humid environments with good air circulation. The ideal temperature range varies depending on the species, but most mushrooms thrive in temperatures between 60-75°F. Humidity is crucial for mushroom development, so you may need to mist your growing area regularly to maintain adequate moisture levels.
How do I know when my mushrooms are ready to harvest?
Mushrooms are typically ready to harvest when the caps have fully expanded but before they start to release spores. The exact timing depends on the species, but generally, you want to harvest them when they are firm and plump.
What if my mushroom grow kit gets contaminated?
Contamination is a common problem in mushroom cultivation. If you notice mold or other unwanted growth in your grow kit, it’s important to remove it immediately to prevent it from spreading. In some cases, you may be able to salvage the kit by carefully removing the contaminated area and spraying the remaining substrate with a diluted bleach solution. However, if the contamination is widespread, it’s best to discard the kit and start over.
Can I reuse the substrate after harvesting mushrooms?
Yes, you can often get multiple flushes (harvests) from the same substrate. After harvesting the first flush, soak the substrate in water for a few hours to rehydrate it. This will encourage the mushrooms to fruit again. You can typically get two to three flushes from a single substrate before it becomes depleted of nutrients.
Is growing mushrooms at home safe?
Yes, growing edible mushrooms at home is generally safe, as long as you follow proper hygiene practices and only consume mushrooms that you have positively identified as edible. It’s important to research the specific species you’re growing and to be aware of any potential look-alikes. If you’re unsure about the identity of a mushroom, it’s best to err on the side of caution and discard it.
Where can I buy mushroom spawn or grow kits?
Mushroom spawn and grow kits are available from a variety of online retailers and specialty gardening stores. Look for reputable suppliers that offer high-quality products and provide clear instructions for growing. You can also find local mushroom growers in your area who may be able to provide spawn or kits.
What are some common mistakes to avoid when growing mushrooms at home?
Some common mistakes to avoid include using contaminated substrate, failing to maintain adequate humidity, and overwatering the mushrooms. It’s also important to choose the right mushroom species for your growing environment and to follow the instructions provided by the supplier.
How can I improve the yield of my mushroom crops?
To improve the yield of your mushroom crops, ensure that you are using a high-quality substrate, maintaining optimal environmental conditions, and providing adequate air circulation. You can also try supplementing the substrate with additional nutrients, such as coffee grounds or bran.
Can I grow mushrooms indoors without a grow kit?
Yes, you can grow mushrooms indoors without a grow kit by creating your own growing environment using materials such as plastic tubs, buckets, or even repurposed containers. You’ll need to source your own mushroom spawn and substrate, but this can be a more cost-effective and customizable option.
What are the benefits of growing mushrooms at home?
The benefits of growing mushrooms at home include access to fresh, flavorful ingredients, a sustainable way to supplement your diet, a deeper connection with nature, and the satisfaction of harvesting your own food. It’s also a fun and educational hobby that can be enjoyed by people of all ages.


Leave a Comment