
Grow Peanuts in Plastic Bottles? Absolutely! Imagine harvesting a bounty of fresh, homegrown peanuts right from your balcony or windowsill. It sounds like something out of a science fiction movie, doesn’t it? But trust me, it’s not only possible, it’s surprisingly easy and incredibly rewarding. For centuries, peanuts have been a staple crop in many cultures, providing essential nutrients and a delicious snack. From ancient South American civilizations to modern-day peanut butter sandwiches, this humble legume has a rich and fascinating history.
But why should you bother growing peanuts in plastic bottles? Well, for starters, it’s a fantastic way to recycle and reduce waste. Instead of tossing those empty bottles, you can transform them into mini peanut farms! More importantly, this DIY project is perfect for urban dwellers or anyone with limited garden space. You don’t need acres of land to enjoy the satisfaction of growing your own food. Plus, let’s be honest, there’s something incredibly cool about showing off your homegrown peanuts to friends and family. I’m excited to show you how to grow peanuts in plastic bottles, a simple and effective method that will bring a touch of the countryside to your home, no matter where you live.
Erdnüsse im Plastikflaschen-Garten: Dein DIY-Guide für den Anbau zu Hause
Hey Gartenfreunde! Habt ihr schon mal darüber nachgedacht, Erdnüsse in Plastikflaschen anzubauen? Klingt verrückt, oder? Aber glaubt mir, es ist ein super spannendes Projekt, das nicht nur Spaß macht, sondern euch auch mit leckeren, selbstgezogenen Erdnüssen belohnt. Und das Beste daran: Ihr recycelt dabei auch noch Plastikflaschen! Ich zeige euch, wie es geht.
Was du brauchst: Die Materialliste
Bevor wir loslegen, hier eine Liste mit allem, was du für dein Erdnuss-Flaschen-Garten-Abenteuer brauchst:
* Plastikflaschen: Am besten eignen sich 1,5-Liter- oder 2-Liter-Flaschen. Je mehr, desto mehr Erdnüsse könnt ihr anbauen! Achtet darauf, dass sie sauber und unbeschädigt sind.
* Erdnüsse: Rohe, ungesalzene Erdnüsse sind ein Muss. Ihr findet sie in den meisten Supermärkten oder Bioläden. Achtet darauf, dass sie nicht geröstet sind, sonst keimen sie nicht.
* Erde: Eine gute Blumenerde oder Anzuchterde ist ideal. Ihr könnt auch eure eigene Erde mischen, z.B. aus Kompost, Gartenerde und Sand.
* Messer oder Schere: Zum Zuschneiden der Plastikflaschen.
* Bohrer oder Nagel: Für die Entwässerungslöcher.
* Wasser: Zum Gießen, natürlich!
* Optional: Etiketten und Stift zum Beschriften der Flaschen.
Die Vorbereitung: Flaschen und Erdnüsse startklar machen
Bevor wir mit dem Pflanzen beginnen, müssen wir die Flaschen vorbereiten und die Erdnüsse zum Keimen bringen.
1. Die Plastikflaschen vorbereiten
1. Reinigung: Spült die Plastikflaschen gründlich mit Wasser und Spülmittel aus, um alle Rückstände zu entfernen. Lasst sie gut trocknen.
2. Zuschneiden: Schneidet die Oberseite der Flasche ab, etwa 10-15 cm unterhalb des Flaschenhalses. Diese abgeschnittene Oberseite werden wir später als eine Art Mini-Gewächshaus verwenden.
3. Entwässerungslöcher: Bohrt oder stecht mit einem Nagel mehrere kleine Löcher in den Boden der Flasche. Diese Löcher sind wichtig, damit überschüssiges Wasser ablaufen kann und die Wurzeln nicht faulen.
4. Optional: Wenn ihr möchtet, könnt ihr die Flaschen mit Etiketten versehen, um den Überblick zu behalten.
2. Die Erdnüsse vorkeimen lassen
Das Vorkeimen der Erdnüsse ist optional, aber es beschleunigt den Prozess und erhöht die Erfolgsrate.
1. Einweichen: Legt die Erdnüsse für 24 Stunden in lauwarmes Wasser. Das Wasser hilft, die harte Schale aufzuweichen und den Keimprozess anzustoßen.
2. Abtropfen: Gießt das Wasser ab und legt die Erdnüsse auf ein feuchtes Papiertuch.
3. Keimen: Wickelt das Papiertuch um die Erdnüsse und legt es in einen Plastikbeutel. Verschließt den Beutel und stellt ihn an einen warmen, dunklen Ort.
4. Kontrolle: Kontrolliert die Erdnüsse täglich. Das Papiertuch sollte immer feucht sein. Nach ein paar Tagen sollten die ersten Keime sichtbar sein.
Das Pflanzen: Erdnüsse in die Flasche bringen
Jetzt kommt der spannende Teil: Wir bepflanzen die vorbereiteten Flaschen mit den vorgekeimten Erdnüssen.
1. Erde einfüllen: Füllt die Plastikflaschen mit Erde. Lasst etwa 2-3 cm Platz bis zum Rand.
2. Erdnüsse pflanzen: Macht kleine Löcher in die Erde, etwa 2-3 cm tief. Legt in jedes Loch eine vorgekeimte Erdnuss mit dem Keim nach oben.
3. Zudecken: Bedeckt die Erdnüsse vorsichtig mit Erde und drückt sie leicht an.
4. Angießen: Gießt die Erde vorsichtig an, bis sie gut durchfeuchtet ist. Achtet darauf, dass kein Wasser in den Untersetzer läuft.
5. Mini-Gewächshaus: Setzt die abgeschnittene Oberseite der Flasche umgekehrt auf die bepflanzte Flasche. Das erzeugt ein Mini-Gewächshaus, das die Keimung beschleunigt und die jungen Pflanzen vor Kälte schützt.
Die Pflege: Erdnüsse hegen und pflegen
Erdnüsse sind relativ pflegeleicht, aber ein paar Dinge solltet ihr beachten, damit sie gut wachsen und viele Früchte tragen.
1. Standort: Stellt die bepflanzten Flaschen an einen sonnigen und warmen Ort. Erdnüsse lieben die Sonne!
2. Gießen: Gießt die Erdnüsse regelmäßig, aber nicht zu viel. Die Erde sollte immer leicht feucht sein, aber nicht nass. Vermeidet Staunässe, da dies zu Wurzelfäule führen kann.
3. Belüftung: Entfernt regelmäßig die abgeschnittene Oberseite der Flasche, um die Pflanzen zu belüften und Schimmelbildung zu vermeiden.
4. Düngen: Düngt die Erdnüsse alle paar Wochen mit einem organischen Dünger.
5. Beobachtung: Beobachtet die Pflanzen regelmäßig auf Schädlinge und Krankheiten. Bei Bedarf könnt ihr natürliche Schädlingsbekämpfungsmittel einsetzen.
6. Stützen: Wenn die Pflanzen größer werden, kann es notwendig sein, sie zu stützen, damit sie nicht umknicken. Ihr könnt dafür kleine Stäbe oder Bambusstäbe verwenden.
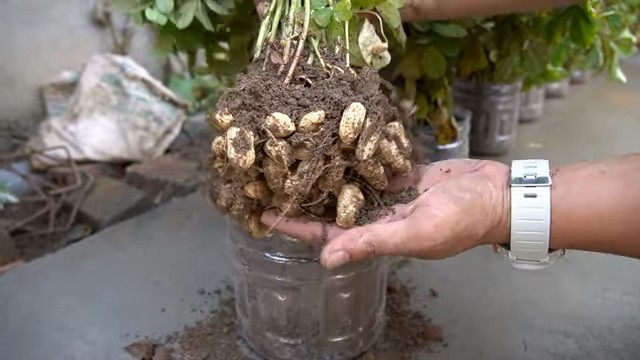
Die Ernte: Endlich Erdnüsse!
Nach etwa 4-5 Monaten, wenn die Blätter der Erdnusspflanzen gelb werden und absterben, ist es Zeit für die Ernte.
1. Erntezeitpunkt: Der beste Zeitpunkt für die Ernte ist, wenn die Blätter der Pflanzen gelb werden und absterben.
2. Ernten: Kippt die Flasche vorsichtig aus und löst die Erdnüsse aus der Erde.
3. Reinigen: Entfernt die Erde von den Erdnüssen und wascht sie gründlich ab.
4. Trocknen: Legt die Erdnüsse zum Trocknen an einen warmen, trockenen Ort. Lasst sie dort für ein paar Tage liegen, bis sie vollständig getrocknet sind.
5. Genießen: Jetzt könnt ihr eure selbstgezogenen Erdnüsse genießen! Ihr könnt sie roh essen, rösten oder zu Erdnussbutter verarbeiten.
Zusätzliche Tipps und Tricks
* Sortenwahl: Es gibt verschiedene Erdnusssorten. Informiert euch, welche Sorte am besten für euren Standort und eure Bedürfnisse geeignet ist.
* Bodenverbesserung: Wenn eure Erde nicht optimal ist, könnt ihr sie mit Kompost oder anderen organischen Materialien verbessern.
* Schutz vor Schädlingen: Um eure Erdnusspflanzen vor Schädlingen zu schützen, könnt ihr sie mit einem Netz abdecken oder natürliche Schädlingsbekämpfungsmittel einsetzen.
* Mehrere Flaschen: Pflanzt mehrere Flaschen gleichzeitig, um eine größere Ernte zu erzielen.
* Experimentieren: Probiert verschiedene Anbaumethoden und Sorten aus, um herauszufinden, was für euch am besten funktioniert.
Häufige Probleme und Lösungen
* Keine Keimung: Wenn die Erdnüsse nicht keimen, kann das verschiedene Ursachen haben. Überprüft, ob die Erdnüsse frisch und ungeröstet sind. Achtet darauf, dass die Erde feucht genug ist und die Temperatur warm genug ist.
* Gelbe Blätter: Gelbe Blätter können ein Zeichen für Nährstoffmangel oder Überwässerung sein. Düngt die Pflanzen regelmäßig und achtet darauf, dass die Erde nicht zu nass ist.
* Schädlinge: Wenn eure Erdnusspflanzen von Schädlingen befallen sind, könnt ihr natürliche Schädlingsbekämpfungsmittel einsetzen oder die Pflanzen mit einem Netz abdecken.
* Wurzelfäule: Wurzelfäule wird durch Staunässe verursacht. Achtet darauf, dass die Erde gut entwässert ist und gießt nicht zu viel.

Conclusion
So, there you have it! Growing peanuts in plastic bottles is not just a quirky gardening experiment; it’s a genuinely rewarding and surprisingly efficient way to cultivate your own fresh, delicious peanuts, even if you’re short on space or live in an area with less-than-ideal soil conditions. This method offers a unique opportunity to witness the entire peanut life cycle up close, from the initial sprouting to the eventual development of those delectable underground treasures.
Why is this DIY trick a must-try? Because it democratizes peanut cultivation. No longer is growing peanuts limited to those with sprawling gardens and specialized equipment. With readily available plastic bottles, some basic potting mix, and a little patience, anyone can experience the joy of harvesting their own homegrown peanuts. It’s an educational project for kids, a space-saving solution for urban gardeners, and a conversation starter for anyone interested in sustainable living.
Beyond the practical benefits, growing peanuts in plastic bottles offers a fascinating glimpse into the ingenuity of nature. Witnessing the plant’s unique ability to “peg” – sending its stems down into the soil (or in this case, the potting mix) to form peanuts – is a truly captivating experience. It’s a reminder of the resilience and adaptability of the natural world, and it’s a lesson that can be applied to many other areas of life.
But the best part? The taste! Freshly harvested, homegrown peanuts have a flavor that far surpasses anything you can buy in a store. The subtle sweetness and nutty aroma are simply unmatched. Imagine roasting your own peanuts, making homemade peanut butter, or adding them to your favorite recipes. The possibilities are endless!
Ready to take your peanut growing to the next level? Consider these variations:
* Vertical Gardening: Create a vertical peanut garden by hanging multiple plastic bottles from a balcony or fence. This maximizes space and adds a unique aesthetic to your outdoor area.
* Companion Planting: Experiment with planting herbs like basil or thyme alongside your peanuts. These herbs can help deter pests and enhance the flavor of your peanuts.
* Different Peanut Varieties: Explore different peanut varieties to find your favorite. Virginia peanuts are known for their large size, while Spanish peanuts have a sweeter flavor.
* Nutrient Boost: Supplement your potting mix with organic fertilizers like compost tea or worm castings to provide your peanuts with the nutrients they need to thrive.
We wholeheartedly encourage you to try this DIY trick and experience the satisfaction of growing your own peanuts in plastic bottles. It’s a fun, educational, and rewarding project that will bring you closer to nature and provide you with a delicious harvest.
Don’t forget to share your experiences with us! We’d love to see photos of your peanut plants, hear about your successes (and challenges!), and learn any tips or tricks you discover along the way. Use the hashtag #BottlePeanuts on social media so we can all follow your peanut-growing journey. Let’s spread the word about this amazing DIY trick and inspire others to grow their own food! Growing your own peanuts in plastic bottles is a rewarding experience.
Frequently Asked Questions (FAQ)
What type of plastic bottle is best for growing peanuts?
Ideally, you should use clear or translucent plastic bottles that are at least two liters in size. Clear bottles allow sunlight to reach the roots, which is essential for healthy growth. Make sure the bottles are clean and free of any residue before using them. Avoid using dark-colored bottles, as they can overheat and damage the roots. Soda bottles, water bottles, or even milk jugs (thoroughly cleaned) can work well. The key is to ensure adequate drainage by creating sufficient drainage holes.
How many peanut plants can I grow in one bottle?
It’s generally recommended to grow only one peanut plant per two-liter bottle. While you might be tempted to cram more plants into a single container, overcrowding can lead to stunted growth, reduced yields, and increased susceptibility to diseases. Each peanut plant needs sufficient space to develop its root system and produce a healthy crop of peanuts. If you have larger bottles, you might be able to grow two plants, but be sure to monitor their growth and provide adequate support.
What type of soil or potting mix should I use?
Peanuts thrive in well-draining, sandy loam soil. A good potting mix for growing peanuts in plastic bottles should be light, airy, and rich in organic matter. You can use a commercially available potting mix or create your own by combining equal parts of garden soil, compost, and perlite or vermiculite. Avoid using heavy clay soil, as it can become waterlogged and suffocate the roots. Ensure the potting mix is slightly acidic to neutral (pH 6.0-7.0) for optimal peanut growth.
How often should I water my peanut plants in plastic bottles?
Water your peanut plants regularly, especially during hot and dry weather. The frequency of watering will depend on the climate, the size of the bottle, and the type of potting mix you’re using. Generally, you should water when the top inch of soil feels dry to the touch. Avoid overwatering, as this can lead to root rot. Ensure the bottles have adequate drainage holes to prevent water from accumulating at the bottom. During the flowering and pegging stages, peanuts require more water, so monitor the soil moisture closely.
How much sunlight do peanut plants need?
Peanut plants need at least 6-8 hours of direct sunlight per day to thrive. Place your plastic bottles in a sunny location where they will receive ample sunlight throughout the day. If you live in a particularly hot climate, you may need to provide some afternoon shade to prevent the plants from overheating. Insufficient sunlight can lead to leggy growth, reduced flowering, and lower peanut yields.
How long does it take to grow peanuts in plastic bottles?
The time it takes to grow peanuts in plastic bottles depends on the variety of peanut, the climate, and the growing conditions. Generally, it takes about 120-150 days from planting to harvest. You’ll know the peanuts are ready to harvest when the foliage starts to turn yellow and the pods feel plump and mature. You can also dig up a few plants to check the peanuts’ development.
How do I harvest peanuts from plastic bottles?
Harvesting peanuts from plastic bottles is relatively easy. Simply cut open the bottle and gently remove the plant, being careful not to damage the peanuts. Shake off any excess soil and allow the peanuts to dry in a well-ventilated area for a few days. Once the peanuts are dry, you can roast them, boil them, or use them in your favorite recipes.
What are some common pests and diseases that affect peanut plants?
Some common pests that affect peanut plants include aphids, spider mites, and leafhoppers. Diseases that can affect peanut plants include leaf spot, root rot, and peanut rust. To prevent pests and diseases, ensure your plants are healthy and well-nourished. You can also use organic pest control methods, such as neem oil or insecticidal soap. Proper drainage and good air circulation can help prevent fungal diseases.
Can I grow peanuts indoors in plastic bottles?
While it’s possible to grow peanuts indoors in plastic bottles, it can be challenging to provide them with the necessary sunlight and growing conditions. If you choose to grow peanuts indoors, you’ll need to supplement with artificial lighting, such as grow lights. Ensure the plants receive at least 12-14 hours of light per day. You’ll also need to monitor the humidity levels and provide adequate ventilation.
How do I store harvested peanuts?
Store harvested peanuts in a cool, dry, and well-ventilated place. You can store them in airtight containers or bags. Shelled peanuts can be stored in the refrigerator for several months or in the freezer for up to a year. Roasted peanuts should be stored in airtight containers to prevent them from becoming stale.

Leave a Comment