
Grow Potatoes at Home – imagine harvesting a bounty of fresh, earthy potatoes right from your own backyard! Forget those bland, store-bought spuds; with a few simple tricks and a little DIY spirit, you can cultivate flavorful, homegrown potatoes that will elevate your meals to a whole new level.
The humble potato has a rich history, dating back thousands of years to the Andes Mountains of South America, where it was a staple food for the Inca civilization. From its origins as a vital source of sustenance to its current status as a global culinary favorite, the potato has truly stood the test of time. Today, we’re bringing this agricultural legacy to your doorstep!
Why should you learn to grow potatoes at home? Well, for starters, it’s incredibly rewarding! There’s nothing quite like the satisfaction of digging up your own food. Plus, you’ll have complete control over the growing process, ensuring your potatoes are free from harmful chemicals and pesticides. In this article, I’ll share some easy-to-follow DIY tricks and hacks that will help you achieve a successful potato harvest, even if you have limited space or gardening experience. Get ready to roll up your sleeves and discover the joy of homegrown potatoes!
Grow Your Own Delicious Potatoes: A Beginner’s Guide
Hey there, fellow gardening enthusiasts! I’m so excited to share my experience with growing potatoes at home. It’s surprisingly easy and incredibly rewarding. Imagine digging up your own fresh, flavorful potatoes – nothing beats that! This guide will walk you through everything you need to know, from choosing the right potatoes to harvesting your bounty. Let’s get started!
Choosing Your Seed Potatoes
First things first, you can’t just plant any old potato from the grocery store. You need “seed potatoes.” These are potatoes specifically grown for planting and are certified disease-free.
* What are Seed Potatoes? Seed potatoes are simply potatoes that have “eyes” or buds on them. These eyes are where the new potato plants will sprout from.
* Where to Buy Them: You can find seed potatoes at your local garden center, online retailers specializing in gardening supplies, or even some farm supply stores.
* Choosing the Right Variety: This is where the fun begins! There are tons of potato varieties to choose from, each with its own unique flavor, texture, and growing characteristics. Consider these factors:
* Climate: Some varieties are better suited for warmer climates, while others thrive in cooler regions. Check the seed potato’s description for its ideal growing conditions.
* Days to Maturity: This tells you how long it will take for the potatoes to be ready for harvest. Early-season varieties mature faster than late-season ones.
* Intended Use: Do you want potatoes for boiling, baking, frying, or making mashed potatoes? Different varieties are better suited for different purposes. For example, Yukon Gold potatoes are great for all-purpose use, while Russet potatoes are ideal for baking.
* Disease Resistance: Look for varieties that are resistant to common potato diseases like blight and scab.
* My Personal Recommendations: I’ve had great success with Yukon Gold (versatile and delicious), Red Pontiac (early-season and great for boiling), and Russet Burbank (classic baking potato).
Preparing Your Seed Potatoes: Chitting (Optional but Recommended)
Chitting, also known as sprouting, is the process of encouraging your seed potatoes to sprout before planting. This gives them a head start and can result in an earlier harvest.
* Why Chit? Chitting helps your potatoes develop strong sprouts, which means they’ll emerge from the soil faster and be less susceptible to pests and diseases.
* How to Chit:
1. Timing: Start chitting about 4-6 weeks before your last expected frost date.
2. Location: Find a cool, bright, and frost-free location. A windowsill or a garage with good lighting works well.
3. Arrangement: Place the seed potatoes in egg cartons or trays with the “eyes” facing upwards.
4. Light and Temperature: Expose them to indirect sunlight and keep the temperature between 60-70°F (15-21°C).
5. Watering: Lightly mist the potatoes with water every few days to prevent them from drying out.
6. Sprout Development: Over the next few weeks, you’ll see small, green sprouts emerging from the eyes. These sprouts should be short and sturdy, not long and spindly.
Preparing the Planting Site
Potatoes need well-drained soil that’s rich in organic matter.
* Sunlight: Choose a location that receives at least 6-8 hours of direct sunlight per day.
* Soil Preparation:
1. Clear the Area: Remove any weeds, rocks, and debris from the planting area.
2. Soil Testing: Ideally, you should test your soil to determine its pH and nutrient levels. Potatoes prefer a slightly acidic soil pH of 6.0-6.5.
3. Amend the Soil: Amend the soil with plenty of compost, well-rotted manure, or other organic matter. This will improve drainage, fertility, and water retention. I personally love using composted leaves and aged chicken manure.
4. Loosen the Soil: Use a garden fork or tiller to loosen the soil to a depth of at least 12 inches. This will allow the potato roots to grow easily.
* Creating Rows or Hills: Potatoes are typically planted in rows or hills.
* Rows: Dig trenches that are about 6-8 inches deep and 3 feet apart.
* Hills: Create mounds of soil that are about 8-10 inches high and 3 feet apart.
Planting Your Seed Potatoes
Now for the exciting part – planting!
1. Cutting Seed Potatoes (Optional): If your seed potatoes are large (larger than an egg), you can cut them into smaller pieces, making sure each piece has at least one or two “eyes.” Let the cut pieces dry for a day or two to prevent rotting. I usually don’t cut mine unless they are really big.
2. Planting Depth: Place the seed potatoes (or cut pieces) in the trenches or hills, with the “eyes” facing upwards. Cover them with 4-6 inches of soil.
3. Spacing: Space the seed potatoes about 12 inches apart within the rows or hills.
4. Watering: Water the planting area thoroughly after planting.
Caring for Your Potato Plants
Once your potato plants emerge, it’s important to provide them with proper care.
* Watering: Water regularly, especially during dry periods. Potatoes need consistent moisture to develop properly. Aim for about 1-2 inches of water per week.
* Fertilizing: Fertilize your potato plants with a balanced fertilizer (e.g., 10-10-10) about 4-6 weeks after they emerge. Follow the instructions on the fertilizer package. You can also side-dress with compost or well-rotted manure.
* Weeding: Keep the planting area free of weeds, which can compete with the potato plants for nutrients and water.
* Pest and Disease Control: Monitor your plants regularly for pests and diseases. Common potato pests include potato beetles, aphids, and flea beetles. Common diseases include blight and scab. Use organic pest control methods whenever possible. I’ve had good luck with neem oil for controlling pests.
* Hilling: This is a crucial step in potato growing. As the potato plants grow, gradually mound soil around the base of the stems. This encourages the formation of more potatoes along the stems and protects the developing tubers from sunlight, which can cause them to turn green and become bitter.
* When to Hill: Start hilling when the plants are about 6-8 inches tall.
* How to Hill: Use a hoe or shovel to pull soil from between the rows or hills and mound it around the base of the stems. Repeat this process every few weeks as the plants grow.
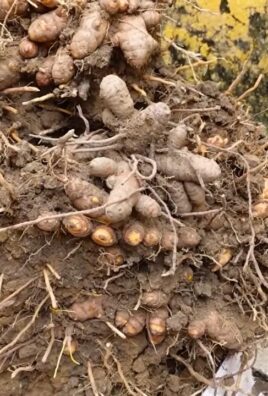
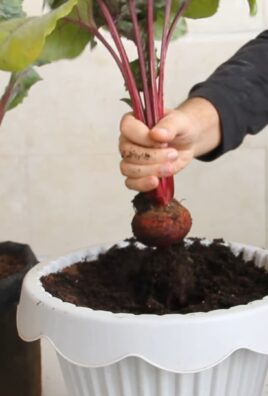
Harvesting Your Potatoes
The moment you’ve been waiting for!
* When to Harvest: The timing of your harvest will depend on the variety of potato you’re growing and whether you want “new potatoes” or mature potatoes.
* New Potatoes: These are small, tender potatoes that are harvested early, about 2-3 weeks after the plants flower. They have thin skins and a delicate flavor.
* Mature Potatoes: These are larger, more starchy potatoes that are harvested after the plants have died back. They have thicker skins and are better for storage.
* Harvesting New Potatoes: Gently dig around the base of the plants and carefully remove the small potatoes. Be careful not to damage the remaining potatoes.
* Harvesting Mature Potatoes:
1. Wait for Dieback: Wait until the potato plants have died back completely. This indicates that the potatoes have reached maturity.
2. Dig Carefully: Use a garden fork or shovel to carefully dig up the potatoes. Start a few inches away from the base of the plant to avoid damaging the tubers.
3. Handle with Care: Potatoes are easily bruised, so handle them gently.
4. Curing (Optional but Recommended): Cure the potatoes by spreading them out in a cool, dry, and dark place for about 1-2 weeks. This will help them develop thicker skins and improve their storage life.
Storing Your Potatoes
Proper storage is essential for keeping your potatoes fresh and delicious.
* Ideal Storage Conditions: Store potatoes in a cool, dark, and well-ventilated place. The ideal temperature is between 40-50°F (4-10°C).
* Avoid Sunlight: Exposure to sunlight can cause potatoes to turn green and produce solanine, a toxic compound.
* Don’t Wash Before Storing: Washing potatoes before storing them can promote rotting.
* Storage Containers: Store potatoes in
Conclusion
So, there you have it! Growing potatoes at home, especially using the container gardening method we’ve explored, is not just a fun project; it’s a rewarding experience that puts fresh, flavorful potatoes right at your fingertips. Forget those bland, store-bought spuds – imagine the taste of freshly dug, homegrown potatoes, bursting with earthy goodness.
This DIY trick is a must-try for several compelling reasons. First and foremost, it offers unparalleled control over the growing environment. You dictate the soil quality, watering schedule, and pest control methods, ensuring your potatoes are grown organically and free from harmful chemicals. This is particularly important if you’re conscious about what you’re putting into your body. Secondly, container gardening makes potato cultivation accessible to everyone, regardless of space constraints. Whether you have a sprawling backyard or a small balcony, you can successfully grow potatoes in containers. It’s a fantastic way to maximize your gardening potential, even in urban environments.
Beyond the practical benefits, growing your own potatoes is incredibly satisfying. There’s something truly special about nurturing a plant from seed (or in this case, a seed potato) to harvest. Witnessing the entire life cycle, from sprouting to flowering to the eventual digging up of your buried treasure, is an educational and fulfilling experience. It connects you to the natural world and provides a tangible sense of accomplishment.
Now, let’s talk about variations. While we’ve focused on container gardening, you can adapt this DIY trick to raised beds or even traditional garden plots. The key principles remain the same: well-draining soil, consistent watering, and adequate sunlight. For those seeking a challenge, consider experimenting with different potato varieties. From the classic Russet Burbank to the colorful Yukon Gold or the petite fingerling potatoes, each variety offers a unique flavor profile and texture. You can also try companion planting. Marigolds, for example, are known to deter pests, while basil can improve the overall health of your potato plants.
Another exciting variation is the “potato tower” method. This involves building a tall structure, such as a wire mesh cylinder, and gradually adding soil as the potato plants grow. This technique allows you to maximize vertical space and potentially yield an even larger harvest. Don’t be afraid to get creative and tailor the DIY trick to your specific needs and preferences.
Growing potatoes at home is more than just a gardening project; it’s an investment in your health, your well-being, and your connection to nature. It’s a chance to learn new skills, experiment with different techniques, and ultimately, enjoy the fruits (or rather, the tubers) of your labor.
So, what are you waiting for? Grab some seed potatoes, a container, and some soil, and embark on this exciting gardening adventure. We’re confident that you’ll be amazed by the results. And most importantly, we want to hear about your experience! Share your photos, tips, and stories with us in the comments below. Let’s build a community of home potato growers and inspire others to discover the joys of homegrown goodness. Happy growing!
Frequently Asked Questions (FAQ)
What kind of container should I use for growing potatoes?
The ideal container for growing potatoes should be at least 15 gallons in size, preferably larger. This provides ample space for the potato plants to develop a healthy root system and produce a good yield. Choose a container made of durable material such as plastic, metal, or even a repurposed trash can. Ensure the container has drainage holes to prevent waterlogging, which can lead to root rot. Fabric pots are also a great option as they allow for excellent aeration and drainage.
What type of soil is best for growing potatoes in containers?
Potatoes thrive in well-draining, slightly acidic soil. A good potting mix for potatoes should be loose and airy, allowing for easy root growth. Avoid using heavy clay soil, as it can become compacted and hinder drainage. A mixture of equal parts compost, peat moss (or coconut coir), and perlite or vermiculite works well. The compost provides essential nutrients, while the peat moss or coconut coir helps retain moisture, and the perlite or vermiculite improves drainage and aeration. You can also add a slow-release fertilizer to the soil mix to provide a steady supply of nutrients throughout the growing season.
How often should I water my potato plants?
Watering frequency depends on several factors, including the weather, the size of the container, and the type of soil. Generally, you should water your potato plants when the top inch of soil feels dry to the touch. Avoid overwatering, as this can lead to root rot. During hot, dry weather, you may need to water daily, while during cooler, wetter periods, you may only need to water every few days. When watering, water deeply, ensuring the entire root ball is thoroughly moistened.
How much sunlight do potato plants need?
Potato plants need at least six to eight hours of direct sunlight per day to thrive. Choose a location that receives plenty of sunlight throughout the day. If you live in a particularly hot climate, you may need to provide some afternoon shade to prevent the plants from overheating. If you’re growing potatoes indoors, you’ll need to supplement with grow lights to provide adequate light.
How do I know when my potatoes are ready to harvest?
The time it takes for potatoes to mature depends on the variety and growing conditions. Generally, potatoes are ready to harvest about 70 to 100 days after planting. You can start harvesting “new potatoes” (small, immature potatoes) about two to three weeks after the plants flower. To harvest new potatoes, carefully dig around the base of the plant and remove a few potatoes, leaving the rest to continue growing. For mature potatoes, wait until the foliage starts to turn yellow and die back. This indicates that the potatoes have reached their full size and are ready to be harvested. To harvest, carefully dig around the base of the plant and lift the entire plant out of the container.
What are some common pests and diseases that affect potato plants?
Common pests that affect potato plants include aphids, potato beetles, and flea beetles. Aphids can be controlled with insecticidal soap or neem oil. Potato beetles can be hand-picked or controlled with Bacillus thuringiensis (Bt). Flea beetles can be deterred with row covers or insecticidal soap. Common diseases that affect potato plants include early blight, late blight, and potato scab. Early blight can be prevented by ensuring good air circulation and avoiding overhead watering. Late blight can be prevented by using disease-resistant varieties and applying a fungicide. Potato scab can be prevented by maintaining a slightly acidic soil pH.
Can I grow potatoes from store-bought potatoes?
While you can technically grow potatoes from store-bought potatoes, it’s not recommended. Store-bought potatoes may have been treated with chemicals to prevent sprouting, and they may also carry diseases. It’s best to use certified seed potatoes, which are specifically grown for planting and are guaranteed to be disease-free. Seed potatoes are available at most garden centers and online retailers.
How do I store my harvested potatoes?
To store your harvested potatoes, cure them for about two weeks in a cool, dark, and well-ventilated place. This allows the skins to harden and prevents spoilage. After curing, store the potatoes in a cool, dark, and dry place, such as a root cellar or a basement. Avoid storing potatoes in the refrigerator, as this can cause them to develop a sweet taste. Properly stored potatoes can last for several months.
Can I grow potatoes in the same container year after year?
It’s generally not recommended to grow potatoes in the same container year after year, as this can deplete the soil of nutrients and increase the risk of disease. It’s best to rotate your crops and use fresh potting mix each year. If you must reuse the same container, amend the soil with plenty of compost and fertilizer to replenish the nutrients.
What are some good companion plants for potatoes?
Good companion plants for potatoes include beans, cabbage, corn, garlic, horseradish, marigolds, peas, and thyme. These plants can help deter pests, improve soil health, and enhance the growth of your potato plants. Avoid planting potatoes near tomatoes, cucumbers, pumpkins, raspberries, sunflowers, and turnips, as these plants can attract pests and diseases that can harm your potato plants.
Leave a Comment