
Grow Romanesco Cauliflower in Pots: Ever dreamt of harvesting those mesmerizing, fractal-patterned Romanesco cauliflowers right from your own balcony or patio? I know I have! This unique vegetable, with its striking geometric beauty, isn’t just a feast for the eyes; it’s also packed with nutrients and boasts a delicious, nutty flavor. But let’s be honest, the idea of growing cauliflower, especially the somewhat temperamental Romanesco variety, can seem daunting, especially if you’re short on space.
For centuries, cauliflower has been a staple in gardens and kitchens worldwide, with Romanesco being a relatively modern cultivar, believed to have originated in Italy. Its intricate design has even inspired mathematicians and artists! But you don’t need to be a botanist or a mathematician to enjoy the satisfaction of growing your own. That’s where this DIY guide comes in.
Many people shy away from growing vegetables like Romanesco because they believe it requires a large garden. But the truth is, with the right techniques, you can absolutely grow Romanesco Cauliflower in Pots successfully, even in small spaces. This article will break down the process into simple, manageable steps, providing you with all the tips and tricks you need to cultivate these stunning vegetables right at home. Imagine the pride and joy of serving a homegrown Romanesco cauliflower – it’s a conversation starter and a delicious addition to any meal! So, let’s get our hands dirty and embark on this exciting gardening adventure together!
Growing Romanesco Cauliflower in Pots: A Step-by-Step Guide
Hey there, fellow gardening enthusiasts! Ever wanted to grow something truly unique and visually stunning? Then Romanesco cauliflower is your answer! This fractal vegetable isn’t just a conversation starter; it’s also delicious and surprisingly easy to grow in pots, even if you don’t have a sprawling garden. I’m going to walk you through the entire process, from seed to harvest, so you can enjoy your own homegrown Romanesco.
Choosing the Right Pot and Soil
Before we even think about seeds, let’s get the foundation right. The pot and soil are crucial for healthy Romanesco growth.
* Pot Size: Romanesco needs room to grow. A pot that’s at least 12 inches in diameter and 12 inches deep is ideal. Bigger is always better, so if you have the space, go for a 15-inch or even 18-inch pot. This gives the roots plenty of space to develop, leading to a larger, healthier head.
* Drainage: Excellent drainage is non-negotiable. Romanesco hates sitting in soggy soil, which can lead to root rot. Make sure your pot has drainage holes at the bottom. If you’re using a plastic pot, you might even want to add a few extra holes for good measure.
* Soil Mix: Forget garden soil; it’s too heavy and compacts easily in pots. Instead, opt for a high-quality potting mix. I like to use a mix that’s specifically formulated for vegetables. You can also make your own by combining equal parts of:
* Compost: Provides nutrients and improves drainage.
* Peat moss or coco coir: Retains moisture and helps aerate the soil.
* Perlite or vermiculite: Improves drainage and aeration.
Starting Your Romanesco Seeds
You have two options here: starting seeds indoors or direct sowing outdoors. I prefer starting indoors because it gives the seedlings a head start and protects them from pests and harsh weather.
* Timing: Romanesco needs a long growing season, about 75-90 days. Start your seeds indoors 6-8 weeks before the last expected frost in your area. If you’re direct sowing, wait until the soil has warmed up to at least 60°F (15°C).
* Materials:
* Seed starting trays or small pots
* Seed starting mix (finer than regular potting mix)
* Spray bottle
* Heat mat (optional, but helpful)
* Grow lights (optional, but recommended)
Step-by-Step Seed Starting:
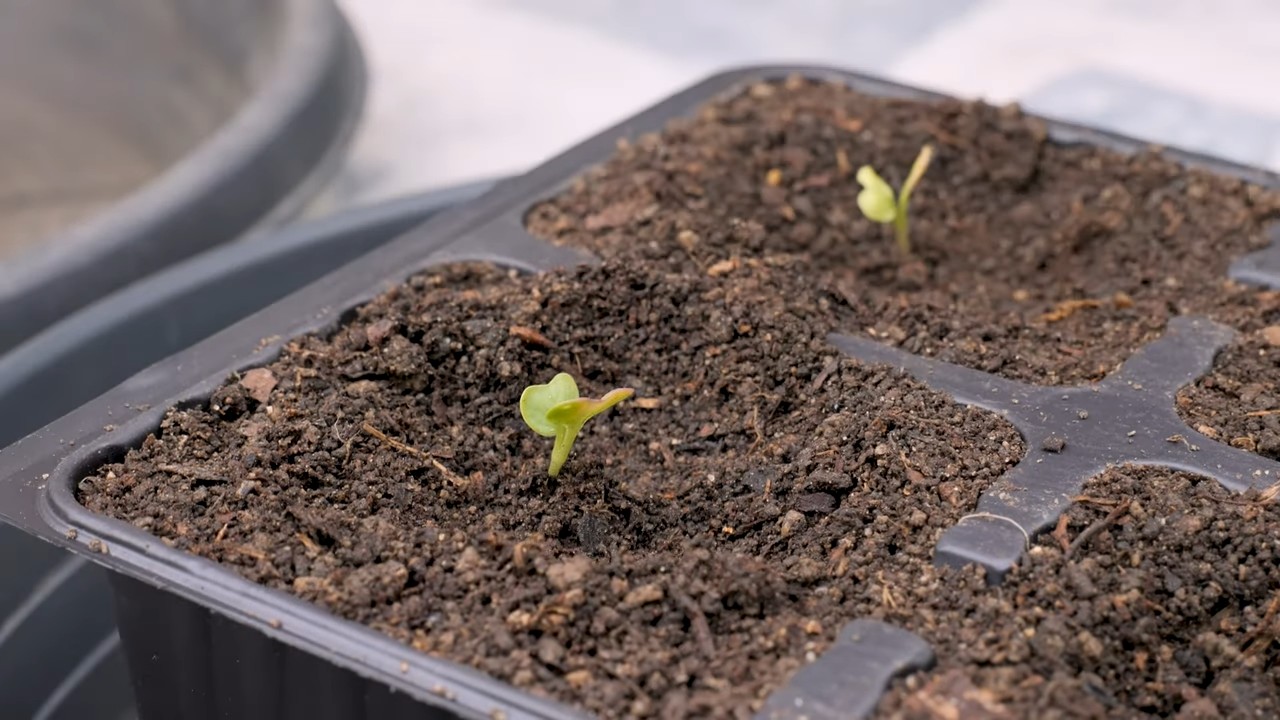
1. Fill the trays or pots: Fill your seed starting trays or small pots with seed starting mix. Gently tap the containers to settle the soil.
2. Sow the seeds: Make a small indentation (about ¼ inch deep) in the center of each cell or pot. Place 2-3 seeds in each indentation. This increases your chances of at least one seed germinating.
3. Cover the seeds: Gently cover the seeds with seed starting mix.
4. Water gently: Use a spray bottle to mist the soil thoroughly. Avoid overwatering, which can cause the seeds to rot.
5. Provide warmth: Place the trays or pots on a heat mat, if using. This will help speed up germination.
6. Provide light: If you’re not using grow lights, place the trays or pots in a sunny window. However, grow lights provide more consistent and even light, which is ideal for seedlings.
7. Keep the soil moist: Check the soil daily and mist with water as needed to keep it consistently moist but not soggy.
8. Thin the seedlings: Once the seedlings have emerged and have a couple of true leaves (the second set of leaves), thin them out, leaving only the strongest seedling in each cell or pot. Use small scissors to snip off the weaker seedlings at the soil line.
Transplanting Your Seedlings
Once your seedlings have developed several sets of true leaves and are about 4-6 inches tall, it’s time to transplant them into their final pots.
* Hardening Off: Before transplanting, you need to “harden off” the seedlings. This means gradually exposing them to outdoor conditions to acclimate them to the sun, wind, and temperature changes. Start by placing the seedlings outdoors in a sheltered location for an hour or two each day, gradually increasing the amount of time they spend outside over the course of a week.
* Timing: Transplant your seedlings on a cloudy day or in the late afternoon to minimize stress.
Step-by-Step Transplanting:
1. Prepare the pot: Fill your chosen pot with the potting mix, leaving a few inches of space at the top.
2. Dig a hole: Dig a hole in the center of the pot that’s large enough to accommodate the root ball of the seedling.
3. Remove the seedling: Gently remove the seedling from its tray or pot. Be careful not to damage the roots. If the seedling is root-bound (the roots are tightly circling the bottom of the pot), gently loosen the roots before planting.
4. Place the seedling: Place the seedling in the hole, making sure the top of the root ball is level with the surrounding soil.
5. Fill the hole: Fill the hole with potting mix, gently firming the soil around the seedling.
6. Water thoroughly: Water the seedling thoroughly after transplanting.
Caring for Your Romanesco Plants
Now that your Romanesco is in its final pot, it’s time to provide the care it needs to thrive.
* Sunlight: Romanesco needs at least 6 hours of sunlight per day. Place your pot in a sunny location.
* Watering: Water regularly, especially during hot, dry weather. Keep the soil consistently moist but not soggy. Check the soil moisture by sticking your finger into the soil. If the top inch feels dry, it’s time to water.
* Fertilizing: Romanesco is a heavy feeder, meaning it needs a lot of nutrients. Fertilize every 2-3 weeks with a balanced liquid fertilizer. You can also amend the soil with compost or aged manure.
* Pest Control: Keep an eye out for pests like aphids, cabbage worms, and flea beetles. You can control these pests with insecticidal soap, neem oil, or by handpicking them off the plants. Covering the plants with row covers can also help prevent pest infestations.
* Weed Control: Keep the pot free of weeds, which can compete with the Romanesco for nutrients and water.
* Support: As the Romanesco head develops, it may become heavy and cause the plant to topple over. Provide support by staking the plant or using a tomato cage.
Harvesting Your Romanesco
The moment you’ve been waiting for! Harvesting your own Romanesco is incredibly rewarding.
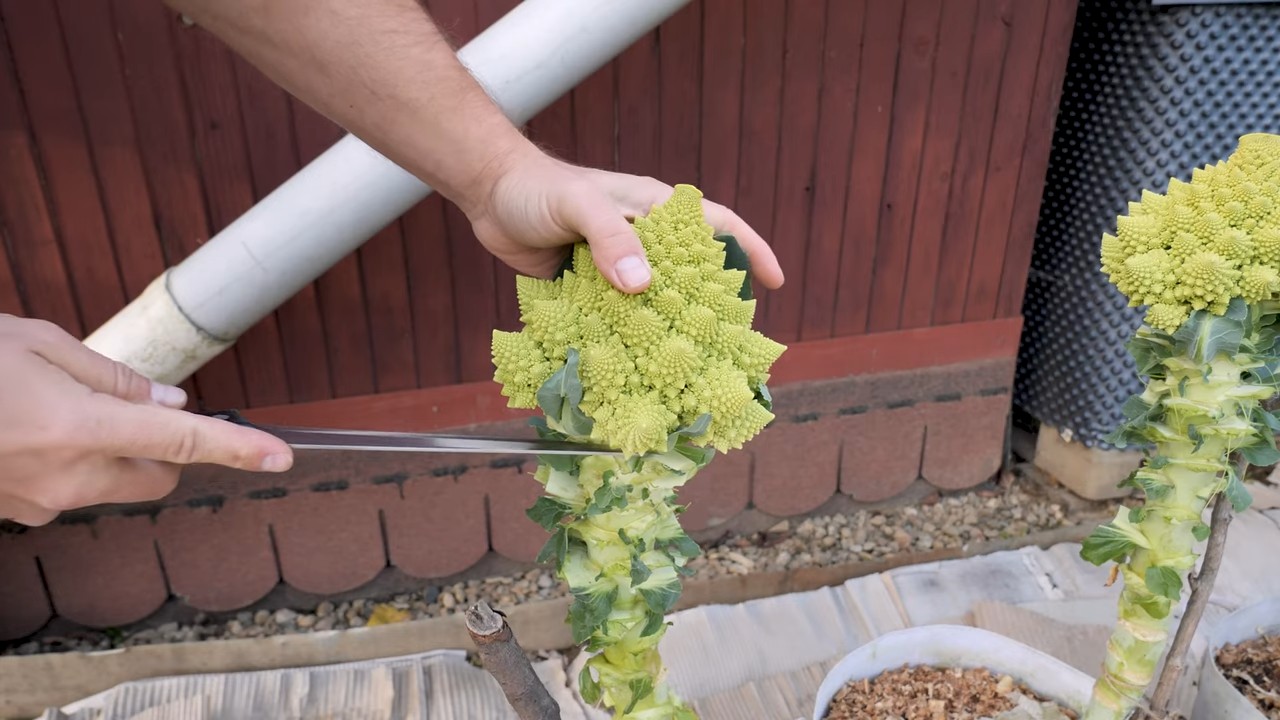
* Timing: Romanesco is typically ready to harvest 75-90 days after planting. The head should be firm and compact, and the florets should be tightly closed.
* How to Harvest: Use a sharp knife to cut the head from the plant, leaving a few inches of stem attached.
Troubleshooting
Even with the best care, you might encounter some problems along the way. Here are a few common issues and how to address them:
* Yellowing Leaves: This could be a sign of nutrient deficiency, overwatering, or underwatering. Check the soil moisture and fertilize if necessary.
* Small Heads: This could be due to insufficient sunlight, water, or nutrients. Make sure your plant is getting enough of all three.
* Pest Infestations: As mentioned earlier, keep an eye out for pests and take action promptly.
* Bolting: Bolting (premature flowering) can occur if the plant is stressed by heat or lack of water. Try to provide consistent moisture and shade during hot weather.
Growing Romanesco cauliflower in pots is a fun and rewarding experience. With a little care and attention, you can enjoy your own homegrown fractal vegetable. Happy gardening!
Conclusion
Growing Romanesco cauliflower in pots might seem daunting, but as we’ve explored, it’s a surprisingly achievable and rewarding endeavor. This isn’t just about saving money; it’s about connecting with your food, understanding its growth cycle, and enjoying the unparalleled satisfaction of harvesting your own uniquely beautiful and nutritious vegetable. The vibrant green spirals of a homegrown Romanesco are a testament to your patience and care, a far cry from the often-lackluster specimens found in supermarkets.
This DIY trick is a must-try for several compelling reasons. Firstly, it offers flexibility. Whether you have a sprawling garden or a small balcony, container gardening allows you to cultivate Romanesco cauliflower regardless of space constraints. Secondly, it provides greater control over the growing environment. You can meticulously manage soil quality, watering, and pest control, leading to healthier and more productive plants. Thirdly, it’s an educational experience. Observing the intricate development of the Romanesco head is fascinating, offering insights into the wonders of nature.
But the benefits don’t stop there. Growing your own Romanesco cauliflower allows you to experiment with different varieties. While the classic lime-green Romanesco is a showstopper, consider exploring other cultivars with slightly different hues or growth habits. You can also tailor the growing conditions to optimize the flavor and texture of your harvest. Perhaps you prefer a slightly sweeter taste? Experiment with different fertilizers or watering schedules.
For those looking to add a personal touch, consider companion planting in your pots. Marigolds can deter pests, while herbs like rosemary or thyme can enhance the flavor of your Romanesco. You could even interplant with low-growing greens like spinach or lettuce to maximize space utilization.
Don’t be intimidated by the perceived complexity of growing Romanesco cauliflower. With the right knowledge and a little dedication, you can successfully cultivate this remarkable vegetable in pots. We’ve provided you with the essential steps, from selecting the right pot size and soil mix to providing adequate sunlight and water. Now, it’s your turn to put these tips into practice.
We wholeheartedly encourage you to embark on this gardening adventure. Start small, perhaps with just one or two plants, and gradually expand your operation as you gain confidence. The rewards are well worth the effort. Imagine the pride you’ll feel when you harvest your first homegrown Romanesco cauliflower, a true masterpiece of nature and your own handiwork.
More importantly, we want to hear about your experiences! Share your successes, challenges, and any innovative techniques you discover along the way. Post photos of your thriving Romanesco plants, describe the unique flavors you achieve, and inspire others to join the growing community of home gardeners. Let’s learn from each other and collectively master the art of growing Romanesco cauliflower in pots. Your insights could be invaluable to fellow gardeners, helping them overcome obstacles and achieve their own bountiful harvests. So, grab your pots, seeds, and gardening gloves, and let’s get growing! Remember, the journey of a thousand miles begins with a single seed, and the journey to a delicious, homegrown Romanesco cauliflower begins with you.
Frequently Asked Questions (FAQ)
What is the ideal pot size for growing Romanesco cauliflower?
The ideal pot size for growing Romanesco cauliflower is at least 12 inches in diameter and 12 inches deep, but larger is generally better. A 5-gallon pot is a good starting point, but a 7-gallon or even 10-gallon pot will provide more room for the roots to develop, leading to a healthier and more productive plant. Remember that Romanesco cauliflower needs space to grow its substantial head, and a cramped root system can stunt its growth.
What type of soil mix should I use for growing Romanesco cauliflower in pots?
Use a well-draining, nutrient-rich potting mix. Avoid using garden soil directly in pots, as it can become compacted and impede drainage. A good potting mix should contain a blend of peat moss, perlite, and vermiculite, along with compost or other organic matter to provide essential nutrients. You can also amend the potting mix with slow-release fertilizer to ensure a steady supply of nutrients throughout the growing season. The pH level should ideally be between 6.0 and 7.0.
How much sunlight does Romanesco cauliflower need?
Romanesco cauliflower requires at least 6 hours of direct sunlight per day to thrive. Choose a location that receives ample sunlight throughout the day. If you live in a particularly hot climate, some afternoon shade may be beneficial to prevent the plants from overheating. If you don’t have access to enough natural sunlight, you can supplement with grow lights.
How often should I water my Romanesco cauliflower plants?
Water Romanesco cauliflower plants regularly, keeping the soil consistently moist but not waterlogged. Check the soil moisture level daily, and water when the top inch of soil feels dry to the touch. Avoid overhead watering, as this can promote fungal diseases. Instead, water at the base of the plant, ensuring that the water reaches the roots. During hot weather, you may need to water more frequently.
What are some common pests and diseases that affect Romanesco cauliflower, and how can I control them?
Common pests that affect Romanesco cauliflower include aphids, cabbage worms, and flea beetles. You can control these pests by handpicking them off the plants, using insecticidal soap, or applying Bacillus thuringiensis (Bt), a natural bacterium that is effective against cabbage worms. Common diseases include clubroot and black rot. To prevent these diseases, ensure good drainage, avoid overhead watering, and practice crop rotation. If you suspect a disease, remove the affected leaves or plants immediately.
How long does it take for Romanesco cauliflower to mature?
Romanesco cauliflower typically takes 75-90 days to mature from transplant. The exact time will depend on the variety, growing conditions, and climate. Monitor the plants closely, and harvest the head when it is firm and compact, before the florets start to separate.
Can I grow Romanesco cauliflower in pots during the winter?
In mild climates, you may be able to grow Romanesco cauliflower in pots during the winter. However, in colder climates, you will need to provide protection from frost and freezing temperatures. You can move the pots indoors or cover them with frost blankets.
What are some signs that my Romanesco cauliflower plant is not doing well?
Some signs that your Romanesco cauliflower plant is not doing well include yellowing leaves, stunted growth, wilting, and the presence of pests or diseases. If you notice any of these signs, take action immediately to address the underlying problem. Check the soil moisture level, adjust the watering schedule, and inspect the plants for pests or diseases.
How do I know when my Romanesco cauliflower is ready to harvest?
The Romanesco cauliflower head is ready to harvest when it is firm, compact, and has reached its desired size. The florets should be tightly packed together, and the head should be free from blemishes or discoloration. Use a sharp knife to cut the head from the plant, leaving a few leaves attached.
Can I save seeds from my homegrown Romanesco cauliflower?
Saving seeds from Romanesco cauliflower is possible, but it requires allowing the plant to bolt (flower) and produce seeds. This process takes two growing seasons. However, Romanesco cauliflower is an open-pollinated variety, meaning that the seeds will produce plants that are similar to the parent plant. Be aware that cross-pollination with other brassicas (like broccoli or other cauliflowers) can occur, potentially altering the characteristics of the offspring. For best results, isolate your Romanesco cauliflower plants from other brassicas during flowering.

Leave a Comment