
Grow Sage in Kitchen: Imagine stepping into your kitchen, not just to cook, but to snip fresh, fragrant sage leaves for your culinary creations. No more last-minute dashes to the grocery store or settling for dried herbs that lack that vibrant, earthy flavor! This isn’t just a dream; it’s an achievable reality with a few simple DIY tricks.
For centuries, sage has been more than just a culinary herb. Ancient Romans revered it for its medicinal properties, believing it could cure everything from snakebites to memory loss. Its name, derived from the Latin “salvere” meaning “to save,” speaks volumes about its historical significance. Today, while we might not rely on it for snakebites, sage continues to be a beloved ingredient in cuisines worldwide, adding depth and complexity to dishes.
But why should you bother with a DIY approach to growing sage? Well, for starters, it’s incredibly rewarding! There’s something truly special about nurturing a plant from a tiny seedling to a thriving herb. Plus, it’s a fantastic way to reduce your carbon footprint by cutting down on trips to the store and packaging waste. And let’s be honest, fresh sage from your own kitchen tastes infinitely better than anything you can buy pre-packaged. I’m going to show you how easy it is to grow sage in kitchen, even if you don’t have a green thumb. Get ready to transform your kitchen into a mini herb garden!
Growing Sage in the Kitchen: Your DIY Guide for Fresh Herbs
I love having fresh herbs right at hand, especially when cooking! Sage is no exception. Its aromatic scent and versatile flavor make it a must-have in my kitchen. And the best part? You can easily grow it yourself! Here, I’ll show you how to grow your own sage in the kitchen, whether you have a garden or not.
What you need:
- Sage seeds or a sage plant (young plant)
- A pot (at least 15 cm in diameter)
- High-quality potting soil (preferably herb soil)
- Gravel or clay shards for drainage
- A watering can or spray bottle
- A sunny location (windowsill or under a plant lamp)
- Optional: Liquid fertilizer for herbs
Growing Sage from Seed:
Growing sage from seed requires a bit more patience, but it’s a rewarding experience.
Sowing:
- Prepare the pot: First, fill the bottom of the pot with a layer of gravel or clay shards to ensure good drainage. This prevents waterlogging, which sage really dislikes. Then, fill the pot with potting soil, leaving about 2-3 cm of space to the rim.
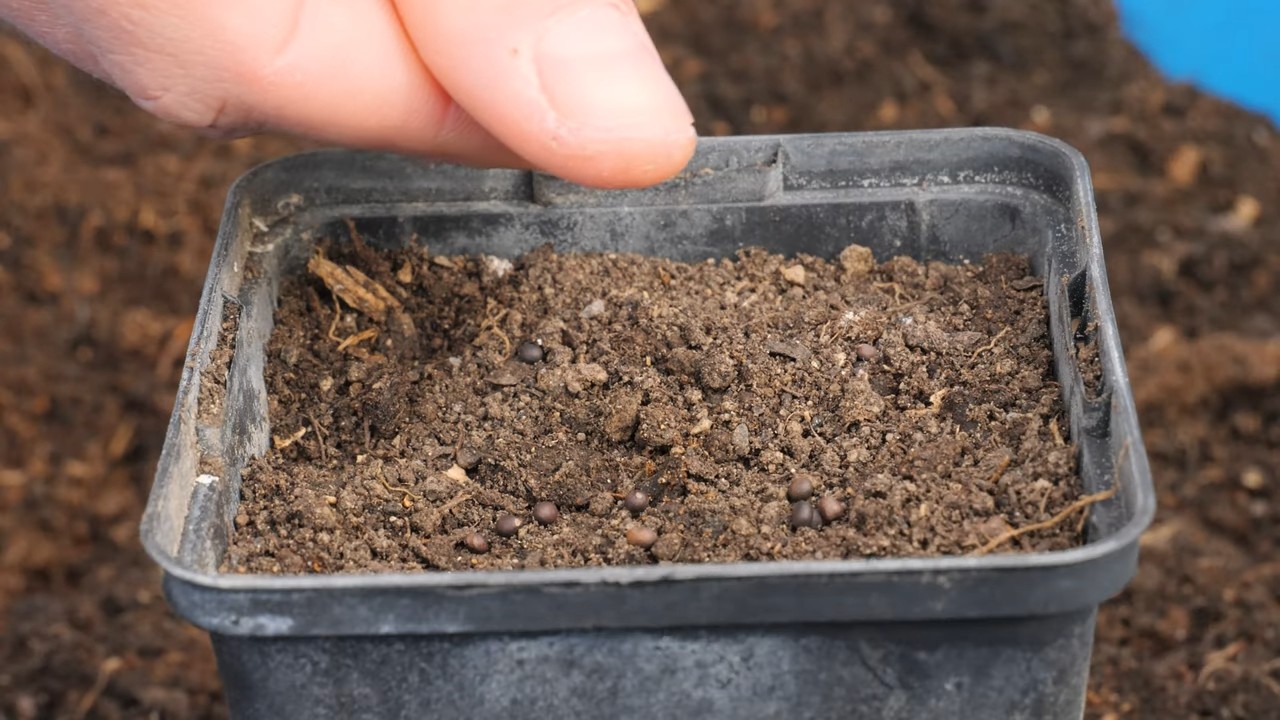
- Sow the seeds: Sage seeds are relatively small. Distribute them evenly on the soil. Press them down lightly, but do not cover them completely with soil. Sage is a light germinator, which means it needs light to germinate.
- Watering: Moisten the soil gently with a spray bottle. The soil should be damp, but not wet.
- Location: Place the pot in a warm and bright place. A windowsill with direct sunlight is ideal.
- Germination: Germination usually takes 14-21 days. Keep the soil moist during this time. You can also cover the pot with plastic wrap to increase humidity. But don’t forget to briefly air it out daily to prevent mold.
Caring for the Seedlings:
- Thinning out: Once the seedlings are large enough to handle (about 5-7 cm high), you need to thin them out. This means removing the weaker plants so the stronger ones have enough space to grow. Leave about 5-7 cm of space between the individual plants.
- Watering: Water the seedlings regularly, but avoid waterlogging. The soil should dry out slightly between waterings.
- Fertilizing: Start fertilizing about 4-6 weeks after thinning. Use a liquid fertilizer for herbs and follow the instructions on the package.
- Repotting: When the plants become too large for the pot, you will need to repot them into a larger one.
Growing Sage from a Young Plant:
Growing sage from a young plant is easier and faster than from seed.
Planting:
- Prepare the pot: As with growing from seed, fill the bottom of the pot with a layer of gravel or clay shards for drainage. Then, fill the pot with potting soil, leaving about 2-3 cm of space to the rim.
- Plant the young plant: Dig a hole in the soil large enough to accommodate the root ball of the young plant. Carefully remove the young plant from its nursery pot and place it in the hole. Fill the hole with soil and press down lightly.
- Watering: Water the plant thoroughly until water runs out of the drainage hole in the pot.
- Location: Place the pot in a sunny location.
Caring for the Sage Plant:
- Watering: Water the plant regularly, but avoid waterlogging. The soil should dry out slightly between waterings.
- Fertilizing: Fertilize the plant every 2-4 weeks with a liquid fertilizer for herbs.
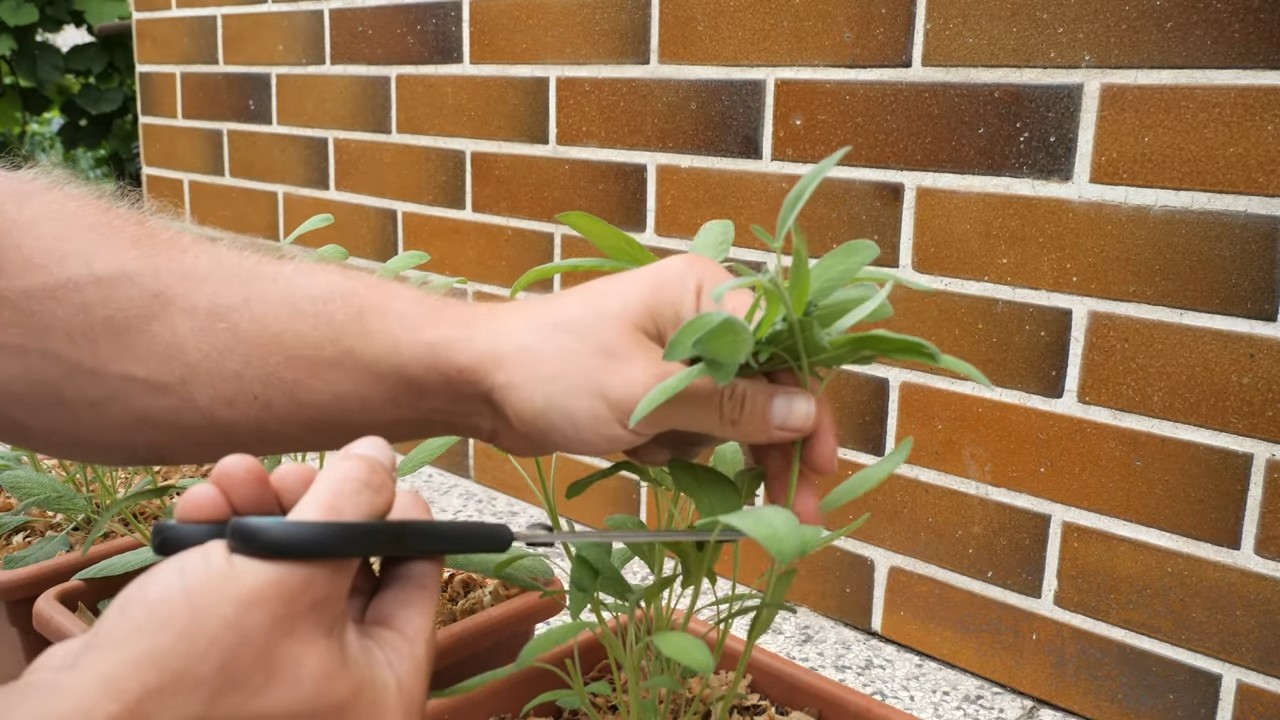
- Pruning: Prune the plant regularly to encourage growth and to harvest the leaves. Cut the stems just above a leaf node. This encourages the plant to produce new shoots.
- Overwintering: Sage is hardy, but in cold regions, you should bring the plant indoors for the winter or cover it with fleece.
Tips and Tricks for Healthy Sage:
- Sunshine: Sage loves the sun! Make sure your plant gets at least 6 hours of sunlight per day. If you don’t have enough sunlight, you can use a plant lamp.
- Drainage: Good drainage is crucial to prevent waterlogging. Always use a pot with a drainage hole and a drainage layer of gravel or clay shards.
- Soil: Use high-quality potting soil, preferably herb soil. This soil is specially tailored to the needs of herbs and contains the right nutrients.
- Pruning: Regular pruning is important to promote growth and keep the plant bushy. Cut the stems just above a leaf node.
- Pests: Watch out for pests like aphids or spider mites. If you discover pests, you can combat them with a natural insecticide.
- Harvesting: You can harvest the leaves anytime you need them. It’s best to harvest them in the morning when they are most aromatic.
- Drying: If you have more sage than you can use, you can dry the leaves. Tie the stems into small bundles and hang them in a dry, dark, and airy place. Once the leaves are dry, you can store them in an airtight container.
Common Problems and Solutions:
- Yellow leaves: Yellow leaves can be a sign of overwatering or a nutrient deficiency. Check your watering and fertilize the plant if necessary.
- Brown leaves: Brown leaves can be a sign of dryness or sunburn. Water the plant regularly and move it to a shadier spot if necessary.
- Mold: Mold can occur if the humidity is too high. Ensure good ventilation and avoid waterlogging.
- Pests: Pests can weaken the plant and hinder its growth. Combat pests with a natural insecticide.
Using Sage in the Kitchen:
Sage is a versatile herb that can be used in many dishes. Here are a few ideas:
- Sage butter: Melt butter in a pan and add fresh sage leaves. Let the butter brown slightly and serve it over pasta, gnocchi, or vegetables.
- Sage pesto: Replace part of the basil in your pesto recipe with sage.
- Sage tea: Pour hot water over fresh or dried sage leaves and let the tea steep for 5-10 minutes.
- Sage chicken: Stuff a chicken with sage leaves, garlic, and lemon and roast it in the oven.
- Sage soup: Add sage leaves to your favorite soup to give it a special flavor.
I hope this guide helps you to grow your own sage in the kitchen. It’s really easier than you think and it…
Conclusion
So, there you have it! Growing your own sage in the kitchen is not just a whimsical idea; it’s a practical, rewarding, and surprisingly simple way to elevate your culinary creations and bring a touch of nature indoors. Forget those sad, wilted bunches of sage from the grocery store that lose their flavor before you even get a chance to use them. With this easy DIY trick, you can have fresh, fragrant sage at your fingertips, ready to infuse your dishes with its earthy, slightly peppery notes.
Why is this a must-try? Because it’s more than just convenience. It’s about control. You control the quality of your sage, ensuring it’s organically grown and free from harmful pesticides. You control the quantity, harvesting only what you need, minimizing waste, and maximizing freshness. And you control the variety! Experiment with different types of sage, from the classic garden sage to the fruity pineapple sage or the striking purple sage. Each variety offers a unique flavor profile that can add a new dimension to your cooking.
Beyond the culinary benefits, growing sage in your kitchen is also a mood booster. The vibrant green leaves and the aromatic scent can brighten up your space and create a calming atmosphere. It’s a little piece of nature that you can nurture and enjoy every day. Plus, it’s a fantastic conversation starter! Imagine the delight of your guests when you snip a few fresh sage leaves right from your kitchen garden to garnish their meal.
Ready to take your kitchen garden to the next level? Consider these variations:
* Hydroponic Sage: For a truly modern approach, try growing your sage hydroponically. This method uses nutrient-rich water instead of soil, allowing for faster growth and less mess.
* Sage in a Terrarium: Create a miniature ecosystem by growing your sage in a terrarium. This is a great option for smaller spaces and adds a touch of whimsy to your kitchen decor.
* Companion Planting: Plant your sage alongside other herbs like rosemary and thyme. These herbs thrive in similar conditions and can create a beautiful and fragrant kitchen garden.
* Dried Sage: Once your sage plant is thriving, you can harvest and dry the leaves to create your own dried sage for long-term storage. Simply hang the stems upside down in a cool, dry place until the leaves are brittle.
Don’t be intimidated if you’ve never grown herbs before. This DIY trick is designed for beginners. With a little sunlight, water, and love, you’ll be amazed at how quickly your sage plant will flourish.
So, what are you waiting for? Grab a pot, some soil, and a sage cutting or seeds, and get started on your own kitchen sage garden today! We’re confident that you’ll love the convenience, the flavor, and the satisfaction of growing your own herbs.
We’d love to hear about your experience! Share your photos, tips, and questions in the comments below. Let’s create a community of kitchen gardeners who are passionate about fresh, flavorful herbs. Let us know how this DIY trick for growing sage in the kitchen worked for you! Happy growing!
Frequently Asked Questions (FAQ)
What kind of sage should I grow in my kitchen?
The best type of sage to grow in your kitchen depends on your personal preferences and culinary needs. Common garden sage (Salvia officinalis) is a classic choice, known for its robust flavor and versatility. However, you might also consider pineapple sage (Salvia elegans) for its fruity aroma and edible flowers, or purple sage (Salvia officinalis ‘Purpurascens’) for its striking foliage and slightly milder flavor. Consider the space you have available, as some varieties can grow larger than others. Ultimately, the best sage is the one you’ll enjoy using the most!
How much sunlight does my kitchen sage plant need?
Sage thrives in bright, sunny locations. Aim for at least six hours of direct sunlight per day. If you don’t have a sunny windowsill, you can supplement with a grow light. Insufficient sunlight can lead to leggy growth and reduced flavor. Rotate your plant regularly to ensure all sides receive adequate light.
How often should I water my kitchen sage plant?
Water your sage plant when the top inch of soil feels dry to the touch. Avoid overwatering, as this can lead to root rot. Sage prefers well-draining soil, so make sure your pot has drainage holes. During the winter months, when growth slows down, you’ll need to water less frequently.
What kind of soil is best for growing sage in the kitchen?
Sage prefers well-draining soil that is slightly alkaline. A good potting mix for herbs, amended with a bit of perlite or sand to improve drainage, is ideal. Avoid using heavy clay soil, as it can retain too much moisture and lead to root rot.
How do I harvest sage leaves from my kitchen plant?
Harvest sage leaves by snipping them off the plant with clean scissors or pruning shears. Avoid removing more than one-third of the plant at a time, as this can stress the plant. The best time to harvest sage is in the morning, after the dew has dried. Regular harvesting encourages bushier growth.
My sage plant is getting leggy. What should I do?
Leggy growth in sage plants is often caused by insufficient sunlight. Move your plant to a sunnier location or supplement with a grow light. You can also prune back the leggy stems to encourage bushier growth. Regular pruning is essential for maintaining a healthy and productive sage plant.
Can I grow sage from cuttings?
Yes, growing sage from cuttings is a relatively easy way to propagate new plants. Take a 4-6 inch cutting from a healthy stem, remove the lower leaves, and place the cutting in water or directly into moist potting mix. Keep the cutting in a warm, bright location, and roots should develop within a few weeks.
How do I deal with pests on my kitchen sage plant?
Inspect your sage plant regularly for pests such as aphids, spider mites, and whiteflies. If you find any pests, you can try washing them off with a strong stream of water or using an insecticidal soap. Avoid using harsh chemicals, as they can harm the plant and contaminate your kitchen.
Can I use fertilizer on my kitchen sage plant?
Sage doesn’t require heavy fertilization. However, you can give it a light feeding with a balanced liquid fertilizer every few weeks during the growing season. Avoid over-fertilizing, as this can lead to leggy growth and reduced flavor.
How long will my kitchen sage plant last?
With proper care, a sage plant can last for several years. However, it’s important to note that sage plants tend to become woody and less productive over time. You may need to replace your plant every few years to maintain a healthy and flavorful supply of sage.
Leave a Comment