
Grow Spinach at Home and unlock the secrets to fresh, vibrant greens right outside your door! Imagine stepping into your garden and harvesting crisp, delicious spinach leaves for your salad, smoothie, or favorite dish. No more trips to the grocery store or worrying about the freshness of store-bought produce.
For centuries, spinach has been a staple in diets around the world, revered not only for its nutritional value but also for its versatility in culinary creations. From ancient Persia, where it’s believed to have originated, to its adoption by cultures across the globe, spinach has consistently proven its worth as a healthy and delicious vegetable. I think it’s time we bring that tradition home!
But let’s be honest, sometimes gardening can feel a little daunting, especially when you’re trying to navigate complex instructions and unfamiliar techniques. That’s where these simple, effective DIY tricks come in. I’m going to show you how to grow spinach at home, even if you have limited space or experience. These hacks will help you overcome common gardening challenges, ensuring a bountiful harvest of this leafy green. Think of it as your personal guide to a thriving spinach patch, tailored for the everyday gardener. So, grab your gardening gloves, and let’s get started!
Grow Your Own Delicious Spinach: A Beginner’s Guide
Hey there, fellow gardening enthusiasts! I’m so excited to share my tried-and-true method for growing spinach right in your own backyard (or even on your balcony!). Fresh, homegrown spinach is so much tastier than the store-bought stuff, and it’s incredibly rewarding to nurture your own leafy greens. Let’s dive in!
Choosing the Right Spinach Variety
Before we get our hands dirty, let’s talk about spinach varieties. Not all spinach is created equal, and choosing the right one for your climate and preferences is key. Here are a few popular options:
* Bloomsdale Long Standing: This is a classic, reliable variety known for its crinkled leaves and resistance to bolting (going to seed prematurely). It’s a great choice for beginners.
* Giant Nobel: As the name suggests, this variety produces large, smooth leaves. It’s quick to mature and has a mild flavor.
* Malabar Spinach: Technically not a true spinach, Malabar spinach thrives in hot weather and produces thick, succulent leaves. It’s a great alternative if you live in a warmer climate where traditional spinach struggles.
* Tyee: A semi-savoy type with good disease resistance and a tolerance for heat.
I personally love Bloomsdale Long Standing because it’s so easy to grow and produces a generous harvest. But feel free to experiment and find the variety that works best for you!
Preparing Your Spinach Patch
Spinach loves well-drained, fertile soil. Here’s how to get your garden bed ready:
* Sunlight: Spinach needs at least 3-4 hours of direct sunlight per day. Morning sun is ideal, as it helps prevent bolting in warmer weather.
* Soil: Spinach prefers a soil pH between 6.5 and 7.0. Amend your soil with compost or well-rotted manure to improve drainage and fertility. I always add a generous amount of compost – it’s like a superfood for your plants!
* Location: Choose a spot that’s sheltered from strong winds. Spinach leaves can be delicate, and strong winds can damage them.
* Testing the Soil: Consider using a soil test kit to determine the pH and nutrient levels of your soil. This will help you make informed decisions about amendments.
Planting Your Spinach Seeds
Now for the fun part – planting!
1. Timing is Key: Spinach is a cool-season crop, meaning it thrives in cooler temperatures. The best time to plant spinach is in early spring (as soon as the soil can be worked) or in late summer/early fall for a fall harvest. Avoid planting during the hottest months of summer, as the heat can cause spinach to bolt. I usually aim for planting in March/April and again in August/September.
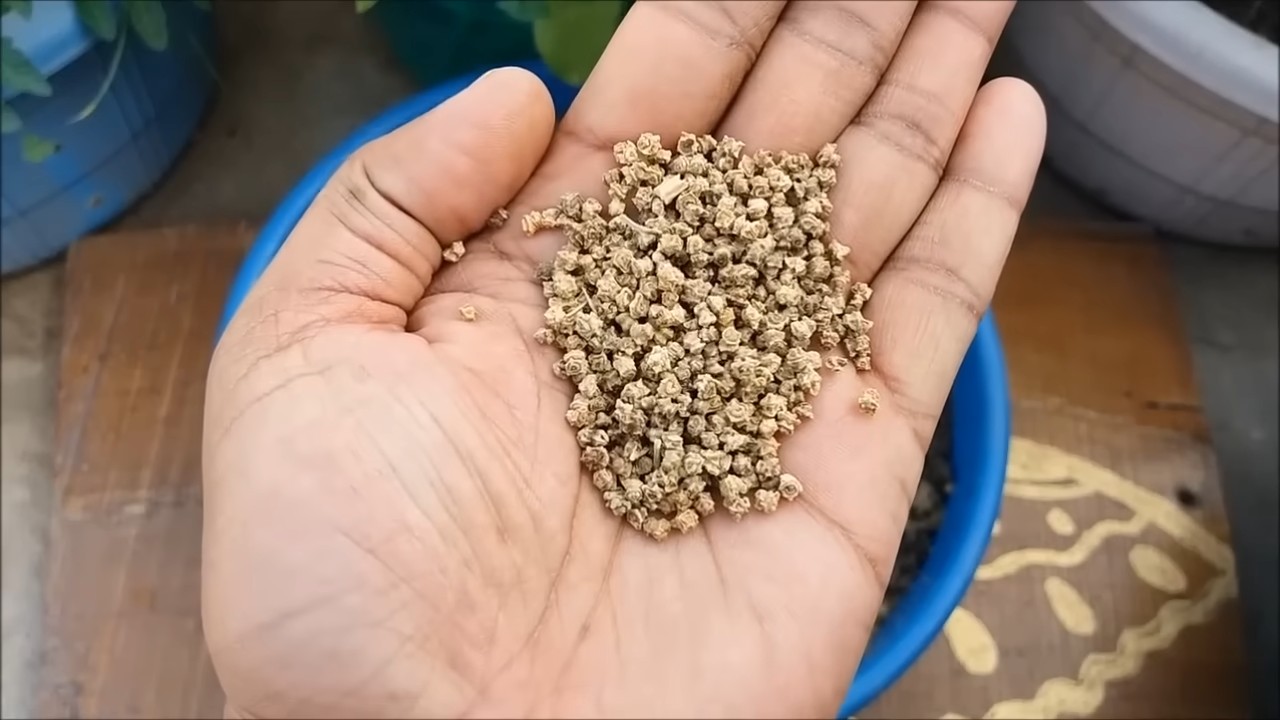
2. Sowing the Seeds: Sow spinach seeds directly into the ground, about ½ inch deep and 1 inch apart. You can also start seeds indoors 4-6 weeks before the last expected frost.
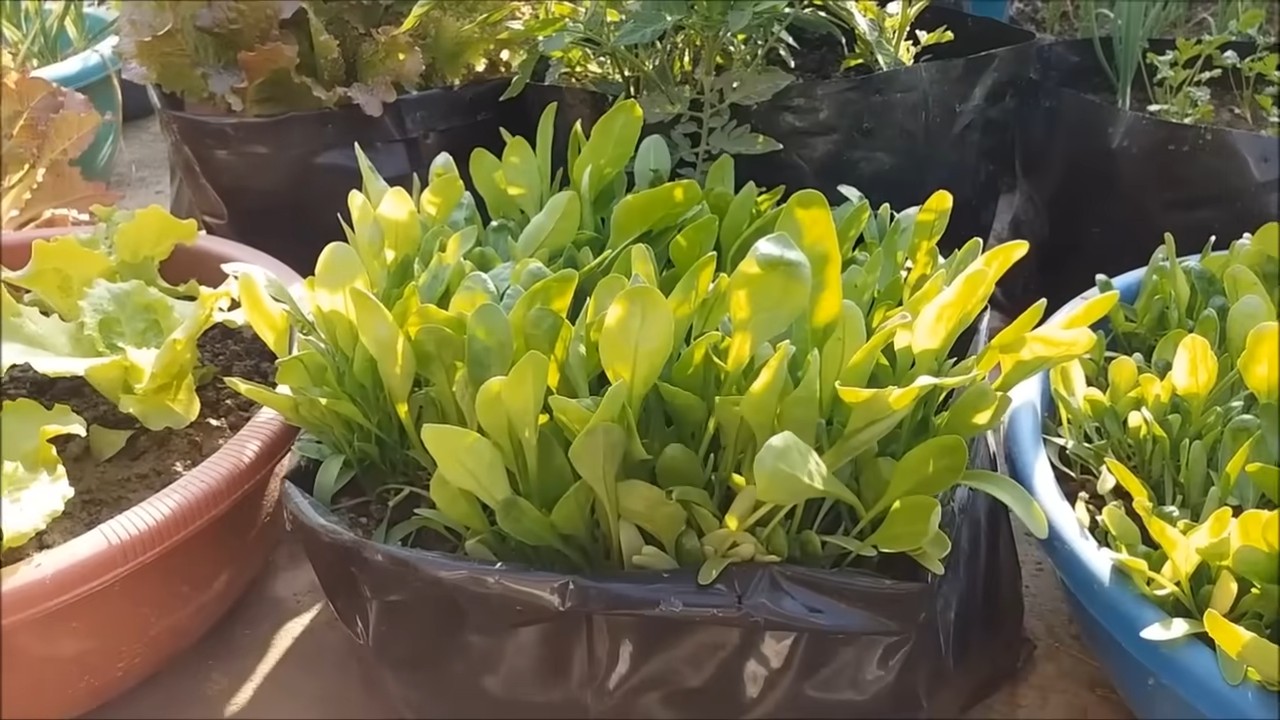
3. Spacing: Once the seedlings emerge, thin them to about 3-6 inches apart. This will give them enough room to grow and prevent overcrowding. Don’t throw away the thinned seedlings! You can transplant them to another location or add them to your salad.
4. Watering: Water the seeds gently after planting and keep the soil consistently moist until they germinate.
5. Germination: Spinach seeds typically germinate in 5-10 days, depending on the soil temperature.
Caring for Your Spinach Plants
Once your spinach plants are established, here’s how to keep them happy and healthy:
* Watering: Spinach needs consistent moisture, especially during hot weather. Water deeply and regularly, but avoid overwatering, which can lead to root rot. I usually water my spinach plants every other day, or more often if the weather is particularly dry.
* Fertilizing: Spinach is a heavy feeder, so it benefits from regular fertilization. Use a balanced fertilizer or side-dress with compost every few weeks. I like to use a liquid seaweed fertilizer, which is gentle and effective.
* Weeding: Keep your spinach patch free of weeds, which can compete with the plants for nutrients and water. Hand-pull weeds carefully to avoid disturbing the spinach roots.
* Mulching: Apply a layer of mulch around your spinach plants to help retain moisture, suppress weeds, and regulate soil temperature. Straw, shredded leaves, or grass clippings are all good options.
* Pest Control: Spinach is generally pest-resistant, but it can be susceptible to aphids, flea beetles, and leaf miners. Inspect your plants regularly and take action if you notice any signs of infestation. I usually try to control pests with organic methods, such as insecticidal soap or neem oil.
* Bolting Prevention: As I mentioned earlier, bolting is when spinach plants go to seed prematurely, which can make the leaves bitter. To prevent bolting, choose bolt-resistant varieties, provide shade during hot weather, and water regularly.
Harvesting Your Spinach
The moment we’ve all been waiting for – harvesting!
1. When to Harvest: You can start harvesting spinach leaves as soon as they are large enough to eat, usually about 4-6 weeks after planting.
2. How to Harvest: Harvest spinach by cutting the outer leaves with a sharp knife or scissors, leaving the inner leaves to continue growing. This is known as “cut-and-come-again” harvesting, and it allows you to enjoy a continuous supply of spinach throughout the season.
3. Harvesting the Whole Plant: If you prefer, you can also harvest the entire plant at once by cutting it off at the base.
4. Harvesting in Warm Weather: In warmer weather, harvest spinach in the morning, before the sun heats up the leaves. This will help prevent wilting.
5. Storage: Store freshly harvested spinach in the refrigerator in a plastic bag or container. It will keep for several days.
Troubleshooting Common Spinach Problems
Even with the best care, you might encounter some problems while growing spinach. Here are a few common issues and how to address them:
* Yellowing Leaves: Yellowing leaves can be a sign of nutrient deficiency, overwatering, or disease. Check the soil pH and nutrient levels, adjust your watering schedule, and inspect the plants for signs of disease.
* Bolting: As mentioned earlier, bolting is when spinach plants go to seed prematurely. To prevent bolting, choose bolt-resistant varieties, provide shade during hot weather, and water regularly.
* Pest Infestations: Aphids, flea beetles, and leaf miners can all attack spinach plants. Inspect your plants regularly and take action if you notice any signs of infestation. Use organic pest control methods whenever possible.
* Downy Mildew: Downy mildew is a fungal disease that can cause yellow spots on spinach leaves. To prevent downy mildew, choose disease-resistant varieties, provide good air circulation, and avoid overhead watering.
Extending Your Spinach Season
Want to enjoy fresh spinach for as long as possible? Here are a few tips for extending your spinach season:
* Succession Planting: Sow spinach seeds every 2-3 weeks to ensure a continuous supply of fresh leaves.
* Cold Frames or Row Covers: Use cold frames or row covers to protect your spinach plants from frost and extend the growing season into the fall and winter.
* Overwintering: In mild climates, you can overwinter spinach plants by covering them with a thick layer of mulch. They will start growing again in the spring.
Spinach Recipes to Enjoy Your Harvest
Now that you have a bountiful harvest of fresh spinach, it’s time to get cooking! Here are a few of my favorite spinach recipes:
* Spinach Salad: A classic and simple way to enjoy fresh spinach. Toss it with your favorite dressing, nuts, and berries.
* Spinach and Artichoke Dip: A crowd-pleasing appetizer that’s perfect for parties.
* Spinach Smoothie: A healthy and delicious way to sneak some extra greens into your diet.
* Spinach Quiche: A savory and satisfying dish that’s perfect for breakfast, lunch, or dinner.
* Sauteed Spinach: A quick and easy side dish that’s perfect for any meal.
Final Thoughts
Growing your own spinach is a rewarding and delicious experience. With a little bit of planning and care, you can enjoy fresh, homegrown spinach throughout the growing season. So get out there, get your hands dirty, and start growing! Happy gardening!
Conclusion
So, there you have it! Growing spinach at home is not only achievable, but it’s also incredibly rewarding. Imagine stepping out into your garden or even just onto your balcony and harvesting fresh, vibrant spinach leaves for your salad, smoothie, or side dish. Forget those pre-packaged bags from the grocery store that wilt before you even get them home. With this simple DIY trick, you’ll have access to the freshest, most nutritious spinach imaginable, all grown with your own two hands.
This isn’t just about saving money (though that’s certainly a perk!). It’s about connecting with your food, understanding where it comes from, and enjoying the unparalleled flavor of homegrown produce. The taste difference between store-bought and homegrown spinach is truly remarkable. The homegrown variety boasts a sweeter, earthier flavor that you simply can’t find anywhere else.
But the benefits don’t stop there. Growing your own spinach allows you to control exactly what goes into it. No harmful pesticides, no artificial fertilizers – just pure, natural goodness. You can even choose organic seeds and soil to ensure the healthiest possible crop.
And the best part? It’s easier than you think! Whether you have a sprawling garden or just a small windowsill, there’s a way to make this DIY trick work for you.
Variations and Suggestions:
* Container Gardening: If you’re short on space, container gardening is your best friend. Choose a pot that’s at least 6 inches deep and fill it with well-draining potting mix. You can even grow spinach indoors under grow lights.
* Succession Planting: To ensure a continuous harvest, try succession planting. Sow a new batch of seeds every two weeks. This way, you’ll always have fresh spinach ready to pick.
* Companion Planting: Spinach loves to grow alongside other vegetables like radishes, lettuce, and strawberries. These companion plants can help deter pests and improve the overall health of your garden.
* Different Varieties: Experiment with different varieties of spinach to find your favorite. Some popular choices include Bloomsdale Long Standing, Tyee, and Baby’s Leaf Hybrid. Each variety has its own unique flavor and texture.
* Winter Growing: With a little protection, you can even grow spinach during the winter months. Use a cold frame or row cover to shield your plants from frost and snow.
Don’t be intimidated by the idea of growing your own food. This DIY trick is designed to be simple and accessible for everyone, regardless of their gardening experience. So, grab some seeds, get your hands dirty, and prepare to be amazed by the deliciousness of homegrown spinach.
We’re confident that you’ll love the results. And we can’t wait to hear about your experience! Share your photos, tips, and stories with us in the comments below. Let’s create a community of spinach-growing enthusiasts! Start your journey to **grow spinach at home** today!
Frequently Asked Questions (FAQ)
Q: What is the best time of year to plant spinach?
A: Spinach is a cool-season crop, meaning it thrives in cooler temperatures. The best time to plant spinach is in early spring or early fall. For a spring crop, sow seeds as soon as the ground can be worked, typically 4-6 weeks before the last expected frost. For a fall crop, sow seeds 6-8 weeks before the first expected frost. In warmer climates, you can grow spinach throughout the winter. Avoid planting spinach during the hottest months of summer, as high temperatures can cause it to bolt (go to seed) and become bitter.
Q: How much sunlight does spinach need?
A: Spinach needs at least 3-6 hours of sunlight per day. While it can tolerate some shade, especially in warmer climates, more sunlight will result in a larger and more productive harvest. If you’re growing spinach indoors, consider using grow lights to supplement natural sunlight.
Q: What kind of soil is best for growing spinach?
A: Spinach prefers well-drained soil that is rich in organic matter. The ideal soil pH is between 6.5 and 7.0. Before planting, amend your soil with compost or other organic matter to improve its fertility and drainage. If your soil is heavy clay, consider adding sand or perlite to improve drainage.
Q: How often should I water spinach?
A: Spinach needs consistent moisture to thrive. Water deeply whenever the top inch of soil feels dry to the touch. Avoid overwatering, as this can lead to root rot. During hot weather, you may need to water more frequently. Mulching around your spinach plants can help retain moisture and suppress weeds.
Q: How do I harvest spinach?
A: You can harvest spinach leaves as soon as they are large enough to eat, typically when they are 4-6 inches long. You can either harvest the entire plant at once or harvest individual leaves as needed. To harvest individual leaves, simply snip them off at the base of the plant with scissors or garden shears. Harvesting outer leaves first will allow the inner leaves to continue growing.
Q: What are some common pests and diseases that affect spinach?
A: Some common pests that affect spinach include aphids, flea beetles, and leaf miners. Diseases that can affect spinach include downy mildew, white rust, and fusarium wilt. To prevent pests and diseases, choose disease-resistant varieties, practice crop rotation, and keep your garden clean and free of debris. If you do encounter pests or diseases, treat them promptly with organic pest control methods or fungicides.
Q: Can I grow spinach indoors?
A: Yes, you can absolutely grow spinach indoors! Choose a pot that’s at least 6 inches deep and fill it with well-draining potting mix. Place the pot in a sunny location or under grow lights. Water regularly and fertilize every few weeks with a balanced fertilizer.
Q: How do I prevent spinach from bolting?
A: Bolting is when spinach prematurely goes to seed, which can make the leaves bitter. To prevent bolting, plant spinach in early spring or early fall, avoid planting during the hottest months of summer, and provide adequate shade during hot weather. Choose bolt-resistant varieties of spinach.
Q: What are some ways to use homegrown spinach?
A: The possibilities are endless! You can use homegrown spinach in salads, smoothies, soups, stews, omelets, quiches, and more. It’s also delicious sautéed with garlic and olive oil. Get creative and experiment with different recipes to find your favorite ways to enjoy your homegrown spinach.
Q: How do I store harvested spinach?
A: To store harvested spinach, wash it thoroughly and pat it dry. Wrap the spinach in a paper towel and store it in a plastic bag in the refrigerator. It will typically last for 5-7 days. You can also freeze spinach for longer storage. To freeze spinach, blanch it in boiling water for 2 minutes, then plunge it into ice water. Drain the spinach and squeeze out any excess water. Pack the spinach into freezer bags or containers and freeze.


Leave a Comment