
Grow Sweet Honeydew Melons right in your own backyard! Imagine biting into a juicy, perfectly ripe honeydew melon, bursting with sweetness, knowing you nurtured it from seed to table. Forget those bland, store-bought melons – this year, we’re taking control and cultivating our own little slice of summer paradise.
For centuries, melons have been cherished across cultures, from ancient Egypt where they were found in tombs, to the sun-drenched fields of Persia, their ancestral home. They represent abundance and the sweet rewards of hard work. But let’s be honest, growing them can seem intimidating, right? That’s where this DIY guide comes in!
Many gardeners shy away from melons, thinking they require vast spaces or expert knowledge. But I’m here to tell you that’s simply not true! With a few clever tricks and hacks, you can successfully grow sweet honeydew melons even in smaller gardens or containers. We’ll break down the process step-by-step, from selecting the right seeds and preparing your soil, to providing the perfect amount of sunlight and water.
Why bother with the effort? Because the taste of a homegrown honeydew, ripened on the vine, is simply unmatched. Plus, you’ll know exactly what went into growing it – no pesticides, no artificial ripening agents, just pure, natural goodness. So, grab your gardening gloves, and let’s embark on this delicious adventure together! I promise, you’ll be amazed at what you can achieve.
So baust du süße Honigmelonen selbst an: Ein umfassender DIY-Leitfaden
Hallo liebe Gartenfreunde! Ich freue mich riesig, euch heute in die Welt des Honigmelonen-Anbaus mitzunehmen. Es gibt kaum etwas Befriedigenderes, als eine saftige, selbst gezogene Honigmelone zu genießen. Und glaubt mir, es ist gar nicht so schwer, wie man vielleicht denkt! Mit ein bisschen Geduld und den richtigen Tipps könnt auch ihr bald eure eigenen süßen Honigmelonen ernten.
Was du für den Honigmelonen-Anbau brauchst:
* Samen: Wählt hochwertige Honigmelonen-Samen. Achtet auf Sorten, die für euer Klima geeignet sind. Es gibt viele verschiedene Sorten, von denen einige besser für kürzere Sommer geeignet sind.
* Anzuchttöpfe oder -schalen: Für die Voranzucht im Haus.
* Anzuchterde: Spezielle Erde für die Anzucht, die nährstoffarm und locker ist.
* Pflanzerde: Nährstoffreiche Erde für das Beet oder den Topf.
* Kompost: Zur Verbesserung der Bodenqualität.
* Gartenkalk: Honigmelonen bevorzugen einen leicht alkalischen Boden.
* Mulchmaterial: Stroh, Holzhackschnitzel oder ähnliches, um den Boden feucht zu halten und Unkraut zu unterdrücken.
* Gießkanne oder Gartenschlauch: Für die Bewässerung.
* Rankhilfe (optional): Wenn ihr wenig Platz habt oder die Melonen in die Höhe wachsen lassen wollt.
* Gartenvlies (optional): Zum Schutz vor Kälte und Schädlingen in den ersten Wochen.
* Gartenschere: Zum Ausgeizen der Pflanzen.
* Geduld und Liebe: Das Wichtigste überhaupt!
Phase 1: Die Voranzucht (ca. 4-6 Wochen vor dem Auspflanzen)
Die Voranzucht im Haus ist besonders in Regionen mit kürzeren Sommern empfehlenswert. So haben die Pflanzen einen Wachstumsvorsprung, wenn sie ins Freie kommen.
1. Samen vorbereiten: Um die Keimung zu beschleunigen, könnt ihr die Samen vor dem Aussäen für 24 Stunden in lauwarmem Wasser einweichen. Das macht die Samenschale weicher.
2. Aussaat: Füllt die Anzuchttöpfe mit Anzuchterde. Legt pro Topf 2-3 Samen etwa 1-2 cm tief in die Erde. Bedeckt die Samen leicht mit Erde und gießt sie vorsichtig an.
3. Standort: Stellt die Töpfe an einen warmen, hellen Ort. Eine Fensterbank über der Heizung ist ideal. Die optimale Keimtemperatur liegt bei 22-25°C.
4. Feuchtigkeit: Haltet die Erde gleichmäßig feucht, aber nicht nass. Am besten sprüht ihr die Erde regelmäßig mit einer Sprühflasche an.
5. Keimung: Nach etwa 7-14 Tagen sollten die ersten Keimlinge zu sehen sein.
6. Pikieren: Sobald die Keimlinge ihre ersten richtigen Blätter (nach den Keimblättern) entwickelt haben, könnt ihr sie pikieren. Das bedeutet, dass ihr die stärksten Pflanzen in größere Töpfe umsetzt, damit sie mehr Platz zum Wachsen haben. Achtet darauf, die Wurzeln nicht zu beschädigen.
Phase 2: Die Vorbereitung des Beetes oder Topfes
Honigmelonen sind Starkzehrer und brauchen einen nährstoffreichen Boden. Eine gute Vorbereitung ist daher entscheidend für eine reiche Ernte.
1. Standortwahl: Wählt einen sonnigen Standort für eure Honigmelonen. Sie brauchen mindestens 6-8 Stunden Sonne pro Tag. Der Boden sollte gut durchlässig und locker sein.
2. Bodenverbesserung: Lockert den Boden gründlich auf und entfernt Unkraut. Mischt reichlich Kompost und Gartenkalk unter die Erde. Honigmelonen bevorzugen einen pH-Wert zwischen 6,0 und 7,5.
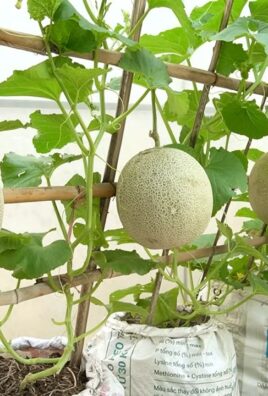
3. Beetgestaltung: Ihr könnt die Honigmelonen entweder in einem Beet oder in großen Töpfen (mindestens 40 Liter Volumen) anbauen. Wenn ihr wenig Platz habt, könnt ihr auch eine Rankhilfe verwenden, an der die Pflanzen hochklettern können.
4. Mulchen: Bedeckt den Boden mit einer Schicht Mulchmaterial. Das hält den Boden feucht, unterdrückt Unkraut und schützt die Früchte vor direktem Kontakt mit dem Boden.
Phase 3: Das Auspflanzen und die Pflege
Sobald die Temperaturen steigen und keine Frostgefahr mehr besteht (in der Regel Mitte Mai nach den Eisheiligen), können die Jungpflanzen ins Freie.
1. Abhärten: Bevor ihr die Pflanzen auspflanzt, solltet ihr sie einige Tage lang abhärten. Das bedeutet, dass ihr sie tagsüber für einige Stunden ins Freie stellt, damit sie sich an die Sonne und den Wind gewöhnen können.
2. Auspflanzen: Grabt Löcher, die etwas größer sind als die Wurzelballen der Pflanzen. Setzt die Pflanzen vorsichtig ein und füllt die Löcher mit Erde auf. Gießt die Pflanzen gründlich an.
3. Pflanzabstand: Haltet einen Pflanzabstand von etwa 80-100 cm zwischen den Pflanzen ein.
4. Gießen: Gießt die Honigmelonen regelmäßig, besonders während der Blütezeit und der Fruchtbildung. Vermeidet Staunässe. Gießt am besten morgens, damit die Blätter über Tag abtrocknen können.
5. Düngen: Düngt die Pflanzen regelmäßig mit einem organischen Dünger. Komposttee oder Brennnesseljauche sind ideal.
6. Ausgeizen: Honigmelonen bilden viele Seitentriebe. Um die Fruchtbildung zu fördern, solltet ihr die Seitentriebe regelmäßig ausgeizen. Das bedeutet, dass ihr die kleinen Triebe, die in den Blattachseln wachsen, entfernt. Lasst nur den Haupttrieb und einige wenige Seitentriebe mit Blütenansätzen stehen.
7. Rankhilfe (optional): Wenn ihr eine Rankhilfe verwendet, leitet die Triebe der Pflanzen daran entlang. Bindet sie gegebenenfalls mit weichem Bindematerial fest.
8. Schutz vor Schädlingen: Honigmelonen können von verschiedenen Schädlingen befallen werden, wie z.B. Schnecken, Blattläuse oder Gurkenmosaikvirus. Kontrolliert die Pflanzen regelmäßig und bekämpft Schädlinge bei Bedarf mit natürlichen Mitteln. Ein Gartenvlies kann in den ersten Wochen helfen, die Pflanzen vor Schädlingen und Kälte zu schützen.
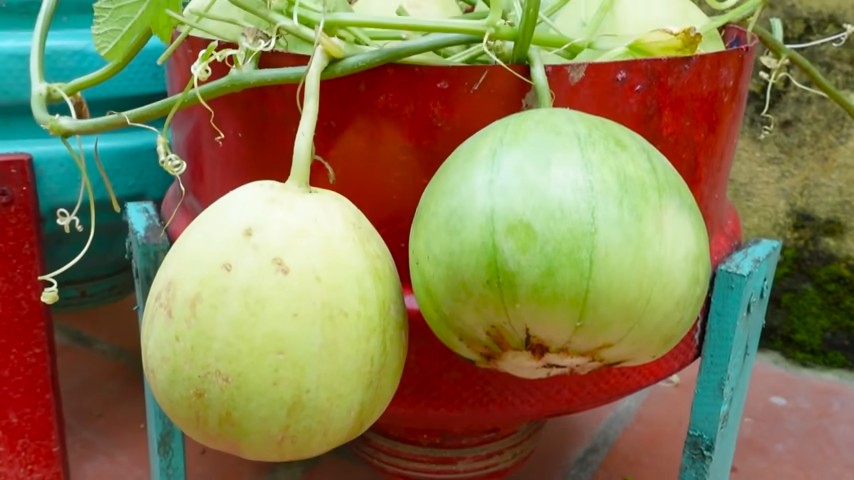
9. Fruchtunterlage: Legt unter die wachsenden Melonen Stroh oder Holzbrettchen, um sie vor Fäulnis durch Bodenkontakt zu schützen.
Phase 4: Die Ernte
Die Erntezeit der Honigmelonen hängt von der Sorte und den Witterungsbedingungen ab. In der Regel sind die Melonen etwa 3-4 Monate nach der Aussaat reif.
1. Reifezeichen: Es gibt verschiedene Anzeichen, an denen ihr erkennen könnt, ob eine Honigmelone reif ist:
* Die Schale verfärbt sich von grün nach gelblich.
* Die Schale gibt auf leichten Druck nach.
* Die Melone duftet aromatisch.
* Der Stielansatz löst sich leicht von der Frucht.
2. Ernte: Schneidet die reifen Melonen mit einem scharfen Messer vom Stiel ab. Lasst dabei einen kleinen Stielansatz an der Frucht.
3. Lagerung: Reife Honigmelonen sind nicht lange haltbar. Lagert sie am besten im Kühlschrank. Angeschnittene Melonen sollten abgedeckt werden.
Zusätzliche Tipps für den erfolgreichen Honigmelonen-Anbau:
* Sortenwahl: Wählt Sorten, die für euer Klima geeignet sind. Es gibt viele verschiedene Sorten, von denen einige besser für kürzere Sommer geeignet sind. Informiert euch im Fachhandel oder im Internet.
* Fruchtfolge: Baut Honigmelonen nicht jedes Jahr am selben Standort an. Eine Fruchtfolge hilft, Krankheiten und Schädlinge zu vermeiden.
* Bestäubung: Honigmelonen sind auf die Bestäubung durch Bienen und

Conclusion
So, there you have it! Growing sweet honeydew melons at home, while it might seem daunting at first, is entirely achievable with a little patience, the right techniques, and a whole lot of love. We’ve walked you through the essential steps, from selecting the perfect seeds and preparing your garden to nurturing your vines and harvesting your prize. But why should you embark on this journey?
Firstly, the taste. Let’s be honest, store-bought honeydew, while convenient, often lacks the intense sweetness and juicy flavor of a homegrown melon. Imagine biting into a perfectly ripe honeydew, bursting with natural sugars, the result of your own hard work and dedication. It’s an experience that simply can’t be replicated.
Secondly, control. When you grow your own honeydew, you have complete control over the growing process. You can choose organic methods, avoiding harmful pesticides and herbicides, ensuring that your family is enjoying a healthy and delicious treat. You know exactly what went into your melon, from the soil it grew in to the water it received. This peace of mind is invaluable.
Thirdly, the satisfaction. There’s an undeniable sense of accomplishment that comes with growing your own food. Watching a tiny seed sprout into a thriving vine, and then bearing fruit, is a truly rewarding experience. It connects you to nature, teaches you patience, and provides a tangible result of your efforts.
But don’t just take our word for it. We encourage you to try this DIY trick for yourself. Start small, perhaps with just a few plants, and see how it goes. Experiment with different varieties of honeydew to find your favorite. Consider trellising your vines to save space and improve air circulation. Try companion planting with herbs like basil or mint to deter pests and enhance flavor.
And speaking of variations, don’t be afraid to get creative! You could try growing honeydew in containers if you have limited space. You could also experiment with different soil amendments to see how they affect the flavor and texture of your melons. The possibilities are endless!
Growing sweet honeydew melons is more than just a gardening project; it’s an investment in your health, your happiness, and your connection to the natural world. It’s a chance to learn, to grow, and to enjoy the fruits (literally!) of your labor.
We’re confident that with the information we’ve provided, you’ll be well on your way to harvesting your own delicious honeydew melons. So, grab your seeds, get your hands dirty, and prepare to be amazed by the results.
Finally, we’d love to hear about your experiences! Share your tips, your challenges, and your successes in the comments below. Let’s create a community of honeydew enthusiasts, sharing our knowledge and inspiring each other to grow the best melons possible. Happy gardening!
Frequently Asked Questions (FAQ)
What is the best time to plant honeydew melon seeds?
The ideal time to plant honeydew melon seeds is after the last frost, when the soil temperature has reached at least 65°F (18°C). Honeydew melons are warm-season crops and are sensitive to cold temperatures. Planting too early can stunt their growth or even kill them. In most regions, this means planting in late spring or early summer. If you live in a colder climate, you can start your seeds indoors 4-6 weeks before the last expected frost and transplant them outdoors once the weather warms up. This will give your plants a head start and allow them to mature before the end of the growing season.
How much sunlight do honeydew melons need?
Honeydew melons require at least 6-8 hours of direct sunlight per day to thrive. Sunlight is essential for photosynthesis, the process by which plants convert light energy into chemical energy for growth and fruit production. Choose a planting location that receives full sun throughout the day. If your garden doesn’t get enough sunlight, you may need to supplement with artificial lighting, especially if you’re starting your seeds indoors. Insufficient sunlight can result in weak, leggy plants and poor fruit development.
What kind of soil is best for growing honeydew melons?
Honeydew melons prefer well-drained, fertile soil with a pH of 6.0 to 6.8. The soil should be rich in organic matter, such as compost or well-rotted manure. Good drainage is crucial to prevent root rot, a common problem with melons. Before planting, amend your soil with plenty of organic matter to improve its fertility and drainage. You can also add a slow-release fertilizer to provide your plants with the nutrients they need throughout the growing season. Avoid heavy clay soils, as they tend to retain too much water. If you have clay soil, consider growing your honeydew melons in raised beds or containers.
How often should I water my honeydew melon plants?
Honeydew melon plants need consistent watering, especially during hot, dry weather. Water deeply and regularly, aiming to keep the soil consistently moist but not waterlogged. The frequency of watering will depend on the weather conditions and the type of soil you have. In general, water your plants every 2-3 days, or more often if the soil dries out quickly. Avoid overhead watering, as this can promote fungal diseases. Instead, water at the base of the plants, using a soaker hose or drip irrigation system. Reduce watering as the fruits begin to ripen to prevent them from cracking.
How do I know when my honeydew melon is ripe?
Determining when a honeydew melon is ripe can be tricky, but there are a few key indicators to look for. First, check the color of the rind. A ripe honeydew melon will have a creamy yellow or ivory color, rather than a pale green. Second, feel the blossom end of the melon. It should be slightly soft and yielding to gentle pressure. Third, smell the melon. A ripe honeydew melon will have a sweet, fragrant aroma. Finally, listen for a dull thud when you tap the melon. An unripe melon will sound hollow. Once your honeydew melon is ripe, cut it from the vine with a sharp knife or pruning shears, leaving a short stem attached.
What are some common pests and diseases that affect honeydew melons?
Honeydew melons are susceptible to a variety of pests and diseases, including aphids, squash bugs, cucumber beetles, powdery mildew, and fusarium wilt. To prevent pest and disease problems, practice good garden hygiene. Remove weeds and debris from around your plants, and water them at the base to avoid wetting the foliage. Inspect your plants regularly for signs of pests or diseases, and take action promptly if you spot any problems. You can use organic pesticides or fungicides to control pests and diseases, but be sure to follow the instructions carefully. Crop rotation can also help to prevent soilborne diseases.
Can I grow honeydew melons in containers?
Yes, you can grow honeydew melons in containers, but you’ll need to choose a large container that is at least 24 inches in diameter and 12 inches deep. The container should have drainage holes to prevent waterlogging. Use a high-quality potting mix that is well-draining and rich in organic matter. Be sure to provide your container-grown honeydew melons with plenty of sunlight and water. You may also need to fertilize them more frequently than plants grown in the ground. Consider using a trellis to support the vines and save space. Choose a compact or bush variety of honeydew melon for container growing.
How can I improve the sweetness of my honeydew melons?
Several factors can influence the sweetness of honeydew melons, including sunlight, water, and soil fertility. Make sure your plants are getting at least 6-8 hours of direct sunlight per day. Avoid overwatering, especially as the fruits begin to ripen. Provide your plants with a balanced fertilizer that is rich in potassium, which is essential for fruit development and sweetness. You can also add Epsom salts to the soil to improve the sweetness of your melons. Finally, be patient and allow your honeydew melons to ripen fully on the vine before harvesting them.
What are some companion plants for honeydew melons?
Companion planting can help to improve the growth and flavor of honeydew melons, as well as deter pests and diseases. Some good companion plants for honeydew melons include basil, mint, marigolds, nasturtiums, and radishes. Basil and mint can help to repel pests, while marigolds and nasturtiums attract beneficial insects that prey on pests. Radishes can help to break up the soil and improve drainage. Avoid planting honeydew melons near potatoes or other members of the nightshade family, as they can compete for nutrients and attract pests.
How do I save seeds from my honeydew melons?
Saving seeds from your honeydew melons is a great way to ensure that you have a supply of seeds for future plantings. To save seeds, allow your honeydew melon to ripen fully on the vine. Once it is ripe, cut it open and scoop out the seeds. Rinse the seeds thoroughly to remove any pulp or debris. Spread the seeds out on a paper towel to dry completely. Once the seeds are dry, store them in an airtight container in a cool, dark, and dry place. Be aware that seeds saved from hybrid varieties of honeydew melon may not produce
Leave a Comment