
Grow sweet melons easily, even if you think you don’t have a green thumb! Have you ever bitten into a store-bought melon, dreaming of that juicy, sun-ripened sweetness you only get from a homegrown fruit? I know I have! That’s why I’m so excited to share these simple, yet incredibly effective, DIY tricks that will have you harvesting the most delicious melons you’ve ever tasted, right from your own backyard.
Melons have a rich history, dating back to ancient civilizations in Africa and Asia. For centuries, they’ve been prized for their refreshing taste and nutritional benefits. But let’s be honest, sometimes getting that perfect melon sweetness can feel like a gamble. That’s where these DIY hacks come in.
Let’s face it, growing your own food is incredibly rewarding, and with these tips, you can grow sweet melons easily, without the frustration of bland, disappointing results. I’ll guide you through everything from soil preparation to watering techniques, ensuring you get the most out of your melon patch. Say goodbye to store-bought disappointments and hello to the sweet taste of success! Get ready to transform your garden into a melon paradise!
Melonenanbau leicht gemacht: Dein DIY-Guide für süße Früchte
Hallo liebe Gartenfreunde! Ich liebe es, frische, saftige Melonen direkt aus dem eigenen Garten zu ernten. Es gibt kaum etwas Besseres, oder? Aber ich weiß auch, dass viele Leute denken, Melonenanbau sei kompliziert und nur etwas für Profis. Das stimmt aber überhaupt nicht! Mit ein paar Tricks und Kniffen kannst auch du ganz einfach süße Melonen ziehen. In diesem Artikel zeige ich dir, wie es geht – Schritt für Schritt und ganz ohne kompliziertes Fachwissen. Los geht’s!
Die Vorbereitung: Der Schlüssel zum Erfolg
Bevor wir mit dem eigentlichen Anbau beginnen, ist eine gute Vorbereitung das A und O. Das betrifft die Auswahl der richtigen Sorte, den idealen Standort und die Vorbereitung des Bodens.
* Sortenwahl: Nicht jede Melonensorte ist gleich gut für jeden Standort geeignet. Achte auf Sorten, die für dein Klima und deine Gartengröße passen. Wassermelonen brauchen viel Platz, während Zuckermelonen etwas kompakter sind. Es gibt auch spezielle Mini-Wassermelonen, die sich gut für kleinere Gärten oder sogar den Anbau im Kübel eignen. Informiere dich am besten im Fachhandel oder online über die verschiedenen Sorten und wähle die aus, die am besten zu deinen Bedürfnissen passen. Ich persönlich mag die “Sugar Baby” Wassermelone, weil sie relativ klein bleibt und sehr süß ist. Bei den Zuckermelonen empfehle ich die “Charentais”, die ein tolles Aroma hat.
* Standort: Melonen lieben die Sonne! Wähle einen Standort, der mindestens 6-8 Stunden Sonne pro Tag bekommt. Außerdem sollte der Standort windgeschützt sein, da starker Wind die Pflanzen beschädigen kann. Ein Platz an einer Südwand ist ideal, da die Wand die Wärme speichert und an die Pflanzen abgibt.
* Boden: Melonen brauchen einen nährstoffreichen, gut durchlässigen Boden. Schwere, lehmige Böden solltest du unbedingt mit Kompost oder Sand verbessern, damit das Wasser gut abfließen kann und die Wurzeln nicht faulen. Der pH-Wert des Bodens sollte idealerweise zwischen 6,0 und 7,0 liegen. Du kannst den pH-Wert mit einem Bodentest überprüfen und gegebenenfalls mit Kalk oder Schwefel anpassen.
Schritt-für-Schritt-Anleitung: Melonen selbst ziehen
Jetzt geht es ans Eingemachte! Hier ist eine detaillierte Anleitung, wie du deine eigenen Melonen ziehen kannst:
1. Vorkultur (optional): Ich empfehle, Melonen vorzuziehen, besonders wenn du in einer Region mit kurzen Sommern wohnst. Beginne etwa 4-6 Wochen vor dem letzten Frost mit der Aussaat. Fülle kleine Töpfe (ca. 8-10 cm Durchmesser) mit Anzuchterde und säe 2-3 Samen pro Topf. Bedecke die Samen leicht mit Erde und gieße sie vorsichtig an. Stelle die Töpfe an einen warmen, hellen Ort (z.B. auf eine Fensterbank oder in ein Gewächshaus). Die ideale Keimtemperatur liegt bei 25-30°C. Halte die Erde feucht, aber nicht nass. Sobald die Sämlinge gekeimt sind, kannst du den schwächsten Trieb pro Topf entfernen.
2. Auspflanzen: Sobald keine Frostgefahr mehr besteht und die Bodentemperatur mindestens 15°C beträgt, kannst du die Melonenpflanzen ins Freie auspflanzen. Grabe Löcher, die etwas größer sind als die Töpfe, in denen die Pflanzen gewachsen sind. Setze die Pflanzen vorsichtig in die Löcher und fülle sie mit Erde auf. Achte darauf, dass der Wurzelballen nicht beschädigt wird. Der Abstand zwischen den Pflanzen sollte je nach Sorte 80-120 cm betragen. Gieße die Pflanzen nach dem Auspflanzen gründlich an.
3. Bodenverbesserung und Düngung: Bevor du die Melonenpflanzen auspflanzt, solltest du den Boden mit Kompost oder gut verrottetem Mist anreichern. Das sorgt für eine gute Nährstoffversorgung. Während der Wachstumsphase kannst du die Pflanzen regelmäßig mit einem organischen Dünger düngen. Ich verwende gerne Brennnesseljauche oder einen speziellen Melonendünger. Achte darauf, den Dünger nicht direkt auf die Blätter zu gießen, sondern in den Boden einzuarbeiten.
4. Gießen: Melonen brauchen viel Wasser, besonders während der Fruchtbildung. Gieße die Pflanzen regelmäßig, aber vermeide Staunässe. Am besten gießt du morgens, damit die Blätter über den Tag abtrocknen können und Pilzkrankheiten vorgebeugt wird. Eine Mulchschicht aus Stroh oder Rasenschnitt hilft, die Feuchtigkeit im Boden zu halten und Unkraut zu unterdrücken.
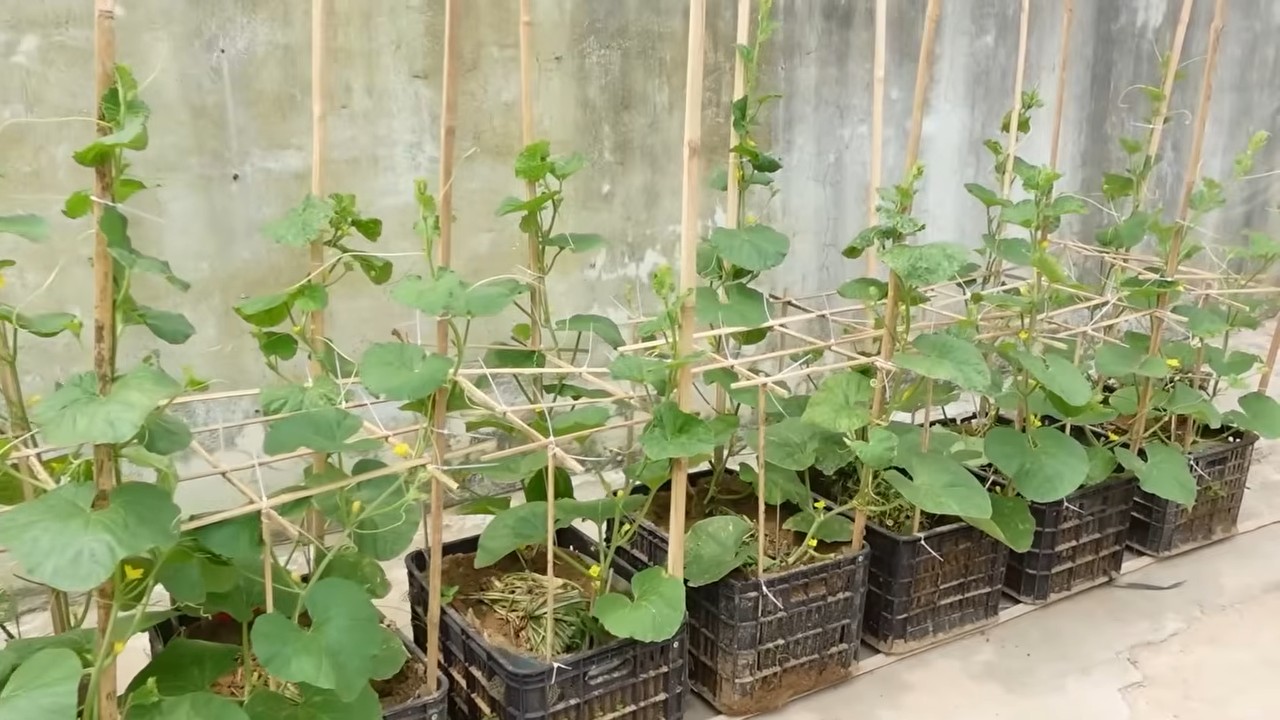
5. Rankhilfe (optional): Einige Melonensorten, besonders Zuckermelonen, können von einer Rankhilfe profitieren. Das hält die Früchte vom Boden fern und verbessert die Luftzirkulation, was das Risiko von Pilzkrankheiten reduziert. Du kannst eine einfache Rankhilfe aus Bambusstäben oder einem Drahtgitter bauen.
6. Bestäubung: Melonen sind auf die Bestäubung durch Bienen und andere Insekten angewiesen. Wenn du in einer Gegend mit wenig Insekten wohnst, kannst du die Blüten auch von Hand bestäuben. Dazu nimmst du einen kleinen Pinsel und überträgst den Pollen von den männlichen auf die weiblichen Blüten. Die männlichen Blüten erkennst du daran, dass sie keinen Fruchtansatz haben, während die weiblichen Blüten einen kleinen Fruchtansatz direkt unter der Blüte haben.
7. Fruchtpflege: Wenn die Früchte wachsen, solltest du darauf achten, dass sie nicht auf dem feuchten Boden liegen. Lege ein Brett oder einen Stein unter die Früchte, um sie vor Fäulnis zu schützen. Bei Wassermelonen kannst du auch die Anzahl der Früchte pro Pflanze reduzieren, um größere und süßere Früchte zu erhalten. Entferne einfach einige der kleineren Früchte, damit die Pflanze ihre Energie auf die verbleibenden Früchte konzentrieren kann.
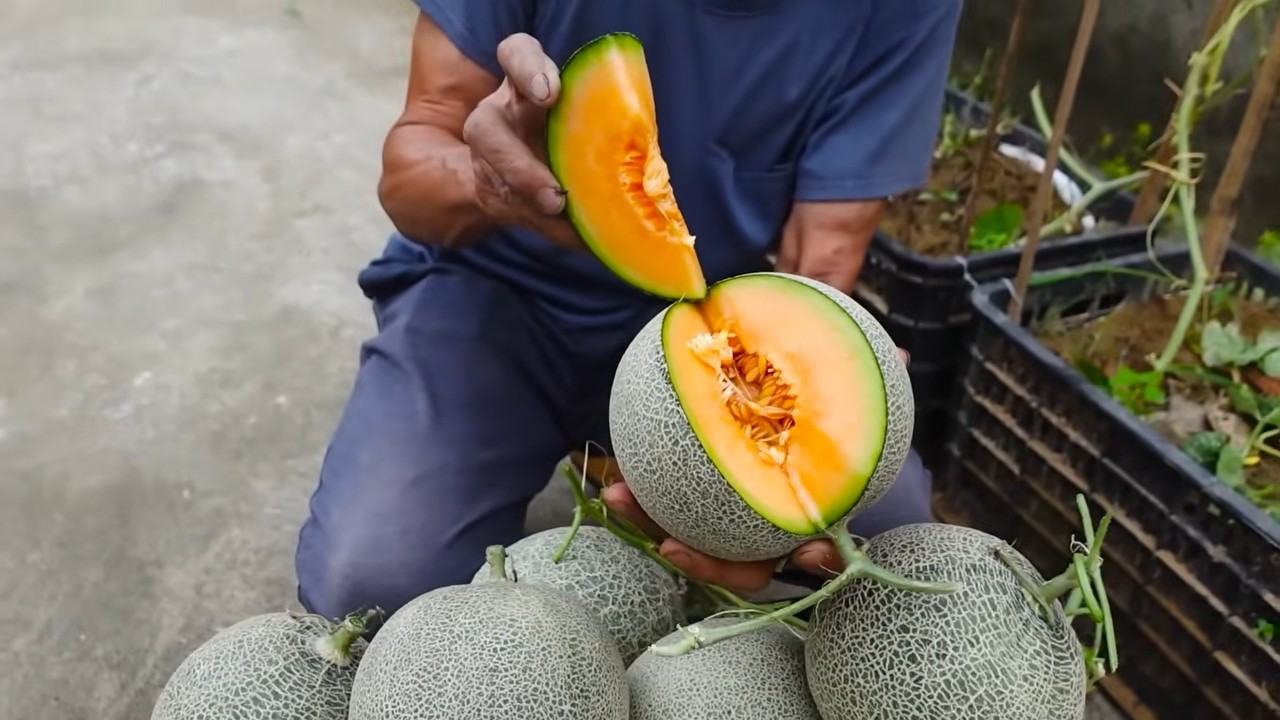
8. Ernte: Der Zeitpunkt der Ernte hängt von der Melonensorte ab. Wassermelonen sind reif, wenn sie beim Abklopfen hohl klingen und die Stelle, an der sie auf dem Boden liegen, gelblich verfärbt ist. Zuckermelonen sind reif, wenn sie einen süßen Duft verströmen und sich leicht vom Stiel lösen lassen. Sei vorsichtig beim Ernten, um die Früchte nicht zu beschädigen.
Herausforderungen und Lösungen
Auch beim Melonenanbau gibt es manchmal Herausforderungen. Hier sind einige häufige Probleme und wie du sie lösen kannst:
* Schädlinge: Blattläuse, Schnecken und Gurkenkäfer können Melonenpflanzen befallen. Blattläuse kannst du mit einem Wasserstrahl oder mit Schmierseifenlösung bekämpfen. Schnecken kannst du absammeln oder mit Schneckenkorn bekämpfen. Gurkenkäfer kannst du mit einem Insektizid bekämpfen oder mit einem Netz abdecken.
* Krankheiten: Mehltau und andere Pilzkrankheiten können Melonenpflanzen befallen, besonders bei feuchtem Wetter. Achte auf eine gute Belüftung der Pflanzen und entferne befallene Blätter. Du kannst auch ein Fungizid verwenden, um die Ausbreitung der Krankheit zu verhindern.
* Fruchtfäule: Fruchtfäule kann auftreten, wenn die Früchte auf dem feuchten Boden liegen. Lege ein Brett oder einen Stein unter die Früchte, um sie vor Fäulnis zu schützen. Achte auch auf eine gute Drainage des Bodens.
* Schlechte Bestäubung: Wenn die Blüten nicht bestäubt werden, entwickeln sich keine Früchte. Fördere die Bestäubung durch Bienen und andere Insekten, indem du bienenfreundliche Pflanzen in deinem Garten anbaust. Du kannst die Blüten auch von Hand bestäuben, wie oben beschrieben.
Zusätzliche Tipps für den Melonenanbau
Hier sind noch ein paar zusätzliche Tipps, die dir helfen können, noch bessere Ergebnisse zu erzielen:
* Mulchen: Eine Mulchschicht aus Stroh oder Rasenschnitt hilft, die Feuchtigkeit im Boden zu halten, Unkraut zu unterdrücken und den Boden vor Temperaturschwankungen zu schützen.
* Bewässerung: Verwende eine Tropfbewässerung, um das Wasser direkt an die Wurzeln der Pflanzen zu bringen und die Blätter trocken zu halten. Das reduziert das Risiko von Pilzkrankheiten.
* Schutz vor Kälte:
Conclusion
So, there you have it! Growing sweet melons doesn’t have to be a gamble or a task reserved for seasoned gardeners. With this simple, yet effective DIY trick, you can significantly increase your chances of harvesting juicy, flavorful melons right in your own backyard. We’ve demystified the process and provided you with a practical solution to common challenges like inconsistent watering and nutrient deficiencies.
This isn’t just about growing melons; it’s about empowering you to take control of your garden and enjoy the fruits (or rather, the melons!) of your labor. Imagine biting into a sun-ripened melon, bursting with sweetness, knowing that you nurtured it from seed to table. That’s the satisfaction this DIY trick unlocks.
Why is this a must-try? Because it’s accessible, affordable, and yields tangible results. It addresses the core needs of melon plants – consistent moisture and targeted nutrition – in a way that’s easy to implement, even for beginner gardeners. You’ll be amazed at the difference this simple adjustment can make in the size, sweetness, and overall health of your melon crop.
But don’t just take our word for it. We encourage you to experiment and adapt this technique to your specific growing conditions. For example, if you live in a particularly hot and dry climate, consider adding a layer of mulch around your DIY watering system to further conserve moisture. Or, if you’re growing melons in containers, you might need to adjust the size of your reservoir to accommodate the limited space.
Variations to consider:
* Compost Tea Boost: Instead of plain water, occasionally fill your reservoir with diluted compost tea for an extra boost of nutrients.
* Companion Planting: Plant beneficial herbs like basil or marigolds near your melon plants to deter pests and attract pollinators.
* Vertical Growing: If space is limited, train your melon vines to grow vertically on a trellis or fence. This also improves air circulation and reduces the risk of fungal diseases.
* Different Melon Varieties: This trick works well with various melon types, including cantaloupe, honeydew, and watermelon. Experiment with different varieties to find your favorites.
* Adjusting the Mixture: Depending on your soil, you may need to adjust the ratio of ingredients in your soil mixture. Observe your plants closely and adjust accordingly.
We’re confident that this DIY trick will transform your melon-growing experience. It’s a game-changer that simplifies the process and maximizes your chances of success. So, grab your supplies, get your hands dirty, and prepare to be amazed by the abundance of sweet melons you’ll be harvesting in no time.
Now, we want to hear from you! Try this DIY trick and share your results with us. Post pictures of your thriving melon plants, tell us about any variations you tried, and let us know how this technique helped you grow the sweetest melons you’ve ever tasted. Your experiences will inspire other gardeners and help us refine this method even further. Let’s cultivate a community of successful melon growers!
Frequently Asked Questions (FAQ)
Q: What exactly is the DIY trick you’re referring to?
A: The DIY trick involves creating a simple, self-watering system for your melon plants using a buried container with holes. This container acts as a reservoir, providing consistent moisture and allowing you to deliver nutrients directly to the roots. It helps to avoid overwatering and ensures that the plants receive the right amount of water, leading to sweeter and healthier melons.
Q: What kind of container should I use for the reservoir?
A: You can use a variety of containers, such as a plastic bucket, a large pot, or even a repurposed plastic bottle. The key is to choose a container that is durable, has a lid (to prevent evaporation and debris from entering), and can be easily buried in the ground. Make sure the container is food-grade plastic to avoid any harmful chemicals leaching into the soil. The size of the container will depend on the size of your melon plants and the frequency with which you want to refill it.
Q: How many holes should I drill in the container, and what size should they be?
A: Drill several small holes (about ¼ inch in diameter) around the sides of the container, especially near the bottom. The number of holes will depend on the size of the container, but aim for at least 10-15 holes. These holes allow water to seep out slowly into the surrounding soil, providing a consistent supply of moisture to the melon roots. Avoid making the holes too large, as this could cause the water to drain too quickly.
Q: How deep should I bury the container?
A: Bury the container so that the top is a few inches above the soil surface. This will make it easy to refill the reservoir with water or nutrient solution. The majority of the container should be buried within the root zone of the melon plant, typically around 6-12 inches deep.
Q: What kind of soil mixture should I use around the container?
A: A well-draining soil mixture is essential for growing healthy melons. A good mix would include equal parts of garden soil, compost, and perlite or vermiculite. The compost provides nutrients, while the perlite or vermiculite improves drainage and aeration. Avoid using heavy clay soil, as it can become waterlogged and suffocate the roots.
Q: How often should I refill the reservoir?
A: The frequency of refilling will depend on the weather conditions, the size of your melon plants, and the type of soil you’re using. Check the reservoir regularly, especially during hot and dry periods. When the water level is low, refill it with water or a diluted nutrient solution. As a general rule, you may need to refill the reservoir every 2-3 days during peak growing season.
Q: What kind of nutrients should I add to the water?
A: Melons are heavy feeders, so they benefit from regular fertilization. You can use a balanced liquid fertilizer or a diluted compost tea. Follow the instructions on the fertilizer label carefully to avoid over-fertilizing, which can damage the plants. A fertilizer with a higher potassium content is beneficial for fruit development and sweetness.
Q: Can I use this trick for other plants besides melons?
A: Yes, this DIY trick can be adapted for other plants that require consistent moisture and nutrients, such as tomatoes, peppers, and cucumbers. The key is to adjust the size of the container and the frequency of refilling based on the specific needs of the plant.
Q: What if I live in a rainy area? Will this trick cause overwatering?
A: If you live in a rainy area, you may need to monitor the water level in the reservoir more closely. If the soil is already saturated from rainfall, you may not need to refill the reservoir as often. You can also consider covering the reservoir with a lid to prevent rainwater from entering.
Q: My melons are growing, but they’re not very sweet. Will this trick help?
A: Yes, this DIY trick can definitely help improve the sweetness of your melons. Consistent watering and targeted nutrition are essential for fruit development and sugar production. By providing a steady supply of moisture and nutrients directly to the roots, you can encourage the plants to produce sweeter and more flavorful melons. Also, make sure your melons are getting plenty of sunlight, as sunlight is crucial for photosynthesis and sugar production.
Q: What are some common pests and diseases that affect melon plants, and how can I prevent them?
A: Common pests that affect melon plants include aphids, squash bugs, and vine borers. Diseases include powdery mildew and fusarium wilt. To prevent these problems, practice good garden hygiene, such as removing weeds and debris, and rotate your crops each year. You can also use organic pest control methods, such as insecticidal soap or neem oil. Ensure good air circulation around your plants to prevent fungal diseases.
Q: Can I use this trick for container gardening?
A: Absolutely! This trick is perfect for container gardening. Choose a large container (at least 20 gallons) and follow the same steps as you would for in-ground planting. Adjust the size of the reservoir to fit the container. Container-grown melons may require more frequent watering and fertilization than those grown in the ground.
Q: How do I know when my melons are ripe and ready to harvest?
A: The signs of ripeness vary depending on the type of melon. Generally, look for changes in color, aroma, and the sound the melon makes when tapped. For example, cantaloupes will develop a sweet aroma and the stem will begin to slip easily from the fruit. Watermelons will produce a dull thud when tapped and the underside will turn yellow.

Leave a Comment