
Grow Watermelons at Home? Absolutely! Imagine biting into a juicy, sweet watermelon that you nurtured from seed to fruit, right in your own backyard. Forget those bland, store-bought melons – we’re talking about homegrown flavor that bursts with sunshine and summer vibes.
For centuries, watermelons have been a symbol of abundance and refreshment, gracing tables from ancient Egypt to modern-day picnics. Their vibrant colors and thirst-quenching flesh have made them a beloved treat across cultures. But did you know that you don’t need acres of farmland to enjoy this delicious fruit? With a few clever tricks and a little DIY spirit, you can successfully grow watermelons at home, even in smaller spaces.
Many people shy away from growing watermelons, thinking it’s too difficult or requires too much space. But that’s where these DIY hacks come in! I’m here to show you that with the right techniques, you can overcome common challenges like limited space, pest control, and ensuring proper pollination. This article is packed with easy-to-follow tips and tricks that will empower you to cultivate your own watermelon patch, no matter your gardening experience. Get ready to impress your friends and family with the sweetest, most satisfying watermelons they’ve ever tasted!
Wassermelonen selbst anbauen: Dein ultimativer DIY-Guide
Hey Leute! Habt ihr euch jemals vorgestellt, saftige, süße Wassermelonen direkt aus eurem eigenen Garten zu ernten? Ich schon! Und ich kann euch sagen, es ist gar nicht so schwer, wie man denkt. In diesem Artikel zeige ich euch Schritt für Schritt, wie ihr eure eigenen Wassermelonen zu Hause anbauen könnt. Lasst uns loslegen!
Was du brauchst: Die richtige Vorbereitung ist alles!
Bevor wir loslegen, brauchen wir natürlich die richtigen Materialien. Hier ist eine Liste von Dingen, die ihr besorgen solltet:
* Wassermelonensamen: Wählt eine Sorte, die für euer Klima geeignet ist. Es gibt viele verschiedene Sorten, von kleinen, runden Melonen bis hin zu großen, länglichen. Informiert euch, welche in eurer Region am besten wachsen.
* Anzuchttöpfe oder -tabletts: Für die Voranzucht der Samen.
* Anzuchterde: Spezielle Erde für die Anzucht, die nährstoffarm und locker ist.
* Gartenerde: Gute, nährstoffreiche Gartenerde für das Beet oder den Topf.
* Kompost oder organischer Dünger: Um den Boden anzureichern.
* Gießkanne oder Gartenschlauch: Zum Bewässern der Pflanzen.
* Mulch: Stroh oder Holzhackschnitzel, um den Boden feucht zu halten und Unkraut zu unterdrücken.
* Pflanzstäbe oder Rankgitter (optional): Für Sorten, die ranken.
* Gartenschere: Zum Beschneiden der Pflanzen.
* Geduld: Wassermelonen brauchen Zeit, um zu wachsen!
Phase 1: Die Voranzucht der Samen
Die Voranzucht ist besonders wichtig, wenn ihr in einer Region mit kurzem Sommer wohnt. So gebt ihr euren Wassermelonen einen Vorsprung.
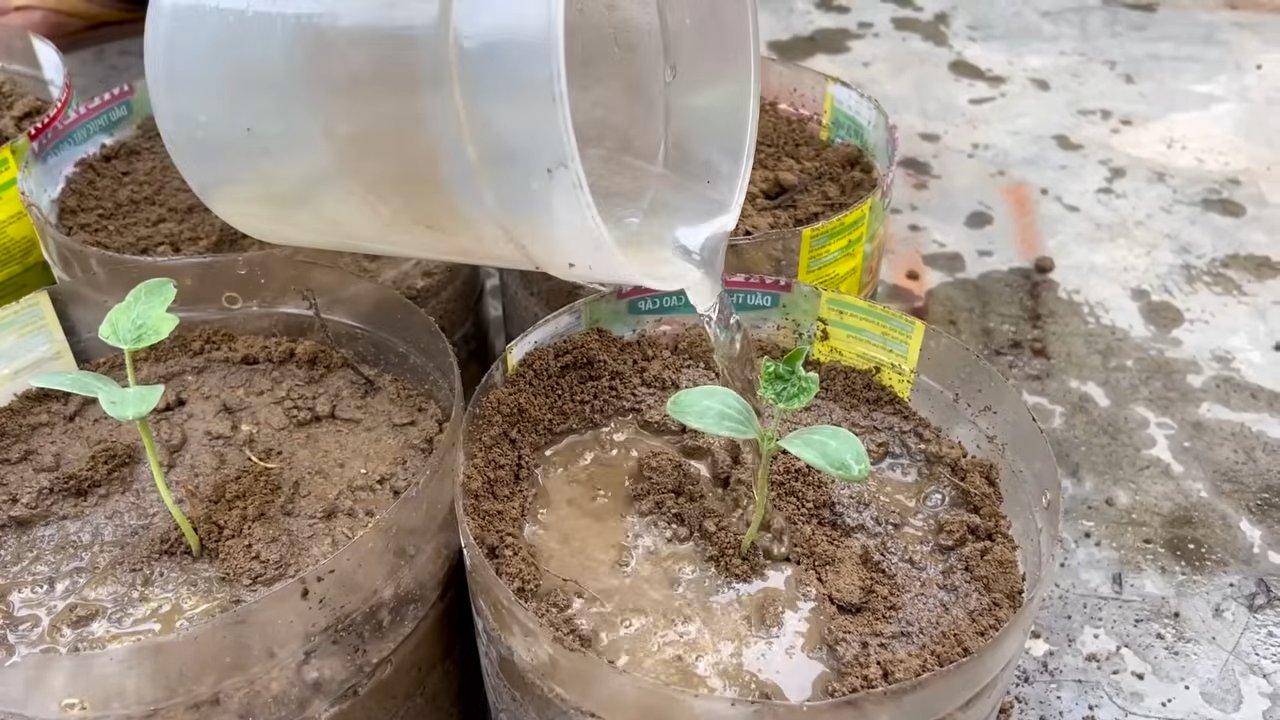
1. Samen vorbereiten: Weicht die Samen für 24 Stunden in lauwarmem Wasser ein. Das hilft, die Keimung zu beschleunigen.
2. Anzuchttöpfe befüllen: Füllt die Anzuchttöpfe oder -tabletts mit Anzuchterde.
3. Samen säen: Legt in jeden Topf 2-3 Samen, etwa 1-2 cm tief.
4. Gießen: Gießt die Erde vorsichtig an, sodass sie feucht, aber nicht nass ist.
5. Warm stellen: Stellt die Töpfe an einen warmen, hellen Ort. Eine Temperatur von 20-25°C ist ideal. Ein Mini-Gewächshaus oder eine Fensterbank über der Heizung sind perfekt.
6. Feucht halten: Haltet die Erde feucht, aber vermeidet Staunässe.
7. Keimung abwarten: Nach etwa 7-14 Tagen sollten die Samen keimen.
8. Vereinzeln: Sobald die Keimlinge ein paar Blätter haben, könnt ihr die schwächeren entfernen, sodass nur der stärkste Keimling pro Topf übrig bleibt.
Phase 2: Die Vorbereitung des Beets oder Topfes
Wassermelonen brauchen viel Sonne und einen gut vorbereiteten Boden.
1. Standort wählen: Sucht einen sonnigen Standort aus, der mindestens 6-8 Stunden Sonne pro Tag bekommt.
2. Boden vorbereiten: Lockert den Boden gründlich auf und entfernt Unkraut.
3. Boden anreichern: Mischt Kompost oder organischen Dünger unter die Erde. Wassermelonen sind Starkzehrer und brauchen viele Nährstoffe.
4. Drainage verbessern: Wenn der Boden zu lehmig ist, könnt ihr Sand oder Kies untermischen, um die Drainage zu verbessern. Staunässe mögen Wassermelonen gar nicht.
5. Beet formen: Formt ein leicht erhöhtes Beet, um die Drainage zu verbessern.
6. Topf wählen (optional): Wenn ihr die Wassermelonen in Töpfen anbauen wollt, wählt große Töpfe mit mindestens 50 Litern Fassungsvermögen.
Phase 3: Das Auspflanzen der Jungpflanzen
Jetzt geht es ans Eingemachte!
1. Abhärten: Bevor ihr die Jungpflanzen ins Freie pflanzt, müsst ihr sie abhärten. Stellt sie dazu für ein paar Tage tagsüber ins Freie und holt sie nachts wieder rein. So gewöhnen sie sich an die Bedingungen draußen.
2. Warten auf den richtigen Zeitpunkt: Pflanzt die Jungpflanzen erst aus, wenn keine Frostgefahr mehr besteht und die Bodentemperatur mindestens 15°C beträgt. Das ist meistens Mitte Mai oder Anfang Juni.
3. Pflanzabstand beachten: Pflanzt die Jungpflanzen mit einem Abstand von mindestens 80-100 cm zueinander. Wassermelonen brauchen viel Platz zum Wachsen.
4. Pflanzen: Grabt ein Loch, das groß genug für den Wurzelballen ist. Setzt die Jungpflanzen vorsichtig ein und füllt das Loch mit Erde auf.
5. Angießen: Gießt die Pflanzen gründlich an.
6. Mulchen: Verteilt eine Schicht Mulch um die Pflanzen, um den Boden feucht zu halten und Unkraut zu unterdrücken.
Phase 4: Die Pflege der Wassermelonen
Jetzt heißt es: Geduld haben und die Pflanzen gut pflegen.
1. Regelmäßig gießen: Gießt die Wassermelonen regelmäßig, besonders während der Blütezeit und der Fruchtbildung. Achtet darauf, dass der Boden immer feucht ist, aber vermeidet Staunässe.
2. Düngen: Düngt die Pflanzen alle 2-3 Wochen mit einem organischen Dünger oder Kompost.
3. Beschneiden (optional): Ihr könnt die Seitentriebe der Wassermelonen beschneiden, um die Fruchtbildung zu fördern. Lasst aber genügend Blätter an der Pflanze, damit sie Photosynthese betreiben kann.
4. Rankhilfe (optional): Wenn ihr rankende Sorten angebaut habt, könnt ihr ihnen eine Rankhilfe geben, z.B. einen Pflanzstab oder ein Rankgitter.
5. Schutz vor Schädlingen: Achtet auf Schädlinge wie Schnecken oder Blattläuse und bekämpft sie gegebenenfalls mit natürlichen Mitteln.
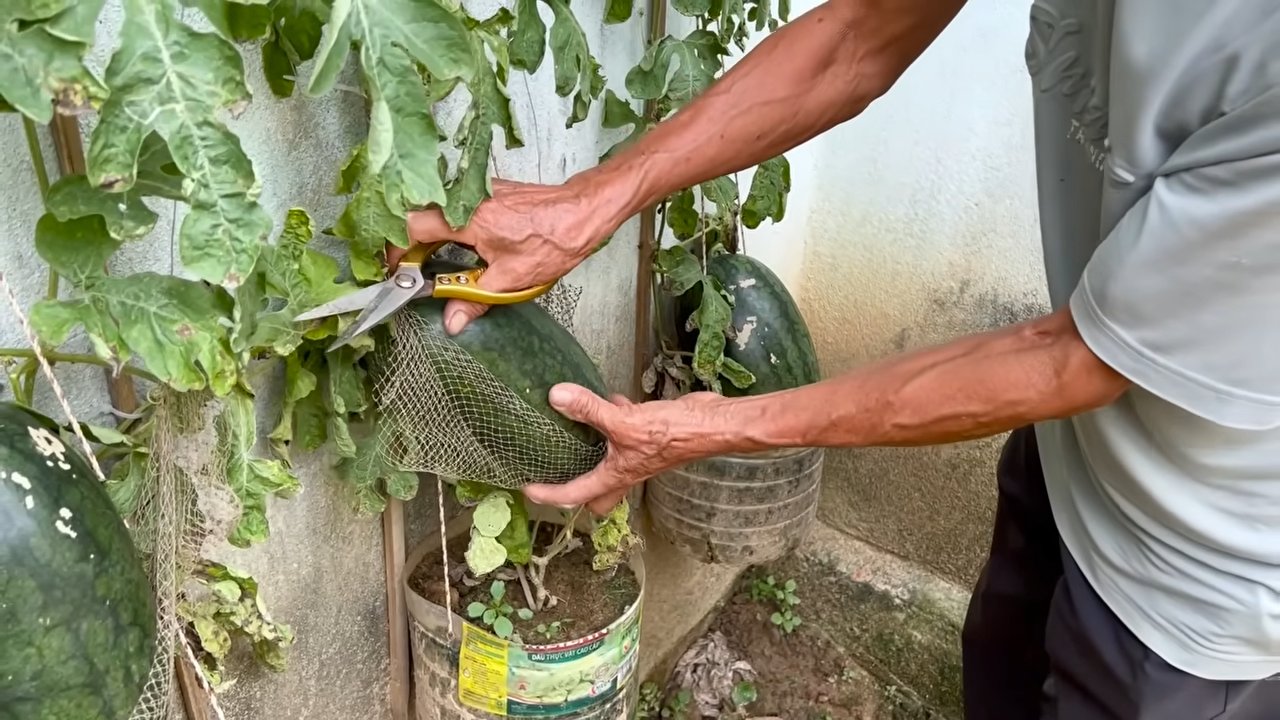
6. Früchte schützen: Legt die wachsenden Früchte auf Stroh oder Holzbretter, damit sie nicht direkt auf dem feuchten Boden liegen und faulen.
Phase 5: Die Ernte
Der schönste Teil!
1. Reife erkennen: Die Reife der Wassermelonen erkennt man an verschiedenen Faktoren:
* Der Stiel, der die Frucht mit der Pflanze verbindet, wird trocken und braun.
* Die Stelle, an der die Frucht auf dem Boden liegt, wird gelblich.
* Wenn man auf die Frucht klopft, sollte sie hohl klingen.
2. Ernten: Schneidet die reifen Wassermelonen mit einem scharfen Messer vom Stiel ab.
3. Genießen: Lasst euch die selbst angebauten Wassermelonen schmecken!
Zusätzliche Tipps und Tricks
* Bestäubung: Wassermelonen brauchen Bienen und andere Insekten zur Bestäubung. Wenn ihr wenig Insekten in eurem Garten habt, könnt ihr die Blüten auch von Hand bestäuben.
* Sortenwahl: Informiert euch, welche Wassermelonensorten in eurer Region am besten wachsen. Es gibt viele verschiedene Sorten, von kleinen, runden Melonen bis hin zu großen, länglichen.
* Bodenanalyse: Eine Bodenanalyse kann euch helfen, den Nährstoffgehalt eures Bodens zu bestimmen und ihn entsprechend anzupassen.
* Geduld: Wassermelonen brauchen Zeit, um zu wachsen. Seid geduldig und gebt nicht auf!
Ich hoffe, dieser Guide hilft euch dabei, eure eigenen Wassermelonen zu Hause anzubauen. Viel Erfolg und viel Spaß beim Gärtnern! Lasst mich wissen, wenn ihr Fragen habt!
Conclusion
So, there you have it! Growing watermelons at home, while it might seem daunting at first, is entirely achievable with a little planning, patience, and the right techniques. This DIY approach not only saves you money compared to buying them at the store, but it also allows you to enjoy the unparalleled satisfaction of harvesting a juicy, homegrown watermelon that you nurtured from seed to fruit. Imagine biting into that first slice, knowing you were responsible for bringing that deliciousness into existence. That’s a reward that store-bought watermelons simply can’t offer.
This method, focusing on [mention a key technique from the article, e.g., vertical gardening or specific soil amendments], is a game-changer for those with limited space or those simply looking for a more efficient and rewarding gardening experience. It allows you to maximize your yield, minimize pest problems, and enjoy a healthier, more vibrant watermelon crop.
But don’t just take our word for it. The real magic happens when you put these tips into practice. Experiment with different watermelon varieties to find your personal favorite. Try adding different types of compost to your soil to see how it affects the sweetness and size of your fruit. Consider using companion planting techniques to naturally deter pests and attract beneficial insects. The possibilities are endless!
Growing watermelons at home is more than just a gardening project; it’s an adventure. It’s a chance to connect with nature, learn new skills, and enjoy the fruits (literally!) of your labor. We encourage you to embrace the challenge, get your hands dirty, and experience the joy of growing your own watermelons.
And remember, gardening is a journey, not a destination. There will be successes and setbacks along the way. Don’t be discouraged if your first attempt isn’t perfect. Learn from your mistakes, adapt your approach, and keep trying. With each season, you’ll become a more skilled and confident watermelon grower.
We’re confident that with these tips, you’ll be well on your way to enjoying a bountiful harvest of delicious, homegrown watermelons. Now, go forth and grow!
We’d love to hear about your experiences! Share your photos, tips, and stories in the comments below. Let’s create a community of watermelon enthusiasts and learn from each other. What variety are you most excited to try? What challenges have you faced, and how did you overcome them? Your insights could be invaluable to other aspiring watermelon growers. Let’s grow together!
Frequently Asked Questions (FAQ)
Q: What is the best time to start growing watermelons?
A: The ideal time to start growing watermelons depends on your climate. Watermelons are warm-season crops and require a long growing season of at least 70-90 days. In colder climates, you’ll need to start seeds indoors about 6-8 weeks before the last expected frost. In warmer climates, you can direct sow seeds outdoors once the soil temperature reaches at least 70°F (21°C). A good rule of thumb is to wait until the danger of frost has passed and the soil has warmed up sufficiently. Check your local weather forecasts and planting guides for specific recommendations for your region.
Q: What kind of soil is best for growing watermelons?
A: Watermelons thrive in well-drained, sandy loam soil that is rich in organic matter. The soil should have a pH between 6.0 and 6.8. Before planting, amend your soil with compost, well-rotted manure, or other organic materials to improve drainage, fertility, and water retention. Avoid heavy clay soils, as they can become waterlogged and inhibit root growth. If you have clay soil, consider growing watermelons in raised beds or containers filled with a suitable potting mix.
Q: How much sunlight do watermelons need?
A: Watermelons require at least 6-8 hours of direct sunlight per day to produce healthy vines and sweet, juicy fruits. Choose a planting location that receives full sun throughout the day. If you live in a particularly hot climate, some afternoon shade may be beneficial to prevent the fruits from scorching.
Q: How often should I water my watermelons?
A: Watermelons need consistent moisture, especially during fruit development. Water deeply and regularly, aiming for about 1-2 inches of water per week. Avoid overhead watering, as this can promote fungal diseases. Instead, water at the base of the plant, using a soaker hose or drip irrigation system. Check the soil moisture regularly and adjust your watering schedule as needed, depending on the weather conditions. Reduce watering as the fruits ripen to concentrate the sugars and improve their flavor.
Q: What are some common pests and diseases that affect watermelons?
A: Watermelons are susceptible to various pests and diseases, including aphids, squash bugs, vine borers, powdery mildew, and fusarium wilt. Regularly inspect your plants for signs of infestation or disease. Use organic pest control methods, such as insecticidal soap or neem oil, to control aphids and squash bugs. Protect your plants from vine borers by wrapping the stems with aluminum foil or using row covers. Prevent powdery mildew by ensuring good air circulation and avoiding overhead watering. Choose disease-resistant watermelon varieties to minimize the risk of fusarium wilt.
Q: How do I know when my watermelons are ripe?
A: Determining when a watermelon is ripe can be tricky, but there are several indicators to look for. The tendril closest to the fruit should be brown and dry. The spot where the watermelon rests on the ground (the ground spot) should be yellow or creamy. The rind should be dull and slightly waxy, rather than shiny. When you thump the watermelon, it should sound hollow and deep. With practice, you’ll develop a feel for when your watermelons are perfectly ripe.
Q: Can I grow watermelons in containers?
A: Yes, you can grow watermelons in containers, but you’ll need to choose a large container (at least 20 gallons) and a compact or bush-type watermelon variety. Use a high-quality potting mix and provide regular watering and fertilization. Container-grown watermelons may require more frequent watering and feeding than those grown in the ground.
Q: What are some good companion plants for watermelons?
A: Companion planting can help improve the health and yield of your watermelon crop. Good companion plants for watermelons include marigolds (which deter nematodes), nasturtiums (which attract beneficial insects), and radishes (which repel squash vine borers). Avoid planting watermelons near potatoes or tomatoes, as they can compete for nutrients.
Q: How can I improve the sweetness of my watermelons?
A: Several factors can influence the sweetness of your watermelons. Choose a watermelon variety known for its sweetness. Ensure your plants receive adequate sunlight and water. Amend your soil with compost or other organic materials to provide essential nutrients. Avoid over-fertilizing with nitrogen, as this can promote leafy growth at the expense of fruit development. Reduce watering as the fruits ripen to concentrate the sugars.
Q: What are some different varieties of watermelons I can grow?
A: There are many different varieties of watermelons to choose from, each with its own unique characteristics. Some popular varieties include Sugar Baby (a small, early-maturing variety), Crimson Sweet (a classic red-fleshed variety), Jubilee (a large, oblong variety), and Yellow Doll (a yellow-fleshed variety). Experiment with different varieties to find your personal favorite. Consider factors such as size, sweetness, disease resistance, and growing season when selecting a watermelon variety.

Leave a Comment