
Growing bell peppers indoors can seem like a daunting task, but trust me, with a few clever tricks and a little DIY spirit, you can be harvesting your own colorful peppers right from your windowsill! Imagine the satisfaction of adding fresh, homegrown bell peppers to your meals, even when the weather outside is frightful.
For centuries, humans have cultivated plants indoors, from the elaborate orangeries of European royalty to the humble houseplants gracing our modern homes. This connection to nature, brought inside, offers a sense of calm and accomplishment. But beyond the aesthetic appeal, growing your own food, like bell peppers, provides a tangible benefit: fresh, healthy produce right at your fingertips.
Why should you bother learning these DIY tricks for growing bell peppers indoors? Well, think about it: no more relying on grocery store produce that may have traveled hundreds of miles. You control the growing environment, ensuring your peppers are free from harmful pesticides and bursting with flavor. Plus, it’s a fantastic way to extend the growing season, enjoying fresh peppers long after the outdoor garden has gone dormant. I’m excited to share some simple, effective DIY hacks that will empower you to successfully grow bell peppers indoors, regardless of your experience level. Let’s get started!
Paprika im Haus anbauen: Dein umfassender DIY-Leitfaden
Hallo liebe Gartenfreunde! Habt ihr auch genug von teuren Paprika aus dem Supermarkt, die kaum Geschmack haben? Oder wohnt ihr vielleicht in einer Gegend, in der das Klima nicht ideal für den Paprikaanbau im Freien ist? Keine Sorge, ich zeige euch, wie ihr eure eigenen, saftigen Paprika ganz einfach im Haus anbauen könnt! Es ist einfacher als ihr denkt und macht unglaublich viel Spaß. Lasst uns loslegen!
Was du brauchst: Die richtige Ausrüstung
Bevor wir mit dem Anbau beginnen, müssen wir sicherstellen, dass wir alles Notwendige zur Hand haben. Hier ist eine Liste der Dinge, die ihr benötigt:
* Paprikasamen: Wählt eure Lieblingssorten! Es gibt unzählige Paprikasorten, von milden Gemüsepaprika bis hin zu feurigen Chilis. Achtet darauf, dass die Samen von guter Qualität sind.
* Anzuchttöpfe oder -schalen: Kleine Töpfe oder Schalen mit Drainagelöchern sind ideal für die Anzucht.
* Anzuchterde: Diese Erde ist speziell für die Anzucht von Sämlingen formuliert und enthält weniger Nährstoffe, um das Wurzelwachstum zu fördern.
* Pflanztöpfe: Größere Töpfe (mindestens 20 cm Durchmesser) für die späteren Stadien des Wachstums.
* Universalerde: Eine gute, nährstoffreiche Blumenerde für die Pflanztöpfe.
* Pflanzenlampe: Gerade im Winter oder in dunkleren Wohnungen ist eine Pflanzenlampe unerlässlich, um den Paprikapflanzen ausreichend Licht zu geben.
* Sprühflasche: Zum Befeuchten der Erde.
* Dünger: Ein Flüssigdünger speziell für Gemüse oder Tomaten ist ideal.
* Pflanzstäbe: Um die Pflanzen bei Bedarf zu stützen.
* Thermometer: Um die Temperatur im Auge zu behalten.
* Optional: Heizmatte für die Anzucht, um die Keimung zu beschleunigen.
Phase 1: Die Anzucht der Paprikasamen
Die Anzucht ist ein wichtiger Schritt, um gesunde und kräftige Paprikapflanzen zu erhalten. Hier ist, wie ich es mache:
1. Vorbereitung der Anzuchttöpfe: Füllt die Anzuchttöpfe oder -schalen mit Anzuchterde. Drückt die Erde leicht an.
2. Aussaat der Samen: Legt 2-3 Samen pro Topf auf die Erde. Bedeckt die Samen mit einer dünnen Schicht Erde (ca. 0,5 cm).
3. Bewässerung: Befeuchtet die Erde vorsichtig mit einer Sprühflasche. Die Erde sollte feucht, aber nicht nass sein.
4. Abdeckung: Deckt die Töpfe mit Frischhaltefolie oder einem transparenten Deckel ab, um die Luftfeuchtigkeit zu erhöhen.
5. Standort: Stellt die Töpfe an einen warmen Ort (ca. 22-25°C). Eine Heizmatte kann hier sehr hilfreich sein.
6. Beobachtung: Überprüft die Erde täglich und befeuchtet sie bei Bedarf. Nach etwa 1-2 Wochen sollten die ersten Keimlinge erscheinen.
7. Entfernung der Abdeckung: Sobald die Keimlinge erscheinen, entfernt die Abdeckung, um Schimmelbildung zu vermeiden.
8. Licht: Stellt die Töpfe an einen hellen Ort oder unter eine Pflanzenlampe. Die Sämlinge benötigen mindestens 12-14 Stunden Licht pro Tag.
9. Vereinzelung: Wenn die Sämlinge einige Zentimeter groß sind und 2-3 Blätter haben, könnt ihr die schwächeren Pflanzen entfernen, sodass nur die stärkste Pflanze pro Topf übrig bleibt.
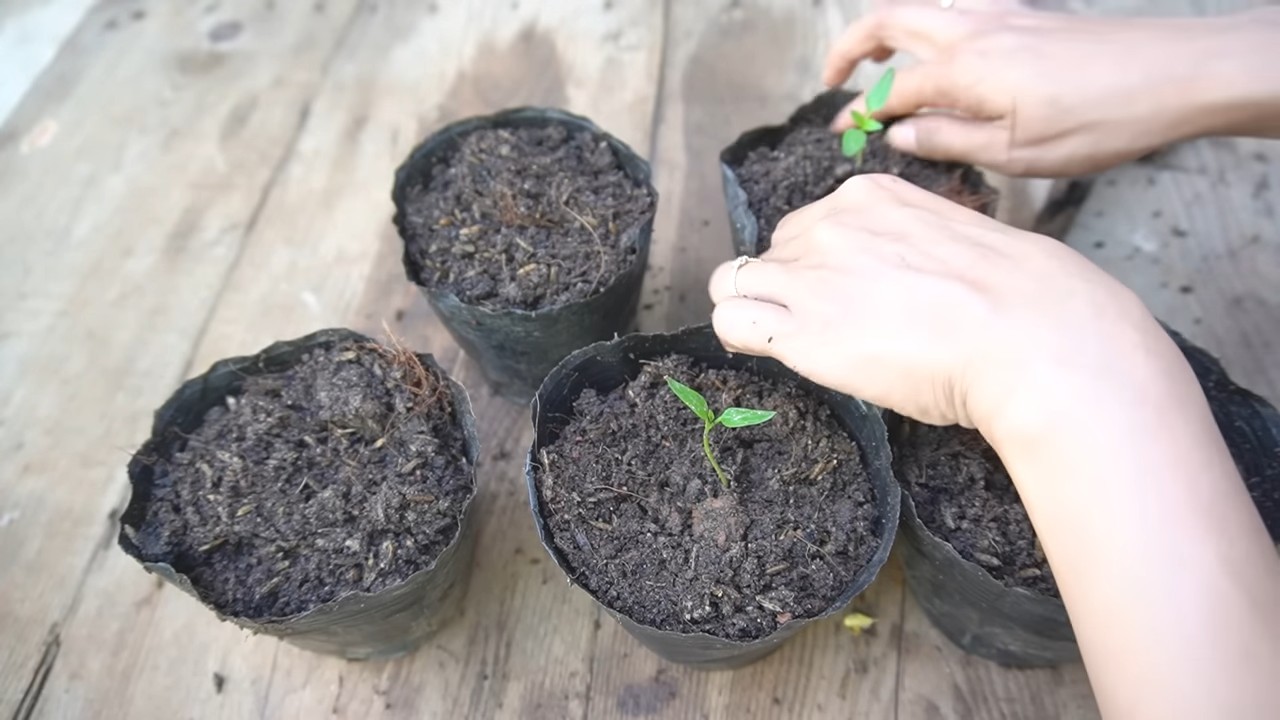
Phase 2: Das Umpflanzen in größere Töpfe
Sobald die Sämlinge kräftig genug sind, ist es Zeit, sie in größere Töpfe umzupflanzen.
1. Vorbereitung der Pflanztöpfe: Füllt die Pflanztöpfe mit Universalerde. Lasst oben einen Rand von ca. 2-3 cm frei.
2. Entnahme der Sämlinge: Nehmt die Sämlinge vorsichtig aus den Anzuchttöpfen. Achtet darauf, die Wurzeln nicht zu beschädigen.
3. Einpflanzen: Setzt die Sämlinge in die Pflanztöpfe. Die Oberseite des Wurzelballens sollte mit der Oberfläche der Erde abschließen.
4. Bewässerung: Gießt die Pflanzen gründlich an.
5. Standort: Stellt die Töpfe an einen hellen und warmen Ort.
Phase 3: Die Pflege der Paprikapflanzen
Die richtige Pflege ist entscheidend für eine reiche Ernte. Hier sind meine Tipps:
* Bewässerung: Gießt die Paprikapflanzen regelmäßig, aber vermeidet Staunässe. Die Erde sollte immer leicht feucht sein.
* Düngung: Düngt die Pflanzen alle 2-3 Wochen mit einem Flüssigdünger. Achtet auf die Dosierungsanleitung des Herstellers.
* Licht: Paprikapflanzen benötigen viel Licht. Stellt sie an einen sonnigen Standort oder verwendet eine Pflanzenlampe.
* Temperatur: Die ideale Temperatur für Paprikapflanzen liegt zwischen 20 und 28°C.
* Bestäubung: Im Haus müssen die Blüten manuell bestäubt werden. Verwendet dazu einen kleinen Pinsel und übertragt den Pollen von einer Blüte zur anderen. Ihr könnt die Pflanze auch leicht schütteln.
* Stützung: Wenn die Pflanzen größer werden und Früchte tragen, kann es notwendig sein, sie mit Pflanzstäben zu stützen.
* Schädlinge: Achtet auf Schädlinge wie Blattläuse oder Spinnmilben. Bei Befall könnt ihr die Pflanzen mit einem natürlichen Insektizid behandeln.
* Ausgeizen: Entfernt regelmäßig die Seitentriebe (Geiztriebe), die zwischen Haupttrieb und Blattachseln wachsen. Dies fördert das Wachstum der Früchte.
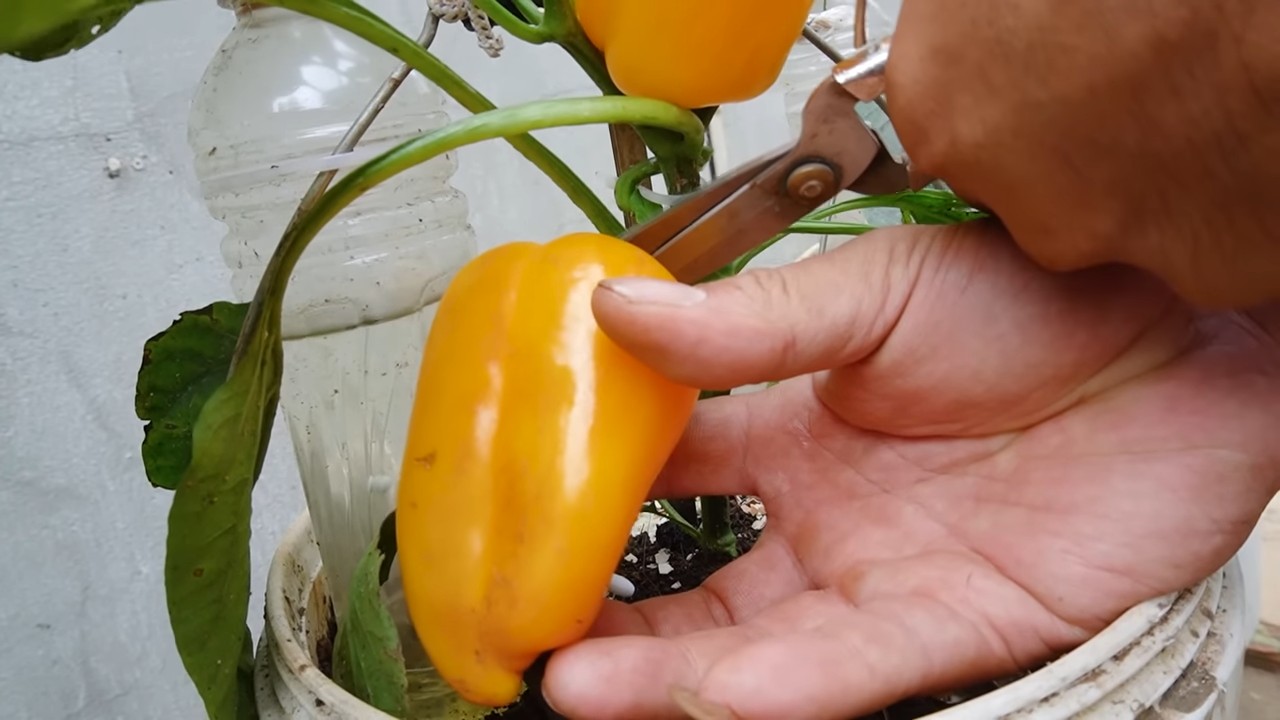
Phase 4: Die Ernte
Die Ernte ist der schönste Teil!
1. Reife: Paprika sind reif, wenn sie ihre endgültige Farbe erreicht haben und sich fest anfühlen.
2. Ernte: Schneidet die Paprika mit einem scharfen Messer oder einer Schere ab. Lasst einen kleinen Stiel an der Frucht.
3. Lagerung: Frische Paprika können im Kühlschrank einige Tage gelagert werden.
Zusätzliche Tipps für den Erfolg
* Wählt die richtige Sorte: Einige Paprikasorten sind besser für den Anbau im Haus geeignet als andere. Informiert euch vor dem Kauf der Samen.
* Achtet auf die Luftfeuchtigkeit: Eine zu niedrige Luftfeuchtigkeit kann zu Problemen führen. Ihr könnt die Luftfeuchtigkeit erhöhen, indem ihr eine Schale mit Wasser in die Nähe der Pflanzen stellt oder einen Luftbefeuchter verwendet.
* Geduld: Der Anbau von Paprika braucht Zeit und Geduld. Lasst euch nicht entmutigen, wenn es nicht sofort klappt. Mit etwas Übung werdet ihr bald eure eigenen, köstlichen Paprika ernten können.
* Beobachtung: Beobachtet eure Pflanzen genau. Je früher ihr Probleme erkennt, desto besser könnt ihr sie beheben.
Ich hoffe, dieser Leitfaden hilft euch dabei, eure eigenen Paprika im Haus anzubauen. Es ist ein lohnendes Hobby, das euch mit frischen, gesunden und leckeren Paprika belohnt. Viel Erfolg und viel Spaß beim Gärtnern!
Conclusion
So, there you have it! Growing bell peppers indoors might seem like a daunting task at first, but with the right knowledge, a little patience, and a dash of dedication, you can enjoy fresh, vibrant bell peppers right from the comfort of your home, regardless of the season. This DIY approach isn’t just about saving money; it’s about connecting with your food, understanding the growing process, and experiencing the immense satisfaction of nurturing life from seed to harvest.
Why is this a must-try? Because it empowers you to control the quality of your produce. You know exactly what goes into your bell peppers – no harmful pesticides, no questionable fertilizers, just pure, homegrown goodness. Plus, imagine the bragging rights! “Oh, these bell peppers? I grew them myself, indoors.” It’s a conversation starter and a testament to your green thumb (even if it’s a fluorescent-lit one!).
But the beauty of this DIY project lies in its adaptability. Feel free to experiment with different varieties of bell peppers. Perhaps you’re a fan of the classic green, or maybe you’re drawn to the sweetness of red, yellow, or even purple bell peppers. The choice is yours! You can also explore different potting mixes to find what works best for your growing environment. Some gardeners swear by a mix of peat moss, perlite, and vermiculite, while others prefer a more organic approach with compost and coco coir.
Consider adding companion plants to your indoor garden. Basil, for example, is known to repel pests and improve the flavor of bell peppers. Marigolds are another excellent choice for pest control. These additions not only enhance your bell pepper growing experience but also create a more diverse and thriving indoor ecosystem.
Don’t be afraid to get creative with your lighting setup. While grow lights are highly recommended, you can also supplement with natural light from a sunny window. Just be sure to rotate your plants regularly to ensure even exposure. And if you’re feeling particularly ambitious, you can even explore hydroponic growing methods for an even more efficient and space-saving approach to growing bell peppers indoors.
We wholeheartedly encourage you to embark on this rewarding journey. It’s a learning experience, a therapeutic activity, and a delicious way to enhance your meals. Start small, be patient, and don’t be discouraged by initial setbacks. Every gardener, even the most experienced, has faced challenges along the way. The key is to learn from your mistakes, adapt your approach, and keep growing!
And most importantly, we want to hear about your experiences! Share your tips, your triumphs, and even your failures in the comments below. Let’s create a community of indoor bell pepper growers, supporting each other and sharing our knowledge. Together, we can transform our homes into thriving indoor gardens, one bell pepper at a time. So, grab your seeds, prepare your pots, and get ready to experience the joy of growing your own delicious bell peppers indoors!
Frequently Asked Questions (FAQ)
What are the best bell pepper varieties to grow indoors?
Choosing the right variety is crucial for indoor success. Compact or dwarf varieties are generally better suited for indoor growing due to limited space. Some excellent choices include:
* **’Mini Bell’**: As the name suggests, these produce smaller, bite-sized bell peppers, perfect for snacking or salads. They mature quickly and are well-suited for container gardening.
* **’Patio Bell’**: Another compact variety that thrives in containers. It produces standard-sized bell peppers on a smaller plant, making it ideal for indoor spaces.
* **’Sweet Palermo’**: While technically a sweet pepper, it’s often grouped with bell peppers due to its similar shape and mild flavor. It’s known for its sweetness and thin skin, making it a delicious addition to any meal.
* **’Lunchbox Peppers’**: These are small, colorful peppers that are perfect for snacking. They come in a variety of colors, including red, yellow, and orange, adding a vibrant touch to your indoor garden.
* **’Gypsy’**: This variety is known for its early maturity and high yields. It produces medium-sized bell peppers that are sweet and flavorful.
Consider the size of your growing space and the amount of light available when selecting your bell pepper variety.
How much light do bell peppers need indoors?
Light is arguably the most critical factor for successful indoor bell pepper growing. Bell peppers require at least 6-8 hours of direct sunlight per day. However, since natural sunlight can be limited indoors, especially during winter months, supplemental lighting is often necessary.
* **Grow Lights**: LED grow lights are the most energy-efficient and effective option. Look for full-spectrum LED grow lights that provide a balanced spectrum of light, mimicking natural sunlight.
* **Placement**: Position your grow lights 6-12 inches above the plants, adjusting the height as the plants grow.
* **Timers**: Use a timer to ensure consistent light exposure. A 14-16 hour light cycle followed by an 8-10 hour dark period is generally recommended.
* **Natural Light Supplementation**: If you have a sunny window, supplement with natural light whenever possible. Rotate your plants regularly to ensure even exposure to the sun.
Insufficient light can lead to leggy growth, reduced fruit production, and smaller, less flavorful bell peppers.
What type of soil is best for growing bell peppers indoors?
Bell peppers need well-draining soil that is rich in organic matter. A good potting mix will provide the necessary nutrients and drainage for healthy growth.
* **Commercial Potting Mix**: A high-quality commercial potting mix is a convenient and reliable option. Look for mixes that are specifically formulated for vegetables or container gardening.
* **DIY Potting Mix**: You can also create your own potting mix by combining equal parts of peat moss, perlite, and vermiculite. This mix provides good drainage and aeration.
* **Amendments**: Amend your potting mix with compost or other organic matter to improve its nutrient content and water retention.
* **pH Level**: Bell peppers prefer a slightly acidic soil pH of around 6.0 to 6.8. You can test the pH of your soil using a soil testing kit and adjust it accordingly.
Avoid using garden soil in containers, as it can become compacted and poorly drained.
How often should I water my indoor bell pepper plants?
Watering frequency depends on several factors, including the size of the pot, the type of soil, the temperature, and the humidity.
* **Check the Soil**: The best way to determine if your bell pepper plants need water is to check the soil moisture. Stick your finger about an inch into the soil. If it feels dry, it’s time to water.
* **Water Thoroughly**: When you water, water thoroughly until water drains out of the bottom of the pot. This ensures that the entire root system is moistened.
* **Avoid Overwatering**: Overwatering can lead to root rot, which is a common problem for indoor plants. Avoid letting your plants sit in standing water.
* **Watering Frequency**: In general, you may need to water your bell pepper plants every 2-3 days, but this can vary depending on the conditions.
How do I pollinate bell pepper flowers indoors?
Bell peppers are self-pollinating, meaning they can pollinate themselves. However, indoor plants may need a little help with pollination, as there are no bees or other insects to do the job.
* **Hand Pollination**: The easiest way to pollinate bell pepper flowers indoors is to hand pollinate them. Use a small paintbrush or cotton swab to gently transfer pollen from the stamen (the male part of the flower) to the pistil (the female part of the flower).
* **Shake the Plants**: You can also gently shake the plants to help release pollen.
* **Fan**: Use a small fan to circulate air around the plants, which can also help with pollination.
Pollinating your bell pepper flowers will increase your chances of getting a good harvest.
What are common pests and diseases that affect indoor bell pepper plants?
Indoor bell pepper plants are susceptible to several pests and diseases, including:
* **Aphids**: These small, sap-sucking insects can cause stunted growth and distorted leaves.
* **Spider Mites**: These tiny pests create webs on the leaves and can cause them to turn yellow and die.
* **Whiteflies**: These small, white insects fly around the plants and suck sap from the leaves.
* **Fungal Diseases**: Fungal diseases, such as powdery mildew and blossom end rot, can also affect bell pepper plants.
To prevent pests and diseases, keep your plants healthy and well-ventilated. Inspect your plants regularly for signs of infestation or disease. If you find any pests or diseases, treat them promptly with appropriate organic or chemical controls.
How long does it take to grow bell peppers indoors?
The time it takes to grow bell peppers indoors depends on the variety, the growing conditions, and your level of care.
* **Seed to Harvest**: In general, it takes about 60-90 days from seed to harvest for most bell pepper varieties.
* **Transplant to Harvest**: If you start with transplants, you can shorten the growing time by a few weeks.
* **Factors Affecting Growth**: Factors such as


Leave a Comment