
Growing Black Corn Pots: Ever dreamt of adding a touch of gothic elegance and unique flavor to your garden and dinner table? Forget the usual yellow kernels; we’re diving into the fascinating world of black corn! This isn’t just about growing food; it’s about cultivating a conversation starter, a piece of living art, and a delicious, nutritious treat, all in one pot.
Black corn, also known as Aztec Black corn, boasts a rich history rooted in ancient Mesoamerica. For centuries, indigenous cultures have revered it for its vibrant color, nutritional benefits, and ceremonial significance. Imagine channeling that ancient wisdom and bringing a piece of that history into your own backyard, or even your balcony!
But why should you try growing black corn pots? Well, beyond its striking appearance, black corn is packed with antioxidants, making it a healthier alternative to traditional corn varieties. Plus, growing it in pots makes it accessible to everyone, regardless of space! No sprawling farm needed – just a sunny spot and a little bit of know-how. I’m here to share some simple, effective DIY tricks and hacks that will have you harvesting your own beautiful, black kernels in no time. Get ready to impress your friends, nourish your body, and add a touch of the extraordinary to your everyday life with these easy growing black corn pots tips!
Schwarzer Mais im Topf: Eine DIY-Anleitung für den Gartenneuling
Hallo liebe Gartenfreunde! Habt ihr Lust auf etwas Ungewöhnliches in eurem Garten oder auf eurem Balkon? Dann lasst uns gemeinsam schwarzen Mais in Töpfen anbauen! Es ist einfacher als ihr denkt und das Ergebnis ist nicht nur wunderschön anzusehen, sondern auch superlecker. Ich zeige euch, wie es geht!
Was ihr für den Anbau von schwarzem Mais im Topf benötigt:
* Maissamen der Sorte “Black Aztec” oder einer anderen schwarzen Maissorte: Diese sind online oder in gut sortierten Gartencentern erhältlich. Achtet darauf, dass die Samen keimfähig sind.
* Große Töpfe oder Kübel: Mindestens 30 cm Durchmesser und Tiefe sind ideal. Mais braucht Platz für seine Wurzeln.
* Hochwertige Blumenerde: Eine gute Drainage ist wichtig, also mischt etwas Sand oder Perlite unter die Erde.
* Dünger: Langzeitdünger oder Flüssigdünger für Gemüse. Mais ist ein Starkzehrer und braucht viele Nährstoffe.
* Gießkanne oder Gartenschlauch: Für die regelmäßige Bewässerung.
* Pflanzstäbe oder Bambusstäbe: Um die Pflanzen bei Bedarf zu stützen.
* Sonniger Standort: Mais liebt die Sonne!
* Geduld und Freude am Gärtnern: Das Wichtigste überhaupt!
Die Vorbereitung: Der Grundstein für eine erfolgreiche Ernte
Bevor wir mit dem Pflanzen loslegen, ist eine gute Vorbereitung das A und O. Hier sind die Schritte, die ihr beachten solltet:
1. Die Wahl des richtigen Topfes: Wie bereits erwähnt, ist die Größe des Topfes entscheidend. Ein zu kleiner Topf führt zu kümmerlichem Wachstum und geringer Ernte. Achtet darauf, dass der Topf Abzugslöcher hat, damit überschüssiges Wasser ablaufen kann.
2. Die richtige Erde: Mais braucht eine nährstoffreiche und gut durchlässige Erde. Ich mische meine Blumenerde immer mit etwas Kompost und Sand, um die Drainage zu verbessern.
3. Der Standort: Sucht euch einen sonnigen Platz für eure Maispflanzen aus. Mindestens sechs Stunden Sonne am Tag sind ideal.
Die Aussaat: Der Beginn des Abenteuers
Jetzt geht es ans Eingemachte! Die Aussaat ist der erste Schritt zum eigenen schwarzen Mais.
1. Den Topf vorbereiten: Füllt den Topf mit der vorbereiteten Erde, lasst aber etwa 5 cm Platz bis zum Rand.
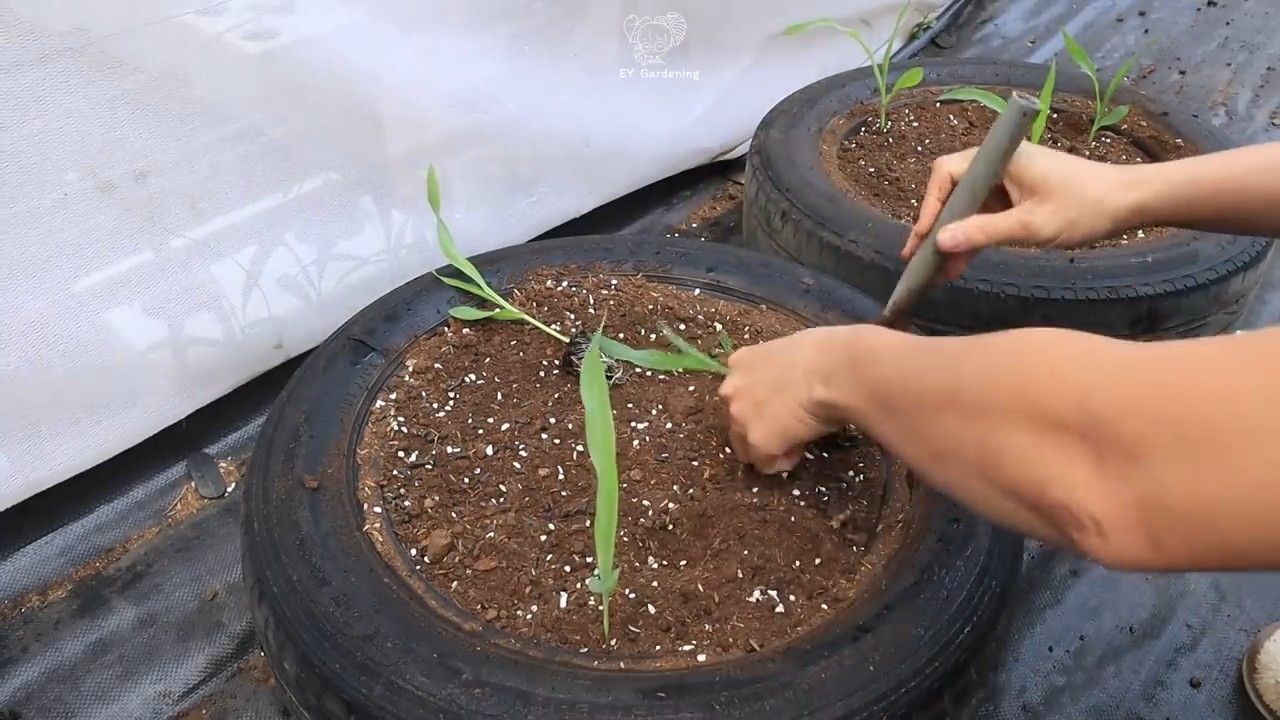
2. Die Samen säen: Legt 3-4 Samen pro Topf etwa 2-3 cm tief in die Erde. Achtet darauf, dass die Samen gleichmäßig verteilt sind.
3. Mit Erde bedecken: Bedeckt die Samen mit Erde und drückt sie leicht an.
4. Angießen: Gießt die Erde vorsichtig an, sodass sie gut durchfeuchtet ist. Vermeidet Staunässe.
5. Warm und hell stellen: Stellt den Topf an einen warmen und hellen Ort. Die ideale Keimtemperatur liegt bei 20-25 Grad Celsius.
Die Pflege: Damit euer Mais prächtig gedeiht
Nach der Aussaat beginnt die eigentliche Arbeit: die Pflege eurer Maispflanzen. Hier sind die wichtigsten Punkte, die ihr beachten solltet:
1. Bewässerung: Mais braucht regelmäßig Wasser, besonders während der Wachstums- und Blütezeit. Achtet darauf, dass die Erde immer feucht ist, aber vermeidet Staunässe. Gießt am besten morgens oder abends, um Verbrennungen durch die Sonne zu vermeiden.
2. Düngung: Mais ist ein Starkzehrer und braucht viele Nährstoffe. Düngt eure Pflanzen regelmäßig mit einem Langzeitdünger oder Flüssigdünger für Gemüse. Beginnt mit der Düngung etwa 2-3 Wochen nach dem Aufgang der Pflanzen.
3. Unkraut entfernen: Haltet den Topf frei von Unkraut, damit eure Maispflanzen genügend Nährstoffe und Platz haben.
4. Stützen: Wenn die Pflanzen größer werden, kann es notwendig sein, sie mit Pflanzstäben oder Bambusstäben zu stützen, besonders bei Wind.
5. Bestäubung: Mais ist auf Windbestäubung angewiesen. Wenn ihr nur wenige Pflanzen habt, könnt ihr die Bestäubung unterstützen, indem ihr die männlichen Blütenstände (die Fahnen oben an der Pflanze) vorsichtig schüttelt, um den Pollen freizusetzen.
Schädlinge und Krankheiten: Was tun, wenn es Probleme gibt?
Auch beim Anbau von Mais im Topf können Schädlinge und Krankheiten auftreten. Hier sind einige der häufigsten Probleme und wie ihr sie bekämpfen könnt:
* Blattläuse: Blattläuse saugen an den Blättern und können das Wachstum der Pflanzen beeinträchtigen. Ihr könnt sie mit einem Wasserstrahl abspritzen oder mit einem biologischen Insektizid bekämpfen.
* Maisbeulenbrand: Maisbeulenbrand ist eine Pilzkrankheit, die zu unansehnlichen Wucherungen an den Kolben führt. Befallene Kolben sollten entfernt und entsorgt werden.
* Maiszünsler: Der Maiszünsler ist ein Schmetterling, dessen Raupen sich in die Stängel und Kolben bohren. Ihr könnt ihn mit einem biologischen Insektizid bekämpfen oder die befallenen Pflanzenteile entfernen.
Die Ernte: Der Lohn für eure Mühe
Nach etwa 80-100 Tagen ist es endlich soweit: Die Erntezeit ist gekommen!
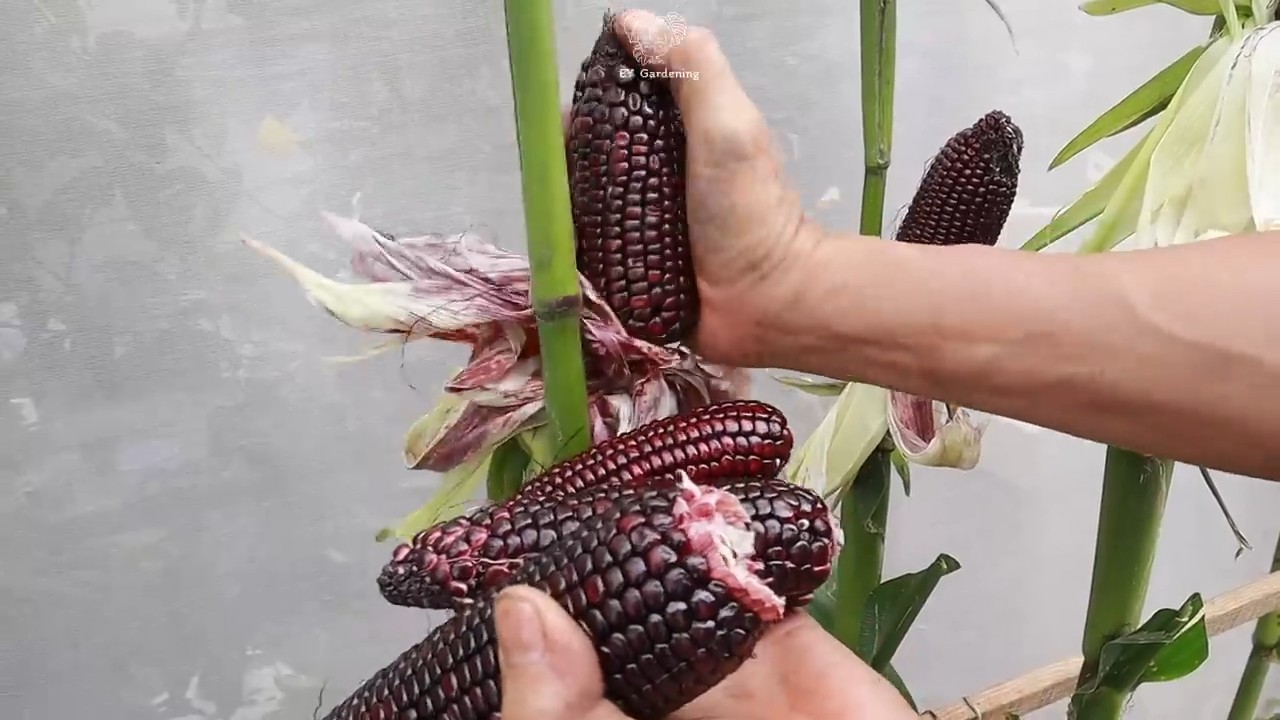
1. Den richtigen Zeitpunkt erkennen: Die Kolben sind reif, wenn die Hüllblätter trocken und braun werden und die Körner prall und fest sind.
2. Die Kolben ernten: Brecht die Kolben vorsichtig von der Pflanze ab.
3. Die Kolben trocknen: Lasst die Kolben einige Tage an einem trockenen und luftigen Ort trocknen.
4. Die Körner entfernen: Entfernt die Körner von den Kolben.
5. Die Körner lagern: Lagert die Körner in einem luftdichten Behälter an einem kühlen und trockenen Ort.
Verwendung des schwarzen Maises: Vielseitig und lecker
Schwarzer Mais ist nicht nur schön anzusehen, sondern auch vielseitig verwendbar. Ihr könnt ihn kochen, grillen, zu Mehl verarbeiten oder für Tortillas verwenden. Der Geschmack ist leicht süßlich und nussig.
Rezeptidee: Schwarzer Mais vom Grill
1. Die Maiskolben in Salzwasser kochen, bis sie gar sind.
2. Die Kolben mit Öl bestreichen und auf dem Grill goldbraun grillen.
3. Mit Salz, Pfeffer und Kräutern nach Geschmack würzen.
Guten Appetit!
Ich hoffe, diese Anleitung hat euch geholfen und ihr habt bald euren eigenen schwarzen Mais im Topf. Viel Spaß beim Gärtnern!
Conclusion
So, there you have it! Growing black corn in pots isn’t just a quirky gardening experiment; it’s a rewarding journey that culminates in a stunning visual display and a unique culinary experience. Forget the bland, predictable yellow corn – imagine the vibrant contrast of deep purple-black kernels against the backdrop of your patio or balcony. This isn’t just about growing food; it’s about adding a touch of artistry to your outdoor space and impressing your friends and family with your gardening prowess.
Why is this DIY trick a must-try? Because it democratizes the experience of growing your own food. You don’t need acres of farmland to enjoy the satisfaction of harvesting your own corn. Even if you’re limited to a small apartment balcony, you can still cultivate these beautiful and nutritious kernels. It’s also a fantastic educational opportunity, especially for children. They can witness the entire life cycle of a plant, from seed to harvest, and learn about the importance of sustainable food practices.
Beyond the visual appeal and educational value, growing black corn in pots offers a unique culinary advantage. The kernels have a slightly nutty, earthy flavor that sets them apart from traditional sweet corn. They’re perfect for grilling, roasting, or even grinding into a distinctive cornmeal for tortillas or polenta. Imagine serving up a batch of black corn tortillas at your next taco night – your guests will be amazed!
Looking for variations? Absolutely! Experiment with different pot sizes to see how it affects the yield. Try companion planting with herbs like basil or marigolds to deter pests and attract pollinators. You can also explore different varieties of black corn, such as ‘Black Aztec’ or ‘Cherokee Black,’ each with its own unique characteristics. Consider adding a slow-release fertilizer specifically formulated for corn to ensure optimal growth and kernel development. And don’t be afraid to get creative with your container design – use colorful pots or even repurposed containers to add a personal touch to your garden.
We strongly encourage you to give this DIY trick a try. It’s easier than you might think, and the rewards are well worth the effort. From the satisfaction of nurturing a plant from seed to the delight of harvesting your own unique crop, growing black corn in pots is an experience you won’t soon forget.
But don’t just take our word for it! We want to hear about your experiences. Share your photos, tips, and challenges in the comments below. Let’s build a community of black corn enthusiasts and learn from each other’s successes and failures. Together, we can unlock the secrets to growing the most beautiful and delicious corn right in our own backyards (or balconies!). So, grab your seeds, pots, and potting mix, and get ready to embark on a rewarding gardening adventure. Happy growing!
Frequently Asked Questions (FAQ)
What exactly *is* black corn, and is it safe to eat?
Black corn, also known as purple corn or blue corn depending on the specific variety, is a type of corn that gets its distinctive color from high levels of anthocyanins. Anthocyanins are powerful antioxidants also found in blueberries, blackberries, and other dark-colored fruits and vegetables. These antioxidants are known for their potential health benefits, including reducing inflammation and protecting against certain diseases. So, yes, black corn is absolutely safe to eat and is, in fact, a nutritious and delicious alternative to traditional yellow corn. It often has a slightly nuttier and earthier flavor profile.
What size pot is best for growing black corn?
The ideal pot size for growing black corn is at least 12 inches in diameter and 12 inches deep. However, larger pots (15-18 inches) are even better, as they provide more room for the roots to grow and allow for better water retention. Remember that corn plants can get quite tall, so a sturdy pot is essential to prevent them from tipping over in windy conditions. If you’re planning on growing multiple corn stalks in the same pot, opt for an even larger container to ensure each plant has enough space to thrive. A good rule of thumb is to allow at least 6 inches of space between each plant.
What type of soil should I use for growing black corn in pots?
Black corn thrives in well-draining, fertile soil. A good potting mix specifically formulated for vegetables is an excellent choice. You can also create your own mix by combining equal parts of potting soil, compost, and perlite or vermiculite. The compost will provide essential nutrients, while the perlite or vermiculite will improve drainage and aeration. Avoid using garden soil in pots, as it tends to compact and doesn’t drain well, which can lead to root rot.
How often should I water my black corn plants?
Watering frequency depends on several factors, including the weather, pot size, and soil type. Generally, you should water your black corn plants whenever the top inch of soil feels dry to the touch. During hot, dry weather, you may need to water them daily. Be sure to water deeply, allowing the water to drain out of the bottom of the pot. Avoid overwatering, as this can lead to root rot. A good way to check if your plants need water is to stick your finger into the soil – if it feels dry, it’s time to water.
How much sunlight do black corn plants need?
Black corn plants need at least 6-8 hours of direct sunlight per day to thrive. Choose a sunny location for your pots, such as a south-facing balcony or patio. If you live in a particularly hot climate, you may need to provide some afternoon shade to prevent the plants from getting scorched. If you don’t have access to enough natural sunlight, you can supplement with grow lights.
Do I need to fertilize my black corn plants?
Yes, black corn plants are heavy feeders and benefit from regular fertilization. Use a balanced fertilizer (e.g., 10-10-10) or a fertilizer specifically formulated for vegetables. Follow the instructions on the fertilizer package for application rates. You can also supplement with organic fertilizers, such as compost tea or fish emulsion. Fertilize your plants every 2-3 weeks during the growing season.
How do I pollinate my black corn plants if they’re grown in pots?
Corn is wind-pollinated, so if you’re growing your plants indoors or in a sheltered location, you may need to hand-pollinate them. To do this, gently shake the tassels (the male flowers at the top of the plant) to release the pollen. Then, use a small brush or cotton swab to collect the pollen and transfer it to the silks (the female flowers that emerge from the developing ears of corn). Repeat this process every day for several days to ensure proper pollination. You can also gently shake the entire plant to help distribute the pollen.
When is black corn ready to harvest?
Black corn is typically ready to harvest about 60-90 days after planting, depending on the variety and growing conditions. The silks will turn brown and dry, and the kernels will be plump and filled with milky liquid. To test for ripeness, peel back a portion of the husk and puncture a kernel with your fingernail. If the liquid is milky, the corn is ready to harvest. If it’s clear, it needs more time.
Can I save seeds from my black corn to plant next year?
Yes, you can save seeds from your black corn, but keep in mind that if you’re growing multiple varieties of corn in the same area, there’s a chance of cross-pollination, which could result in hybrid seeds that don’t produce true-to-type plants. To save seeds, allow the ears of corn to dry completely on the plant. Once they’re dry, remove the kernels from the cob and store them in an airtight container in a cool, dry place.
What are some common pests and diseases that affect black corn, and how can I prevent them?
Common pests that affect black corn include corn earworms, aphids, and spider mites. Diseases include corn smut and leaf blight. To prevent these problems, practice good garden hygiene, such as removing weeds and debris around your plants. You can also use organic pest control methods, such as insecticidal soap or neem oil. Ensure proper air circulation to prevent fungal diseases. Regularly inspect your plants for signs of pests or diseases and take action promptly.
Leave a Comment