
Growing Brussels Sprouts Home can seem daunting, right? I get it! Those tightly packed little cabbages on a stalk look like they belong in a professional farm, not your backyard. But trust me, with a few simple tricks and a little DIY spirit, you can absolutely cultivate these nutritional powerhouses yourself. Forget the bland, overcooked Brussels sprouts you might remember from childhood; homegrown ones are bursting with fresh, nutty flavor!
For centuries, Brussels sprouts have been a staple in European cuisine, particularly in Belgium (hence the name!). They were likely cultivated in their modern form around the 13th century. Imagine the satisfaction of connecting with that long history by growing your own!
Why bother with the effort? Well, store-bought Brussels sprouts can be expensive and often lack the vibrant taste of freshly harvested ones. Plus, growing Brussels Sprouts Home allows you to control exactly what goes into your food – no pesticides or mystery ingredients! This DIY guide will equip you with the knowledge to nurture your own thriving Brussels sprouts patch, from seed to harvest. We’ll cover everything from choosing the right variety to protecting your plants from pests, ensuring a bountiful and delicious crop. Let’s get started!
DIY: Rosenkohl Anbauen – Dein eigener kleiner Garten
Hallo Gartenfreunde! Ich liebe frischen Rosenkohl, und was gibt es Besseres, als ihn selbst anzubauen? Es ist einfacher, als du vielleicht denkst, und das Ergebnis ist einfach köstlich. In diesem Artikel zeige ich dir Schritt für Schritt, wie du deinen eigenen Rosenkohl anbauen kannst. Los geht’s!
Was du brauchst:
* Rosenkohlsamen oder Jungpflanzen
* Anzuchttöpfe (falls du mit Samen startest)
* Anzuchterde (falls du mit Samen startest)
* Gartenhandschuhe
* Gartenschaufel oder Spaten
* Kompost oder gut verrotteter Mist
* Gartenkalk (optional, je nach Bodenbeschaffenheit)
* Pflanzstäbe (zur Unterstützung der Pflanzen)
* Gießkanne oder Gartenschlauch
* Schutznetz gegen Schädlinge (optional, aber sehr empfehlenswert)
Der richtige Zeitpunkt:
Rosenkohl braucht eine lange Wachstumsperiode und verträgt Frost. Daher ist der beste Zeitpunkt für die Aussaat oder das Pflanzen:
* **Aussaat im Haus:** Ab März/April für eine frühe Ernte.
* **Direktsaat im Freien:** Ab Mai/Juni.
* **Pflanzung von Jungpflanzen:** Ab Mai/Juni.
Aussaat (falls du mit Samen startest):
1. Vorbereitung der Anzuchttöpfe: Fülle die Anzuchttöpfe mit Anzuchterde. Drücke die Erde leicht an.
2. Aussaat der Samen: Lege 2-3 Samen pro Topf in die Erde. Bedecke die Samen mit einer dünnen Schicht Erde (ca. 0,5 cm).
3. Bewässerung: Gieße die Erde vorsichtig an, sodass sie feucht, aber nicht nass ist.
4. Standort: Stelle die Anzuchttöpfe an einen hellen und warmen Ort (z.B. Fensterbank).
5. Feuchtigkeit: Halte die Erde feucht, indem du sie regelmäßig besprühst oder gießt.
6. Keimung: Die Samen keimen in der Regel innerhalb von 7-14 Tagen.
7. Pikieren: Sobald die Sämlinge 2-3 echte Blätter haben, kannst du sie pikieren. Das bedeutet, du setzt die stärksten Sämlinge in größere Töpfe um, damit sie mehr Platz zum Wachsen haben.
Vorbereitung des Bodens:
Rosenkohl ist ein Starkzehrer und benötigt einen nährstoffreichen Boden. Eine gute Vorbereitung ist daher entscheidend für eine reiche Ernte.
1. Standortwahl: Wähle einen sonnigen Standort für deinen Rosenkohl. Er braucht mindestens 6 Stunden Sonne pro Tag.
2. Bodenbearbeitung: Lockere den Boden gründlich auf. Entferne Unkraut, Steine und Wurzeln.
3. Bodenverbesserung: Arbeite Kompost oder gut verrotteten Mist in den Boden ein. Das verbessert die Bodenstruktur und versorgt den Rosenkohl mit wichtigen Nährstoffen.
4. Kalken (optional): Rosenkohl bevorzugt einen leicht alkalischen Boden (pH-Wert zwischen 6,5 und 7,5). Wenn dein Boden zu sauer ist, kannst du ihn mit Gartenkalk aufbessern. Eine Bodenanalyse gibt dir Aufschluss über den pH-Wert deines Bodens.
Pflanzung:
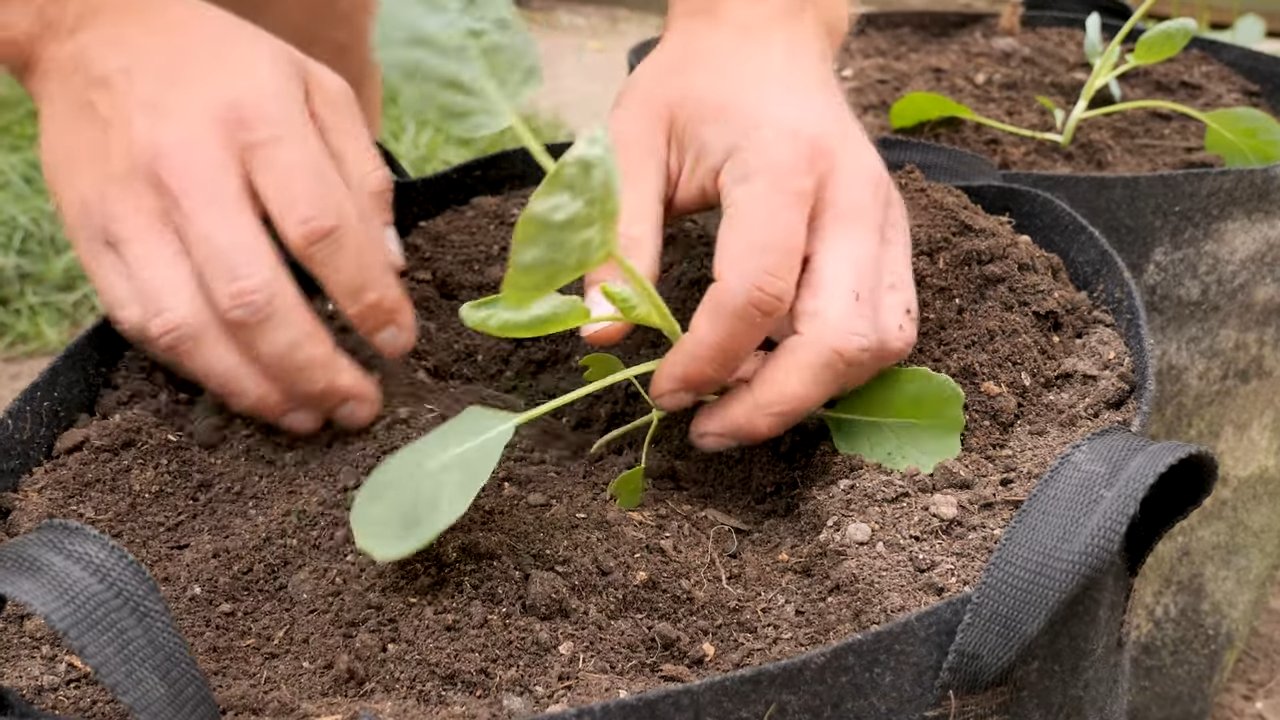
Egal, ob du Jungpflanzen gekauft oder selbst vorgezogen hast, die Pflanzung ist ein wichtiger Schritt.
1. Abhärten der Jungpflanzen: Bevor du die Jungpflanzen ins Freie setzt, solltest du sie abhärten. Das bedeutet, du stellst sie für einige Tage tagsüber ins Freie und holst sie nachts wieder rein. So gewöhnen sie sich langsam an die Bedingungen im Garten.
2. Pflanzabstand: Pflanze die Rosenkohlpflanzen im Abstand von 60-75 cm zueinander. Zwischen den Reihen sollte ein Abstand von 75-90 cm sein.
3. Pflanzlöcher: Grabe Pflanzlöcher, die etwas größer sind als die Wurzelballen der Pflanzen.
4. Pflanzung: Setze die Pflanzen in die Pflanzlöcher und fülle sie mit Erde auf. Drücke die Erde leicht an. Achte darauf, dass der Wurzelhals der Pflanze nicht mit Erde bedeckt ist.
5. Bewässerung: Gieße die Pflanzen nach dem Pflanzen gründlich an.
6. Pflanzstäbe: Setze Pflanzstäbe neben die Pflanzen, um sie zu stützen. Rosenkohl kann sehr hoch werden und bei Wind umknicken.
Pflege:
Rosenkohl braucht regelmäßige Pflege, um gut zu wachsen und eine reiche Ernte zu bringen.
1. Bewässerung: Gieße den Rosenkohl regelmäßig, besonders in trockenen Perioden. Achte darauf, dass die Erde immer feucht, aber nicht nass ist.
2. Düngung: Dünge den Rosenkohl regelmäßig mit einem organischen Dünger. Du kannst zum Beispiel Kompost oder Hornspäne verwenden. Eine zusätzliche Düngung mit Brennnesseljauche ist ebenfalls sehr empfehlenswert.
3. Unkrautbekämpfung: Entferne regelmäßig Unkraut, das um den Rosenkohl wächst. Unkraut konkurriert mit dem Rosenkohl um Nährstoffe und Wasser.
4. Häufeln: Häufle die Pflanzen regelmäßig an. Das bedeutet, du schiebst Erde um die Stängel der Pflanzen. Das fördert die Wurzelbildung und stabilisiert die Pflanzen.
5. Ausgeizen: Entferne die unteren Blätter der Pflanzen, sobald sie gelb werden. Das fördert die Bildung der Rosenkohlköpfe.
6. Schutz vor Schädlingen: Rosenkohl ist anfällig für verschiedene Schädlinge, wie zum Beispiel Kohlweißlinge, Erdflöhe und Kohlfliegen. Schütze deine Pflanzen mit einem Schutznetz. Du kannst auch natürliche Schädlingsbekämpfungsmittel verwenden, wie zum Beispiel Neemöl oder Bacillus thuringiensis.
Schutz vor Schädlingen im Detail:
Rosenkohl kann von verschiedenen Schädlingen befallen werden. Hier sind einige der häufigsten Schädlinge und wie du sie bekämpfen kannst:
* Kohlweißling: Die Raupen des Kohlweißlings fressen die Blätter des Rosenkohls. Du kannst die Raupen absammeln oder ein Schutznetz über die Pflanzen spannen. Bacillus thuringiensis ist ein biologisches Insektizid, das gegen Kohlweißlingsraupen wirksam ist.
* Erdflöhe: Erdflöhe sind kleine Käfer, die Löcher in die Blätter des Rosenkohls fressen. Du kannst die Pflanzen mit einem Schutznetz schützen oder sie regelmäßig mit Wasser besprühen. Erdflöhe mögen keine feuchte Umgebung.
* Kohlfliege: Die Larven der Kohlfliege fressen an den Wurzeln des Rosenkohls. Du kannst die Pflanzen mit einem Kohlkragen schützen. Das ist eine Art Manschette, die um den Stängel der Pflanze gelegt wird und verhindert, dass die Kohlfliege ihre Eier in die Erde legt.
* Blattläuse: Blattläuse saugen Pflanzensaft und können den Rosenkohl schwächen. Du kannst die Blattläuse mit einem Wasserstrahl abspritzen oder mit einem natürlichen Insektizid bekämpfen. Neemöl ist ein wirksames Mittel gegen Blattläuse.
* Schnecken: Schnecken können ebenfalls an den Blättern des Rosenkohls fressen. Du kannst Schneckenkorn verwenden oder Schneckenfallen aufstellen.
Ernte:
Die Erntezeit für Rosenkohl ist von November bis Januar.
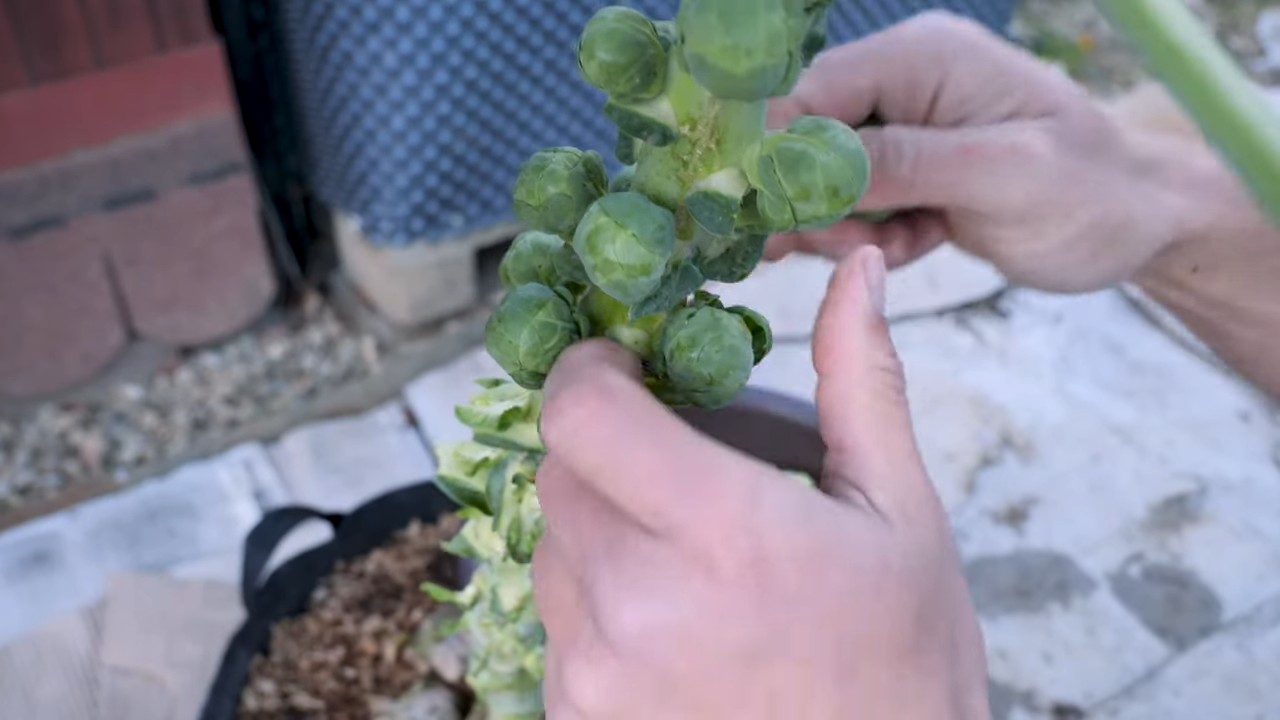
1. Erntezeitpunkt: Die Rosenkohlköpfe sind erntereif, wenn sie fest und geschlossen sind. Sie sollten etwa 2-4 cm groß sein.
2. Erntemethode: Breche die Rosenkohlköpfe von unten nach oben ab. Die unteren Köpfe reifen zuerst.
3. Lagerung: Rosenkohl kann im Kühlschrank für einige Tage gelagert werden. Du kannst ihn auch einfrieren.
Zusätzliche Tipps:
* Fruchtfolge: Pflanze Rosenkohl nicht jedes Jahr am selben Standort. Wechsle die Anbaufläche, um Krankheiten und Schädlingen vorzubeugen.
Conclusion
So, there you have it! Growing Brussels sprouts at home isn’t just a gardening project; it’s an investment in fresh, flavorful, and incredibly rewarding meals. Forget the bland, often bitter sprouts you might find at the grocery store. When you cultivate your own, you control the entire process, from soil quality to harvest time, resulting in Brussels sprouts bursting with a sweetness and nutty flavor you simply can’t replicate otherwise.
This DIY approach offers a level of satisfaction that goes beyond just having fresh vegetables. It’s about connecting with nature, understanding the growing cycle, and appreciating the effort that goes into producing your own food. Plus, it’s a fantastic way to reduce your carbon footprint and contribute to a more sustainable lifestyle.
But the benefits don’t stop there. Growing your own Brussels sprouts allows for experimentation and customization. Want to try a different variety? Go for it! There are numerous cultivars available, each with its own unique characteristics. Some are more cold-hardy, others mature earlier, and some even boast vibrant colors. Consider trying ‘Long Island Improved’ for a classic flavor, or ‘Redarling’ for a visually stunning addition to your garden and plate.
Furthermore, you can tailor your growing practices to suit your specific needs and preferences. Organic gardening enthusiasts can focus on using natural fertilizers and pest control methods, ensuring a truly wholesome harvest. Those with limited space can explore container gardening options, bringing the joy of growing Brussels sprouts to even the smallest balconies or patios.
Don’t be intimidated by the perceived complexity of growing Brussels sprouts. While they do require some attention and care, the process is surprisingly straightforward, especially with the tips and techniques outlined in this guide. Remember to provide them with plenty of sunlight, well-drained soil, and consistent watering. Protect them from pests like cabbage worms and aphids, and be patient as they mature.
And speaking of patience, the reward is well worth the wait. Imagine the satisfaction of harvesting your own Brussels sprouts on a crisp autumn day, knowing that you nurtured them from tiny seedlings to plump, flavorful vegetables. Picture the delicious meals you can create with your homegrown bounty – roasted Brussels sprouts with balsamic glaze, sautéed Brussels sprouts with bacon, or even shaved Brussels sprouts salads with cranberries and pecans.
We strongly encourage you to give this DIY trick a try. Start small, perhaps with just a few plants, and gradually expand your growing operation as you gain experience. Don’t be afraid to experiment with different varieties and growing techniques. And most importantly, don’t be discouraged by setbacks. Gardening is a learning process, and even experienced gardeners encounter challenges along the way.
Once you’ve harvested your first crop of homegrown Brussels sprouts, we’d love to hear about your experience. Share your successes, your challenges, and your favorite recipes in the comments below. Let’s create a community of passionate Brussels sprouts growers and inspire others to embrace the joy of growing their own food. So, grab your gardening gloves, get your hands dirty, and embark on this rewarding journey of growing Brussels sprouts at home. You won’t regret it!
Frequently Asked Questions (FAQ)
How long does it take to grow Brussels sprouts from seed to harvest?
Generally, Brussels sprouts require a long growing season, typically ranging from 80 to 120 days from transplanting seedlings. Starting seeds indoors 4-6 weeks before the last expected frost can give you a head start. The exact time will depend on the variety you choose and your local climate. Keep a close eye on the sprouts as they develop; they are ready to harvest when the sprouts are firm, green, and about 1 to 1.5 inches in diameter.
What are the best conditions for growing Brussels sprouts?
Brussels sprouts thrive in cool weather, ideally with temperatures between 60°F and 75°F (15°C and 24°C). They need at least 6 hours of direct sunlight per day. The soil should be well-drained, fertile, and rich in organic matter. A slightly acidic to neutral soil pH (6.0 to 7.0) is ideal. Amend the soil with compost or well-rotted manure before planting to improve drainage and fertility.
What are some common pests and diseases that affect Brussels sprouts, and how can I prevent them?
Brussels sprouts are susceptible to several pests and diseases, including cabbage worms, aphids, clubroot, and downy mildew. To prevent these problems, practice crop rotation, choose disease-resistant varieties, and inspect your plants regularly for signs of infestation or disease.
* **Cabbage worms:** These caterpillars can decimate your plants. Handpick them off the plants or use Bacillus thuringiensis (Bt), a natural insecticide.
* **Aphids:** These tiny insects suck sap from the plants, weakening them. Spray them with a strong stream of water or use insecticidal soap.
* **Clubroot:** This soilborne disease causes swollen roots and stunted growth. Prevent it by maintaining a proper soil pH and avoiding planting brassicas in the same spot year after year.
* **Downy mildew:** This fungal disease causes yellow spots on the leaves. Improve air circulation around the plants and avoid overhead watering to prevent it.
Can I grow Brussels sprouts in containers?
Yes, you can grow Brussels sprouts in containers, but you’ll need a large container, at least 12 inches in diameter and 12 inches deep, to accommodate their root system. Choose a well-draining potting mix and provide regular watering and fertilization. Container-grown Brussels sprouts may require more frequent watering than those grown in the ground.
How often should I water Brussels sprouts?
Brussels sprouts need consistent watering, especially during dry periods. Water deeply whenever the top inch of soil feels dry to the touch. Avoid overhead watering, as this can promote fungal diseases. Mulching around the plants can help retain moisture and suppress weeds.
When is the best time to harvest Brussels sprouts?
Brussels sprouts are typically harvested in the fall or early winter, after they have been exposed to a few light frosts. Frosts actually improve the flavor of the sprouts, making them sweeter and less bitter. Harvest the sprouts from the bottom of the stalk upwards, as they mature. Twist or snap them off the stalk when they are firm and green.
Can I freeze Brussels sprouts?
Yes, you can freeze Brussels sprouts for later use. To freeze them, blanch them in boiling water for 3-5 minutes, then plunge them into ice water to stop the cooking process. Drain them well and pack them into freezer bags or containers. Frozen Brussels sprouts can be stored for up to 12 months.
What are some delicious ways to cook Brussels sprouts?
Brussels sprouts are incredibly versatile and can be cooked in many different ways. Some popular methods include roasting, sautéing, steaming, and grilling. They can be served as a side dish or incorporated into salads, soups, and stir-fries. Try roasting them with balsamic glaze, sautéing them with bacon, or shaving them into a salad with cranberries and pecans. The possibilities are endless!
How do I encourage the sprouts to form tightly on the stalk?
Pinching out the top of the plant (the terminal bud) about a month before the expected harvest can encourage the sprouts to mature more evenly and tightly on the stalk. This redirects the plant’s energy into developing the sprouts rather than producing more leaves.
Are there different varieties of Brussels sprouts I should consider?
Absolutely! Exploring different varieties is part of the fun. ‘Long Island Improved’ is a classic, reliable choice. ‘Jade Cross’ is known for its high yields and disease resistance. ‘Redarling’ offers beautiful red-purple sprouts that add visual appeal. ‘Diablo’ is a newer variety that matures early and produces uniform sprouts. Research different varieties to find one that suits your climate and taste preferences.


Leave a Comment