
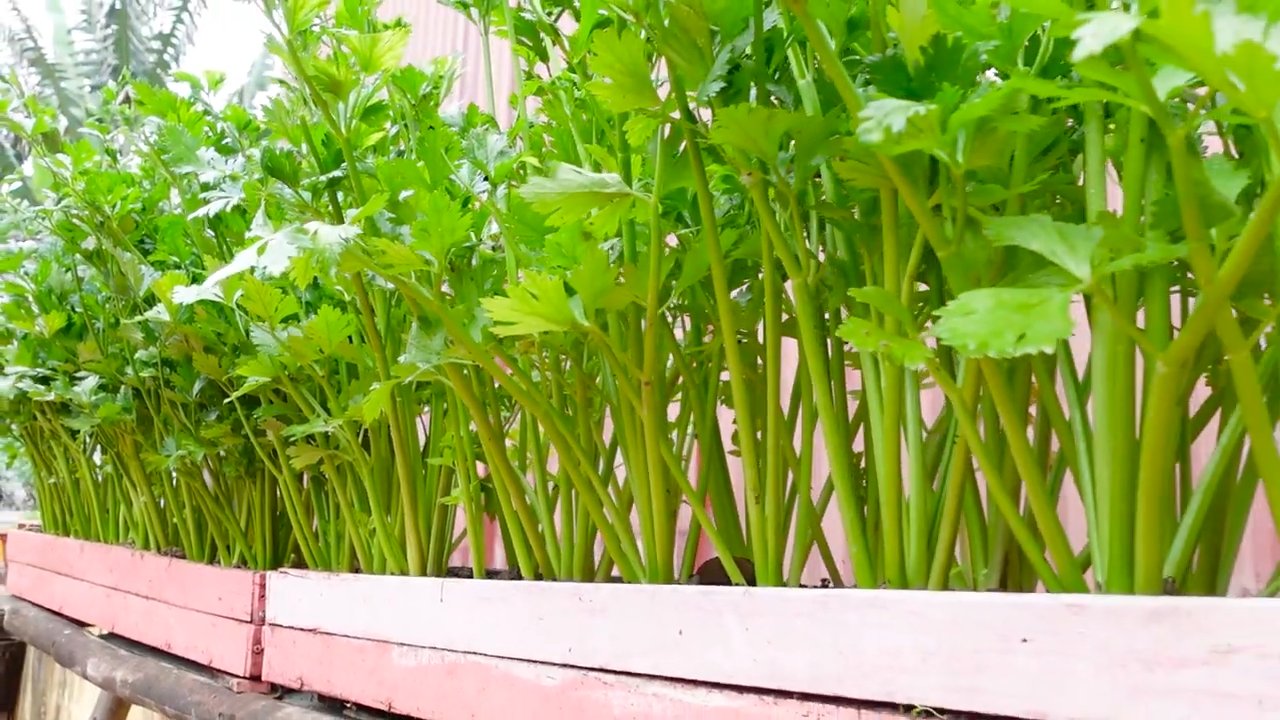
Growing celery along a fence? Sounds a bit unconventional, right? But trust me, this simple DIY trick can revolutionize your home garden! For centuries, gardeners have sought clever ways to maximize space and yield, and this method is a modern twist on that age-old quest. Think of it – a lush, green celery wall, adding beauty and fresh produce to your outdoor space.
Why should you consider this? Well, let’s face it, many of us are short on garden space. Apartment balconies, small backyards, or even just a desire to keep things tidy can limit our gardening ambitions. This DIY hack allows you to utilize vertical space, turning an ordinary fence into a productive and visually appealing feature. Plus, growing celery along a fence provides natural support for the stalks, preventing them from sprawling and becoming unruly. It’s a win-win! I’m excited to share this easy and effective method with you, so you can enjoy fresh, homegrown celery, no matter how limited your space may be. Let’s get started and transform your fence into a celery-growing haven!
Zellereianbau am Zaun: Ein DIY-Leitfaden für vertikalen Gemüseanbau
Hallo liebe Gartenfreunde! Habt ihr wenig Platz im Garten, aber trotzdem Lust auf frischen, knackigen Sellerie? Dann habe ich heute genau das Richtige für euch: Wir bauen Sellerie vertikal an einem Zaun an! Das spart nicht nur Platz, sondern sieht auch noch richtig cool aus. Ich zeige euch, wie es geht!
Warum Sellerie am Zaun anbauen?
* Platzsparend: Perfekt für kleine Gärten, Balkone oder Terrassen.
* Schädlingsbekämpfung: Durch die erhöhte Position sind die Pflanzen weniger anfällig für Schnecken und andere Schädlinge.
* Bessere Belüftung: Die Luft kann besser zirkulieren, was das Risiko von Pilzkrankheiten reduziert.
* Dekorativ: Ein grüner Selleriezaun ist ein echter Hingucker.
* Ernteerleichterung: Das Ernten ist bequemer, da man sich nicht so tief bücken muss.
Was ihr braucht:
* Selleriepflanzen: Am besten Jungpflanzen aus dem Gartencenter oder selbst vorgezogene.
* Zaun: Ein stabiler Zaun, der das Gewicht der Pflanzen und der Erde tragen kann. Ein Maschendrahtzaun oder ein Holzzaun eignen sich gut.
* Pflanzgefäße: Hängekörbe, Pflanztaschen oder selbstgebaute Behälter aus alten Plastikflaschen oder Eimern.
* Pflanzerde: Hochwertige Gemüseerde, die gut Wasser speichert und Nährstoffe abgibt.
* Kokosfaser oder Blähton: Zur Drainage in den Pflanzgefäßen.
* Dünger: Organischer Gemüsedünger oder Kompost.
* Gießkanne oder Gartenschlauch: Zum Bewässern der Pflanzen.
* Werkzeug: Schere, Spaten, eventuell Bohrmaschine und Schrauben (je nach Art der Befestigung der Pflanzgefäße).
* Handschuhe: Zum Schutz der Hände.
Schritt-für-Schritt-Anleitung: Sellerie-Zaun anlegen
1. Vorbereitung des Zauns
1. Zaun prüfen: Stellt sicher, dass euer Zaun stabil genug ist, um das Gewicht der Pflanzgefäße und der Erde zu tragen. Verstärkt ihn gegebenenfalls.
2. Reinigen: Entfernt eventuelle Verschmutzungen, Algen oder Moos vom Zaun.
3. Abstand markieren: Legt fest, in welchem Abstand ihr die Pflanzgefäße anbringen möchtet. Ich empfehle einen Abstand von etwa 30-40 cm, damit die Selleriepflanzen genügend Platz zum Wachsen haben. Markiert die Stellen mit einem Stift oder Klebeband.
2. Pflanzgefäße vorbereiten
1. Gefäße auswählen: Entscheidet euch für die Art der Pflanzgefäße, die ihr verwenden möchtet. Hängekörbe sind eine einfache Lösung, Pflanztaschen bieten mehr Platz für die Wurzeln, und selbstgebaute Behälter sind eine kostengünstige Alternative.
2. Drainage anlegen: Füllt den Boden der Pflanzgefäße mit einer Schicht Kokosfaser oder Blähton, um Staunässe zu vermeiden. Das ist super wichtig, damit die Wurzeln nicht faulen!
3. Erde einfüllen: Füllt die Pflanzgefäße mit hochwertiger Gemüseerde. Lasst etwa 2-3 cm Platz bis zum Rand.
3. Selleriepflanzen vorbereiten
1. Pflanzen wässern: Taucht die Selleriepflanzen vor dem Einpflanzen in einen Eimer mit Wasser, bis der Wurzelballen gut durchfeuchtet ist.
2. Pflanzen aus dem Topf nehmen: Drückt vorsichtig auf den Topf, um die Pflanze herauszulösen. Achtet darauf, die Wurzeln nicht zu beschädigen.
3. Wurzelballen lockern: Lockert den Wurzelballen vorsichtig mit den Fingern auf, um das Anwachsen zu erleichtern.
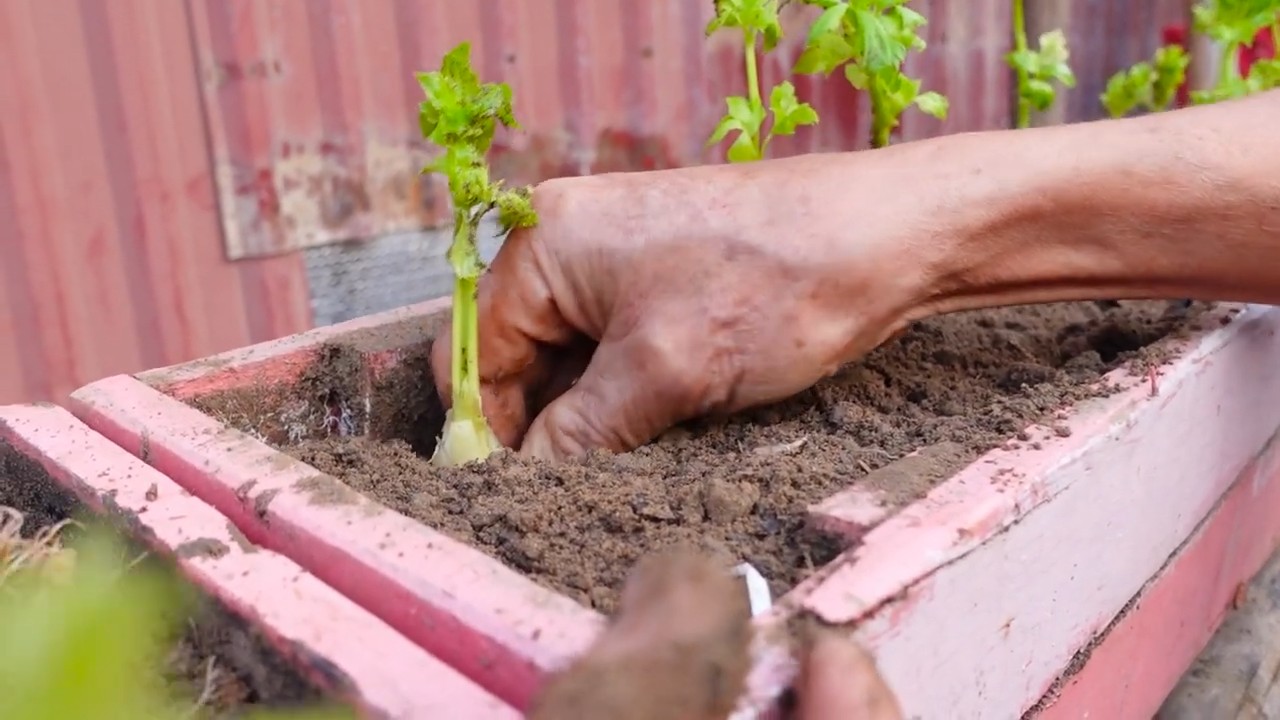
4. Sellerie einpflanzen
1. Pflanzloch graben: Grabt in der Erde in den Pflanzgefäßen ein kleines Loch, das groß genug für den Wurzelballen der Selleriepflanze ist.
2. Pflanze einsetzen: Setzt die Selleriepflanze in das Loch und füllt es mit Erde auf. Achtet darauf, dass der Wurzelballen vollständig mit Erde bedeckt ist.
3. Andrücken: Drückt die Erde um die Pflanze herum leicht an.
4. Gießen: Gießt die Selleriepflanzen nach dem Einpflanzen gründlich an.
5. Pflanzgefäße am Zaun befestigen
1. Befestigungsmethode wählen: Je nach Art der Pflanzgefäße und des Zauns gibt es verschiedene Möglichkeiten, die Gefäße zu befestigen. Hängekörbe können einfach an den Zaun gehängt werden. Pflanztaschen können mit Haken oder Kabelbindern befestigt werden. Selbstgebaute Behälter können mit Schrauben oder Draht befestigt werden.
2. Gefäße befestigen: Befestigt die Pflanzgefäße in dem zuvor markierten Abstand am Zaun. Achtet darauf, dass die Gefäße sicher und stabil befestigt sind.
3. Kontrollieren: Überprüft, ob alle Gefäße fest sitzen und nicht herunterfallen können.
6. Pflege des Sellerie-Zauns
1. Bewässerung: Sellerie braucht regelmäßig Wasser, besonders an heißen Tagen. Gießt die Pflanzen am besten morgens oder abends, um Verdunstung zu vermeiden. Achtet darauf, dass die Erde immer leicht feucht ist, aber nicht nass.
2. Düngung: Düngt die Selleriepflanzen alle 2-3 Wochen mit organischem Gemüsedünger oder Kompost. Das sorgt für ein gesundes Wachstum und eine reiche Ernte.
3. Schädlingskontrolle: Kontrolliert die Pflanzen regelmäßig auf Schädlinge wie Blattläuse oder Schnecken. Entfernt Schädlinge gegebenenfalls von Hand oder mit natürlichen Schädlingsbekämpfungsmitteln.
4. Ausgeizen: Entfernt regelmäßig die Seitentriebe der Selleriepflanzen, um das Wachstum der Hauptknolle zu fördern.
5. Ernte: Sellerie kann geerntet werden, sobald die Knolle eine ausreichende Größe erreicht hat. Das ist in der Regel nach etwa 3-4 Monaten der Fall. Schneidet die Knolle mit einem scharfen Messer ab. Die Blätter können ebenfalls geerntet und in der Küche verwendet werden.
Zusätzliche Tipps für den erfolgreichen Sellerie-Anbau am Zaun
* Sonneneinstrahlung: Sellerie braucht einen sonnigen bis halbschattigen Standort. Achtet darauf, dass der Zaun genügend Sonnenlicht bekommt.
* Windschutz: Ein windgeschützter Standort ist ideal, da starker Wind die Pflanzen austrocknen kann.
* Sortenwahl: Wählt Selleriesorten, die für den Anbau in Pflanzgefäßen geeignet sind. Es gibt spezielle Zwergsorten, die weniger Platz benötigen.
* Nachbarn: Gute Nachbarn für Sellerie sind Tomaten, Gurken, Kohl und Salat. Vermeidet die Nähe zu Fenchel, da dieser das Wachstum von Sellerie hemmen kann.
* Mulchen: Eine Mulchschicht aus Stroh oder Rasenschnitt hilft, die Feuchtigkeit im Boden zu halten und Unkraut zu unterdrücken.
* Regelmäßige Kontrolle: Kontrolliert die Pflanzen regelmäßig auf Krankheiten und Schädlinge, um frühzeitig eingreifen zu können.
Häufige Probleme und Lösungen
* Gelbe Blätter: Gelbe Blätter können ein Zeichen für Nährstoffmangel sein. Düngt die Pflanzen mit einem organischen Gemüsedünger.
* Schneckenbefall: Schnecken können die Blätter des Selleries anfressen. Sammelt die Schnecken ab oder verwendet natürliche Schneckenbekämpfungsmittel.
* Pilzkrankheiten: Bei feuchtem Wetter können Pilzkrankheiten auftreten. Sorgt für eine gute Belüftung der Pflanzen und entfernt befallene Blätter.
* Wurzelfäule: Wurzelfäule entsteht
Conclusion
So, there you have it! Growing celery along a fence isn’t just a quirky gardening experiment; it’s a practical, space-saving, and aesthetically pleasing way to cultivate this crisp and refreshing vegetable. We’ve explored how this method maximizes your garden’s potential, turning an often-underutilized area into a thriving celery patch. Think about it: no more battling for precious bed space, no more struggling to keep those celery stalks upright. The fence provides natural support, protection from harsh winds, and even a bit of shade during the hottest parts of the day.
But the benefits extend beyond mere convenience. By strategically planting your celery along a fence, you’re creating a microclimate that fosters healthy growth. The fence acts as a heat sink, radiating warmth back to the plants during cooler evenings, extending your growing season. Plus, the vertical orientation improves air circulation, reducing the risk of fungal diseases that can plague traditional celery crops.
Don’t be afraid to experiment with different varieties of celery to find what thrives best in your specific climate and soil conditions. Consider planting companion herbs like parsley or cilantro nearby to attract beneficial insects and further enhance the flavor of your celery. You could even train climbing flowers like morning glories or sweet peas to grow alongside the celery, creating a beautiful and edible living wall. Imagine the vibrant colors and textures adding a touch of whimsy to your garden!
This method isn’t just for those with sprawling backyards, either. Even if you have a small patio or balcony, you can adapt this technique using containers and trellises. The key is to provide adequate support and ensure proper drainage. With a little creativity, you can enjoy fresh, homegrown celery no matter where you live.
We truly believe that growing celery along a fence is a game-changer for any gardener, regardless of experience level. It’s a simple yet effective way to boost your yield, conserve space, and add a touch of visual appeal to your outdoor space. So, what are you waiting for? Grab your seeds, find a sunny spot along your fence, and get planting!
We’re eager to hear about your experiences with this method. Did you find it easier than traditional gardening? Did you notice a difference in the quality or yield of your celery? Share your tips, tricks, and photos in the comments below. Let’s create a community of gardeners who are passionate about maximizing their space and growing delicious, healthy food. Your insights could inspire others to try this innovative technique and discover the joys of growing their own celery along a fence. Happy gardening!
Frequently Asked Questions (FAQ)
What type of fence is best for growing celery?
The ideal fence for growing celery is one that provides adequate support and allows for good air circulation. A wooden fence, chain-link fence, or even a sturdy trellis can work well. The height of the fence should be at least 2-3 feet to provide sufficient support as the celery grows taller. Avoid fences that are heavily shaded, as celery needs at least 6 hours of sunlight per day. If you’re using a chain-link fence, you might consider adding a layer of burlap or shade cloth to provide additional support and protection from the elements. Remember to consider the material of the fence as well. Some materials might leach chemicals into the soil, so opt for natural or treated wood that is safe for gardening.
How do I prepare the soil along the fence for planting celery?
Soil preparation is crucial for successful celery growth. Celery prefers rich, well-drained soil with a pH between 6.0 and 6.8. Start by removing any weeds, grass, or debris from the planting area. Then, amend the soil with plenty of organic matter, such as compost, well-rotted manure, or peat moss. This will improve drainage, aeration, and nutrient content. Work the amendments into the soil to a depth of at least 12 inches. Consider adding a slow-release fertilizer specifically formulated for vegetables to provide a steady supply of nutrients throughout the growing season. Before planting, water the soil thoroughly to ensure it’s evenly moist. You can also perform a soil test to determine if any specific nutrient deficiencies need to be addressed.
How far apart should I plant the celery seedlings along the fence?
The spacing between celery seedlings depends on the variety and your personal preference. Generally, space the seedlings about 6-8 inches apart along the fence. This will allow them enough room to grow and mature without overcrowding. If you’re planting multiple rows along the fence, space the rows about 12-18 inches apart. Remember to consider the mature size of the celery variety you’re planting. Some varieties can grow quite large, so adjust the spacing accordingly. Proper spacing is essential for good air circulation and to prevent the spread of diseases.
How often should I water celery planted along a fence?
Celery requires consistent moisture to thrive. Water deeply and regularly, especially during hot, dry weather. Aim to keep the soil consistently moist but not waterlogged. Check the soil moisture regularly by sticking your finger into the soil about an inch deep. If the soil feels dry, it’s time to water. Consider using a soaker hose or drip irrigation system to deliver water directly to the roots of the plants. Avoid overhead watering, as this can increase the risk of fungal diseases. Mulching around the plants with straw or wood chips can help retain moisture and suppress weeds.
What are some common pests and diseases that affect celery, and how can I prevent them?
Celery is susceptible to several pests and diseases, including aphids, celery leaf miners, and fungal diseases like early blight and late blight. To prevent these problems, start by choosing disease-resistant varieties. Practice good garden hygiene by removing any diseased or dead plant material promptly. Encourage beneficial insects like ladybugs and lacewings, which prey on aphids and other pests. Use insecticidal soap or neem oil to control aphids and other soft-bodied insects. Apply a fungicide to prevent or treat fungal diseases. Ensure good air circulation by spacing the plants properly and pruning any overcrowded foliage. Regularly inspect your plants for signs of pests or diseases and take action promptly to prevent them from spreading.
Can I grow celery along a fence in containers?
Yes, you can absolutely grow celery along a fence in containers! This is a great option for those with limited space or who want to grow celery on a patio or balcony. Choose containers that are at least 12 inches deep and wide to provide enough room for the roots to grow. Use a high-quality potting mix that drains well. Provide support for the celery stalks by using trellises or stakes attached to the fence. Water regularly and fertilize every few weeks with a balanced liquid fertilizer. Make sure the containers receive at least 6 hours of sunlight per day. Growing celery in containers allows you to move the plants around to optimize sunlight exposure and protect them from extreme weather conditions.
How do I blanch celery grown along a fence?
Blanching celery is a technique used to reduce the bitterness of the stalks and make them more tender. To blanch celery grown along a fence, you can use several methods. One option is to mound soil around the base of the stalks, leaving the top few inches exposed. Another option is to wrap the stalks with newspaper or cardboard, securing it with twine. You can also use specialized blanching collars that are available at garden centers. Blanch the celery for about 2-3 weeks before harvesting. This will allow the stalks to turn a lighter color and develop a milder flavor.
When is the best time to harvest celery grown along a fence?
Celery is typically ready to harvest about 80-120 days after planting, depending on the variety and growing conditions. You can harvest individual stalks as needed, or harvest the entire plant at once. To harvest, simply cut the stalks at the base of the plant with a sharp knife. The stalks should be firm, crisp, and have a good color. Avoid harvesting celery that is wilted, yellowed, or shows signs of disease. After harvesting, store the celery in the refrigerator in a plastic bag or container to keep it fresh.
Leave a Comment