
Growing Figs in Bottles: Sounds a little crazy, right? But trust me, this ingenious DIY trick will revolutionize your fig-growing game! Forget sprawling orchards and battling pesky birds; we’re bringing the Mediterranean magic to even the tiniest of spaces. For centuries, figs have been cherished across cultures, from ancient Greece where they were a symbol of prosperity and peace, to Roman gardens where they were a staple fruit. Now, you can cultivate your own little piece of that history, no matter where you live.
I know what you’re thinking: “Why bottles?” Well, this method offers a surprising number of benefits. It creates a microclimate that protects your precious fig from harsh weather, extends the growing season, and even helps to control pests. Plus, it’s incredibly space-saving, making it perfect for balconies, patios, or even indoor gardening. Imagine plucking ripe, juicy figs straight from a bottle – a conversation starter and a delicious treat all in one! This DIY project is not only a fun and rewarding experience, but it also allows you to enjoy the taste of homegrown figs, regardless of your gardening experience or available space. So, let’s dive in and discover the secrets to successfully growing figs in bottles!
Growing Figs in Bottles: A Fun and Unique DIY Project
Hey there, fellow plant enthusiasts! Ever thought about growing figs in bottles? It’s a quirky, space-saving, and surprisingly effective way to cultivate these delicious fruits. I’ve been experimenting with this method for a while now, and I’m excited to share my experience and guide you through the process. It’s easier than you might think, and the results are truly rewarding!
Why Grow Figs in Bottles?
Before we dive in, let’s talk about why you might want to try this.
* Space Saving: Perfect for small apartments, balconies, or anyone with limited garden space.
* Unique Aesthetic: Adds a touch of whimsy and visual interest to your indoor or outdoor space. Imagine a row of bottles with lush fig trees growing inside!
* Controlled Environment: You have more control over the soil, watering, and temperature, which can be beneficial for fig growth.
* Fun Project: It’s a great DIY project that’s both educational and rewarding.
* Easy to Move: Bottles are relatively easy to move around, allowing you to adjust their position based on sunlight and weather conditions.
What You’ll Need
Okay, let’s gather our supplies. Here’s what you’ll need to get started:
* Glass Bottles: This is the most important part! I recommend using large glass bottles, like those used for wine, water, or juice. The bigger the bottle, the more room your fig tree will have to grow. Make sure they are thoroughly cleaned.
* Fig Cutting or Sapling: You can either start with a fig cutting (a small branch taken from a mature fig tree) or a small fig sapling. I’ve had success with both, but cuttings require a bit more patience.
* Potting Mix: Use a well-draining potting mix specifically formulated for container gardening. Avoid using garden soil, as it can become compacted in the bottle.
* Perlite or Vermiculite: Adding perlite or vermiculite to your potting mix will improve drainage and aeration.
* Gravel or Pebbles: A layer of gravel or pebbles at the bottom of the bottle will further enhance drainage.
* Water: Clean, filtered water is best.
* Rooting Hormone (Optional): If you’re starting with a cutting, rooting hormone can help encourage root development.
* Spray Bottle: For misting the cutting or sapling.
* Long-Handled Spoon or Trowel: To help you maneuver the soil inside the bottle.
* Gloves: To keep your hands clean.
* Safety Glasses: When working with glass, it’s always a good idea to protect your eyes.
Getting Started: Preparing the Bottle
Before we plant anything, we need to prep our bottle. This is a crucial step for ensuring proper drainage and a healthy growing environment.
1. Clean the Bottle Thoroughly: Wash the bottle inside and out with soap and water. Rinse it well to remove any soap residue. This is important to prevent any contamination that could harm your fig tree.
2. Add a Drainage Layer: Pour a layer of gravel or pebbles (about 1-2 inches) into the bottom of the bottle. This will help prevent the roots from sitting in water and rotting.
3. Prepare the Potting Mix: In a separate container, mix your potting mix with perlite or vermiculite. A good ratio is about 2 parts potting mix to 1 part perlite/vermiculite. This will create a light and airy mix that drains well.
Planting Your Fig Cutting or Sapling
Now comes the fun part – planting your fig! Whether you’re using a cutting or a sapling, the process is similar.
Planting a Fig Cutting
1. Prepare the Cutting (If Applicable): If you’re using a cutting, make sure it’s about 4-6 inches long and has several leaf nodes (the points where leaves grow). Dip the cut end of the cutting in rooting hormone (optional, but recommended).
2. Fill the Bottle with Potting Mix: Using your long-handled spoon or trowel, carefully fill the bottle with the prepared potting mix, leaving about 2-3 inches of space at the top.
3. Create a Planting Hole: Use your finger or the spoon to create a small hole in the center of the potting mix.
4. Insert the Cutting: Gently insert the cutting into the hole, making sure the bottom leaf node is buried in the soil.
5. Firm the Soil: Gently firm the soil around the cutting to secure it in place.
6. Water Thoroughly: Water the potting mix until it’s evenly moist but not soggy.
7. Mist the Cutting: Use a spray bottle to mist the cutting with water. This will help keep it hydrated while it’s developing roots.
8. Create a Humid Environment (Optional): To further encourage root development, you can create a humid environment by placing a clear plastic bag over the bottle. Make sure to leave a small opening for ventilation.
9. Place in a Warm, Bright Location: Place the bottle in a warm, bright location with indirect sunlight. Avoid direct sunlight, as it can scorch the cutting.
Planting a Fig Sapling
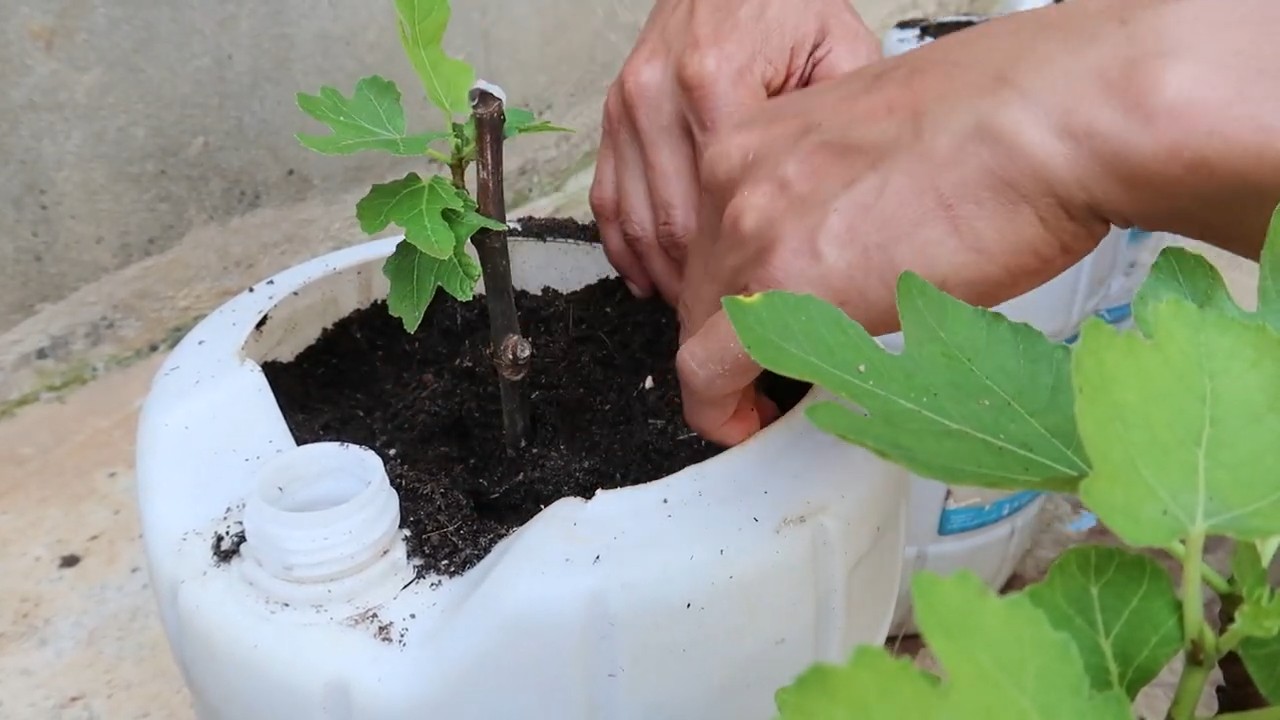
1. Gently Remove the Sapling from its Container: Carefully remove the fig sapling from its nursery pot. Gently loosen the roots if they are tightly bound.
2. Fill the Bottle with Potting Mix: Using your long-handled spoon or trowel, carefully fill the bottle with the prepared potting mix, leaving enough space for the sapling’s root ball.
3. Create a Planting Hole: Make a hole in the center of the potting mix that’s large enough to accommodate the sapling’s root ball.
4. Place the Sapling in the Hole: Gently place the sapling in the hole, making sure the top of the root ball is level with the surface of the potting mix.
5. Fill in with Potting Mix: Fill in the remaining space around the root ball with potting mix, gently firming the soil as you go.
6. Water Thoroughly: Water the potting mix until it’s evenly moist but not soggy.
7. Place in a Warm, Bright Location: Place the bottle in a warm, bright location with indirect sunlight.
Caring for Your Fig Tree in a Bottle
Once your fig is planted, it’s important to provide it with the proper care to ensure its health and growth.
* Watering: Water your fig tree when the top inch of soil feels dry to the touch. Avoid overwatering, as this can lead to root rot. Make sure the bottle has adequate drainage.
* Sunlight: Figs need plenty of sunlight to thrive. Place your bottle in a location that receives at least 6-8 hours of indirect sunlight per day. If you don’t have enough natural light, you can supplement with a grow light.
* Fertilizing: Feed your fig tree with a balanced liquid fertilizer every 2-4 weeks during the growing season (spring and summer). Follow the instructions on the fertilizer label.
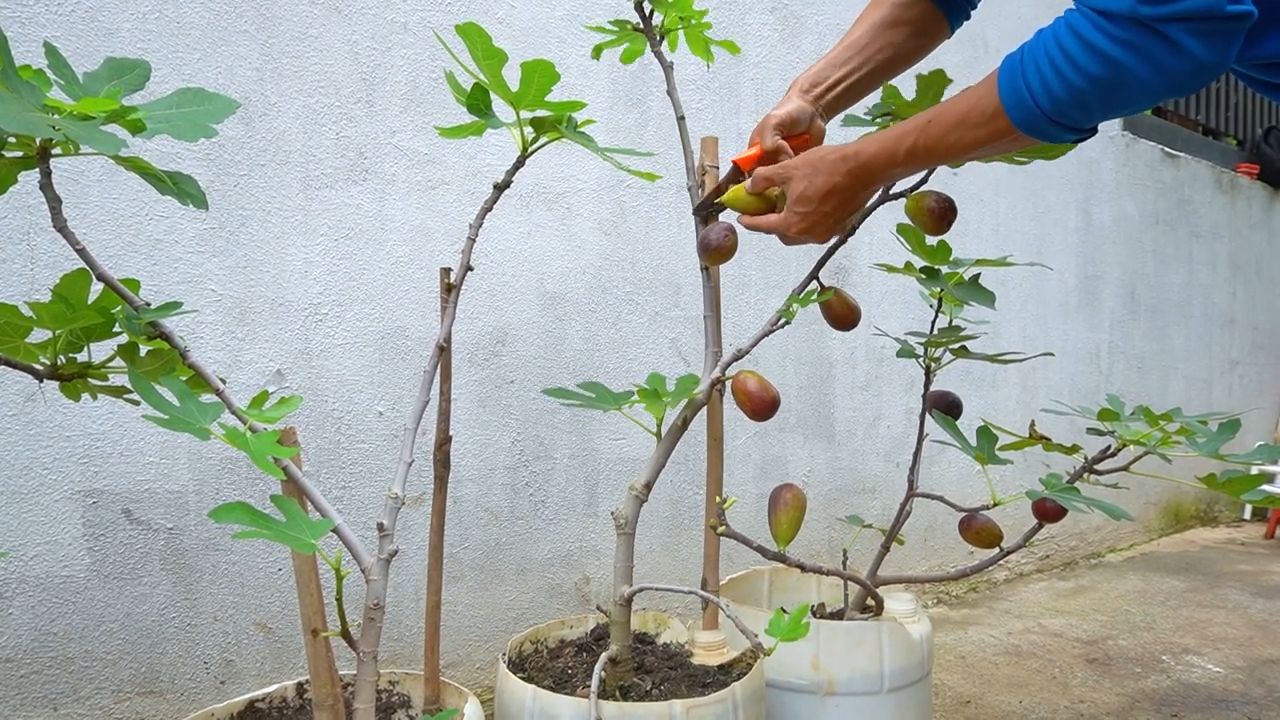
* Pruning: Prune your fig tree as needed to maintain its shape and size. Remove any dead or damaged branches. Pruning can also encourage fruit production.
* Pest Control: Keep an eye out for pests such as aphids, spider mites, and scale. If you notice any pests, treat them with an appropriate insecticide or horticultural oil.
* Repotting: As your fig tree grows, it may eventually outgrow its bottle. When this happens, you’ll need to repot it into a larger container. Choose a container that’s at least 2-3 inches larger in diameter than the current bottle.
Troubleshooting
Even with the best care, you may encounter some challenges when growing figs in bottles. Here are a few common problems and how to address them:
* Yellowing Leaves: Yellowing leaves can be a sign of overwatering, underwatering, or nutrient deficiency. Adjust your watering schedule and fertilize your fig tree as needed.
* Leaf Drop: Leaf drop can be caused by stress, such as sudden changes in temperature or light. Try to maintain a consistent environment for your fig tree.
* Root Rot: Root rot is caused by overwatering and poor drainage. Make sure your bottle has adequate drainage and avoid overwatering. If you suspect root rot, you may need to repot your fig tree into fresh potting mix.
* Lack of Fruit: Some fig varieties take longer to produce fruit than others. Make sure your fig tree is getting enough sunlight and fertilizer. Pruning can also encourage fruit production.
Tips for Success
Here are a few extra tips to help you succeed with growing figs in bottles:
* Choose the Right Fig Variety: Some fig
Conclusion
So, there you have it – a revolutionary and surprisingly simple method for growing figs in bottles! This isn’t just another gardening fad; it’s a game-changer for urban gardeners, those with limited space, or anyone seeking a unique and rewarding horticultural experience. The benefits are undeniable: improved drainage, enhanced warmth retention, protection from pests, and the sheer novelty of watching your fig tree flourish within a glass enclosure.
This DIY trick for growing figs in bottles offers a level of control over the growing environment that traditional methods simply can’t match. By carefully selecting your bottle size, soil composition, and fig variety, you can tailor the conditions to perfectly suit your tree’s needs. Imagine the satisfaction of harvesting plump, juicy figs from a miniature orchard on your balcony or patio, all thanks to a repurposed bottle and a little ingenuity.
But the beauty of this method lies not only in its practicality but also in its adaptability. Feel free to experiment with different bottle types – larger carboys for more mature trees, or smaller decorative bottles for a charming display. Consider adding a layer of activated charcoal to the bottom of the bottle to further improve drainage and filter out impurities. You can even try different fig varieties, such as the dwarf ‘Little Miss Figgy’ which is particularly well-suited for container growing.
Don’t be afraid to get creative with your bottle garden! Add decorative stones, moss, or even small figurines to create a miniature landscape around your fig tree. The possibilities are endless, and the only limit is your imagination.
We understand that venturing into uncharted gardening territory can be daunting, but we assure you that this method is surprisingly straightforward. The initial setup requires minimal effort, and the ongoing maintenance is relatively low. With a little patience and attention, you’ll be rewarded with a bountiful harvest of delicious figs.
We wholeheartedly encourage you to give this DIY trick a try. It’s a fun, rewarding, and sustainable way to grow your own figs, regardless of your gardening experience or available space. Once you’ve experienced the joy of harvesting your own bottle-grown figs, you’ll wonder why you didn’t try it sooner.
And most importantly, we want to hear about your experiences! Share your photos, tips, and stories with us in the comments below. Let’s build a community of bottle-fig enthusiasts and learn from each other’s successes and challenges. Together, we can unlock the full potential of this innovative gardening technique and bring the joy of fresh figs to everyone. So, grab a bottle, a fig cutting, and get ready to embark on a truly unique gardening adventure!
Frequently Asked Questions (FAQ)
What type of bottle is best for growing figs?
The ideal bottle for growing figs depends on the size of the fig variety you intend to grow and its expected mature size. For smaller, dwarf varieties like ‘Little Miss Figgy,’ a 1-3 gallon glass carboy or a large decorative bottle can work well. For larger varieties, you’ll need a larger bottle, potentially up to 5 gallons or more. The bottle should be made of clear glass or plastic to allow sunlight to reach the plant. Ensure the bottle has a wide enough opening to easily insert the fig cutting or seedling and to allow for future maintenance. Avoid bottles with narrow necks that will restrict root growth and make watering difficult.
What kind of soil should I use in the bottle?
The soil mixture is crucial for the success of growing figs in bottles. A well-draining potting mix is essential to prevent root rot. A good starting point is a mix of equal parts:
* **Potting soil:** Provides essential nutrients and structure.
* **Perlite:** Improves drainage and aeration.
* **Coco coir or peat moss:** Helps retain moisture without becoming waterlogged.
You can also add a small amount of compost to provide additional nutrients. Avoid using garden soil, as it can be too heavy and may contain pests or diseases. Consider adding a layer of gravel or pebbles at the bottom of the bottle to further improve drainage.
How often should I water my fig tree in a bottle?
Watering frequency depends on several factors, including the size of the bottle, the fig variety, the climate, and the time of year. Generally, you should water when the top inch of soil feels dry to the touch. Avoid overwatering, as this can lead to root rot. When watering, pour water slowly and evenly around the base of the plant until you see water draining out of the drainage holes (if you’ve created them). During the growing season (spring and summer), you may need to water more frequently than during the dormant season (fall and winter). Always check the soil moisture before watering to avoid overwatering.
How much sunlight does my bottle-grown fig tree need?
Fig trees thrive in full sun, requiring at least 6-8 hours of direct sunlight per day. Place your bottle-grown fig tree in a location that receives ample sunlight, such as a south-facing window or a sunny balcony. If you live in a particularly hot climate, you may need to provide some afternoon shade to prevent the leaves from scorching. If you don’t have access to enough natural sunlight, you can supplement with grow lights. Rotate the bottle regularly to ensure that all sides of the plant receive adequate sunlight.
How do I fertilize my fig tree in a bottle?
Fig trees are relatively heavy feeders and benefit from regular fertilization, especially during the growing season. Use a balanced, water-soluble fertilizer specifically formulated for fruit trees. Follow the instructions on the fertilizer package for application rates and frequency. Generally, you should fertilize every 2-4 weeks during the growing season (spring and summer). Reduce or stop fertilizing during the dormant season (fall and winter). Avoid over-fertilizing, as this can damage the roots. You can also supplement with organic fertilizers, such as compost tea or fish emulsion.
How do I prune my fig tree in a bottle?
Pruning is essential for maintaining the shape and size of your bottle-grown fig tree and for promoting fruit production. Prune your fig tree during the dormant season (late winter or early spring) before new growth begins. Remove any dead, damaged, or crossing branches. Prune to create an open, airy structure that allows sunlight to penetrate the canopy. You can also prune to control the size and shape of the tree. Be careful not to over-prune, as this can reduce fruit production. Use clean, sharp pruning shears to make clean cuts.
How do I protect my bottle-grown fig tree from pests and diseases?
Growing figs in bottles can actually help protect them from some pests and diseases, but it’s still important to be vigilant. Regularly inspect your fig tree for signs of pests, such as aphids, spider mites, or scale. If you find pests, treat them with an appropriate insecticide or horticultural oil. Ensure proper ventilation to prevent fungal diseases. If you notice any signs of disease, such as leaf spots or mildew, treat them with a fungicide. You can also use organic pest control methods, such as neem oil or insecticidal soap.
Can I move my bottle-grown fig tree outdoors?
Yes, you can move your bottle-grown fig tree outdoors during the warmer months, but it’s important to acclimate it gradually to the outdoor environment. Start by placing the bottle in a shady location for a few hours each day, gradually increasing the amount of sunlight over a week or two. This will help prevent sunburn and stress. Make sure the bottle is protected from strong winds, which can damage the plant. Bring the bottle back indoors before the first frost in the fall.
How do I overwinter my bottle-grown fig tree?
Fig trees are relatively cold-hardy, but they still need protection from freezing temperatures. If you live in a cold climate, you’ll need to overwinter your bottle-grown fig tree indoors. Before bringing it indoors, prune the tree and remove any dead or diseased leaves. Place the bottle in a cool, dark location, such as a garage or basement. Water sparingly during the winter months, only when the soil is completely dry. The tree will go dormant during the winter and will not require much light or water. In the spring, gradually acclimate the tree back to the outdoor environment.
What if my fig tree doesn’t produce fruit?
There are several reasons why your fig tree might not be producing fruit. It could be due to insufficient sunlight, improper watering, lack of fertilization, or improper pruning. Make sure your fig tree is receiving at least 6-8 hours of direct sunlight per day. Water regularly, but avoid overwatering. Fertilize regularly during the growing season. Prune your fig tree during the dormant season to promote fruit production. Some fig varieties require pollination to produce fruit, while others are self-pollinating. If your fig tree requires pollination, you may need to hand-pollinate it or introduce fig wasps to your garden. Be patient, as it can take several years for a fig tree to start producing fruit.

Leave a Comment