
Growing Fresh Thyme at home is easier than you might think, and I’m here to show you how! Forget those sad, dried-up jars of thyme in the spice aisle. Imagine stepping outside your door and snipping fragrant, flavorful thyme sprigs whenever you need them. Sounds dreamy, right?
Thyme has a rich history, dating back to ancient Egypt where it was used in embalming rituals. The ancient Greeks believed it symbolized courage, while Romans used it to purify their homes. For centuries, this herb has been cherished not only for its culinary uses but also for its medicinal properties.
In today’s busy world, convenience is king, but so is freshness! That’s where this DIY guide comes in. Growing Fresh Thyme yourself ensures you always have access to the best quality herb, bursting with flavor and aroma. Plus, it’s incredibly rewarding to nurture your own little garden. Whether you have a sprawling backyard or just a sunny windowsill, I’ll walk you through simple, effective tricks to successfully grow thyme, saving you money and adding a touch of green to your life. Let’s get started!
Growing Fresh Thyme Indoors: A Beginner’s Guide
Hey there, fellow plant enthusiasts! I’m so excited to share my experience with growing fresh thyme indoors. It’s easier than you might think, and having fresh thyme readily available for cooking is a total game-changer. Plus, the aroma is just divine! Let’s dive in.
Choosing Your Thyme Variety
First things first, you need to decide which thyme variety you want to grow. There are a bunch of options, each with its own unique flavor and characteristics. Here are a few popular choices:
* **Common Thyme (Thymus vulgaris):** This is your classic, all-purpose thyme. It has a strong, earthy flavor that’s perfect for soups, stews, and roasted meats.
* **Lemon Thyme (Thymus citriodorus):** As the name suggests, this variety has a lovely lemon scent and flavor. It’s fantastic in fish dishes, salads, and even desserts.
* **Creeping Thyme (Thymus serpyllum):** This low-growing thyme is often used as a ground cover, but it’s also edible! It has a milder flavor than common thyme and is great for adding to pizzas or sprinkling on vegetables.
I personally love growing both common thyme and lemon thyme – the variety keeps things interesting!
What You’ll Need
Before we get started, let’s gather all the necessary supplies. Here’s what you’ll need:
* **Thyme Seeds or a Thyme Plant:** You can start from seeds, which is more economical, or buy a small thyme plant from your local nursery. I’ve done both, and both methods work well.
* **A Pot with Drainage Holes:** Thyme needs well-draining soil, so make sure your pot has drainage holes. A 6-inch pot is a good starting size.
* **Well-Draining Potting Mix:** Regular garden soil is too heavy for indoor thyme. Use a potting mix specifically formulated for herbs or vegetables. A mix of potting soil, perlite, and vermiculite works wonders.
* **Grow Lights (Optional but Recommended):** While thyme can grow near a sunny window, grow lights will ensure it gets enough light, especially during the winter months.
* **Watering Can or Spray Bottle:** For watering your thyme.
* **Scissors or Pruning Shears:** For harvesting and pruning.
* **Seed Starting Tray (If Starting from Seeds):** This will help you germinate the seeds before transplanting them to the pot.
Starting from Seeds: A Step-by-Step Guide
If you’re starting from seeds, here’s how to do it:
1. **Prepare the Seed Starting Tray:** Fill the seed starting tray with your well-draining potting mix. Moisten the soil gently with a spray bottle.
2. **Sow the Seeds:** Sprinkle the thyme seeds evenly over the surface of the soil. Thyme seeds are tiny, so don’t worry about burying them too deep. Just gently press them into the soil.
3. **Cover the Tray:** Cover the seed starting tray with a clear plastic lid or plastic wrap to create a humid environment. This will help the seeds germinate.
4. **Place in a Warm Location:** Place the tray in a warm location, such as on top of your refrigerator or near a heat vent. The ideal temperature for germination is around 70-75°F (21-24°C).
5. **Keep the Soil Moist:** Check the soil daily and mist it with a spray bottle to keep it moist. Don’t let the soil dry out.
6. **Wait for Germination:** Thyme seeds typically germinate in 14-21 days. Once the seedlings emerge, remove the plastic lid or wrap.
7. **Provide Light:** Place the seedlings under grow lights or near a sunny window. Make sure they get at least 6 hours of light per day.
8. **Thin the Seedlings:** Once the seedlings have a few sets of true leaves, thin them out so that they are spaced about 1-2 inches apart. This will give them room to grow.
9. **Transplant to the Pot:** When the seedlings are about 2-3 inches tall, they’re ready to be transplanted to the pot. Gently remove them from the seed starting tray and plant them in the pot, spacing them about 2-3 inches apart.
Planting a Thyme Plant: A Simple Process
If you’re starting with a thyme plant, the process is even simpler:
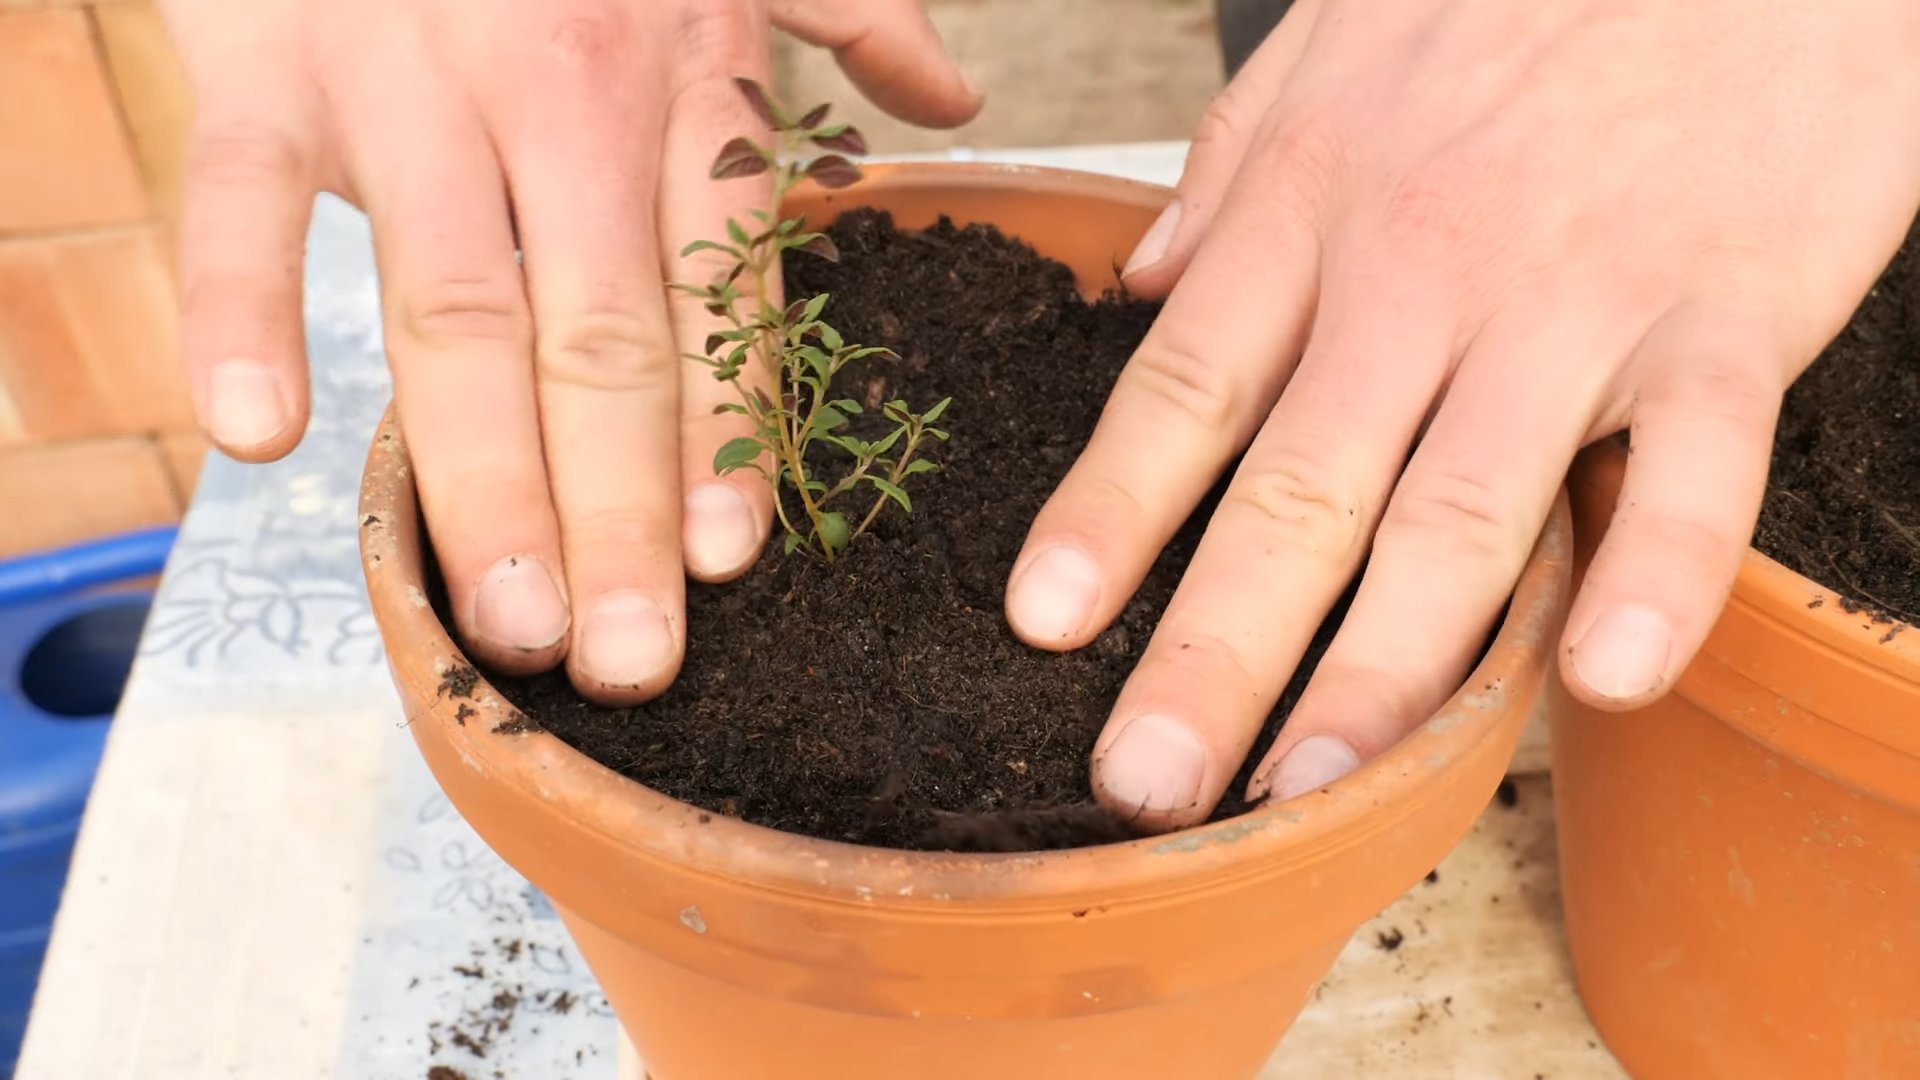
1. **Prepare the Pot:** Fill the pot with your well-draining potting mix.
2. **Remove the Thyme Plant from its Container:** Gently remove the thyme plant from its nursery container. Loosen the roots slightly with your fingers.
3. **Plant the Thyme Plant:** Plant the thyme plant in the pot, making sure the top of the root ball is level with the soil surface.
4. **Water Thoroughly:** Water the thyme plant thoroughly after planting.
Caring for Your Indoor Thyme
Now that your thyme is planted, it’s time to learn how to care for it. Here are some essential tips:
* **Light:** Thyme needs at least 6 hours of sunlight per day. If you don’t have a sunny window, use grow lights. I use LED grow lights, and they work great.
* **Watering:** Water your thyme when the top inch of soil feels dry to the touch. Be careful not to overwater, as this can lead to root rot. Thyme prefers to be slightly dry rather than constantly wet.
* **Fertilizing:** Feed your thyme with a balanced liquid fertilizer every 2-3 weeks during the growing season (spring and summer). I use a fertilizer specifically formulated for herbs.
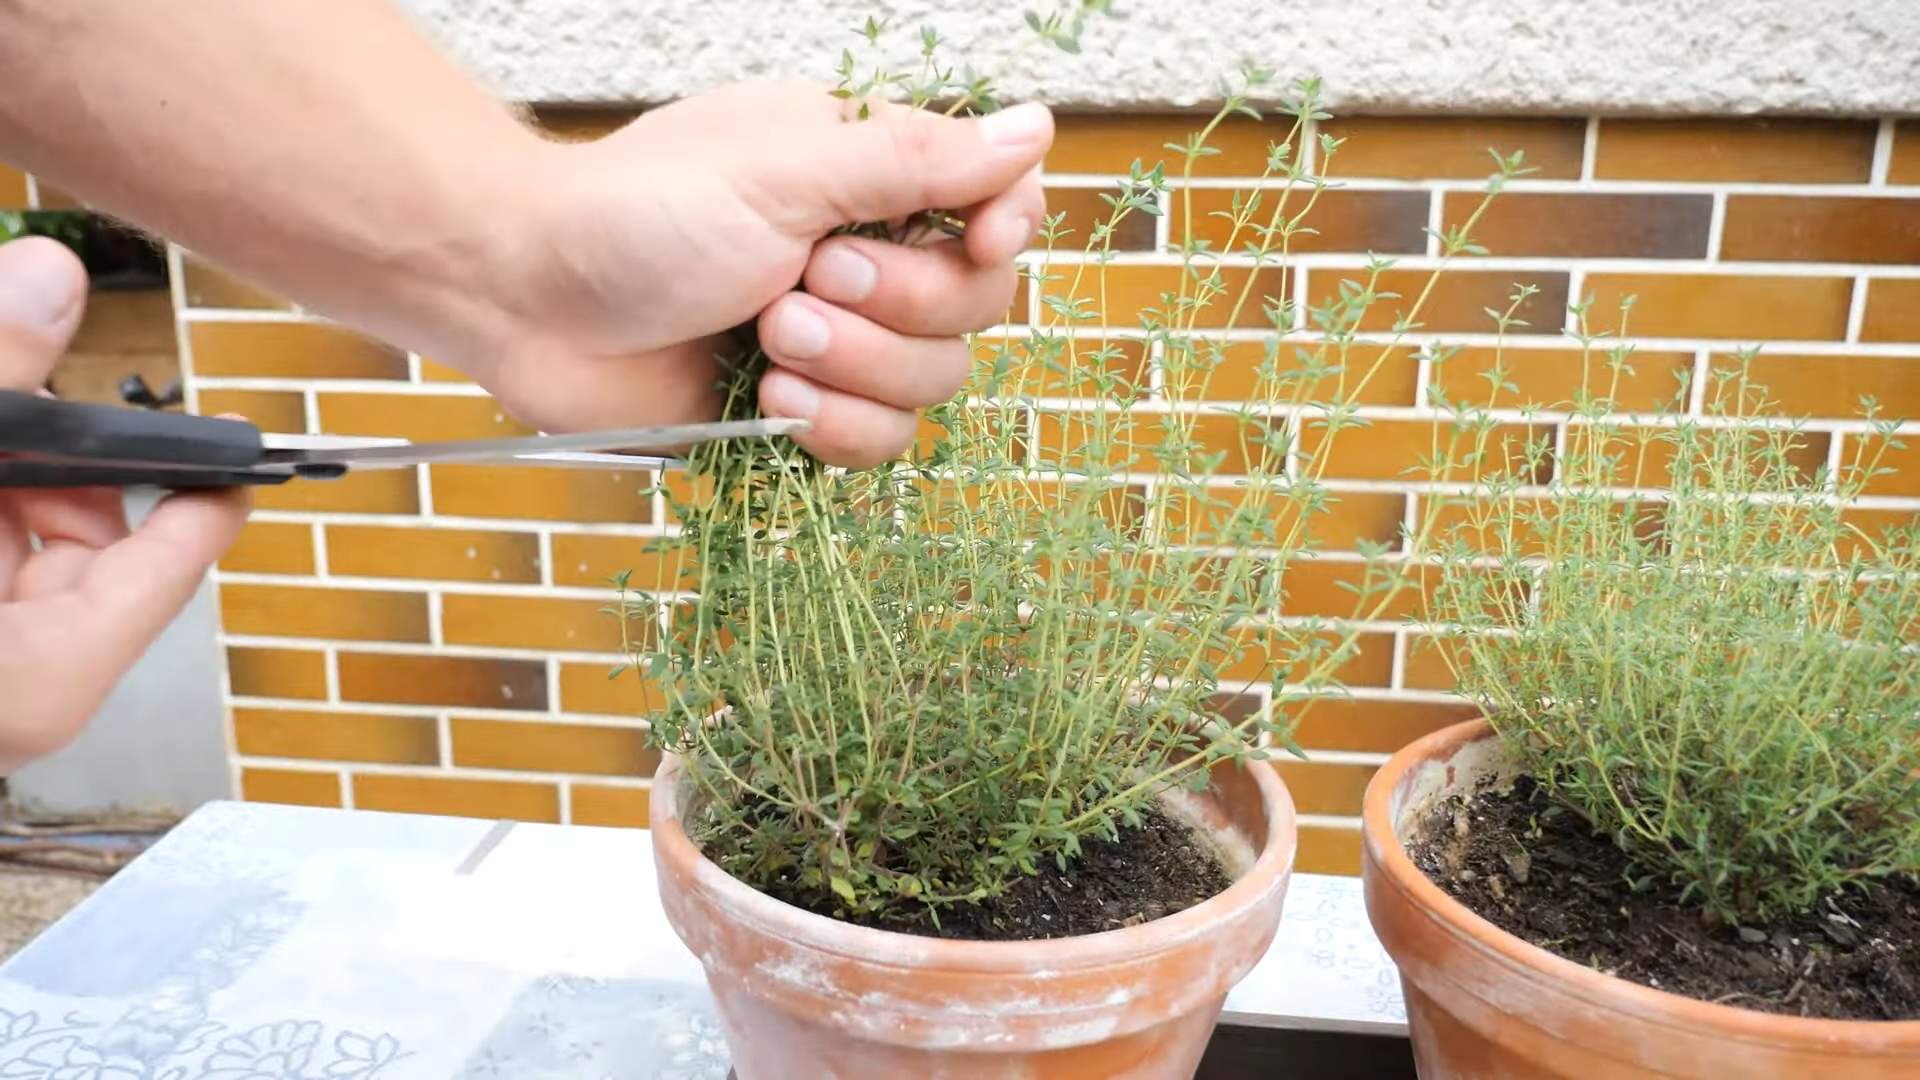
* **Pruning:** Prune your thyme regularly to encourage bushier growth. Pinch off the tips of the stems to promote branching. You can also harvest sprigs of thyme as needed for cooking.
* **Temperature:** Thyme prefers temperatures between 60-70°F (15-21°C). Avoid placing it near drafts or extreme temperatures.
* **Humidity:** Thyme doesn’t need high humidity, so you don’t need to worry about misting it.
* **Repotting:** Repot your thyme every year or two, or when it outgrows its pot. Choose a pot that is slightly larger than the previous one.
Harvesting Your Thyme
Harvesting thyme is easy! Simply snip off sprigs of thyme with scissors or pruning shears. You can harvest thyme at any time, but it’s best to harvest it in the morning, after the dew has dried.
* **Regular Harvesting:** Regular harvesting encourages the plant to grow more vigorously.
* **Drying Thyme:** If you want to dry your thyme, tie the sprigs together and hang them upside down in a cool, dry place. Once the thyme is completely dry, you can store it in an airtight container.
Troubleshooting Common Problems
Even with the best care, you might encounter some problems with your indoor thyme. Here are some common issues and how to fix them:
* **Yellowing Leaves:** Yellowing leaves can be a sign of overwatering, underwatering, or nutrient deficiency. Check the soil moisture and adjust your watering accordingly. If the soil is dry, water thoroughly. If the soil is wet, let it dry out before watering again. You may also need to fertilize your thyme.
* **Leggy Growth:** Leggy growth (long, spindly stems) is usually a sign of insufficient light. Move your thyme to a sunnier location or provide it with grow lights.
* **Root Rot:** Root rot is caused by overwatering. If you suspect root rot, stop watering your thyme and let the soil dry out completely. You may also need to repot your thyme in fresh potting mix.
* **Pests:** Thyme is generally pest-resistant, but it can occasionally be infested with aphids or spider mites. If you see pests, spray your thyme with insecticidal soap.
Enjoying Your Fresh Thyme
Now that you’ve successfully grown your own fresh thyme indoors, it’s time to enjoy the fruits (or rather, herbs!) of your labor. Here are some ideas for using your fresh thyme:
* **Cooking:** Add fresh thyme to soups, stews, roasted meats, vegetables, and sauces.
* **Tea:** Steep fresh thyme in hot water to make a soothing herbal tea.
* **Infused Oil:** Infuse olive oil with fresh thyme for a flavorful cooking oil.
* **Potpourri:** Add dried thyme to potpourri for a fragrant aroma.
* **Garnish:** Use fresh thyme as a garnish for your favorite dishes.
Growing fresh thyme indoors is a rewarding experience. With a little care and attention, you can enjoy fresh, flavorful thyme all year round. Happy growing!
Conclusion
So, there you have it! Growing fresh thyme at home is not only achievable, but it’s also incredibly rewarding. Imagine stepping into your kitchen and having access to fragrant, flavorful thyme whenever you need it. No more trips to the grocery store for wilted, overpriced herbs. No more settling for dried thyme when you crave that vibrant, earthy taste. This simple DIY project empowers you to elevate your cooking and connect with nature, even if you only have a small windowsill.
The benefits extend beyond convenience and cost savings. Homegrown thyme boasts a superior flavor profile compared to store-bought varieties. The essential oils, responsible for thyme’s distinctive aroma and taste, are at their peak when the herb is freshly harvested. Plus, you have complete control over the growing conditions, ensuring your thyme is free from harmful pesticides and chemicals.
But the real magic lies in the versatility of this herb. While we’ve focused on the basics of growing thyme, don’t be afraid to experiment! Try different varieties of thyme, such as lemon thyme for a citrusy twist or creeping thyme for ground cover. Consider planting thyme in companion with other herbs like rosemary and oregano to create a miniature herb garden. You can even dry your excess thyme for later use, preserving its flavor for months to come.
This DIY thyme growing trick is a game-changer for any home cook or gardening enthusiast. It’s a simple, sustainable, and satisfying way to enhance your culinary creations and bring a touch of nature indoors.
We encourage you to give it a try! Start small, learn as you go, and don’t be discouraged by initial setbacks. Gardening is a journey, and every mistake is a learning opportunity. Once you experience the joy of harvesting your own fresh thyme, you’ll wonder why you didn’t start sooner.
And most importantly, we want to hear about your experience! Share your tips, tricks, and triumphs in the comments below. Let us know what varieties of thyme you’re growing, what dishes you’re using it in, and any challenges you’ve overcome. Your insights will inspire and empower other readers to embark on their own thyme-growing adventures. Let’s create a community of thriving thyme growers!
Frequently Asked Questions (FAQ)
What is the best time of year to plant thyme?
The best time to plant thyme depends on your climate. In general, spring and early summer are ideal, after the last frost has passed. This allows the thyme plants to establish themselves before the colder months arrive. If you live in a warmer climate, you can also plant thyme in the fall. However, avoid planting during the hottest part of the summer, as the intense heat can stress the young plants. Starting thyme from seeds indoors 6-8 weeks before the last expected frost is also a great option, giving you a head start on the growing season.
What kind of soil does thyme need?
Thyme thrives in well-draining soil that is slightly alkaline. Avoid heavy clay soils that retain too much moisture, as this can lead to root rot. A sandy or loamy soil is ideal. You can improve drainage by adding perlite or coarse sand to the soil mix. The ideal pH range for thyme is between 6.0 and 8.0. If your soil is acidic, you can amend it with lime to raise the pH. When planting in containers, use a potting mix specifically formulated for herbs.
How much sunlight does thyme need?
Thyme requires at least six hours of sunlight per day to thrive. Choose a sunny location in your garden or place your potted thyme on a sunny windowsill. If you don’t have enough natural light, you can supplement with grow lights. Insufficient sunlight can result in leggy growth and reduced flavor.
How often should I water thyme?
Thyme is drought-tolerant and prefers to be watered sparingly. Overwatering is a common mistake that can lead to root rot. Allow the soil to dry out completely between waterings. When you do water, water deeply, soaking the entire root ball. Avoid getting the foliage wet, as this can promote fungal diseases. In general, water thyme once or twice a week during the growing season, and less frequently during the winter months.
How do I harvest thyme?
You can harvest thyme throughout the growing season. Simply snip off the stems with scissors or pruning shears. Avoid cutting back more than one-third of the plant at a time, as this can weaken it. The best time to harvest thyme is in the morning, after the dew has dried. This is when the essential oils are most concentrated, resulting in the best flavor. You can use fresh thyme immediately or dry it for later use.
How do I dry thyme?
There are several ways to dry thyme. One method is to tie the stems together in small bundles and hang them upside down in a cool, dry, and well-ventilated place. Another method is to spread the thyme sprigs on a baking sheet and dry them in a low oven (170°F or 77°C) for several hours. You can also use a dehydrator to dry thyme. Once the thyme is completely dry, store it in an airtight container in a cool, dark place.
Does thyme need fertilizer?
Thyme is not a heavy feeder and does not require frequent fertilization. In fact, over-fertilizing can result in leggy growth and reduced flavor. If your soil is poor, you can amend it with compost or a slow-release organic fertilizer at planting time. Avoid using high-nitrogen fertilizers, as these can promote excessive foliage growth at the expense of flavor.
How do I propagate thyme?
Thyme can be propagated from seeds, cuttings, or division. Starting from seeds is the most common method. Cuttings can be taken from new growth in the spring or summer. Simply cut a 4-6 inch stem from a healthy plant, remove the lower leaves, and dip the cut end in rooting hormone. Plant the cutting in a pot filled with well-draining potting mix and keep it moist until it roots. Division is another easy way to propagate thyme. Simply dig up a mature plant and divide the root ball into smaller sections. Replant the sections in separate pots or in the garden.
What are some common problems with growing thyme?
Some common problems with growing thyme include root rot, fungal diseases, and pests. Root rot is caused by overwatering and poorly draining soil. Fungal diseases can be prevented by providing good air circulation and avoiding getting the foliage wet. Pests that may attack thyme include aphids, spider mites, and whiteflies. These can be controlled with insecticidal soap or neem oil.
Can I grow thyme indoors?
Yes, you can grow thyme indoors, provided you give it enough sunlight. Place your potted thyme on a sunny windowsill or supplement with grow lights. Use a well-draining potting mix and water sparingly. Make sure the pot has drainage holes to prevent root rot. Prune the thyme regularly to encourage bushier growth.
Leave a Comment