
Growing gourds can be incredibly rewarding, transforming your garden into a whimsical wonderland of unique shapes and sizes. Have you ever dreamt of crafting your own birdhouses, dippers, or even musical instruments from your garden’s bounty? This isn’t just a modern trend; gourds have a rich history, dating back thousands of years, serving as essential tools and vessels in various cultures across the globe. From ancient civilizations using them for water containers to indigenous communities crafting intricate art, gourds have always been more than just plants.
But let’s be honest, growing gourds successfully can sometimes feel like a daunting task. They require specific conditions and a little know-how to truly thrive. That’s where this DIY guide comes in! I’m going to share some smart tricks and hacks that will help you cultivate a flourishing gourd patch, even if you’re a beginner gardener. Forget the frustration of stunted growth or misshapen fruits; with these simple techniques, you’ll be harvesting a bumper crop of beautiful, functional gourds in no time. So, grab your gardening gloves, and let’s get started on this exciting journey of growing gourds the smart way!

Kürbisse clever anbauen: Mein DIY-Leitfaden für eine reiche Ernte
Hallo liebe Gartenfreunde! Ich bin total begeistert von Kürbissen – von den kleinen Zierkürbissen bis zu den riesigen Halloween-Exemplaren. Aber ich weiß auch, dass der Anbau manchmal eine Herausforderung sein kann. Deshalb habe ich im Laufe der Jahre einige Tricks und Kniffe gelernt, die ich gerne mit euch teilen möchte. Dieser Leitfaden ist vollgepackt mit meinen persönlichen Erfahrungen und soll euch helfen, eine reiche Kürbisernte zu erzielen. Los geht’s!
Die richtige Vorbereitung ist alles
Bevor wir mit dem eigentlichen Anbau beginnen, ist eine gute Vorbereitung entscheidend. Das betrifft die Auswahl der Sorte, den Standort und die Bodenbeschaffenheit.
* Sortenwahl: Überlegt euch, welche Kürbisse ihr anbauen möchtet. Es gibt unzählige Sorten, von Speisekürbissen wie Hokkaido und Butternut bis hin zu Zierkürbissen in allen Formen und Farben. Informiert euch über die jeweiligen Ansprüche und die Reifezeit. Ich persönlich liebe den Hokkaido, weil er so vielseitig einsetzbar ist.
* Standort: Kürbisse sind Sonnenanbeter! Sie brauchen mindestens 6 Stunden direkte Sonneneinstrahlung pro Tag. Wählt einen sonnigen und warmen Standort in eurem Garten. Außerdem brauchen sie viel Platz, da ihre Ranken sich gerne ausbreiten.
* Bodenbeschaffenheit: Kürbisse sind Starkzehrer und benötigen einen nährstoffreichen Boden. Lockert den Boden gründlich auf und reichert ihn mit Kompost oder gut verrottetem Mist an. Ein leicht saurer bis neutraler pH-Wert ist ideal.
Schritt-für-Schritt-Anleitung: Kürbisse aussäen und vorziehen
Ich ziehe meine Kürbispflanzen gerne vor, um ihnen einen Vorsprung zu verschaffen. Das ist besonders in Regionen mit kürzeren Sommern empfehlenswert.
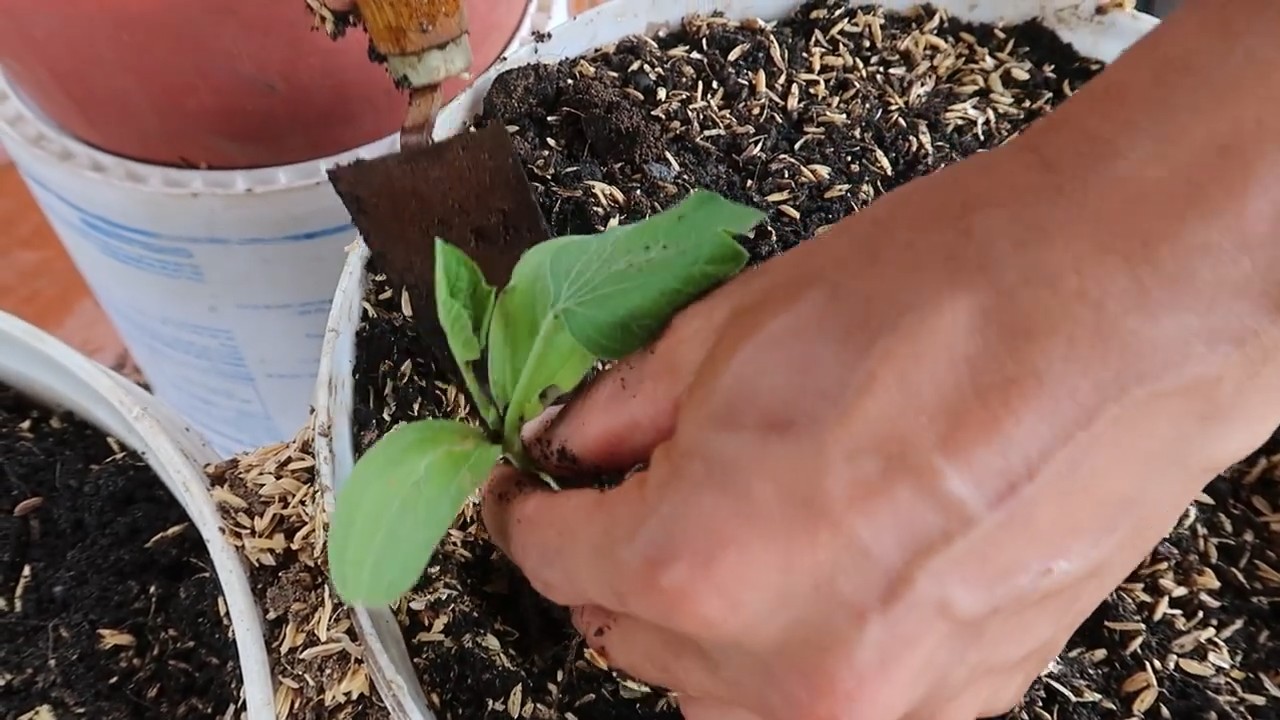
1. Aussaat: Beginnt mit der Aussaat etwa 3-4 Wochen vor dem letzten erwarteten Frost. Ich verwende dafür kleine Töpfe (ca. 8-10 cm Durchmesser) und fülle sie mit Anzuchterde. Legt 1-2 Samen pro Topf etwa 2-3 cm tief in die Erde.
2. Bewässerung: Gießt die Erde vorsichtig an, sodass sie feucht, aber nicht nass ist. Vermeidet Staunässe, da die Samen sonst faulen können.
3. Standort: Stellt die Töpfe an einen warmen und hellen Ort. Eine Fensterbank oder ein Gewächshaus sind ideal. Die Keimtemperatur sollte zwischen 20 und 25 Grad Celsius liegen.
4. Keimung: Die Samen keimen in der Regel innerhalb von 7-14 Tagen. Sobald die ersten Keimlinge erscheinen, entfernt den schwächeren Keimling, falls ihr zwei Samen pro Topf gesät habt.
5. Pflege: Gießt die Jungpflanzen regelmäßig und achtet darauf, dass die Erde nicht austrocknet. Sobald die Pflanzen etwas größer sind, könnt ihr sie vorsichtig umtopfen, falls die Töpfe zu klein werden.
Kürbisse auspflanzen: Der Umzug ins Freie
Sobald die Frostgefahr vorüber ist und die Jungpflanzen kräftig genug sind, können sie ins Freie umziehen.
1. Vorbereitung des Beetes: Lockert den Boden erneut auf und reichert ihn mit Kompost oder Mist an. Achtet darauf, dass der Boden gut durchlässig ist.
2. Pflanzabstand: Kürbisse brauchen viel Platz! Plant einen Abstand von mindestens 1 Meter zwischen den einzelnen Pflanzen, je nach Sorte auch mehr.
3. Auspflanzen: Grabt ein Loch, das etwas größer ist als der Wurzelballen der Jungpflanze. Setzt die Pflanze vorsichtig hinein und füllt das Loch mit Erde auf. Drückt die Erde leicht an.
4. Bewässerung: Gießt die Pflanzen nach dem Auspflanzen gründlich an.
5. Schutz vor Schnecken: Junge Kürbispflanzen sind besonders anfällig für Schneckenfraß. Schützt sie mit Schneckenzäunen oder anderen geeigneten Maßnahmen. Ich habe gute Erfahrungen mit Kaffeesatz als Schneckenabwehr gemacht.
Kürbispflege: Gießen, Düngen und mehr
Die richtige Pflege ist entscheidend für eine reiche Ernte.
* Gießen: Kürbisse brauchen viel Wasser, besonders während der Fruchtbildung. Gießt regelmäßig und gründlich, am besten am Morgen, damit die Blätter über Tag abtrocknen können. Vermeidet es, die Blätter direkt zu gießen, da dies Pilzkrankheiten fördern kann.
* Düngen: Düngt die Kürbispflanzen regelmäßig mit einem organischen Dünger oder Komposttee. Ich dünge meine Kürbisse alle 2-3 Wochen. Achtet darauf, dass der Dünger reich an Kalium ist, da dies die Fruchtbildung fördert.
* Mulchen: Mulcht den Boden um die Kürbispflanzen herum mit Stroh oder Rasenschnitt. Das hält den Boden feucht, unterdrückt Unkraut und schützt die Früchte vor direktem Bodenkontakt.
* Ranken lenken: Kürbisse bilden lange Ranken, die sich gerne ausbreiten. Lenkt die Ranken in die gewünschte Richtung, um Platz zu sparen und die Früchte besser zu belüften.
* Blüten bestäuben: Kürbisse sind einhäusig, das heißt, sie haben männliche und weibliche Blüten auf derselben Pflanze. Die weiblichen Blüten erkennt man an dem kleinen Fruchtansatz unterhalb der Blüte. Wenn die Bestäubung nicht von selbst erfolgt, könnt ihr sie von Hand bestäuben. Nehmt dazu einen Pinsel und übertragt den Pollen von einer männlichen Blüte auf die Narbe einer weiblichen Blüte.
Kürbiskrankheiten und Schädlinge: Was tun?
Auch Kürbisse sind nicht vor Krankheiten und Schädlingen gefeit. Hier sind einige häufige Probleme und wie ihr sie bekämpfen könnt:
* Echter Mehltau: Echter Mehltau ist eine Pilzkrankheit, die sich durch einen weißen, mehlartigen Belag auf den Blättern äußert. Entfernt befallene Blätter und behandelt die Pflanzen mit einem Fungizid oder einem Hausmittel wie Milch-Wasser-Gemisch (1:9).
* Falscher Mehltau: Falscher Mehltau äußert sich durch gelbliche Flecken auf der Blattoberseite und einem grauen Belag auf der Blattunterseite. Auch hier gilt: Befallene Blätter entfernen und mit einem Fungizid behandeln.
* Blattläuse: Blattläuse saugen Pflanzensaft und können die Pflanzen schwächen. Bekämpft sie mit einem Wasserstrahl, Schmierseifenlösung oder Nützlingen wie Marienkäfern.
* Kürbisfliegen: Die Larven der Kürbisfliege fressen sich in die Früchte und können diese zerstören. Schützt die Früchte mit Netzen oder behandelt die Pflanzen mit einem Insektizid.
* Schnecken: Wie bereits erwähnt, sind junge Kürbispflanzen besonders anfällig für Schneckenfraß. Schützt sie mit Schneckenzäunen oder anderen geeigneten Maßnahmen.
Erntezeit: Der Lohn der Mühe
Die Erntezeit ist der schönste Teil des Kürbisanbaus!
1. Reife erkennen: Die Reifezeit hängt von der Sorte ab. In der Regel sind Kürbisse reif, wenn die Schale hart ist und sich nicht mehr mit dem Fingernagel eindrücken lässt. Der Stiel sollte ebenfalls trocken und verholzt sein.
2. Ernten: Schneidet den Kürbis mit einem scharfen Messer oder einer Gartenschere vom Stiel ab. Lasst dabei einen Stielansatz von etwa 5-10 cm stehen, da dies die Haltbarkeit verlängert.
3. Lagern: Lagert die Kürbisse an einem kühlen, trockenen und gut belüfteten Ort. Ideal ist ein Keller oder eine Garage. Vermeidet es, die Kürbisse übereinander zu stapeln, da dies Druckstellen verursachen kann.
Extra-Tipps für eine noch bessere Kürbisernte
* Kürbispyramide: Wenn ihr wenig Platz habt, könnt ihr Kürbisse auch an einer Pyramide anbauen. Baut eine Pyramide aus Holz oder Bambus und lasst die Kürbisranken daran hochklettern.
Conclusion
So, there you have it! Growing gourds doesn’t have to be a daunting task filled with unpredictable results. By embracing this simple yet effective DIY trick, you’re not just planting seeds; you’re cultivating a thriving gourd patch brimming with potential. This method, focusing on optimized soil preparation and strategic support, significantly increases your chances of harvesting a bountiful crop of healthy, uniquely shaped gourds.
Think about the possibilities! Imagine crafting stunning birdhouses, creating whimsical decorations for autumn, or even gifting personalized gourds to friends and family. The satisfaction of using materials you’ve nurtured from seed to harvest is unparalleled. This isn’t just about growing gourds; it’s about connecting with nature, fostering creativity, and enjoying the fruits (or rather, the gourds!) of your labor.
But don’t just take our word for it. We encourage you to try this DIY trick for growing gourds yourself. Experiment with different gourd varieties – from the classic bottle gourd to the ornamental swan gourd – and tailor the support system to suit your specific needs and garden layout. Consider adding organic fertilizers to further enrich the soil and boost growth. You could even try companion planting with beneficial herbs and flowers to deter pests and attract pollinators.
The beauty of this method lies in its adaptability. Whether you’re a seasoned gardener or a complete beginner, you can easily adapt this technique to fit your skill level and available resources. The key is to be patient, observant, and willing to learn from your experiences.
We are confident that you’ll be amazed by the results. And we want to hear all about it! Share your experiences, photos, and tips in the comments below. Let’s create a community of gourd enthusiasts who are passionate about growing these fascinating plants. Your insights could inspire others to embark on their own gourd-growing adventures.
Don’t delay! Start planning your gourd garden today and discover the joy of growing your own unique and beautiful gourds. With this DIY trick, a little bit of effort, and a whole lot of enthusiasm, you’ll be well on your way to a gourd-filled harvest. Happy growing!
Frequently Asked Questions (FAQ)
What types of gourds are best suited for this DIY trick?
This DIY trick is versatile and can be applied to a wide variety of gourds. However, it’s particularly beneficial for larger, heavier gourds like bottle gourds, dipper gourds, and bushel gourds, as the support system helps prevent them from rotting on the ground. Ornamental gourds, such as apple gourds and pear gourds, also benefit from the improved soil conditions and support, leading to healthier and more vibrant fruits. Consider the mature size and weight of the gourd variety when designing your support system to ensure it’s strong enough to handle the load.
How often should I water my gourds grown using this method?
Watering frequency depends on several factors, including the climate, soil type, and stage of growth. Generally, gourds need consistent moisture, especially during flowering and fruit development. Aim to water deeply whenever the top inch of soil feels dry to the touch. Avoid overwatering, as this can lead to root rot. Mulching around the base of the plants can help retain moisture and reduce the need for frequent watering. During hot, dry periods, you may need to water more frequently.
What type of support system is best for growing gourds?
The ideal support system depends on the type of gourd you’re growing and the space you have available. For smaller gourds, a simple trellis or fence may suffice. For larger, heavier gourds, a more robust structure is needed, such as a sturdy A-frame trellis, a pergola, or even a custom-built support system using strong posts and wire. Ensure the support system is strong enough to bear the weight of the mature gourds. Consider using netting or slings to provide additional support to individual gourds as they grow.
How can I prevent pests and diseases from affecting my gourds?
Prevention is key when it comes to pests and diseases. Start by choosing disease-resistant gourd varieties. Ensure good air circulation around the plants by spacing them adequately and pruning excess foliage. Regularly inspect your plants for signs of pests or diseases, such as aphids, squash bugs, or powdery mildew. Use organic pest control methods, such as insecticidal soap or neem oil, to control pests. For fungal diseases, consider using a copper-based fungicide. Crop rotation can also help prevent soilborne diseases.
When is the best time to harvest my gourds?
The timing of harvest depends on the type of gourd and your intended use. Ornamental gourds are typically harvested when they are fully mature and the stems have dried out. Hard-shelled gourds, such as bottle gourds, should be left on the vine until the stems turn brown and dry. Before a hard frost, harvest all mature gourds, even if the stems haven’t completely dried. Handle the gourds carefully to avoid bruising or damaging the skin.
Can I grow gourds in containers using this DIY trick?
Yes, you can grow gourds in containers, but it requires careful planning and execution. Choose a large container with good drainage. Use a high-quality potting mix that is rich in organic matter. Select a smaller gourd variety that is well-suited for container growing. Provide a sturdy trellis or support system for the vines to climb. Water and fertilize regularly, as container-grown plants tend to dry out and deplete nutrients more quickly.
What are some creative ways to use my homegrown gourds?
The possibilities are endless! Gourds can be used for a wide variety of crafts and decorations. Bottle gourds can be transformed into birdhouses, bowls, and musical instruments. Ornamental gourds can be used to create fall displays, wreaths, and centerpieces. Gourds can also be painted, carved, or decorated with beads and other embellishments. Let your imagination run wild and create unique and personalized gourd creations.
How do I cure my gourds after harvesting them?
Curing is essential for preserving gourds and preventing them from rotting. After harvesting, wash the gourds with soapy water and allow them to dry completely. Place the gourds in a well-ventilated area, such as a garage or shed, away from direct sunlight and moisture. Turn the gourds regularly to ensure even drying. The curing process can take several weeks or even months, depending on the size and type of gourd. The gourds are fully cured when they are lightweight and the seeds rattle inside.
What if my gourds don’t grow as expected?
Don’t be discouraged! Gardening is a learning process, and there are many factors that can affect the success of your gourd crop. Review your growing conditions, including soil quality, watering practices, and sunlight exposure. Consider conducting a soil test to identify any nutrient deficiencies. Adjust your gardening practices as needed and try again next year. Remember to learn from your mistakes and celebrate your successes. And most importantly, have fun!

Leave a Comment