
Growing Leeks at Home might seem daunting, but trust me, it’s surprisingly simple and incredibly rewarding! Imagine stepping outside your back door to harvest fresh, flavorful leeks for your favorite soup or quiche. Forget those bland, overpriced leeks from the grocery store – we’re talking about homegrown goodness bursting with flavor!
For centuries, leeks have been a staple in cuisines around the world, from the hearty potages of France to the comforting soups of Wales, where the leek is a national emblem. Their mild, onion-like flavor adds a delicate sweetness to dishes that’s simply irresistible. But beyond their culinary appeal, leeks are packed with vitamins and minerals, making them a healthy addition to your diet.
Why should you learn these DIY tricks for growing leeks at home? Well, for starters, it’s a fantastic way to save money on your grocery bill. Plus, you’ll have complete control over the growing process, ensuring your leeks are free from harmful pesticides and chemicals. But perhaps the best reason is the sheer satisfaction of nurturing a plant from seed to harvest. So, let’s dive into some easy-to-follow tips and tricks that will have you enjoying homegrown leeks in no time!
Leckeren Lauch selbst anbauen: Dein DIY-Guide für den Garten oder Balkon
Hey Gartenfreunde! Ich liebe Lauch. Nicht nur, weil er so vielseitig in der Küche ist, sondern auch, weil er relativ einfach anzubauen ist. Und das Beste: Du brauchst keinen riesigen Garten, um deinen eigenen Lauch zu ernten. Ob im Beet, im Hochbeet oder sogar im Topf auf dem Balkon – ich zeige dir, wie es geht!
Was du für den Lauch-Anbau brauchst
Bevor wir loslegen, lass uns sicherstellen, dass du alles parat hast. Hier ist eine Liste der Dinge, die du brauchst:
* Lauch-Samen: Wähle eine Sorte, die zu deinem Klima passt. Es gibt frühe, mittlere und späte Sorten.
* Anzuchterde: Spezielle Erde für die Anzucht von Sämlingen.
* Anzuchtgefäße: Kleine Töpfe, Anzuchtschalen oder Eierkartons funktionieren super.
* Gießkanne mit feinem Brausekopf: Für sanftes Gießen.
* Pikierstab oder Bleistift: Zum Vereinzeln der Sämlinge.
* Gartenkelle oder Spaten: Zum Ausheben von Pflanzlöchern.
* Kompost oder organischer Dünger: Für eine gute Nährstoffversorgung.
* Gartenhandschuhe: Zum Schutz deiner Hände.
* Geduld: Lauch braucht etwas Zeit, um zu wachsen.
Die Anzucht: So ziehst du deine eigenen Lauch-Pflänzchen
Die Anzucht ist der erste Schritt zum eigenen Lauch. Ich beginne damit meistens im Februar oder März, damit die Pflänzchen im Mai ins Freie können.
1. Vorbereitung der Anzuchtgefäße: Fülle deine Anzuchtgefäße mit Anzuchterde. Drücke die Erde leicht an.
2. Aussaat: Verteile die Lauch-Samen gleichmäßig auf der Erde. Bedecke sie dann mit einer dünnen Schicht Erde (ca. 0,5 cm).
3. Bewässerung: Befeuchte die Erde vorsichtig mit der Gießkanne. Die Erde sollte feucht, aber nicht nass sein.
4. Standort: Stelle die Anzuchtgefäße an einen hellen und warmen Ort. Eine Temperatur von 18-20°C ist ideal.
5. Feuchtigkeit: Halte die Erde feucht, indem du sie regelmäßig besprühst. Du kannst auch eine durchsichtige Folie oder einen Deckel über die Gefäße legen, um die Luftfeuchtigkeit zu erhöhen. Achte aber darauf, regelmäßig zu lüften, um Schimmelbildung zu vermeiden.
6. Keimung: Nach etwa 1-2 Wochen sollten die ersten Keimlinge erscheinen.
7. Vereinzeln (Pikieren): Sobald die Sämlinge 2-3 Blätter haben, ist es Zeit, sie zu vereinzeln. Das bedeutet, dass du sie in größere Töpfe umpflanzt, damit sie mehr Platz zum Wachsen haben.
* Fülle die größeren Töpfe mit Anzuchterde.
* Lockere die Erde um die Sämlinge vorsichtig mit einem Pikierstab oder Bleistift.
* Hebe die Sämlinge vorsichtig aus der Erde und setze sie in die neuen Töpfe.
* Achte darauf, dass die Wurzeln nicht beschädigt werden.
* Drücke die Erde um die Sämlinge leicht an und gieße sie an.
8. Weiterpflege: Stelle die pikierten Sämlinge an einen hellen, aber nicht zu sonnigen Ort. Gieße sie regelmäßig und dünge sie bei Bedarf mit einem organischen Flüssigdünger.
Das Auspflanzen: Ab ins Beet oder den Topf!
Sobald die Lauch-Pflänzchen kräftig genug sind (ca. 15-20 cm hoch), können sie ins Freie gepflanzt werden. Das ist meistens im Mai oder Juni der Fall.
1. Vorbereitung des Bodens: Lockere den Boden gründlich auf und entferne Unkraut. Arbeite Kompost oder organischen Dünger ein, um den Boden mit Nährstoffen anzureichern. Lauch mag einen humosen, nährstoffreichen Boden.
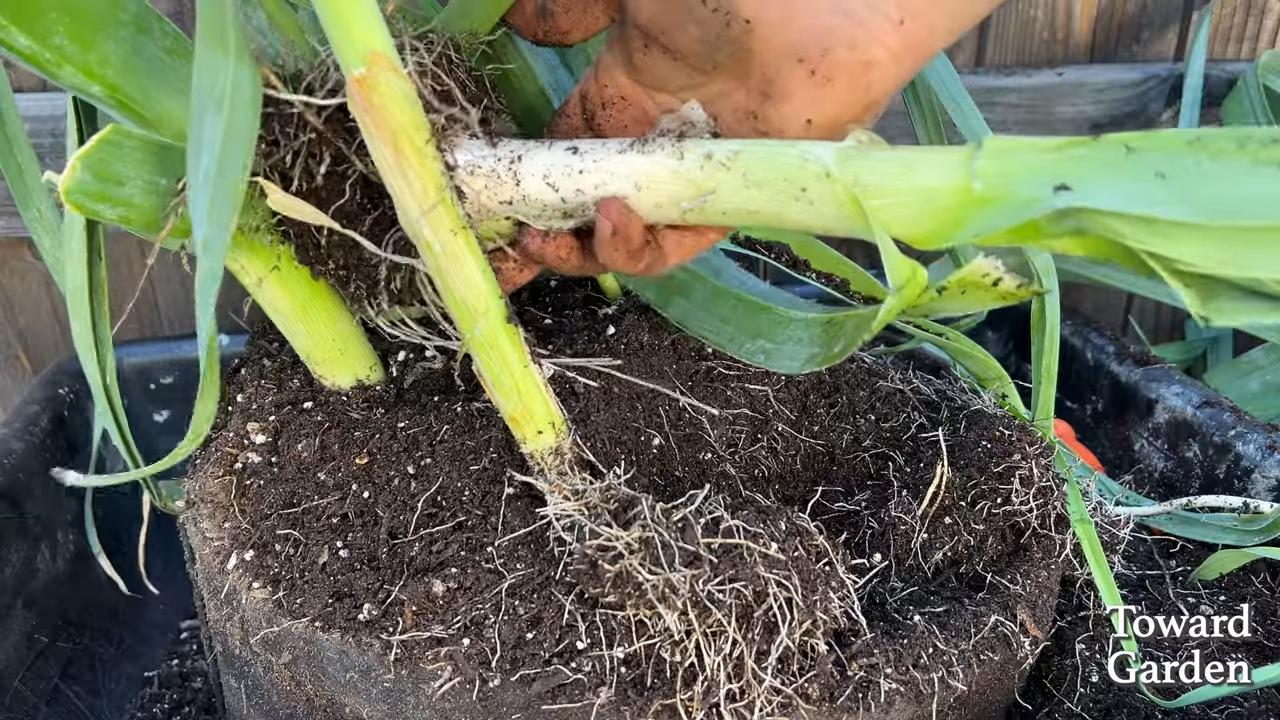
2. Pflanzlöcher ausheben: Hebe Pflanzlöcher im Abstand von ca. 15-20 cm aus. Die Löcher sollten tief genug sein, damit die Lauch-Pflänzchen bis zum unteren Ende des weißen Schafts eingepflanzt werden können. Das fördert die Bildung eines längeren, weißen Schafts.
3. Pflanzen: Setze die Lauch-Pflänzchen vorsichtig in die Pflanzlöcher. Fülle die Löcher mit Erde und drücke sie leicht an.
4. Angießen: Gieße die Pflanzen gründlich an.
5. Anhügeln: Häufle die Erde um die Lauch-Pflänzchen an. Das schützt den weißen Schaft vor Sonnenlicht und sorgt dafür, dass er länger und zarter wird. Du kannst das Anhäufeln im Laufe der Wachstumsperiode mehrmals wiederholen.
Lauch im Topf anbauen: So klappt’s auf dem Balkon
Kein Garten? Kein Problem! Lauch lässt sich auch wunderbar im Topf auf dem Balkon oder der Terrasse anbauen.
1. Topf auswählen: Wähle einen Topf mit einem Durchmesser von mindestens 20 cm und einer Tiefe von mindestens 30 cm. Achte darauf, dass der Topf Abzugslöcher hat, damit überschüssiges Wasser ablaufen kann.
2. Erde: Verwende eine hochwertige Gemüseerde oder mische Gartenerde mit Kompost.
3. Pflanzen: Pflanze 2-3 Lauch-Pflänzchen pro Topf.
4. Standort: Stelle den Topf an einen sonnigen Standort.
5. Bewässerung: Gieße den Lauch regelmäßig, besonders an heißen Tagen. Die Erde sollte immer leicht feucht sein.
6. Düngung: Dünge den Lauch regelmäßig mit einem organischen Flüssigdünger.
7. Anhügeln: Auch im Topf solltest du die Erde um die Lauch-Pflänzchen anhäufeln.
Pflege: Was Lauch zum Wachsen braucht
Lauch ist relativ pflegeleicht, aber ein paar Dinge solltest du beachten, damit er gut gedeiht.
* Bewässerung: Lauch braucht regelmäßig Wasser, besonders während trockener Perioden. Achte darauf, dass die Erde immer leicht feucht ist. Vermeide aber Staunässe.
* Düngung: Dünge den Lauch regelmäßig mit einem organischen Dünger. Das sorgt für eine gute Nährstoffversorgung und kräftiges Wachstum.
* Unkrautbekämpfung: Entferne regelmäßig Unkraut, das um den Lauch wächst. Unkraut entzieht dem Lauch Nährstoffe und Wasser.
* Schutz vor Schädlingen: Lauch kann von verschiedenen Schädlingen befallen werden, wie z.B. der Lauchmotte oder Zwiebelfliegen. Kontrolliere die Pflanzen regelmäßig und bekämpfe Schädlinge bei Bedarf mit biologischen Mitteln.
* Anhügeln: Wie bereits erwähnt, solltest du die Erde um die Lauch-Pflänzchen regelmäßig anhäufeln. Das fördert die Bildung eines längeren, weißen Schafts und schützt ihn vor Sonnenbrand.
Die Ernte: Endlich eigener Lauch!
Je nach Sorte und Aussaatzeitpunkt kannst du deinen Lauch ab dem Spätsommer oder Herbst ernten.
1. Erntezeitpunkt: Der Lauch ist erntereif, wenn er eine ausreichende Größe erreicht hat (ca. 2-3 cm Durchmesser).
2. Ernten: Ziehe den Lauch vorsichtig aus der Erde. Du kannst ihn auch mit einem Messer oder Spaten ausstechen.
3. Reinigen: Entferne die äußeren Blätter und reinige den Lauch unter fließendem Wasser.
4. Lagerung: Lauch hält sich im Kühlschrank einige Tage. Du kannst ihn auch einfrieren.
Häufige Probleme und Lösungen
Auch beim Lauch-Anbau können Probleme auftreten. Hier sind einige der häufigsten Probleme und wie du sie lösen kannst:
* Gelbe

Conclusion
So, there you have it! Growing leeks at home is not only achievable, but it’s also a deeply rewarding experience that connects you to your food in a tangible way. Forget those bland, overpriced leeks from the supermarket – imagine the satisfaction of harvesting your own, bursting with fresh, vibrant flavor. This DIY trick, from seed to table, empowers you to control the quality and freshness of your produce, ensuring you’re serving your family the very best.
But why is this a must-try? Beyond the superior taste and cost savings, growing your own leeks offers a unique opportunity to learn about the natural world. You’ll witness the miracle of germination, the slow and steady growth of your plants, and the impact of your care and attention on the final product. It’s a therapeutic and educational activity that can be enjoyed by gardeners of all skill levels.
Looking for variations? Absolutely! Consider experimenting with different leek varieties. ‘Giant Musselburgh’ is a classic choice known for its impressive size, while ‘Bandit’ offers a milder flavor. You can also adapt the growing method to suit your space. If you’re short on garden space, try growing leeks in containers. Just be sure to choose a large pot with good drainage and provide plenty of sunlight. Another variation is to try succession planting, sowing seeds every few weeks to ensure a continuous harvest throughout the growing season. You can also experiment with companion planting. Carrots and onions are known to be good companions for leeks, as they help to deter pests.
Don’t be intimidated by the process. Start small, be patient, and don’t be afraid to experiment. The beauty of gardening is that there’s always something new to learn. And remember, even if you encounter a few challenges along the way, the reward of harvesting your own homegrown leeks will be well worth the effort.
We wholeheartedly encourage you to give this DIY trick a try. Embrace the journey, get your hands dirty, and experience the joy of growing your own food. And most importantly, share your experience with us! We’d love to hear about your successes, your challenges, and any tips or tricks you discover along the way. Post photos of your leeks on social media using #HomegrownLeeks and tag us so we can celebrate your gardening achievements. Let’s build a community of passionate home gardeners, sharing our knowledge and inspiring others to embrace the joys of growing their own food. So, grab your seeds, prepare your soil, and get ready to embark on a delicious and rewarding adventure. Happy growing!
Frequently Asked Questions (FAQ)
What is the best time of year to start growing leeks from seed?
The ideal time to start growing leeks from seed depends on your climate. In general, you should start seeds indoors 8-10 weeks before the last expected frost. This typically means starting seeds in late winter or early spring. For warmer climates with mild winters, you can start seeds in late summer or early fall for a winter harvest. Check your local gardening resources for specific recommendations based on your region’s climate.
How much sunlight do leeks need?
Leeks thrive in full sun, requiring at least 6-8 hours of direct sunlight per day. If you’re growing leeks indoors, use grow lights to supplement natural sunlight. Insufficient sunlight can result in weak, leggy plants. When transplanting outdoors, choose a location that receives ample sunlight throughout the day.
What type of soil is best for growing leeks?
Leeks prefer well-drained, fertile soil that is rich in organic matter. Amend your soil with compost or well-rotted manure before planting to improve drainage and nutrient content. A slightly acidic to neutral soil pH (6.0-7.0) is ideal. Avoid heavy clay soils, as they can become waterlogged and hinder root development.
How often should I water my leeks?
Leeks need consistent moisture, especially during hot, dry weather. Water deeply and regularly, ensuring the soil remains consistently moist but not waterlogged. Avoid overhead watering, as this can increase the risk of fungal diseases. Mulching around your leeks can help to retain moisture and suppress weeds.
What are some common pests and diseases that affect leeks, and how can I prevent them?
Common pests that affect leeks include onion flies, thrips, and leek moths. Diseases include white rot, rust, and downy mildew. To prevent these problems, practice crop rotation, use insect netting to protect your plants, and ensure good air circulation. Remove any infected plants promptly to prevent the spread of disease. You can also use organic pest control methods, such as neem oil or insecticidal soap.
How do I blanch leeks to get the white stalks?
Blanching leeks involves excluding light from the lower portion of the plant to produce a white, tender stalk. There are several methods for blanching leeks. One common method is to gradually hill up soil around the base of the plants as they grow. Another method is to use cardboard tubes or plastic pipes to cover the stalks. Start blanching when the leeks are about 6-8 inches tall, and continue until harvest.
When are leeks ready to harvest?
Leeks are typically ready to harvest 100-150 days after sowing, depending on the variety. You can harvest leeks at any size, but they are usually harvested when the stalks are about 1-2 inches in diameter. To harvest, loosen the soil around the base of the plant and gently pull it out of the ground.
Can I grow leeks in containers?
Yes, leeks can be successfully grown in containers. Choose a large pot with good drainage and fill it with a well-draining potting mix. Plant the leek seedlings about 4-6 inches apart. Water regularly and fertilize every few weeks with a balanced fertilizer. Place the container in a sunny location that receives at least 6-8 hours of direct sunlight per day.
How do I store harvested leeks?
Harvested leeks can be stored in the refrigerator for up to 1-2 weeks. Wrap them loosely in plastic wrap or store them in a plastic bag. You can also freeze leeks for longer storage. To freeze, wash and chop the leeks, then blanch them in boiling water for 2-3 minutes. Drain and cool the leeks, then freeze them in a single layer on a baking sheet. Once frozen, transfer them to a freezer bag or container.
What are some ways to use homegrown leeks in cooking?
Homegrown leeks can be used in a variety of dishes. They can be sautéed, roasted, grilled, or added to soups, stews, and casseroles. Leeks have a mild, onion-like flavor that complements many different ingredients. Try using them in quiches, frittatas, or as a topping for pizzas. They are also delicious when caramelized and served as a side dish. Don’t forget to use the green tops of the leeks as well! They can be added to stocks and broths for extra flavor.
Leave a Comment