
Growing Long Beans Easily is simpler than you might think! Have you ever dreamt of harvesting armfuls of those impressively long, slender beans right from your own backyard? It’s a rewarding experience, and I’m here to tell you it’s totally achievable, even if you’re a beginner gardener.
Long beans, also known as yardlong beans or asparagus beans, have a fascinating history, originating in Southeast Asia and playing a significant role in various cuisines across the region. They’re not just delicious; they’re packed with nutrients and add a unique visual appeal to your garden. For centuries, these beans have been a staple crop, providing sustenance and flavor to countless meals.
But why should *you* bother learning how to grow them? Well, store-bought long beans often lack the freshness and vibrant flavor of homegrown ones. Plus, knowing how to cultivate your own food is incredibly empowering! This DIY guide will equip you with all the essential tricks and hacks to ensure a bountiful harvest. We’ll cover everything from selecting the right seeds and preparing the soil to providing proper support and warding off pests. So, get ready to discover how growing long beans easily can transform your garden and your plate!
Growing Long Beans: A DIY Guide to a Bountiful Harvest
Hey there, fellow gardening enthusiasts! I’m so excited to share my tried-and-true method for growing long beans – those incredibly prolific and delicious veggies that can climb and sprawl their way into your heart (and onto your dinner plate!). I’ve had amazing success with this DIY approach, and I’m confident you can too. Get ready for a harvest that will have you sharing with neighbors and friends!
What You’ll Need: The Essentials for Long Bean Success
Before we dive into the nitty-gritty, let’s gather our supplies. Having everything on hand will make the process smooth and enjoyable.
* Long Bean Seeds: Choose a variety that suits your climate. I personally love the ‘Yard Long’ variety, but there are many others to explore.
* Well-Draining Soil: Long beans thrive in soil that’s rich in organic matter and drains well.
* Compost or Aged Manure: This will enrich your soil and provide essential nutrients.
* Trellis or Support Structure: Long beans are climbers, so they need something to grow on. A trellis, fence, or even sturdy bamboo poles will work wonders.
* Gardening Gloves: Protect your hands from dirt and potential irritants.
* Hand Trowel or Garden Shovel: For digging holes and transplanting seedlings.
* Watering Can or Hose: Essential for keeping your long beans hydrated.
* Optional: Seed Starting Trays and Potting Mix: If you prefer to start your seeds indoors.
* Optional: Organic Fertilizer: To boost growth and yields.
* Optional: Mulch: To retain moisture and suppress weeds.
Phase 1: Seed Starting (Optional but Recommended)
Starting your long bean seeds indoors gives them a head start, especially if you live in a region with a shorter growing season. Here’s how I do it:
1. Prepare Your Seed Starting Trays: Fill your seed starting trays with a high-quality seed starting mix. Moisten the mix thoroughly, but don’t let it become waterlogged.
2. Sow the Seeds: Plant 2-3 long bean seeds per cell, about 1 inch deep. Gently cover the seeds with the potting mix.
3. Water and Cover: Water the trays gently and cover them with a clear plastic dome or plastic wrap to create a humid environment.
4. Provide Warmth and Light: Place the trays in a warm location (around 70-75°F) and provide them with plenty of light. A sunny windowsill or a grow light will work well.
5. Monitor and Water: Keep the soil consistently moist, but not soggy. Remove the plastic cover once the seedlings emerge.
6. Harden Off the Seedlings: Before transplanting your seedlings outdoors, you’ll need to harden them off. This process gradually acclimates them to outdoor conditions. Start by placing the trays outdoors in a sheltered location for a few hours each day, gradually increasing the amount of time they spend outside over the course of a week.
Phase 2: Preparing the Planting Bed
Long beans need a sunny spot with well-draining soil. Here’s how I prepare my planting bed:
1. Choose a Sunny Location: Select a spot in your garden that receives at least 6-8 hours of direct sunlight per day.
2. Amend the Soil: Long beans thrive in soil that’s rich in organic matter. Amend your soil with compost or aged manure to improve its fertility and drainage. I usually dig in a generous amount – about 2-3 inches – and mix it thoroughly with the existing soil.
3. Install Your Trellis or Support Structure: Before planting, install your trellis or support structure. This will give your long beans something to climb on as they grow. Make sure the structure is sturdy enough to support the weight of the mature plants. I’ve found that a trellis made from sturdy wire mesh works exceptionally well.
4. Water the Soil: Water the soil thoroughly before planting. This will help the seedlings establish themselves more easily.
Phase 3: Planting Your Long Beans
Now for the fun part – getting those long beans in the ground!
1. Direct Sowing (If Not Starting Indoors): If you’re not starting your seeds indoors, you can sow them directly into the prepared planting bed. Plant the seeds about 1 inch deep and 4-6 inches apart.
2. Transplanting Seedlings: If you started your seeds indoors, gently remove the seedlings from their trays. Dig a hole that’s slightly larger than the root ball of the seedling.
3. Planting Depth: Place the seedling in the hole, ensuring that the top of the root ball is level with the surrounding soil.
4. Spacing: Space the seedlings about 4-6 inches apart along the base of your trellis or support structure.
5. Backfill and Water: Backfill the hole with soil and gently firm it around the base of the seedling. Water thoroughly.
Phase 4: Caring for Your Long Beans
Consistent care is key to a bountiful harvest. Here’s what I do to keep my long beans happy and healthy:
1. Watering: Long beans need consistent moisture, especially during hot, dry weather. Water deeply and regularly, ensuring that the soil is moist but not waterlogged. I usually water in the morning to allow the foliage to dry before nightfall, which helps prevent fungal diseases.
2. Fertilizing: Long beans are heavy feeders, so they benefit from regular fertilization. I like to use an organic fertilizer that’s rich in phosphorus and potassium, which promotes flowering and fruiting. Follow the instructions on the fertilizer package. I usually fertilize every 2-3 weeks.
3. Weeding: Keep the planting bed free of weeds, which can compete with your long beans for nutrients and water. Hand-pull weeds regularly or use a hoe to cultivate the soil.
4. Mulching: Apply a layer of mulch around the base of your long bean plants to help retain moisture, suppress weeds, and regulate soil temperature. I like to use straw or shredded leaves as mulch.
5. Training: As your long beans grow, they’ll need to be trained to climb your trellis or support structure. Gently guide the vines up the trellis and tie them in place with soft twine or plant ties if necessary.
6. Pest and Disease Control: Keep an eye out for pests and diseases. Common pests of long beans include aphids, bean beetles, and spider mites. Common diseases include powdery mildew and fungal leaf spots. If you notice any problems, take action promptly. I prefer to use organic pest control methods, such as insecticidal soap or neem oil. For diseases, ensure good air circulation and avoid overhead watering.
Phase 5: Harve
Hey there, fellow gardening enthusiasts! I’m so excited to share my tried-and-true method for growing long beans – those incredibly prolific and delicious veggies that can climb and sprawl their way into your heart (and onto your dinner plate!). I’ve had amazing success with this DIY approach, and I’m confident you can too. Get ready for a harvest that will have you sharing with neighbors and friends!
What You’ll Need: The Essentials for Long Bean Success
Before we dive into the nitty-gritty, let’s gather our supplies. Having everything on hand will make the process smooth and enjoyable.
* Long Bean Seeds: Choose a variety that suits your climate. I personally love the ‘Yard Long’ variety, but there are many others to explore.
* Well-Draining Soil: Long beans thrive in soil that’s rich in organic matter and drains well.
* Compost or Aged Manure: This will enrich your soil and provide essential nutrients.
* Trellis or Support Structure: Long beans are climbers, so they need something to grow on. A trellis, fence, or even sturdy bamboo poles will work wonders.
* Gardening Gloves: Protect your hands from dirt and potential irritants.
* Hand Trowel or Garden Shovel: For digging holes and transplanting seedlings.
* Watering Can or Hose: Essential for keeping your long beans hydrated.
* Optional: Seed Starting Trays and Potting Mix: If you prefer to start your seeds indoors.
* Optional: Organic Fertilizer: To boost growth and yields.
* Optional: Mulch: To retain moisture and suppress weeds.
Phase 1: Seed Starting (Optional but Recommended)
Starting your long bean seeds indoors gives them a head start, especially if you live in a region with a shorter growing season. Here’s how I do it:
1. Prepare Your Seed Starting Trays: Fill your seed starting trays with a high-quality seed starting mix. Moisten the mix thoroughly, but don’t let it become waterlogged.
2. Sow the Seeds: Plant 2-3 long bean seeds per cell, about 1 inch deep. Gently cover the seeds with the potting mix.
3. Water and Cover: Water the trays gently and cover them with a clear plastic dome or plastic wrap to create a humid environment.
4. Provide Warmth and Light: Place the trays in a warm location (around 70-75°F) and provide them with plenty of light. A sunny windowsill or a grow light will work well.
5. Monitor and Water: Keep the soil consistently moist, but not soggy. Remove the plastic cover once the seedlings emerge.
6. Harden Off the Seedlings: Before transplanting your seedlings outdoors, you’ll need to harden them off. This process gradually acclimates them to outdoor conditions. Start by placing the trays outdoors in a sheltered location for a few hours each day, gradually increasing the amount of time they spend outside over the course of a week.
Phase 2: Preparing the Planting Bed
Long beans need a sunny spot with well-draining soil. Here’s how I prepare my planting bed:
1. Choose a Sunny Location: Select a spot in your garden that receives at least 6-8 hours of direct sunlight per day.
2. Amend the Soil: Long beans thrive in soil that’s rich in organic matter. Amend your soil with compost or aged manure to improve its fertility and drainage. I usually dig in a generous amount – about 2-3 inches – and mix it thoroughly with the existing soil.
3. Install Your Trellis or Support Structure: Before planting, install your trellis or support structure. This will give your long beans something to climb on as they grow. Make sure the structure is sturdy enough to support the weight of the mature plants. I’ve found that a trellis made from sturdy wire mesh works exceptionally well.
4. Water the Soil: Water the soil thoroughly before planting. This will help the seedlings establish themselves more easily.
Phase 3: Planting Your Long Beans
Now for the fun part – getting those long beans in the ground!
1. Direct Sowing (If Not Starting Indoors): If you’re not starting your seeds indoors, you can sow them directly into the prepared planting bed. Plant the seeds about 1 inch deep and 4-6 inches apart.
2. Transplanting Seedlings: If you started your seeds indoors, gently remove the seedlings from their trays. Dig a hole that’s slightly larger than the root ball of the seedling.
3. Planting Depth: Place the seedling in the hole, ensuring that the top of the root ball is level with the surrounding soil.
4. Spacing: Space the seedlings about 4-6 inches apart along the base of your trellis or support structure.
5. Backfill and Water: Backfill the hole with soil and gently firm it around the base of the seedling. Water thoroughly.
Phase 4: Caring for Your Long Beans
Consistent care is key to a bountiful harvest. Here’s what I do to keep my long beans happy and healthy:
1. Watering: Long beans need consistent moisture, especially during hot, dry weather. Water deeply and regularly, ensuring that the soil is moist but not waterlogged. I usually water in the morning to allow the foliage to dry before nightfall, which helps prevent fungal diseases.
2. Fertilizing: Long beans are heavy feeders, so they benefit from regular fertilization. I like to use an organic fertilizer that’s rich in phosphorus and potassium, which promotes flowering and fruiting. Follow the instructions on the fertilizer package. I usually fertilize every 2-3 weeks.
3. Weeding: Keep the planting bed free of weeds, which can compete with your long beans for nutrients and water. Hand-pull weeds regularly or use a hoe to cultivate the soil.
4. Mulching: Apply a layer of mulch around the base of your long bean plants to help retain moisture, suppress weeds, and regulate soil temperature. I like to use straw or shredded leaves as mulch.
5. Training: As your long beans grow, they’ll need to be trained to climb your trellis or support structure. Gently guide the vines up the trellis and tie them in place with soft twine or plant ties if necessary.
6. Pest and Disease Control: Keep an eye out for pests and diseases. Common pests of long beans include aphids, bean beetles, and spider mites. Common diseases include powdery mildew and fungal leaf spots. If you notice any problems, take action promptly. I prefer to use organic pest control methods, such as insecticidal soap or neem oil. For diseases, ensure good air circulation and avoid overhead watering.
Phase 5: Harvesting Your Long Beans
The moment you’ve been waiting for! Harvesting your long beans is incredibly rewarding.
1. Harvest Time: Long beans are typically ready to harvest about 60-70 days after planting.
2. Harvesting Technique: Harvest the beans when they are young and tender, before the seeds inside become too large and tough. The beans should be about 12-18 inches long, depending on the variety.
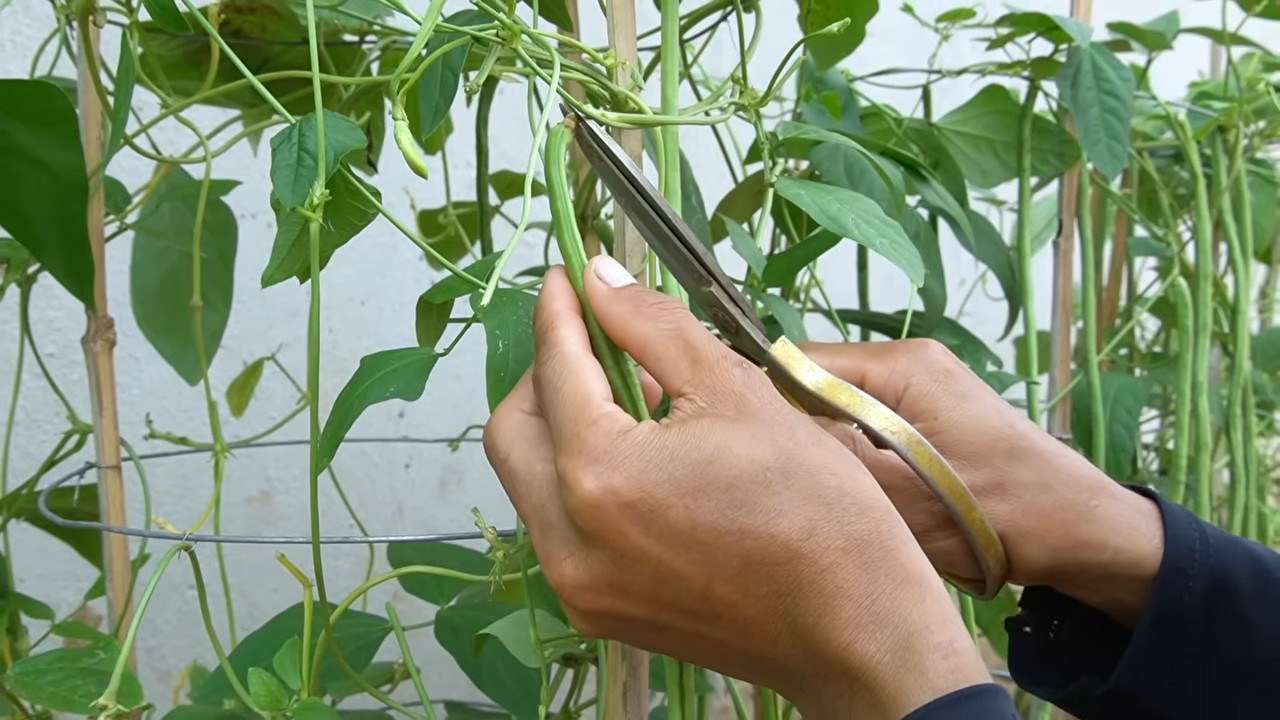
3. How to Harvest: Use scissors or pruning shears to cut the beans from the vine. Be careful not to damage the plant.
4. Regular Harvesting: Harvest your long beans regularly to encourage continued production. The more you harvest, the more beans the plant will produce.
5. Enjoy Your Harvest: Long beans are delicious steamed, stir-fried, or added to soups and stews. They’re also a great source of vitamins and minerals.
Troubleshooting: Common Long Bean Growing Problems
Even with the best care, you might encounter a few challenges along the way. Here are some common problems and how to address them:
* Poor Germination: If your seeds aren’t germinating, make sure the soil is warm enough and consistently moist. You can also try soaking the seeds in water for 24 hours before planting to improve germination rates.
* Yellowing Leaves: Yellowing leaves can be a sign of nutrient deficiency. Fertilize your plants with a balanced fertilizer or amend the soil with compost.
* Pest Infestations: If you notice pests on your long bean plants, take action promptly. Use insecticidal soap or neem oil to control aphids, bean beetles, and spider mites.
* Disease Problems: Prevent fungal diseases by ensuring good air circulation and avoiding overhead watering. If you notice signs of disease, remove affected leaves and treat the plants with a fungicide.
* Lack of Flowering: If your long bean plants aren’t flowering, they may not be getting enough sunlight or nutrients. Make sure they’re in a sunny location and fertilize them with a fertilizer that’s rich in phosphorus and potassium.
Important Tip: Remember to rotate
Conclusion
So, there you have it! Growing long beans easily doesn’t have to be a daunting task. With a little preparation, the right techniques, and a dash of patience, you can transform your garden into a long bean haven, overflowing with these delicious and versatile vegetables. This DIY trick, focusing on proper soil preparation, strategic trellising, and consistent watering, is a game-changer for anyone looking to maximize their long bean yield.
Why is this a must-try? Because it simplifies the process, minimizes common problems like stunted growth and pest infestations, and ultimately delivers a more bountiful harvest. Imagine stepping into your garden and being greeted by a cascade of vibrant green long beans, ready to be transformed into stir-fries, salads, or even pickled delights. That’s the power of this simple yet effective approach.
But don’t stop there! Feel free to experiment with different long bean varieties. Try the classic yardlong bean, or explore the intriguing purple-podded varieties for a pop of color in your garden and on your plate. You can also adjust the trellising system to suit your space and aesthetic preferences. A simple bamboo structure works wonders, but you could also get creative with repurposed materials like old ladders or even sturdy branches.
Consider companion planting to further enhance your long bean growing experience. Marigolds can help deter pests, while basil can improve the overall health of your plants. And don’t forget the importance of regular fertilization. A balanced organic fertilizer will provide your long beans with the nutrients they need to thrive.
The key to success lies in adapting these techniques to your specific environment and observing your plants closely. Pay attention to their needs, adjust your watering schedule as needed, and don’t be afraid to experiment.
We wholeheartedly encourage you to give this DIY trick a try. You’ll be amazed at the difference it makes. And more importantly, we want to hear about your experience! Share your photos, tips, and challenges in the comments below. Let’s create a community of long bean enthusiasts, sharing our knowledge and inspiring each other to grow the best long beans possible. Your insights could be invaluable to other gardeners embarking on their own long bean journey. So, grab your seeds, prepare your soil, and get ready to enjoy the fruits (or rather, the vegetables) of your labor! Happy gardening!
Frequently Asked Questions (FAQ)
What is the best time to plant long beans?
The ideal time to plant long beans is after the last frost, when the soil has warmed up to at least 65°F (18°C). Long beans are warm-season crops and are sensitive to cold temperatures. Planting too early can result in poor germination or stunted growth. In most regions, this typically falls between late spring and early summer. If you live in a warmer climate with a longer growing season, you may be able to plant a second crop in late summer for a fall harvest. Check your local weather patterns and planting calendars for the most accurate timing in your area.
How much sunlight do long beans need?
Long beans require at least 6-8 hours of direct sunlight per day to thrive. Sunlight is essential for photosynthesis, the process by which plants convert light energy into chemical energy for growth and development. Insufficient sunlight can lead to weak, leggy plants with reduced yields. Choose a planting location that receives ample sunlight throughout the day. If you live in an area with intense summer heat, providing some afternoon shade can help prevent leaf scorch.
What type of soil is best for growing long beans?
Long beans prefer well-drained, fertile soil with a slightly acidic to neutral pH (6.0-7.0). Good drainage is crucial to prevent root rot, a common problem in waterlogged soils. Amend heavy clay soils with organic matter such as compost, aged manure, or peat moss to improve drainage and aeration. Sandy soils can be improved by adding organic matter to increase water retention and nutrient availability. Before planting, conduct a soil test to determine the pH and nutrient levels. Amend the soil as needed based on the test results.
How often should I water long beans?
Long beans need consistent moisture, especially during flowering and pod development. Water deeply and regularly, aiming to keep the soil consistently moist but not waterlogged. The frequency of watering will depend on the weather conditions, soil type, and stage of plant growth. In hot, dry weather, you may need to water daily. In cooler, wetter weather, you can reduce the frequency. A good rule of thumb is to water when the top inch of soil feels dry to the touch. Use a soaker hose or drip irrigation to deliver water directly to the roots, minimizing water loss through evaporation and reducing the risk of fungal diseases.
What kind of trellis should I use for long beans?
Long beans are climbing plants and require a sturdy trellis to support their growth. A variety of trellising options are available, including bamboo stakes, netting, wire mesh, and A-frame structures. Choose a trellis that is at least 6-8 feet tall to accommodate the long vines. The trellis should be strong enough to support the weight of the mature plants and the developing pods. Install the trellis before planting to avoid disturbing the roots later on. Ensure the trellis is securely anchored to the ground to prevent it from toppling over in strong winds.
How do I deal with pests and diseases on long beans?
Long beans can be susceptible to various pests and diseases, including aphids, bean beetles, spider mites, and fungal diseases like powdery mildew. Regularly inspect your plants for signs of infestation or disease. Handpick pests or use insecticidal soap or neem oil to control infestations. Ensure good air circulation around the plants to prevent fungal diseases. Avoid overhead watering, which can create a humid environment that favors fungal growth. Remove and destroy any infected plant parts to prevent the spread of disease. Consider using companion planting to deter pests and attract beneficial insects.
When and how do I harvest long beans?
Long beans are typically ready to harvest 60-90 days after planting, depending on the variety and growing conditions. Harvest the pods when they are young, tender, and about 12-18 inches long. Use scissors or pruning shears to cut the pods from the vine, being careful not to damage the plant. Harvest regularly to encourage continued production. Overripe pods will become tough and stringy. Store harvested long beans in the refrigerator for up to a week.
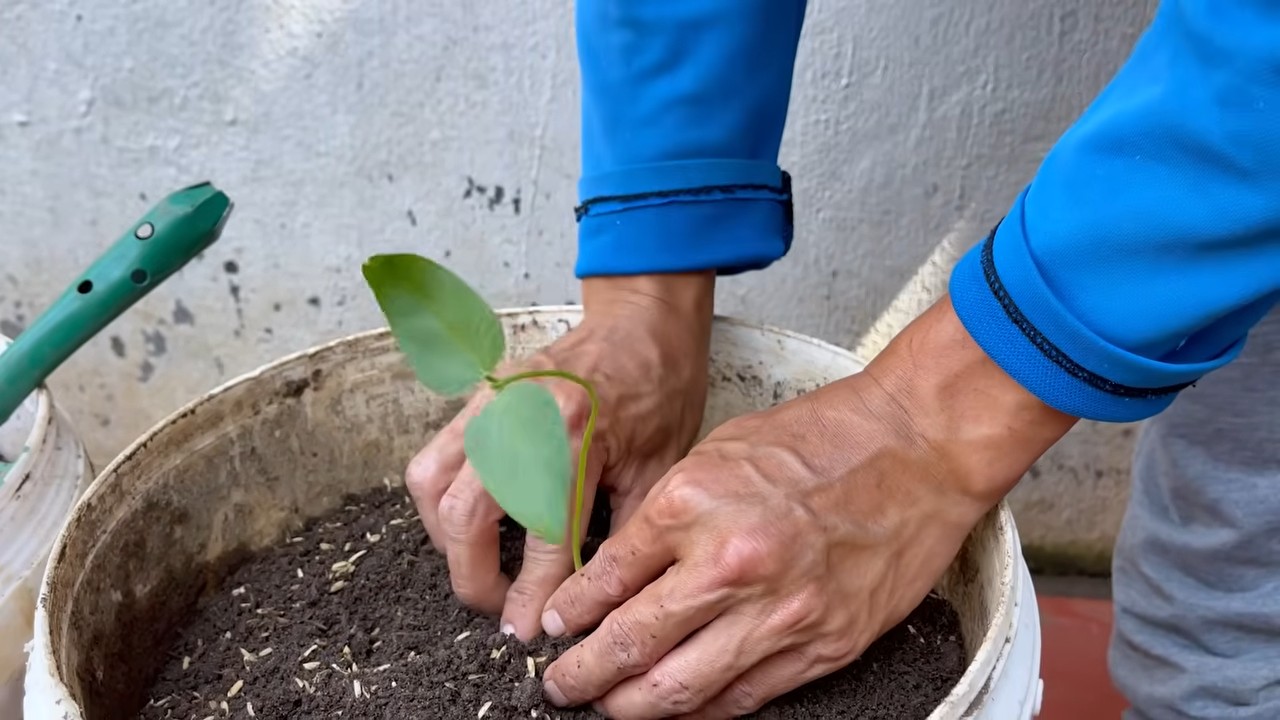
Can I grow long beans in containers?
Yes, long beans can be grown successfully in containers, provided you choose a large enough container and provide adequate support. Select a container that is at least 12 inches in diameter and depth. Use a well-draining potting mix and provide a sturdy trellis for the vines to climb. Water regularly and fertilize every 2-3 weeks with a balanced liquid fertilizer. Place the container in a sunny location that receives at least 6-8 hours of direct sunlight per day. Container-grown long beans may require more frequent watering and fertilization than those grown in the ground.
Are there different varieties of long beans?
Yes, there are several varieties of long beans available, each with its own unique characteristics. Some popular varieties include the yardlong bean, Chinese long bean, and asparagus bean. These varieties differ in pod length, color, and flavor. Experiment with different varieties to find the ones that you enjoy the most. Consider the growing conditions in your area when selecting a variety. Some varieties are more heat-tolerant or disease-resistant than others.
How can I save seeds from my long bean plants?
Saving seeds from your long bean plants is a great way to preserve your favorite varieties and reduce your gardening costs. Allow some of the pods to mature fully on the vine, until they are dry and brown. Harvest the pods and remove the seeds. Spread the seeds out on a tray to dry completely in a cool, dry place. Once the seeds are dry, store them in an airtight container in a cool, dark location. Label the container with the variety and date of harvest. Long bean seeds can remain viable for several years if stored properly.


Leave a Comment