
Growing Parsley Indoors can seem like a daunting task, but trust me, with a few simple tricks, you can have a thriving herb garden right on your windowsill! Imagine fresh, vibrant parsley always at your fingertips, ready to elevate your culinary creations. No more last-minute grocery store runs or settling for dried, flavorless substitutes.
Parsley, with its bright green leaves and refreshing taste, has been a culinary staple for centuries. Originating in the Mediterranean, it was once revered by the ancient Greeks and Romans, not just for its flavor, but also for its medicinal properties and symbolic significance. They even used it to crown victors in athletic competitions! Today, parsley remains a beloved herb worldwide, adding a touch of freshness to countless dishes.
But why bother growing parsley indoors? Well, for starters, it’s incredibly convenient. Having fresh herbs readily available encourages healthier eating and adds a gourmet touch to your meals. Plus, it’s a fantastic way to connect with nature, even if you don’t have a sprawling garden. In this article, I’ll share my favorite DIY tricks and hacks to ensure your indoor parsley thrives, regardless of your experience level. Get ready to unleash your inner gardener and enjoy the delightful rewards of homegrown herbs!
Growing Parsley Indoors: A Beginner’s Guide
Hey there, fellow plant enthusiasts! Ever dreamt of having fresh, vibrant parsley right at your fingertips, no matter the season? Well, you’re in the right place! I’m going to walk you through everything you need to know to successfully grow parsley indoors. Trust me, it’s easier than you think, and the reward of snipping fresh herbs for your favorite dishes is totally worth it.
Choosing the Right Parsley Variety
First things first, let’s talk parsley types. There are two main varieties you’ll encounter: curly parsley and flat-leaf (Italian) parsley.
* Curly Parsley: This is the one you often see as a garnish. It has a slightly milder flavor than its flat-leaf cousin.
* Flat-Leaf Parsley: Also known as Italian parsley, this variety boasts a more robust and pronounced flavor. Many chefs prefer it for cooking.
Honestly, the choice is up to you! I personally love having both on hand. Consider which one you use more often in your cooking and go from there. You can even grow both in separate pots!
Gathering Your Supplies
Before we dive into the planting process, let’s make sure you have everything you need. Here’s your checklist:
* Parsley Seeds or Seedlings: You can start from seeds or buy small parsley plants from your local nursery. Seeds take a bit longer, but it’s a fun and rewarding process. Seedlings give you a head start.
* Pot with Drainage Holes: Drainage is crucial! Parsley doesn’t like soggy roots. Choose a pot that’s at least 6 inches in diameter and has drainage holes at the bottom.
* High-Quality Potting Mix: Don’t skimp on the soil! Use a well-draining potting mix specifically formulated for herbs or vegetables. Avoid using garden soil, as it can be too heavy and compact.
* Watering Can or Spray Bottle: For gentle watering.
* Grow Lights (Optional but Recommended): Parsley needs a good amount of light, especially indoors. If you don’t have a sunny windowsill, grow lights are a great investment.
* Liquid Fertilizer (Optional): A balanced liquid fertilizer can help boost growth, but it’s not essential.
* Small Trowel or Spoon: For handling soil and seedlings.
Planting Parsley from Seeds
Okay, let’s get our hands dirty! Here’s how to plant parsley from seeds:
1. Prepare the Pot: Fill your pot with potting mix, leaving about an inch of space at the top. Gently tap the pot to settle the soil.
2. Sow the Seeds: Parsley seeds can be a bit slow to germinate, so don’t be discouraged if you don’t see sprouts right away. Sprinkle the seeds evenly over the surface of the soil. You can sow them quite densely, as you can always thin them out later.
3. Cover the Seeds: Lightly cover the seeds with a thin layer of potting mix (about ¼ inch).
4. Water Gently: Use a spray bottle or watering can with a gentle nozzle to moisten the soil. Be careful not to dislodge the seeds.
5. Create a Humid Environment: Cover the pot with plastic wrap or a clear plastic bag to create a humid environment. This will help with germination.
6. Place in a Warm Location: Place the pot in a warm location (around 70-75°F or 21-24°C).
7. Wait for Germination: Parsley seeds can take anywhere from 2 to 4 weeks to germinate. Be patient! Keep the soil consistently moist, but not soggy. Remove the plastic wrap or bag once you see sprouts.
Planting Parsley Seedlings
If you’re opting for seedlings, the process is even simpler:
1. Prepare the Pot: Fill your pot with potting mix, leaving about an inch of space at the top.
2. Gently Remove the Seedling: Carefully remove the parsley seedling from its container. Gently loosen the roots if they are tightly packed.
3. Plant the Seedling: Dig a small hole in the potting mix large enough to accommodate the seedling’s root ball. Place the seedling in the hole and gently backfill with potting mix.
4. Water Thoroughly: Water the seedling thoroughly after planting.
5. Place in a Sunny Location: Place the pot in a sunny location.
Caring for Your Indoor Parsley
Now that your parsley is planted, let’s talk about how to keep it happy and thriving indoors.
* Light: Parsley needs at least 6 hours of sunlight per day. A south-facing windowsill is ideal. If you don’t have enough natural light, supplement with grow lights. I’ve found that using a full-spectrum LED grow light for about 12-14 hours a day really makes a difference.
* Watering: Keep the soil consistently moist, but not soggy. Water when the top inch of soil feels dry to the touch. Avoid overwatering, as this can lead to root rot. I usually water mine every 2-3 days, but it depends on the humidity and temperature in my home.
* Temperature: Parsley prefers temperatures between 60-75°F (15-24°C). Avoid placing it near drafts or extreme temperature fluctuations.
* Fertilizing: If you want to give your parsley a boost, you can fertilize it every 2-4 weeks with a balanced liquid fertilizer diluted to half strength. I personally use a fertilizer specifically formulated for herbs.
* Pruning: Regular pruning is essential for keeping your parsley healthy and productive. Snip off the outer leaves as needed, leaving the inner leaves to continue growing. This will encourage bushier growth.
* Pest Control: Keep an eye out for pests like aphids or spider mites. If you spot any, you can try spraying them with insecticidal soap or neem oil. I prefer to use natural pest control methods whenever possible.
Harvesting Your Parsley
The best part! You can start harvesting your parsley once the plants are about 6 inches tall.
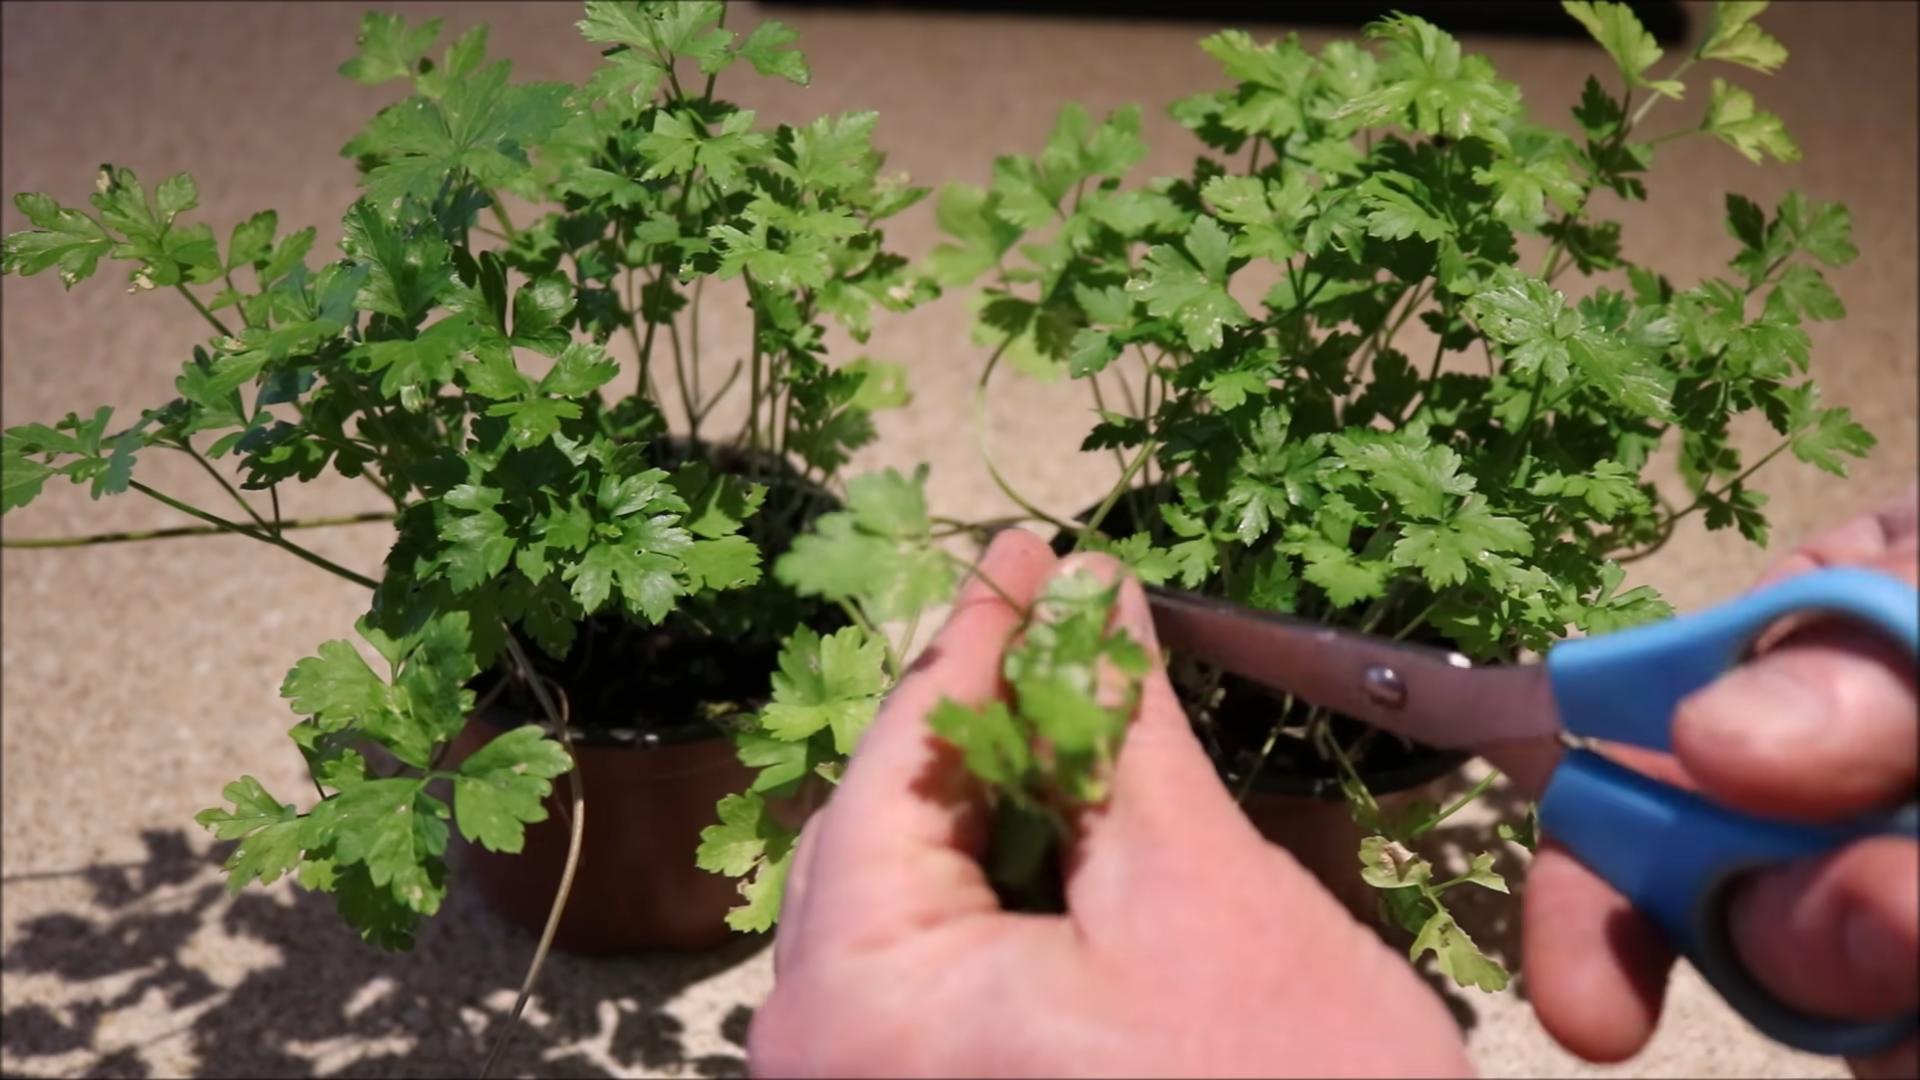
* Harvesting Technique: Use scissors or pruning shears to snip off the outer leaves near the base of the plant. Avoid cutting off the entire plant at once, as this will prevent it from regrowing.
* Harvesting Frequency: You can harvest parsley regularly, as needed. The more you harvest, the more it will grow!
* Storing Parsley: Freshly harvested parsley is best used immediately. However, you can store it in the refrigerator for a few days. Wrap it in a damp paper towel and place it in a plastic bag. You can also freeze parsley for longer storage. Chop it up and freeze it in ice cube trays with water or olive oil.
Troubleshooting Common Problems
Even with the best care, you might encounter a few challenges along the way. Here are some common problems and how to fix them:
* Yellowing Leaves: This could be a sign of overwatering, underwatering, or nutrient deficiency. Check the soil moisture and adjust your watering accordingly. If the soil is consistently moist, you’re likely overwatering. If it’s dry, you need to water more often. You can also try fertilizing with a balanced liquid fertilizer.
* Leggy Growth: This usually indicates that your parsley isn’t getting enough light. Move it to a sunnier location or supplement with grow lights.
* Slow Growth: This could be due to a variety of factors, including insufficient light, poor soil, or lack of nutrients. Make sure your parsley is getting enough light, use a high-quality potting mix, and fertilize regularly.
* Pests: As mentioned earlier, keep an eye out for pests and treat them promptly with insecticidal soap or neem oil.
Enjoying Your Homegrown Parsley
Now that you’ve successfully grown your own parsley indoors, it’s time to enjoy the fruits (or rather, herbs) of your labor! Add it to your favorite soups, salads, sauces, and stews. Use it as a garnish for grilled meats and vegetables. The possibilities are endless!
Growing parsley indoors is a rewarding experience that allows you to have fresh herbs at your fingertips year-round. With a little bit of care and attention, you can enjoy a bountiful harvest of flavorful parsley. Happy gardening!

Conclusion
So, there you have it! Growing parsley indoors isn’t just a whimsical dream for the green-thumbed; it’s an achievable reality for anyone, regardless of their outdoor space or gardening experience. We’ve walked through the essentials, from selecting the right variety and providing optimal lighting to ensuring proper watering and harvesting techniques. But why should you bother with all this effort when you can simply buy parsley at the grocery store?
The answer lies in the unparalleled freshness and flavor that homegrown parsley offers. Imagine snipping vibrant, aromatic leaves just moments before adding them to your favorite dishes. The difference in taste compared to store-bought parsley, which often sits on shelves for days, is truly remarkable. Plus, you have the satisfaction of knowing exactly where your food comes from and that it’s free from harmful pesticides.
Beyond the superior flavor, growing parsley indoors is also incredibly convenient. No more last-minute trips to the store when you realize you’re out of this essential herb. Your fresh parsley is always readily available, right at your fingertips. It’s also a sustainable choice, reducing your reliance on commercially grown produce and minimizing your carbon footprint.
But the benefits don’t stop there. Growing plants indoors, including parsley, has been shown to improve air quality, reduce stress levels, and boost overall well-being. It’s a simple way to bring a touch of nature into your home and create a more calming and inviting environment.
Now, let’s talk about variations and suggestions. While we’ve focused on growing curly parsley, you can also experiment with flat-leaf (Italian) parsley, which has a slightly stronger flavor. You can also try growing different cultivars of each type to discover your personal favorite. Consider using different types of containers, from traditional terracotta pots to self-watering planters, to see what works best for you. You can even incorporate parsley into a larger indoor herb garden, alongside other favorites like basil, mint, and chives.
Don’t be afraid to experiment with different lighting setups. If you don’t have a sunny windowsill, consider using a grow light to supplement natural light. This is especially helpful during the winter months when daylight hours are shorter.
The key to successful indoor parsley cultivation is consistency. Pay attention to your plants, monitor their growth, and adjust your care routine as needed. With a little patience and attention, you’ll be rewarded with a bountiful supply of fresh, flavorful parsley all year round.
So, what are you waiting for? Grab a pot, some soil, and some parsley seeds or seedlings, and embark on your indoor gardening adventure today. We’re confident that you’ll be amazed by the results. And most importantly, don’t forget to share your experiences with us! We’d love to hear about your successes, challenges, and any tips or tricks you’ve discovered along the way. Share your photos and stories on social media using #IndoorParsley or leave a comment below. Let’s create a community of indoor parsley enthusiasts and inspire others to experience the joy of growing their own fresh herbs. This DIY trick is a game changer!
Frequently Asked Questions (FAQ)
Q: What is the best type of parsley to grow indoors?
A: Both curly and flat-leaf (Italian) parsley can be successfully grown indoors. Curly parsley is often preferred for its decorative appearance and slightly milder flavor, while flat-leaf parsley has a stronger, more robust taste. Ultimately, the best type for you depends on your personal preferences and culinary needs. Experiment with both to see which you prefer!
Q: How much sunlight does indoor parsley need?
A: Parsley thrives in bright, indirect sunlight. Aim for at least 6-8 hours of sunlight per day. A south-facing window is ideal, but an east- or west-facing window can also work. If you don’t have access to sufficient natural light, consider using a grow light to supplement. Position the grow light a few inches above the plants and keep it on for 12-14 hours per day.
Q: What kind of soil should I use for growing parsley indoors?
A: Use a well-draining potting mix that is rich in organic matter. Avoid using garden soil, as it can be too heavy and may not drain properly. You can also amend your potting mix with compost or other organic materials to improve its fertility and drainage.
Q: How often should I water my indoor parsley?
A: Water your parsley when the top inch of soil feels dry to the touch. Avoid overwatering, as this can lead to root rot. Ensure that your pot has drainage holes to allow excess water to escape. During the warmer months, you may need to water more frequently than during the cooler months.
Q: How do I harvest parsley from my indoor plant?
A: Harvest parsley by snipping off the outer stems near the base of the plant. Avoid cutting more than one-third of the plant at a time, as this can stunt its growth. Regular harvesting encourages the plant to produce more leaves.
Q: My parsley is turning yellow. What’s wrong?
A: Yellowing leaves can be caused by several factors, including overwatering, underwatering, nutrient deficiencies, or pests. Check the soil moisture and adjust your watering accordingly. If the soil is consistently dry, water more frequently. If the soil is consistently wet, allow it to dry out slightly before watering again. You can also fertilize your parsley with a balanced liquid fertilizer to address any nutrient deficiencies. Inspect your plants for pests, such as aphids or spider mites, and treat them accordingly.
Q: Can I grow parsley from seed indoors?
A: Yes, you can grow parsley from seed indoors. However, parsley seeds can be slow to germinate, so be patient. Soak the seeds in water for 24 hours before planting to improve germination rates. Sow the seeds in a pot filled with well-draining potting mix and keep the soil moist. Place the pot in a warm, sunny location or under a grow light. Germination typically takes 2-3 weeks.
Q: How long will my indoor parsley plant last?
A: Parsley is a biennial plant, meaning it typically lives for two years. However, it often bolts (produces flowers and seeds) in its second year, which can reduce its flavor and productivity. To prolong the life of your parsley plant, pinch off any flower buds as soon as they appear. With proper care, your indoor parsley plant can provide you with fresh herbs for several months.
Q: Can I move my indoor parsley plant outdoors?
A: Yes, you can move your indoor parsley plant outdoors during the warmer months. However, be sure to acclimate it gradually to the outdoor conditions to prevent shock. Start by placing the plant in a sheltered location for a few hours each day, gradually increasing the amount of time it spends outdoors. Bring the plant back indoors before the first frost.
Q: What are some common pests that affect indoor parsley?
A: Common pests that can affect indoor parsley include aphids, spider mites, and whiteflies. Inspect your plants regularly for signs of infestation and treat them accordingly. You can use insecticidal soap or neem oil to control these pests.
Q: Can I freeze parsley for later use?
A: Yes, you can freeze parsley for later use. Wash and dry the parsley thoroughly, then chop it into small pieces. Place the chopped parsley in ice cube trays, fill with water or olive oil, and freeze. Once frozen, transfer the parsley cubes to a freezer bag or container. You can also freeze whole parsley sprigs by laying them flat on a baking sheet and freezing them until solid, then transferring them to a freezer bag.

Leave a Comment