
Growing potatoes no garden? Absolutely! Imagine harvesting a bounty of fresh, earthy potatoes right from your balcony or patio, even if you don’t have a traditional garden. It sounds like a dream, right? Well, get ready to turn that dream into a delicious reality with these simple and effective DIY tricks!
For centuries, potatoes have been a staple food source across the globe. Originating in the Andes Mountains of South America, they’ve journeyed across continents, becoming a vital part of countless cultures and cuisines. From hearty stews to crispy fries, the humble potato is incredibly versatile. But what if you’re short on space? That’s where our ingenious DIY hacks come in.
Many people believe that growing potatoes no garden is impossible, but I’m here to tell you it’s not only possible, it’s surprisingly easy and rewarding! In today’s fast-paced world, access to fresh, healthy produce can be a challenge. Store-bought potatoes, while convenient, often lack the flavor and freshness of homegrown varieties. Plus, there’s something incredibly satisfying about nurturing your own food from seed (or in this case, a seed potato) to table. This DIY guide will empower you to bypass the limitations of space and enjoy the unparalleled taste of homegrown potatoes, all while saving money and reducing your environmental footprint. So, let’s ditch the dirt-only mindset and explore the exciting world of container gardening for potatoes!
Growing Potatoes in a Bag: A Gardener’s Guide for Small Spaces
Hey there, fellow plant enthusiasts! Don’t have a garden? No problem! I’m going to show you how to grow a bountiful potato harvest right on your balcony, patio, or even indoors with enough sunlight, using just a bag. It’s easier than you think, and incredibly rewarding. Get ready for some homegrown goodness!
What You’ll Need
Before we dive in, let’s gather our supplies. This is what you’ll need to get started:
* A Large, Sturdy Bag: Think burlap, heavy-duty plastic (like a potato sack!), or even a strong garbage bag. The bigger, the better – aim for at least 20 gallons. Make sure it has drainage holes!
* Seed Potatoes: These aren’t just any potatoes from the grocery store. Seed potatoes are specifically grown for planting and are disease-free. You can find them at your local garden center or online. Choose a variety you love to eat!
* Potting Mix: A good quality potting mix is crucial. Avoid using garden soil, as it can be too heavy and compact.
* Water: Essential for, well, everything!
* Sunlight: Potatoes need at least 6-8 hours of sunlight per day.
* Fertilizer (Optional): A balanced, slow-release fertilizer can give your potatoes an extra boost.
Preparing Your Seed Potatoes
Okay, so you’ve got your seed potatoes. Now what? This step is important for maximizing your yield.
* Chitting (Sprouting): This is the process of encouraging your seed potatoes to sprout before planting. It gives them a head start.
1. A few weeks before planting (about 2-3 weeks), place your seed potatoes in a cool, bright location. An egg carton works great for holding them upright.
2. You’ll notice small “eyes” or sprouts starting to emerge. This is exactly what we want!
3. If your seed potatoes are large (bigger than an egg), you can cut them into smaller pieces, ensuring each piece has at least 2-3 eyes. Let the cut surfaces dry for a day or two to prevent rotting.
Planting Your Potatoes
Alright, let’s get our hands dirty! This is where the magic happens.
1. Prepare the Bag: If your bag doesn’t already have drainage holes, poke several in the bottom. This is super important to prevent waterlogging, which can rot your potatoes.
2. Add the Initial Soil Layer: Pour about 4-6 inches of potting mix into the bottom of the bag.
3. Plant the Seed Potatoes: Place your seed potatoes (sprouts facing up!) on top of the soil, spacing them about 8-10 inches apart. If you’re only planting one seed potato, place it in the center.
4. Cover with Soil: Cover the seed potatoes with another 4-6 inches of potting mix.
5. Water Thoroughly: Give the soil a good watering until it’s evenly moist, but not soggy.
The “Hilling” Process: Key to a Big Harvest
This is the secret sauce to growing lots of potatoes in a bag. As the potato plants grow, you’ll need to add more soil to encourage more potato production. This is called “hilling.”
1. Wait for Growth: Once the potato plants have grown about 6-8 inches tall, it’s time to hill.
2. Add More Soil: Add another 4-6 inches of potting mix to the bag, burying the stems of the plants, leaving only the top few leaves exposed.
3. Repeat: Continue this process every few weeks as the plants grow taller, until you’ve almost filled the bag with soil. The more of the stem you bury, the more potatoes you’ll get!
4. Water Regularly: Keep the soil consistently moist, but not waterlogged. Check the soil moisture by sticking your finger a couple of inches into the soil. If it feels dry, it’s time to water.
Caring for Your Potato Plants
Now that your potatoes are planted and growing, here’s how to keep them happy and healthy:
* Sunlight: Make sure your bag is in a location that receives at least 6-8 hours of sunlight per day. If you’re growing indoors, you may need to supplement with grow lights.
* Watering: Water regularly, especially during hot, dry weather. Potatoes need consistent moisture to thrive.
* Fertilizing (Optional): If you choose to fertilize, use a balanced, slow-release fertilizer according to the package directions. Avoid over-fertilizing, as this can lead to excessive foliage growth at the expense of potato production.
* Pest Control: Keep an eye out for pests like aphids, potato beetles, and flea beetles. If you spot any, you can try hand-picking them off, using insecticidal soap, or applying neem oil.
* Disease Prevention: Good air circulation and proper watering can help prevent diseases. Avoid overhead watering, as this can create a humid environment that encourages fungal growth.
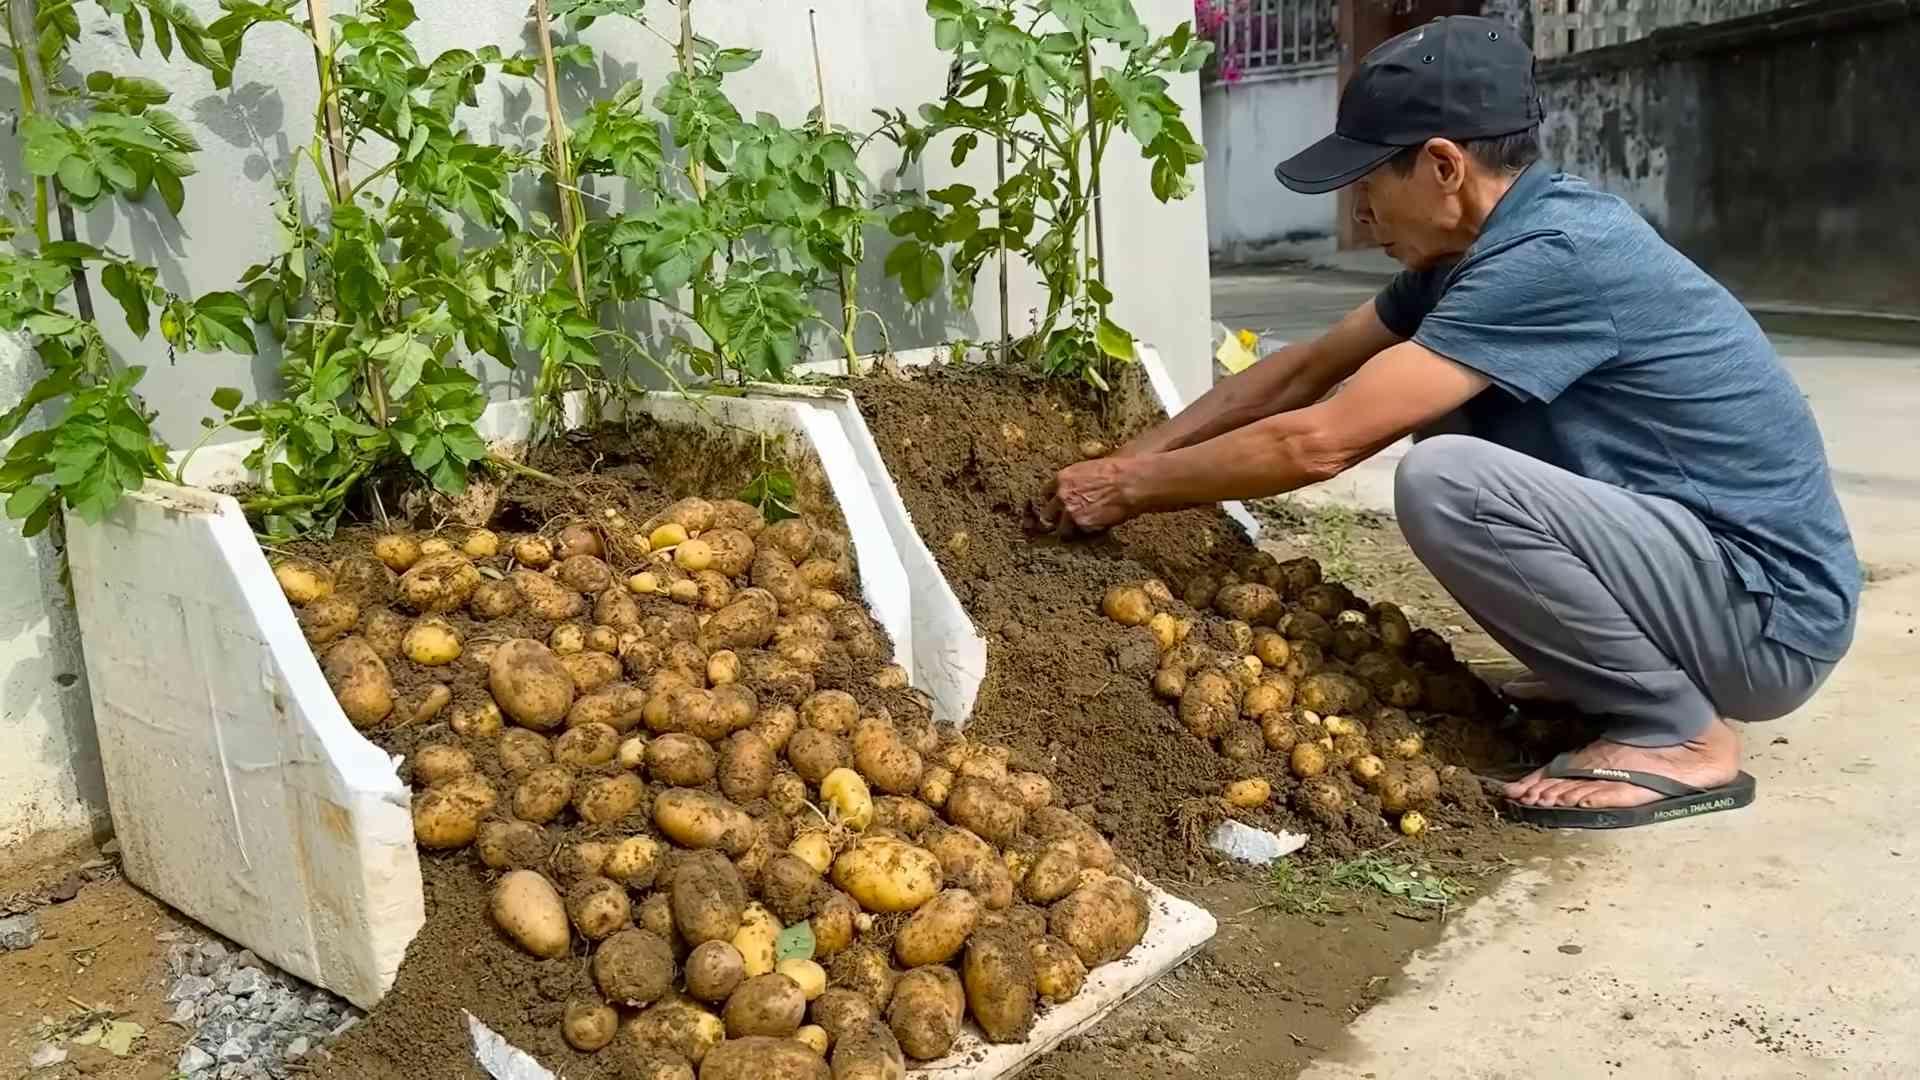
Harvesting Your Potatoes
The most exciting part! Here’s how to know when your potatoes are ready to harvest:
* Timing: Depending on the variety, potatoes typically take 80-100 days to mature.
* Signs of Maturity: The foliage will start to turn yellow and die back. This is a sign that the potatoes are ready to be harvested.
* Harvesting:
1. Gently tip the bag over onto a tarp or large sheet.
2. Carefully sift through the soil, searching for your buried treasure!
3. Harvest all the potatoes, even the small ones.
4. Let the potatoes dry in a cool, dark place for a few days to cure. This will help them store longer.
Troubleshooting
Sometimes things don’t go exactly as planned. Here are some common problems and how to fix them:
* Yellowing Leaves: This could be a sign of overwatering, underwatering, nutrient deficiency, or disease. Check the soil moisture, fertilize if necessary, and look for signs of pests or diseases.
* Small Potatoes: This could be due to insufficient sunlight, lack of nutrients, or not enough hilling. Make sure your plants are getting enough sunlight, fertilize regularly, and continue to hill as the plants grow.
* Rotting Potatoes: This is usually caused by overwatering or poor drainage. Make sure your bag has adequate drainage holes and avoid overwatering.
Choosing the Right Potato Variety
The type of potato you choose to grow will impact the taste, texture, and even the growing time. Here’s a quick rundown of some popular varieties:
* Yukon Gold: These are known for their creamy texture and buttery flavor. They’re great for roasting, mashing, and boiling.
* Red Potatoes: These have a waxy texture and hold their shape well when cooked. They’re perfect for potato salads and boiling.
* Russet Potatoes: These are the classic baking potatoes. They’re fluffy and absorbent, making them ideal for fries and mashed potatoes.
* Fingerling Potatoes: These are small, elongated potatoes with a firm texture and nutty flavor. They’re delicious roasted or boiled.
* Purple Potatoes: These are a fun and colorful option with a slightly earthy flavor. They’re great for adding visual appeal to your dishes.
Tips for Success
Here are a few extra tips to help you grow the best potatoes possible:
* Use a dark-colored bag: Dark colors absorb more heat, which can help warm the soil and promote faster growth.
* Rotate your crops: Avoid planting potatoes in the same bag year after year. This can help prevent soilborne diseases.
* Don’t be afraid to experiment: Try different varieties of potatoes and different growing techniques to see what works best for you.
* Enjoy the process: Growing your own potatoes is a rewarding experience. Take the time to enjoy the process and appreciate the fruits (or rather, tubers) of your labor!
Storing Your Harvest
Once you’ve harvested your potatoes, proper storage is key to keeping them fresh for as long as possible.
* Curing: After harvesting, let your potatoes dry in a cool, dark, and well-ventilated place for about a week. This allows the skins to harden, which helps prevent rot.
* Storage Conditions: Store your cured potatoes in a cool (40-50°F), dark, and humid (85-95% humidity) place. A root cellar is ideal, but a cool basement or garage can also work.
* Avoid Light: Exposure to light can cause potatoes to turn green and produce solanine, a toxic compound.
* Don’t
Conclusion
So, there you have it! Growing potatoes without a garden isn’t just a whimsical idea; it’s a genuinely achievable and rewarding experience. We’ve walked you through the process, highlighting the simplicity and accessibility of this method. Forget the limitations of traditional gardening; with a container, some seed potatoes, and a little bit of patience, you can cultivate your own homegrown spuds, bursting with fresh, earthy flavor.
Why is this DIY potato growing trick a must-try? Because it democratizes gardening. It empowers anyone, regardless of their living situation, to connect with the source of their food. Apartment dwellers, balcony enthusiasts, and those with limited mobility can all participate in the joy of harvesting their own potatoes. It’s also incredibly educational, especially for children, offering a tangible lesson in plant life cycles and sustainable living. Plus, let’s be honest, there’s a certain satisfaction in pulling those first potatoes from the soil – a feeling of accomplishment that’s hard to beat.
But the fun doesn’t stop there! Feel free to experiment with different potato varieties. Russets are fantastic for baking, Yukon Golds are creamy and delicious boiled, and red potatoes add a vibrant touch to salads. You can also play around with the container size and material. While we recommended a large container, you can try smaller ones for a more manageable harvest. Just remember to adjust the watering and fertilization accordingly. Consider adding companion plants like marigolds or basil to deter pests and attract beneficial insects. These additions can enhance the overall health and productivity of your potato plants.
Don’t be afraid to get creative with your growing medium. While a standard potting mix works well, you can also incorporate compost, peat moss, or even shredded leaves to improve drainage and nutrient content. Just be sure to avoid using soil directly from your garden, as it may contain pests or diseases that could harm your potato plants.
And speaking of pests, keep a watchful eye out for common potato problems like aphids, potato beetles, and blight. Early detection and treatment are key to preventing these issues from derailing your harvest. Organic pest control methods, such as neem oil or insecticidal soap, are often effective in managing these problems.
Ultimately, the best way to learn is by doing. So, we wholeheartedly encourage you to give this DIY potato growing trick a try. It’s a simple, affordable, and incredibly rewarding way to enjoy fresh, homegrown potatoes, no matter where you live. Once you’ve harvested your first crop, we’d love to hear about your experience! Share your photos, tips, and stories with us in the comments below. Let’s create a community of urban potato growers and inspire others to embrace the joy of homegrown food. Happy growing! Remember, successful **growing potatoes no garden** is within your reach!
Frequently Asked Questions (FAQ)
What kind of container should I use?
The ideal container for growing potatoes without a garden should be large, at least 20 gallons in size, and have drainage holes. Plastic containers, grow bags, and even repurposed trash cans can work well. The key is to ensure adequate drainage to prevent waterlogging, which can lead to root rot. Dark-colored containers can absorb more heat, which can be beneficial in cooler climates, but may overheat in hotter regions. Consider using a lighter-colored container or providing shade during the hottest part of the day.
How many seed potatoes can I plant in one container?
Generally, you can plant 3-5 seed potatoes in a 20-gallon container. Space them evenly around the container to allow for adequate growth. If you’re using a smaller container, reduce the number of seed potatoes accordingly. Overcrowding can lead to smaller potatoes and reduced yields.
What kind of soil should I use?
Use a well-draining potting mix that is rich in organic matter. Avoid using soil directly from your garden, as it may contain pests or diseases that could harm your potato plants. You can amend the potting mix with compost, peat moss, or shredded leaves to improve drainage and nutrient content. A slightly acidic soil pH (around 6.0-6.5) is ideal for potato growth.
How often should I water my potato plants?
Water your potato plants regularly, especially during hot and dry weather. The soil should be consistently moist, but not waterlogged. Check the soil moisture by sticking your finger about an inch into the soil. If it feels dry, it’s time to water. Avoid overwatering, as this can lead to root rot.
How much sunlight do potato plants need?
Potato plants need at least 6-8 hours of sunlight per day. Choose a location that receives plenty of direct sunlight. If you’re growing potatoes indoors, you may need to supplement with grow lights.
When should I start hilling my potato plants?
Start hilling your potato plants when the stems are about 6-8 inches tall. Add a layer of soil or compost around the base of the plants, burying the lower portion of the stems. This encourages the plants to produce more potatoes along the buried stems. Repeat this process every few weeks as the plants grow taller.
What kind of fertilizer should I use?
Use a balanced fertilizer that is specifically formulated for vegetables. Follow the instructions on the fertilizer package for application rates. You can also use organic fertilizers, such as compost tea or fish emulsion. Fertilize your potato plants every few weeks during the growing season.
How do I know when my potatoes are ready to harvest?
Potato plants typically take 80-100 days to mature. You can start harvesting “new potatoes” (small, immature potatoes) about 2-3 weeks after the plants flower. For larger, more mature potatoes, wait until the foliage starts to die back. At this point, stop watering the plants and allow the soil to dry out slightly. This will help the potatoes to cure and develop a thicker skin.
How do I harvest my potatoes?
Gently dig around the base of the plants with a garden fork or trowel. Be careful not to damage the potatoes. Lift the plants out of the container and remove the potatoes from the soil.
How do I store my potatoes?
Store your potatoes in a cool, dark, and dry place. A root cellar is ideal, but a basement or garage can also work. Avoid storing potatoes in the refrigerator, as this can cause them to develop a sweet taste. Properly stored potatoes can last for several months.
What if my potato plants get pests or diseases?
Keep a close eye on your potato plants for signs of pests or diseases. Common potato pests include aphids, potato beetles, and flea beetles. Common potato diseases include early blight, late blight, and potato scab. Treat any problems promptly with organic pest control methods or fungicides.
Can I grow potatoes in a bag?
Yes, growing potatoes in a bag is a popular and effective method. Use a large, sturdy bag made of burlap, plastic, or fabric. Follow the same planting and hilling instructions as you would for a container.
Can I reuse the soil from my potato container?
It’s generally not recommended to reuse the soil from your potato container, as it may contain pests or diseases. However, if you’re confident that the soil is healthy, you can amend it with fresh compost and fertilizer before reusing it.
What are some good companion plants for potatoes?
Good companion plants for potatoes include marigolds, basil, thyme, and garlic. These plants can help to deter pests and attract beneficial insects. Avoid planting potatoes near tomatoes, peppers, or eggplants, as they are all susceptible to the same diseases.
My potato plants are flowering, is that a good sign?
Yes, flowering is a good sign that your potato plants are healthy and producing tubers. You can start harvesting “new potatoes” about 2-3 weeks after the plants flower.
Can I grow potatoes indoors year-round?
Yes, you can grow potatoes indoors year-round, but you’ll need to provide adequate light and warmth. Use grow lights to supplement natural sunlight and maintain a consistent temperature of around 65-75°F.
What if my potatoes turn green?
Green potatoes contain solanine, a toxic compound that can cause illness. Do not eat green potatoes. Discard them or bury them in the garden.
Is growing potatoes without a garden really worth it?
Absolutely! Growing your own potatoes, even in a container, is a rewarding experience that connects you with your food and provides you with fresh, delicious potatoes. It’s a great way to learn about gardening, reduce your carbon footprint, and enjoy the satisfaction of harvesting your own homegrown produce. The taste of freshly dug potatoes is simply unmatched.
Leave a Comment