
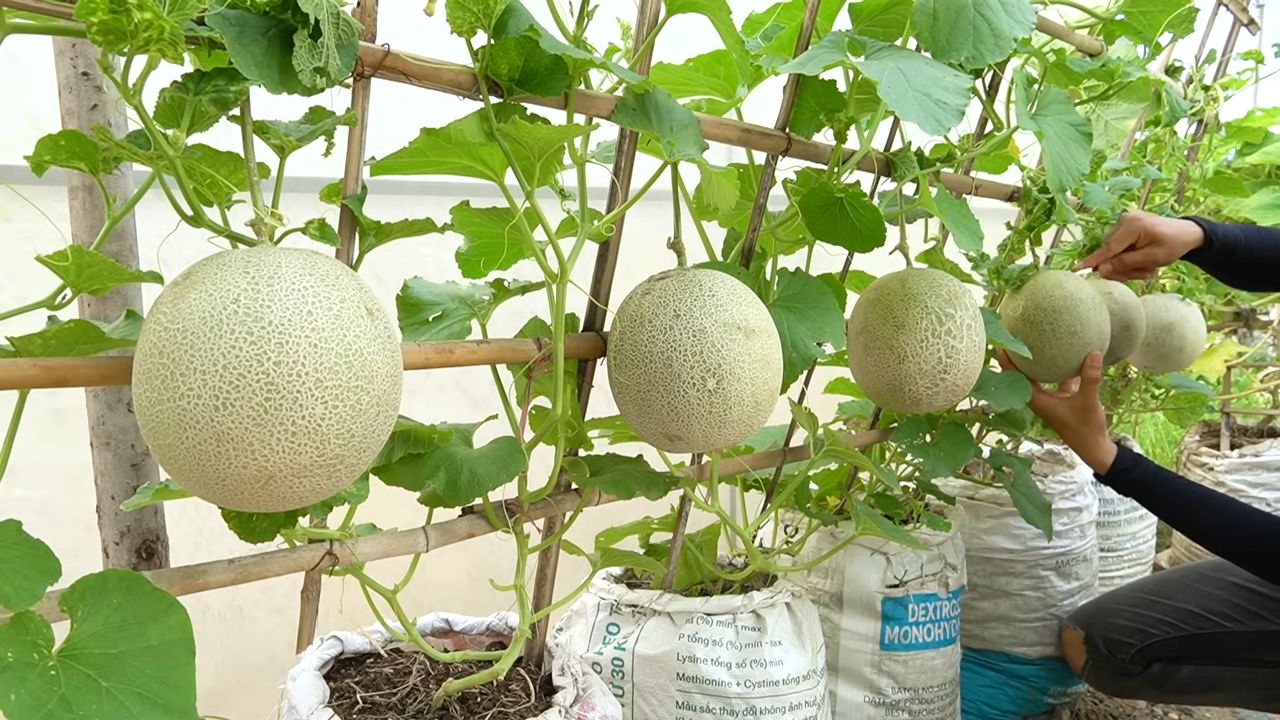
Growing sweeter cantaloupes in bags might sound like a quirky experiment, but trust me, it’s a game-changer for home gardeners! Have you ever bitten into a cantaloupe from the store and been utterly disappointed by its bland, watery taste? I know I have! That’s where this ingenious DIY trick comes in. For centuries, gardeners have sought ways to coax the most delicious flavors from their crops. From ancient Egyptians meticulously tending their melon patches to modern-day enthusiasts experimenting with innovative techniques, the quest for the perfect cantaloupe has been a long and flavorful journey.
But why bags, you ask? Well, this simple hack offers a multitude of benefits. It protects your precious cantaloupes from pests, diseases, and even harsh weather, creating a microclimate that encourages sweetness. Plus, it helps to concentrate the sugars as the fruit ripens, resulting in a flavor explosion that will tantalize your taste buds. If you’re tired of bland, disappointing cantaloupes and crave that juicy, melt-in-your-mouth sweetness, then this DIY guide to growing sweeter cantaloupes in bags is exactly what you need. Let’s get started and transform your garden into a cantaloupe paradise!
Growing Sweeter Cantaloupes in Bags: My Secret for a Delicious Harvest!
Hey there, fellow gardening enthusiasts! I’m so excited to share my tried-and-true method for growing incredibly sweet and juicy cantaloupes right in bags. Forget those bland, store-bought melons – with this DIY hack, you’ll be enjoying homegrown goodness that’s bursting with flavor. I’ve experimented with different techniques over the years, and this one consistently delivers the best results. So, grab your supplies, and let’s get started!
What You’ll Need: The Essentials for Cantaloupe Success
Before we dive into the step-by-step instructions, let’s gather everything we need. Having all your materials ready will make the process smooth and enjoyable.
* Cantaloupe Seeds: Choose a variety known for its sweetness and suitability for your climate. I personally love ‘Athena’ and ‘Hales Best Jumbo’.
* Large Grow Bags: Opt for bags that are at least 15-20 gallons in size. Fabric grow bags are ideal because they allow for good drainage and aeration.
* High-Quality Potting Mix: A well-draining mix is crucial. I recommend a blend of compost, peat moss (or coco coir), and perlite.
* Slow-Release Fertilizer: Cantaloupes are heavy feeders, so a slow-release fertilizer will provide them with the nutrients they need throughout the growing season. Look for a balanced formula like 10-10-10 or one specifically designed for vegetables.
* Water-Soluble Fertilizer: In addition to the slow-release fertilizer, I like to supplement with a water-soluble fertilizer every few weeks to give my cantaloupes an extra boost.
* Trellis or Support System: Cantaloupe vines can get quite long, so you’ll need a trellis or other support system to keep them off the ground.
* Gardening Gloves: To protect your hands.
* Watering Can or Hose: For watering your plants.
* Hand Trowel: For planting and transplanting.
* Pruning Shears: For trimming the vines.
* Mulch: To help retain moisture and suppress weeds. Straw or wood chips work well.
Phase 1: Starting Your Cantaloupe Seeds
Getting a head start on the growing season is key, especially if you live in an area with a shorter growing season. I usually start my cantaloupe seeds indoors about 4-6 weeks before the last expected frost.
1. Prepare Your Seed Starting Trays: Fill your seed starting trays or small pots with a seed starting mix. Moisten the mix thoroughly.
2. Sow the Seeds: Plant 2-3 cantaloupe seeds per cell or pot, about ½ inch deep.
3. Provide Warmth and Light: Cantaloupe seeds need warmth to germinate. Place the trays on a heat mat or in a warm location. They also need plenty of light, so place them under grow lights or in a sunny window.
4. Keep the Soil Moist: Water the seedlings regularly, keeping the soil consistently moist but not waterlogged.
5. Thin the Seedlings: Once the seedlings have emerged and have a few true leaves, thin them to one strong seedling per cell or pot.
Phase 2: Preparing Your Grow Bags
While your seedlings are growing indoors, it’s time to prepare your grow bags. This step is crucial for providing your cantaloupes with the best possible growing environment.
1. Choose a Sunny Location: Cantaloupes need at least 6-8 hours of direct sunlight per day. Select a location that receives plenty of sun.
2. Place the Grow Bags: Position your grow bags in the chosen location. Make sure they are stable and won’t tip over.
3. Fill the Grow Bags: Fill each grow bag with your high-quality potting mix. Leave a few inches of space at the top of the bag.
4. Incorporate Slow-Release Fertilizer: Mix the slow-release fertilizer into the potting mix according to the package instructions.
5. Water the Soil: Water the soil thoroughly to settle it and activate the fertilizer.
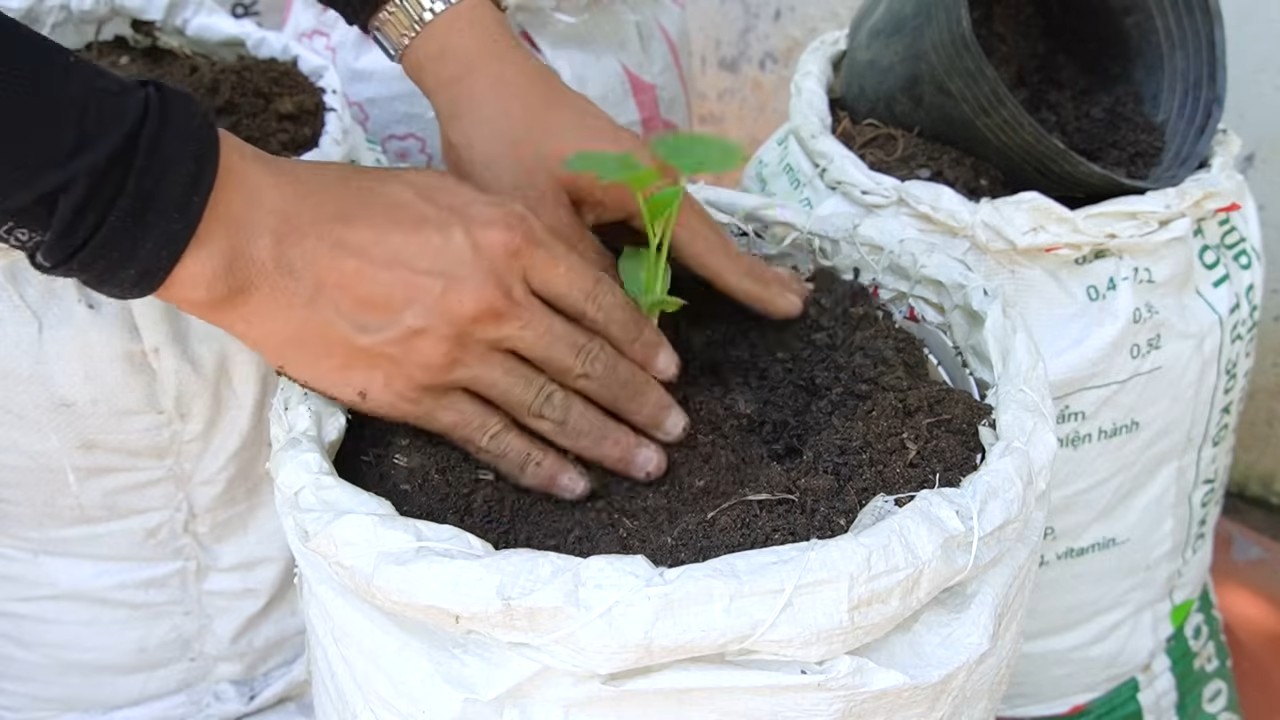
Phase 3: Transplanting Your Cantaloupe Seedlings
Once the danger of frost has passed and your seedlings have developed several true leaves, it’s time to transplant them into the grow bags.
1. Harden Off the Seedlings: Before transplanting, you need to harden off the seedlings. This means gradually exposing them to outdoor conditions over a period of 7-10 days. Start by placing them outside for a few hours each day, gradually increasing the amount of time they spend outdoors.
2. Dig a Hole: Dig a hole in the center of each grow bag, large enough to accommodate the root ball of the seedling.
3. Carefully Remove the Seedling: Gently remove the seedling from its cell or pot, being careful not to damage the roots.
4. Place the Seedling in the Hole: Place the seedling in the hole and backfill with potting mix.
5. Water Thoroughly: Water the seedling thoroughly after transplanting.
6. Add Mulch: Apply a layer of mulch around the base of the plant to help retain moisture and suppress weeds.
Phase 4: Providing Support and Training the Vines
Cantaloupe vines can get quite long and heavy, so providing them with support is essential. This will also help to keep the fruits off the ground, preventing rot and pest problems.
1. Install a Trellis or Support System: Install a trellis or other support system near the grow bag. You can use a traditional trellis, a tomato cage, or even a simple stake with twine.
2. Train the Vines: As the vines grow, gently train them to climb the trellis or support system. You can use plant ties or twine to secure the vines to the support.
3. Prune the Vines: Pruning the vines can help to improve air circulation and encourage fruit production. Remove any dead or yellowing leaves. You can also pinch off the tips of the vines to encourage branching.
Phase 5: Watering and Fertilizing
Proper watering and fertilization are crucial for growing sweet and juicy cantaloupes.
1. Water Regularly: Cantaloupes need consistent moisture, especially during hot weather. Water deeply whenever the top inch of soil feels dry. Avoid overhead watering, as this can lead to fungal diseases.
2. Fertilize Regularly: In addition to the slow-release fertilizer, supplement with a water-soluble fertilizer every 2-3 weeks. Follow the package instructions for application rates. I like to use a fertilizer that is high in potassium, as this helps to promote fruit development and sweetness.
3. Monitor for Nutrient Deficiencies: Keep an eye out for signs of nutrient deficiencies, such as yellowing leaves or stunted growth. If you notice any deficiencies, adjust your fertilization accordingly.
Phase 6: Pollination and Fruit Development
Cantaloupes are pollinated by bees and other insects. If you don’t have enough pollinators in your area, you may need to hand-pollinate the flowers.
1. Attract Pollinators: Plant flowers that attract pollinators near your cantaloupe plants. Some good choices include sunflowers, zinnias, and lavender.
2. Hand-Pollinate (If Necessary): If you’re not seeing a lot of bee activity, you can hand-pollinate the flowers. Use a small paintbrush to transfer pollen from the male flowers to the female flowers. The female flowers have a small fruit developing behind the flower.
3. Monitor Fruit Development: Once the fruits start to develop, monitor them closely. As the fruits ripen, they will change color and develop a sweet aroma.
Phase 7: Harvesting Your Sweet Cantaloupes
Harvesting your cantaloupes at the right time is essential for ensuring maximum sweetness and flavor.
1. Check for Ripeness: Cantaloupes are ripe when they change color from green to tan or yellow. The stem will also start to crack where it attaches to the fruit.
2. Gently Twist the Fruit: To harvest the cantaloupe, gently twist the fruit from the vine. If it’s ripe, it should come off easily.
3. Enjoy Your Harvest: Once you’ve harvested your cantaloupes, store them in the refrigerator for up to a week. Enjoy them fresh, in salads, or in smoothies.
Tips for Extra Sweetness: My Secret Weapons!
Okay, now for the real secrets to getting those cantaloupes unbelievably sweet!
* Water Wisely: Reduce watering as the fruits approach ripeness. This concentrates the sugars in the melon. Don’t completely stop watering, but definitely cut back.
* Sunlight is Key: Make sure your plants get plenty of sunlight. Sunlight is essential for photosynthesis, which is how plants produce sugars
Conclusion
So, there you have it! Growing sweeter cantaloupes in bags isn’t just a quirky gardening experiment; it’s a game-changer for flavor and yield. We’ve explored the science behind it, the practical steps involved, and the undeniable benefits of this simple yet effective technique. If you’ve ever been disappointed by bland, watery cantaloupes from your garden, this is the solution you’ve been waiting for.
The beauty of this method lies in its simplicity and adaptability. While we’ve focused on using plastic bags to create a mini-greenhouse effect, don’t be afraid to experiment with other materials. Consider using breathable fabric bags for better air circulation in humid climates, or even repurposing old pantyhose for a more eco-friendly approach. The key is to create a barrier that traps heat and humidity while still allowing for adequate airflow.
Why is this a must-try? Because it addresses the core issues that often plague cantaloupe cultivation: inconsistent ripening, lack of sweetness, and vulnerability to pests and diseases. By providing a controlled environment, you’re essentially giving your cantaloupes a head start, allowing them to develop their full potential in terms of sugar content and overall flavor. Imagine biting into a cantaloupe bursting with sweetness, grown right in your own backyard, thanks to this simple trick.
Furthermore, this method can extend your growing season. By protecting the developing fruits from early frosts or unexpected cold snaps, you can enjoy fresh, homegrown cantaloupes for a longer period. This is particularly beneficial for gardeners in cooler climates where the growing season is shorter.
Don’t limit yourself to just cantaloupes! This technique can also be adapted for other melons, such as honeydew and Galia melons. Experiment with different varieties and see which ones thrive best in your specific climate and growing conditions. You might even discover a new favorite melon that you never would have considered before.
We understand that trying new gardening techniques can be daunting, but we assure you that growing sweeter cantaloupes in bags is a straightforward process that anyone can master. The rewards are well worth the effort. The taste difference is truly remarkable, and the satisfaction of harvesting your own perfectly ripe, incredibly sweet cantaloupes is unparalleled.
So, what are you waiting for? Grab some bags, select your favorite cantaloupe variety, and get ready to experience the joy of growing the sweetest, most flavorful cantaloupes you’ve ever tasted. We’re confident that you’ll be amazed by the results.
We encourage you to try this DIY trick and share your experiences with us! Post photos of your bagged cantaloupes on social media using the hashtag #SweetCantaloupeChallenge and let us know how it worked for you. We’re eager to hear your success stories, learn from your challenges, and build a community of cantaloupe enthusiasts who are passionate about growing the best possible fruit. Let’s transform our gardens into havens of sweet, juicy cantaloupes, one bag at a time!
Frequently Asked Questions (FAQ)
What type of bags should I use?
The best type of bag to use is a clear or translucent plastic bag. This allows sunlight to penetrate and warm the fruit, creating the greenhouse effect that promotes sweetness. Avoid using dark-colored bags, as they can overheat the fruit and potentially damage it. You can also experiment with breathable fabric bags, especially in humid climates, to improve air circulation and reduce the risk of mold or mildew. The size of the bag should be large enough to comfortably accommodate the growing cantaloupe without restricting its growth.
When should I put the bags on the cantaloupes?
The ideal time to put the bags on the cantaloupes is when they are about the size of a tennis ball. This allows the fruit to develop a good base size before being enclosed in the bag. Avoid putting the bags on too early, as this can hinder pollination and fruit set. Also, avoid waiting too long, as the fruit may become too large to fit comfortably in the bag.
How do I secure the bags to the cantaloupes?
The best way to secure the bags is to gently tie them around the stem of the cantaloupe vine, just above the fruit. Use a soft material, such as twine or garden tape, to avoid damaging the stem. Make sure the bag is securely fastened, but not too tight, as this can restrict the flow of nutrients to the fruit. You can also use clothespins or binder clips to secure the bag, but be careful not to pinch the stem.
Will the bags cause the cantaloupes to rot?
If not managed properly, the bags can potentially create a humid environment that promotes rot or fungal growth. To prevent this, ensure that the bags have adequate ventilation. You can achieve this by poking small holes in the bag or using breathable fabric bags. Regularly inspect the cantaloupes for any signs of rot or disease, and remove any affected fruit immediately. Also, avoid overwatering the plants, as this can increase humidity levels and contribute to rot.
How long should I leave the bags on the cantaloupes?
Leave the bags on the cantaloupes until they are almost fully ripe. This typically takes about 2-3 weeks, depending on the variety and growing conditions. You’ll know the cantaloupes are ready to harvest when they develop a sweet aroma, the skin turns a golden color, and the stem begins to slip easily from the vine. Remove the bags a few days before harvesting to allow the fruit to dry out slightly and develop its full flavor.
Can I reuse the bags?
Yes, you can reuse the bags, but it’s important to clean and disinfect them thoroughly before each use. Wash the bags with soap and water, and then soak them in a solution of diluted bleach (1 part bleach to 9 parts water) for about 30 minutes. Rinse the bags thoroughly with clean water and allow them to dry completely before storing them. This will help prevent the spread of diseases and ensure that your cantaloupes remain healthy.
Does this method work in all climates?
This method is generally effective in most climates, but it may require some adjustments depending on your specific growing conditions. In hot, dry climates, the bags can help retain moisture and protect the fruit from sunburn. In humid climates, it’s important to ensure adequate ventilation to prevent rot. In cooler climates, the bags can help trap heat and extend the growing season. Experiment with different bag materials and ventilation techniques to find what works best for you.
Will this method attract pests?
While the bags can provide some protection from pests, they can also create a sheltered environment that attracts certain insects. Regularly inspect the bags and the cantaloupes for any signs of pests, such as aphids, squash bugs, or vine borers. If you find any pests, take appropriate measures to control them, such as using insecticidal soap or hand-picking the insects off the plants. You can also use netting or row covers to provide additional protection from pests.
What if the cantaloupe gets too big for the bag?
If the cantaloupe outgrows the bag, you have a few options. You can carefully remove the bag and replace it with a larger one. Alternatively, you can cut the bag open to allow the fruit to continue growing, but this will reduce the effectiveness of the method. If the cantaloupe is almost ripe, you can simply remove the bag and allow it to ripen fully on the vine.
Is growing sweeter cantaloupes in bags organic?
Whether or not this method is organic depends on the materials you use and the practices you follow. If you use organic bags (such as those made from natural fibers) and avoid using synthetic pesticides or fertilizers, then the method can be considered organic. Always choose materials and practices that align with your personal values and gardening goals.

Leave a Comment