
Growing Tomatoes Home Gardener, that’s what we’re all about today! Have you ever bitten into a sun-ripened, juicy tomato, bursting with flavor, and thought, “I wish I could grow these myself?” Well, you absolutely can! For centuries, tomatoes have been a staple in cuisines around the world, from the vibrant sauces of Italy to the refreshing salads of the Mediterranean. Originating in South America, these little red (or yellow, or green!) gems have become a symbol of summer and fresh, homegrown goodness.
But let’s be honest, sometimes growing tomatoes can feel a little daunting. Pests, diseases, and unpredictable weather can all throw a wrench in your plans. That’s where these DIY tricks and hacks come in! I’m going to share some simple, yet effective, tips and tricks that will help you cultivate a thriving tomato garden, no matter your experience level. Whether you’re a seasoned gardener or just starting out, these easy-to-follow techniques will empower you to harvest a bountiful crop of delicious tomatoes right in your own backyard. Get ready to transform your garden into a tomato paradise!
Tomato Cultivation for Hobby Gardeners: Your Comprehensive DIY Guide
Hello, fellow gardeners! I’m thrilled to introduce you to the wonderful world of growing tomatoes today. There’s almost nothing more satisfying than harvesting a juicy, sun-ripened tomato from your own garden. And believe me, it’s easier than you might think! This guide is packed with tips and tricks that will help you achieve a bountiful tomato harvest. Let’s get started!
The Basics: What Tomatoes Need to Grow
Before we dive into the details, it’s important to understand what tomatoes really need to thrive. Here’s a brief summary:
- Sun: Tomatoes love the sun! They need at least 6-8 hours of direct sunlight per day.
- Soil: Well-draining, nutrient-rich soil is crucial.
- Water: Regular watering is important, especially during fruit formation.
- Warmth: Tomatoes are heat-loving and cannot tolerate frost.
- Support: Most tomato varieties require some form of support, such as stakes or cages.
Step-by-Step Guide: From Seed to Harvest
Here is a detailed guide that will walk you through the entire process of growing tomatoes:
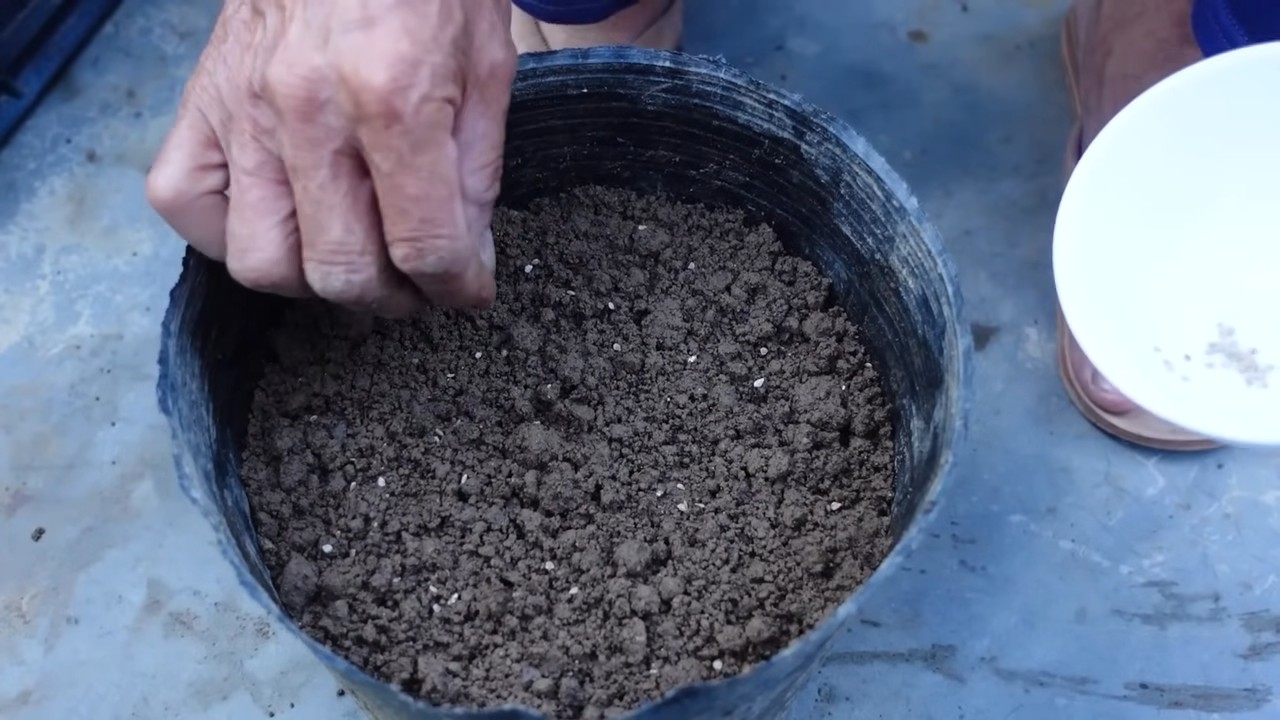
1. Preparation: Sowing Seeds or Buying Young Plants
- Sowing Seeds (approx. 6-8 weeks before the last frost):
- Fill small starter pots or a seed tray with seed-starting mix.
- Place 2-3 seeds per pot/cell about 0.5-1 cm (0.2-0.4 inches) deep in the soil.
- Gently moisten the soil with a spray bottle.
- Cover the pots/tray with a clear plastic wrap or a lid to increase humidity.
- Place the pots/tray in a warm, bright spot (e.g., a windowsill or under a grow light).
- Once the seeds have germinated (after approx. 7-14 days), remove the cover and ensure the seedlings get enough light.
- When the seedlings are large enough (approx. 5-7 cm / 2-3 inches tall), prick them out into larger pots. This means you carefully separate the individual plants and place them in separate pots with fresh soil.
- Buying Young Plants:
- Choose healthy, strong young plants with a sturdy stem and deep green leaves.
- Avoid plants with yellow or brown leaves, spots, or signs of pests.
- Make sure the roots are not growing out of the pot.
2. Planting Out: The Move Outdoors
- Choose the right time: Wait until there is no more danger of frost and the soil has warmed up (at least 10°C / 50°F).
- Prepare the soil: Loosen the soil thoroughly and remove weeds. Mix in compost or well-rotted manure to enrich the soil with nutrients.
- Plant the tomatoes:
- Dig a hole that is slightly larger than the plant’s root ball.
- Carefully remove the plant from the pot and gently loosen the root ball.
- Place the plant in the hole and fill it with soil.
- Press the soil down lightly and water the plant thoroughly.
- Space the plants 60-90 cm (24-36 inches) apart, depending on the variety.
- Install supports: Immediately after planting, install stakes, cages, or other support systems to prop up the plants. This prevents the plants from breaking as they grow taller and bear fruit.
3. Care: Watering, Fertilizing, and Removing Suckers
- Watering: Water the tomatoes regularly, especially during dry periods. Make sure the soil is evenly moist but not waterlogged. It’s best to water early in the morning so the leaves have time to dry before the sun comes up. Avoid watering the leaves directly, as this can promote fungal diseases.
- Fertilizing: Tomatoes are heavy feeders and require regular feeding. Use a special tomato fertilizer or an organic fertilizer like compost tea or nettle tea. Fertilize every 2-3 weeks, starting about 2 weeks after planting out.
- Removing Suckers (Pruning): Removing suckers is an important step to achieve a rich harvest. This involves removing the side shoots (suckers) that form in the leaf axils. This promotes the growth of the main stem and the development of the fruit.
- Look for the small shoots that grow between the main stem and the leaves.
- Gently break or cut these shoots off while they are still small (approx. 5-7 cm / 2-3 inches long).
- Repeat this process regularly, about once a week.
- Not all tomato varieties need to have their suckers removed. Bush tomatoes (determinate varieties) naturally form compact plants and do not need pruning. Check the specific needs of your variety.
- Mulching: A layer of mulch made of straw, wood chips, or grass clippings helps to retain moisture in the soil, suppress weeds, and cool the soil.
- Protection from Diseases and Pests: Regularly check your tomato plants for signs of diseases or pests.
- Diseases: Late blight is a common tomato disease caused by fungi. It manifests as brown spots on the leaves and fruits. To prevent it, ensure good air circulation, avoid watering the leaves, and use a fungicide if necessary.
- Pests: Aphids, whiteflies, and tomato hornworms can infest tomato plants. You can combat them with insecticidal soap, neem oil, or by picking them off by hand.
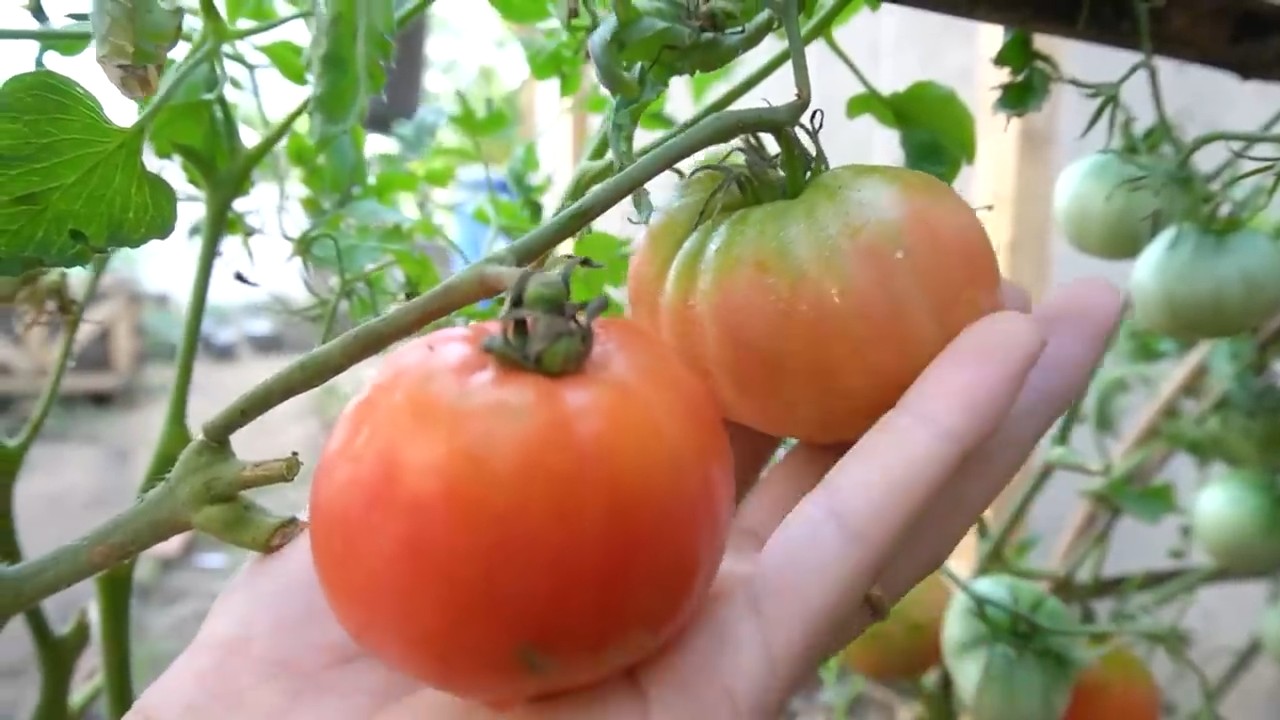
4. The Harvest: The Reward for Your Effort
- Choose the right time: Tomatoes are ripe when they have reached their full color and can be easily detached from the stem. They should feel firm, but not too hard.
- Harvest carefully: Gently twist the tomato at the stem until it comes off.
- Store the tomatoes correctly: Store ripe tomatoes at room temperature to preserve their flavor. Avoid storing them in the refrigerator, as this can affect their taste.
Additional Tips for a Successful Tomato Harvest
Use recycled materials: Use old yogurt cups or egg cartons as starter pots.,
Choose the right variety: There are countless tomato varieties, each with its own characteristics. When choosing your variety, consider your taste, the climate, and the available space.
Crop Rotation: Do not plant tomatoes in the same spot every year to prevent diseases and pests.
Companion Planting: Plant basil, marigolds, or garlic near your tomatoes to deter pests and promote growth.
Conclusion
So, there you have it! Mastering the art of growing tomatoes at home is not only achievable but also incredibly rewarding. We’ve explored a simple yet effective DIY trick that can significantly boost your tomato yield and overall plant health. This isn’t just about saving money; it’s about connecting with your food, understanding the growing process, and enjoying the unparalleled flavor of homegrown tomatoes.
Why is this DIY trick a must-try? Because it addresses some of the most common challenges faced by home gardeners. It provides essential nutrients directly to the roots, promoting robust growth and abundant fruit production. It’s a sustainable and eco-friendly alternative to relying solely on commercial fertilizers, allowing you to control exactly what goes into your garden and, ultimately, onto your plate. Plus, it’s incredibly satisfying to see the tangible results of your efforts – plump, juicy tomatoes bursting with flavor.
But don’t stop there! Experiment with variations to tailor the trick to your specific needs and preferences. Consider adding different types of organic matter, such as composted kitchen scraps or aged manure, to further enrich the soil. You can also adjust the frequency of application based on the specific needs of your tomato plants and the growing conditions in your area. Some gardeners have found success by incorporating beneficial microbes or mycorrhizae into the soil mixture to enhance nutrient uptake. Remember to always observe your plants closely and adjust your approach accordingly.
Growing tomatoes at home should be a fun and engaging experience. This DIY trick is just one piece of the puzzle, but it’s a powerful tool in your arsenal. We encourage you to give it a try and see the difference it can make in your tomato garden. Don’t be afraid to experiment, adapt, and learn from your experiences.
Most importantly, we want to hear from you! Share your successes, your challenges, and your variations on this DIY trick in the comments below. Let’s build a community of passionate home gardeners who are dedicated to growing the best tomatoes possible. Your insights and experiences can help others learn and grow, and together, we can all enjoy the bounty of our gardens. So, get your hands dirty, embrace the process, and start growing tomatoes at home like a pro! We are confident that this simple trick will transform your tomato growing experience.
Frequently Asked Questions (FAQ)
What exactly is this DIY trick for growing tomatoes?
This DIY trick involves creating a nutrient-rich soil amendment that you incorporate into the planting hole when you transplant your tomato seedlings. It typically includes a combination of organic materials like compost, bone meal, Epsom salts, and other ingredients that provide essential nutrients for healthy tomato growth. The specific recipe can vary, but the goal is to create a localized boost of nutrients that support strong root development and abundant fruit production.
Why is this DIY trick better than just using regular fertilizer?
While regular fertilizers can provide nutrients, this DIY trick offers several advantages. First, it’s a more targeted approach, delivering nutrients directly to the root zone where they are most needed. Second, it often relies on organic materials, which release nutrients slowly and steadily over time, providing a more sustained source of nourishment. Third, it allows you to customize the nutrient mix based on the specific needs of your tomato plants and the composition of your existing soil. Finally, it’s a more sustainable and eco-friendly option compared to relying solely on synthetic fertilizers.
What are the key ingredients in this DIY trick, and what do they do?
The specific ingredients can vary, but some common components include:
* **Compost:** Provides a wide range of nutrients, improves soil structure, and enhances water retention.
* **Bone Meal:** A source of phosphorus, which is essential for root development and flowering.
* **Epsom Salts:** Provides magnesium, which is important for chlorophyll production and overall plant health.
* **Crushed Eggshells:** A source of calcium, which helps prevent blossom-end rot.
* **Aged Manure:** Adds nutrients and improves soil structure.
Each ingredient plays a specific role in supporting healthy tomato growth.
How do I apply this DIY trick when planting my tomato seedlings?
When you’re ready to transplant your tomato seedlings, dig a hole that is slightly larger than the root ball. Mix your DIY soil amendment according to your chosen recipe. Place a portion of the mixture in the bottom of the hole, then carefully position the tomato seedling in the hole. Backfill with the remaining soil amendment and the surrounding soil, gently firming the soil around the base of the plant. Water thoroughly after planting.
How often should I reapply this DIY trick during the growing season?
The frequency of reapplication depends on the specific recipe and the growing conditions in your area. Generally, you can reapply a diluted version of the soil amendment every few weeks during the growing season. You can also monitor your plants for signs of nutrient deficiencies, such as yellowing leaves or stunted growth, and adjust your application schedule accordingly.
Can I use this DIY trick for other plants besides tomatoes?
While this DIY trick is specifically tailored for tomatoes, it can also be beneficial for other heavy-feeding plants, such as peppers, eggplants, and squash. However, you may need to adjust the recipe based on the specific nutrient requirements of each plant. Research the needs of your specific plants before applying this trick.
What if I don’t have all the ingredients for this DIY trick?
Don’t worry if you don’t have all the ingredients. You can still create a beneficial soil amendment with a few key components, such as compost and bone meal. Focus on providing a good balance of nutrients and organic matter. You can also substitute ingredients based on what you have available. For example, you can use wood ashes as a source of potassium if you don’t have Epsom salts.
Is there a risk of over-fertilizing my tomato plants with this DIY trick?
Yes, there is a risk of over-fertilizing if you use too much of the soil amendment or reapply it too frequently. Over-fertilization can lead to problems such as excessive vegetative growth, reduced fruit production, and nutrient imbalances. Always follow the recommended application rates and monitor your plants closely for signs of over-fertilization, such as leaf burn or stunted growth.
What are some signs that my tomato plants are not getting enough nutrients?
Some common signs of nutrient deficiencies in tomato plants include:
* Yellowing leaves (chlorosis)
* Stunted growth
* Blossom-end rot (calcium deficiency)
* Purple leaves (phosphorus deficiency)
* Curling leaves (magnesium deficiency)
If you notice any of these signs, adjust your fertilization strategy accordingly.
Where can I find more information about growing tomatoes at home?
There are many resources available to help you learn more about growing tomatoes at home, including books, websites, and local gardening clubs. Your local extension office is also a great resource for information specific to your region. Don’t be afraid to ask questions and learn from other gardeners.


Leave a Comment