
Harvesting peanuts, even without a sprawling yard, might seem like an impossible dream. But guess what? It’s totally achievable! Forget those images of vast peanut farms; I’m here to show you how to cultivate and harvest your own delicious peanuts right in containers, no matter how small your outdoor space is.
Peanuts, originally from South America, have a rich history, becoming a staple food across cultures and continents. They’re not just tasty; they’re packed with protein and healthy fats. For centuries, peanuts have been a symbol of resourcefulness and simple pleasures.
Why should you bother with this DIY project? Well, imagine the satisfaction of snacking on peanuts you’ve grown yourself! Plus, knowing exactly where your food comes from and avoiding those store-bought peanuts with questionable additives is a huge win. Harvesting peanuts at home is also a fantastic way to connect with nature, learn about plant life cycles, and impress your friends with your green thumb. This guide will provide you with simple, step-by-step instructions and clever hacks to ensure a bountiful harvest, even if you’re working with limited space. So, let’s get our hands dirty and start growing!
Growing Peanuts Indoors: From Seed to Snack!
Okay, so you’re craving fresh peanuts but don’t have a yard? No problem! I’m going to walk you through how to grow peanuts right inside your home. It’s a fun project, surprisingly rewarding, and you get to enjoy the fruits (or rather, nuts!) of your labor.
What You’ll Need
Before we dive in, let’s gather our supplies. This is crucial for a smooth peanut-growing journey.
* Peanut Seeds (Raw, Unshelled): This is the most important part! Make sure you get raw, unshelled peanuts. Roasted or salted peanuts won’t sprout. You can find these at most grocery stores or online. Look for peanuts specifically labeled for planting if possible.
* Large Containers: Peanuts need room to grow, especially underground. I recommend containers that are at least 12 inches deep and 12 inches wide. The bigger, the better! Think large pots, plastic tubs, or even repurposed buckets.
* Well-Draining Potting Mix: Peanuts need soil that drains well to prevent root rot. A mix of potting soil, perlite, and vermiculite is ideal. You can also use a sandy loam soil. Avoid heavy clay soils.
* Grow Lights (Optional but Recommended): While peanuts can grow indoors with enough sunlight, grow lights will significantly improve your chances of success, especially during the shorter days of the year.
* Watering Can or Spray Bottle: For gentle watering.
* Small Shovel or Trowel: For planting and transplanting.
* Pea Gravel or Small Stones (Optional): To improve drainage at the bottom of the container.
* Spray Bottle with Water: For misting the seedlings.
* Well-Ventilated Area: Peanuts need good air circulation.
* Patience: Growing peanuts takes time and care!
Getting Started: Germinating Your Peanut Seeds
This is where the magic begins! We need to wake up those dormant peanut seeds.
1. Soak the Peanuts: Place your raw, unshelled peanuts in a bowl of lukewarm water. Let them soak for 12-24 hours. This helps soften the shells and encourages germination. I usually do this overnight.
2. Prepare Your Germination Setup: You have a couple of options here. You can use a damp paper towel or a small container filled with moist potting mix.
* Paper Towel Method: Place the soaked peanuts on a damp paper towel, fold the towel over them, and place it in a plastic bag or container. This keeps the humidity high.
* Potting Mix Method: Fill a small container with moist potting mix. Plant the peanuts about an inch deep.
3. Keep it Warm and Moist: Place your germination setup in a warm location (around 70-80°F or 21-27°C). Check the paper towel or potting mix regularly to make sure it stays moist. Don’t let it dry out!
4. Wait for Sprouts: It usually takes about 5-10 days for the peanuts to sprout. You’ll see a small root emerging from the peanut. Once the root is about half an inch long, they’re ready to be planted in their permanent containers.
Planting Your Peanut Seedlings
Now that we have sprouts, it’s time to give them a home!
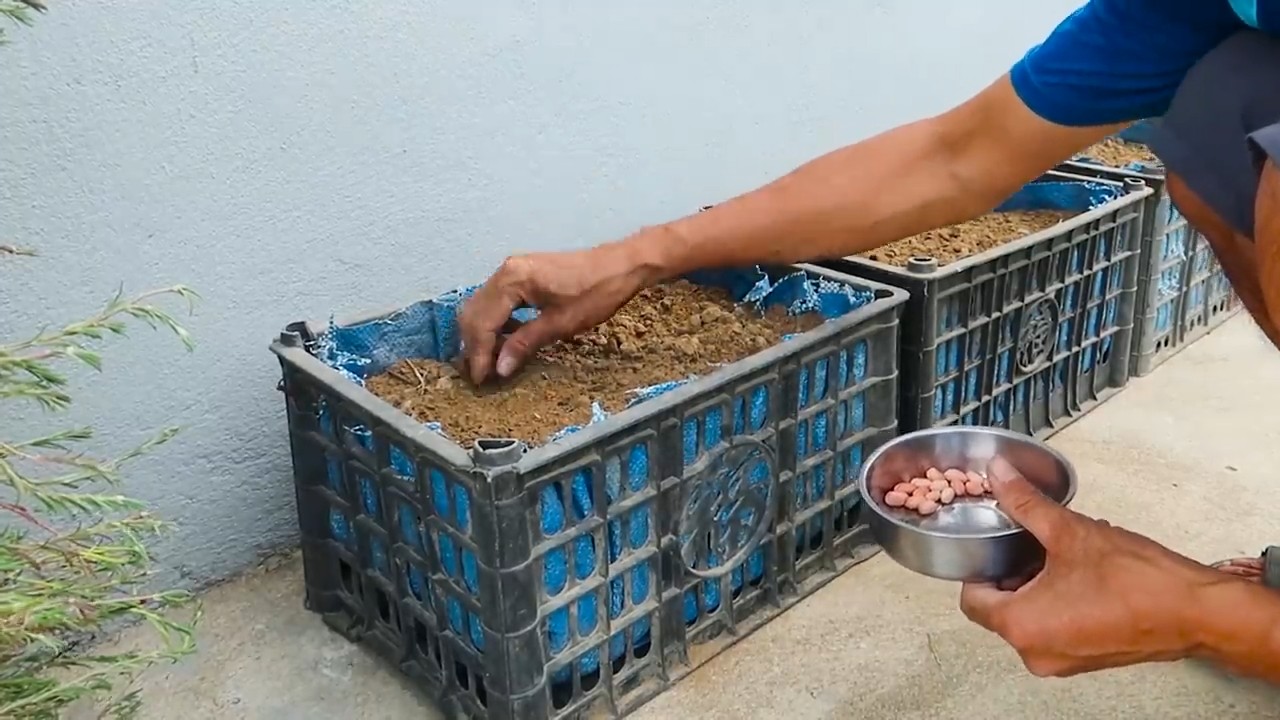
1. Prepare Your Containers: Fill your large containers with well-draining potting mix. Leave about an inch or two of space at the top. If you’re using pea gravel or small stones, place a layer at the bottom of the container to improve drainage.
2. Plant the Seedlings: Gently remove the sprouted peanuts from the paper towel or small container. Be careful not to damage the roots. Plant each peanut about 2-3 inches deep in the potting mix. Space them about 6-8 inches apart if you’re planting multiple peanuts in the same container.
3. Water Gently: Water the soil gently after planting. Make sure the soil is moist but not waterlogged.
4. Provide Light: Place your containers in a location that receives at least 6-8 hours of direct sunlight per day. If you’re using grow lights, position them about 6-12 inches above the plants. I find that using a timer for the grow lights helps maintain a consistent light schedule.
Caring for Your Peanut Plants
This is where the ongoing commitment comes in. Peanuts need consistent care to thrive.
1. Watering: Water your peanut plants regularly, especially during hot weather. The soil should be consistently moist but not soggy. Check the soil moisture by sticking your finger about an inch deep. If it feels dry, it’s time to water. I usually water every 2-3 days, but this will depend on your climate and the size of your containers.
2. Fertilizing: Peanuts are heavy feeders, so they need regular fertilization. Use a balanced fertilizer (e.g., 10-10-10) every 2-3 weeks. Follow the instructions on the fertilizer package. You can also use a liquid fertilizer diluted in water.
3. Pollination: Peanuts are self-pollinating, but you can help them along by gently shaking the plants or using a small brush to transfer pollen from one flower to another. This is especially important if you’re growing them indoors where there are no insects to help with pollination.
4. Hilling: As the peanut plants grow, they will produce “pegs” that grow downwards from the base of the plant. These pegs are what will eventually develop into peanuts. To encourage peanut production, you need to “hill” the soil around the base of the plants. This means adding more soil to cover the pegs. Do this every few weeks as the plants grow.
5. Pest Control: Keep an eye out for pests such as aphids, spider mites, and whiteflies. If you see any pests, you can try spraying the plants with insecticidal soap or neem oil. You can also manually remove the pests.
6. Air Circulation: Ensure good air circulation around your peanut plants. This will help prevent fungal diseases. You can use a small fan to circulate the air.
Harvesting Your Peanuts
The most exciting part! Knowing when to harvest is key.
1. Timing is Everything: Peanuts typically take about 120-150 days to mature. The best time to harvest is when the leaves start to turn yellow and the plants begin to die back. This usually happens in the fall.
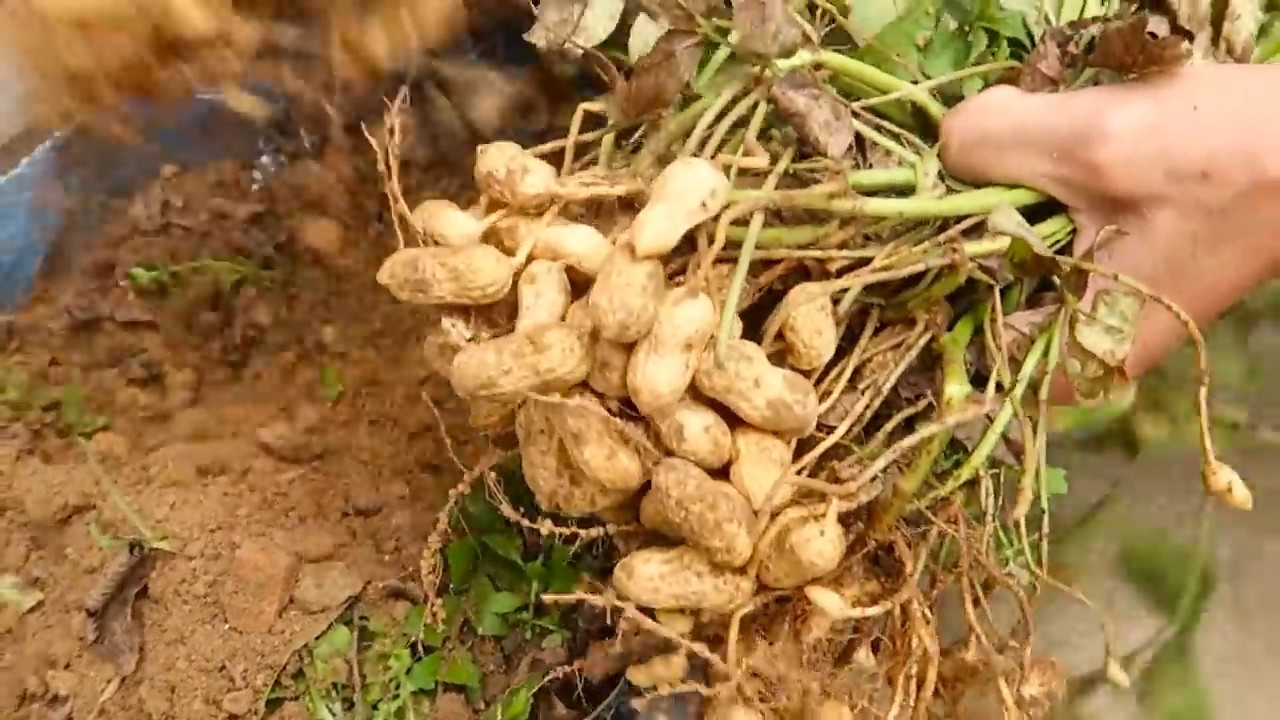
2. Digging Up the Peanuts: Gently dig up the entire plant, being careful not to damage the peanuts. You can use a shovel or trowel.
3. Cleaning the Peanuts: Shake off as much soil as possible from the peanuts. Then, wash them with water to remove any remaining dirt.
4. Curing the Peanuts: This is an important step to prevent mold and improve the flavor of the peanuts. Spread the peanuts out in a single layer on a screen or tray. Place them in a well-ventilated area for about 2-3 weeks. Turn them over occasionally to ensure they dry evenly. The peanuts are cured when the shells are dry and brittle.
5. Storing the Peanuts: Once the peanuts are cured, you can store them in a cool, dry place. You can store them in their shells or shell them and store the kernels in an airtight container.
Troubleshooting
Even with the best care, things can sometimes go wrong. Here are a few common problems and how to fix them:
* Yellowing Leaves: This could be a sign of overwatering, underwatering, or nutrient deficiency. Check the soil moisture and adjust your watering accordingly. Fertilize the plants with a balanced fertilizer.
* Lack of Peanuts: This could be due to poor pollination, insufficient hilling, or lack of nutrients. Make sure you’re pollinating the plants, hilling the soil, and fertilizing regularly.
* Root Rot: This is caused by overwatering. Make sure your soil is well-draining and avoid overwatering.
* Pests: Treat pests with insecticidal soap or neem oil.
Enjoying Your Homegrown Peanuts
Congratulations! You’ve successfully grown peanuts indoors. Now it’s time to enjoy the fruits (or nuts!) of your labor. You can roast them, boil them, or eat them raw. They’re also great in peanut butter, peanut brittle, and other recipes.
Growing peanuts indoors is a rewarding experience. It takes time and effort, but the satisfaction of harvesting your own peanuts is well worth it. Plus, you’ll have a unique and interesting conversation starter for your friends and family. Happy growing!
Conclusion
So, you’re itching to harvest peanuts but lack the sprawling acreage of a traditional farm? Don’t let a small yard (or even no yard at all!) deter you from the joy of homegrown, freshly dug peanuts. This method of growing peanuts in containers is a game-changer, opening up the possibility of peanut cultivation to apartment dwellers, balcony gardeners, and anyone with limited space. It’s not just about the convenience; it’s about the unparalleled flavor and satisfaction that comes from nurturing your own food from seed to harvest.
This DIY trick is a must-try for several compelling reasons. First, it’s incredibly accessible. The materials are readily available and inexpensive, making it a budget-friendly project. Second, it’s surprisingly simple. Even novice gardeners can achieve success with a little patience and attention to detail. Third, and perhaps most importantly, it yields delicious results. The taste of homegrown peanuts, roasted to perfection, is simply unmatched by anything you can buy in a store. The freshness and nutty sweetness are truly exceptional.
But the beauty of this method lies in its adaptability. Feel free to experiment with different peanut varieties. Virginia peanuts, known for their large size, thrive in containers, as do Spanish peanuts, which mature more quickly. Consider adding companion plants to your containers, such as marigolds, which can help deter pests, or herbs like basil, which can enhance the flavor of your peanuts. You can also adjust the soil mix to suit your specific climate and growing conditions. For example, if you live in a particularly dry area, you might want to add more moisture-retentive materials like coco coir to your soil.
Don’t be afraid to get creative with your container choices, too. While a standard plastic pot works perfectly well, you could also use a repurposed bucket, a fabric grow bag, or even a large planter box. Just make sure the container has adequate drainage to prevent waterlogging.
We wholeheartedly encourage you to give this DIY peanut harvesting method a try. It’s a rewarding experience that connects you to the food you eat and allows you to enjoy the unique flavor of homegrown peanuts, regardless of your living situation. The process of watching the plants grow, carefully tending to them, and finally harvesting your own peanuts is incredibly satisfying.
Once you’ve tried it, we’d love to hear about your experience! Share your tips, tricks, and photos with us in the comments below. Let’s build a community of urban peanut farmers and inspire others to discover the joy of growing their own food, one peanut at a time. What variety did you grow? What challenges did you face, and how did you overcome them? Your insights could be invaluable to other aspiring peanut growers. Let’s spread the peanut-growing love!
Frequently Asked Questions (FAQ)
What is the best type of container to use for growing peanuts?
The ideal container should be at least 18 inches in diameter and 18 inches deep to accommodate the peanut plants’ root system and the developing peanuts. Good drainage is crucial, so ensure the container has drainage holes. Plastic pots, fabric grow bags, and repurposed buckets (with drainage holes added) all work well. Fabric grow bags offer the advantage of air pruning, which encourages a healthier root system.
What kind of soil should I use for growing peanuts in containers?
Peanuts thrive in well-draining, sandy loam soil. A good mix consists of equal parts potting soil, sand, and compost. Avoid heavy clay soils, as they can become waterlogged and hinder peanut development. You can also add perlite or vermiculite to improve drainage and aeration. The pH of the soil should be between 6.0 and 6.5 for optimal growth.
How often should I water my peanut plants?
Peanut plants need consistent moisture, especially during flowering and peanut development. Water deeply whenever the top inch of soil feels dry to the touch. Avoid overwatering, as this can lead to root rot. During hot, dry weather, you may need to water daily. Use a watering can or hose with a gentle spray to avoid disturbing the soil around the plants.
How much sunlight do peanut plants need?
Peanut plants require at least 6-8 hours of direct sunlight per day. Choose a sunny location for your containers, such as a south-facing balcony or patio. If you don’t have enough natural sunlight, you can supplement with grow lights.
When is the best time to plant peanuts?
Peanuts are warm-season crops and should be planted after the last frost when the soil temperature reaches at least 65°F (18°C). In most regions, this is typically in late spring or early summer. You can start peanut seeds indoors 4-6 weeks before the last frost to get a head start.
How long does it take for peanuts to mature?
The time it takes for peanuts to mature depends on the variety, but it generally takes 120-150 days from planting to harvest. Virginia peanuts typically take longer to mature than Spanish peanuts.
How do I know when my peanuts are ready to harvest?
The best way to determine if your peanuts are ready to harvest is to dig up a test plant. The peanuts should be plump and the inner shells should have a dark veining pattern. The leaves of the plant will also start to turn yellow and brown.
How do I harvest peanuts from containers?
Gently loosen the soil around the base of the plant and carefully pull the entire plant out of the container. Shake off any excess soil and hang the plants upside down in a warm, dry place for 2-3 weeks to cure.
How do I cure peanuts after harvesting?
Curing peanuts is essential for developing their flavor and preventing mold growth. Hang the peanut plants upside down in a well-ventilated area with temperatures between 80-90°F (27-32°C) for 2-3 weeks. The peanuts are cured when the shells are dry and brittle.
How do I store peanuts after curing?
After curing, remove the peanuts from the vines and store them in a cool, dry place in airtight containers. Properly stored peanuts can last for several months. You can also freeze peanuts for longer storage.
Can I grow peanuts indoors year-round?
While it’s possible to grow peanuts indoors, it can be challenging to provide the necessary sunlight and warmth. You’ll need to use strong grow lights and maintain a consistent temperature. It’s generally easier to grow peanuts outdoors during the warm season.
What are some common pests and diseases that affect peanut plants?
Common pests that affect peanut plants include aphids, spider mites, and leafhoppers. Diseases include leaf spot and root rot. You can control pests with insecticidal soap or neem oil. Prevent diseases by ensuring good drainage and avoiding overwatering.
Can I eat the peanut leaves?
Yes, peanut leaves are edible and can be used in salads or stir-fries. They have a mild, nutty flavor. However, it’s best to harvest the leaves before the plant starts to flower.
Are there any companion plants that are beneficial for peanuts?
Yes, several companion plants can benefit peanut plants. Marigolds help deter nematodes, while basil repels aphids and other pests. Other good companion plants include rosemary, thyme, and oregano.
What if my peanut plants don’t produce any peanuts?
Several factors can contribute to a lack of peanut production, including insufficient sunlight, poor soil drainage, lack of pollination, and nutrient deficiencies. Ensure your plants are getting enough sunlight, water, and nutrients. You can also try hand-pollinating the flowers to improve peanut production. Adding a fertilizer specifically formulated for legumes can also help.

Leave a Comment