
Hydroponic Rosemary Growing Indoors might sound like something out of a sci-fi movie, but trust me, it’s easier than you think! Have you ever dreamed of snipping fresh, fragrant rosemary right from your kitchen counter, even in the dead of winter? I know I have! For centuries, rosemary has been cherished not only for its culinary prowess but also for its medicinal and symbolic significance, representing remembrance and love.
But let’s face it, not everyone has a sprawling garden or the perfect climate for growing this Mediterranean herb outdoors. That’s where the magic of hydroponics comes in. This DIY guide will unlock the secrets to successfully cultivating hydroponic rosemary growing indoors, regardless of your gardening experience.
Imagine the convenience of having a constant supply of fresh rosemary for your favorite recipes, all without the hassle of soil, pests, or weather worries. I’m going to show you how to bypass the traditional gardening challenges and enjoy the delightful aroma and flavor of homegrown rosemary year-round. So, grab your supplies, and let’s dive into the wonderful world of indoor hydroponic rosemary!
DIY Indoor Hydroponic Rosemary: A Beginner’s Guide
Hey there, fellow plant enthusiasts! Ever dreamed of having fresh rosemary at your fingertips, no matter the season? Well, I’m here to tell you it’s totally achievable with a simple DIY hydroponic setup. Forget about soil and messy gardening – we’re going high-tech (well, sort of!) and growing rosemary indoors using just water and nutrients. This guide will walk you through every step, from gathering your supplies to harvesting your fragrant rosemary. Let’s get started!
What You’ll Need
Before we dive in, let’s make sure you have everything you need. This is a pretty straightforward project, so the list isn’t too daunting.
* **Rosemary Cuttings:** You can either take cuttings from an existing rosemary plant (the easiest option) or purchase them online or from a local nursery. Look for healthy, vibrant green stems.
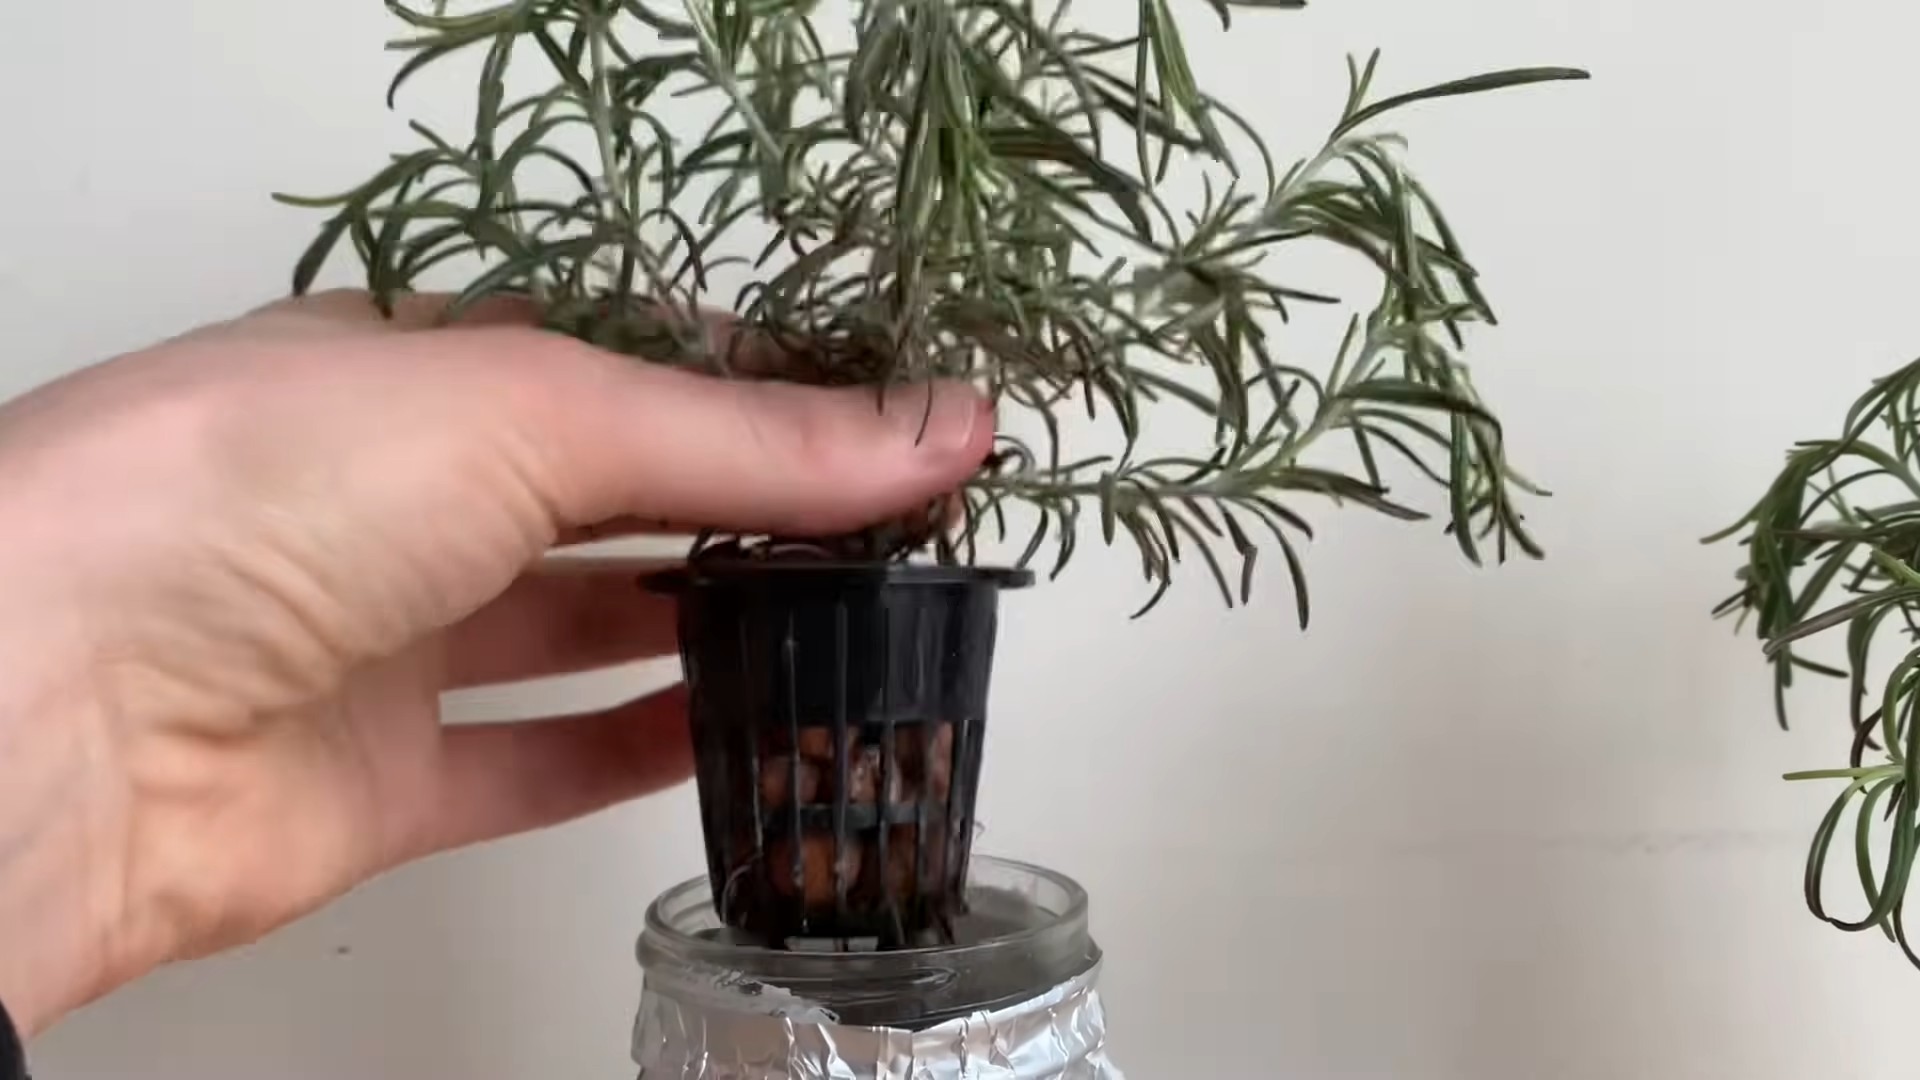
* **Net Pots:** These are small, plastic pots with holes in the sides and bottom. They’ll hold your rosemary cuttings and allow the roots to access the nutrient solution. 2-inch net pots are a good size.
* **Hydroponic Growing Medium:** This provides support for your cuttings and helps retain moisture. Coco coir, rockwool cubes, or clay pebbles (LECA) are all excellent choices. I personally prefer coco coir for its water retention and aeration.
* **Hydroponic Nutrient Solution:** This is the food for your rosemary! You’ll need a balanced nutrient solution specifically formulated for hydroponics. Look for one that’s suitable for herbs or leafy greens.
* **A Container:** This will hold your nutrient solution and the net pots. A dark-colored plastic tub or bucket works well. The size will depend on how many rosemary plants you want to grow.
* **Air Pump and Air Stone:** These are essential for oxygenating the nutrient solution. Rosemary roots need oxygen to thrive.
* **pH Meter or pH Test Strips:** Maintaining the correct pH level is crucial for nutrient absorption.
* **Grow Lights (Optional but Recommended):** Rosemary needs plenty of light, especially indoors. If you don’t have a sunny windowsill, grow lights will provide the necessary illumination. LED grow lights are energy-efficient and work great.
* **Measuring Cups and Spoons:** For accurately measuring the nutrient solution.
* **Clean Water:** Tap water is usually fine, but if your water is heavily chlorinated, let it sit out for 24 hours to allow the chlorine to evaporate.
* **Rooting Hormone (Optional):** This can help speed up the rooting process, but it’s not strictly necessary.
Taking Rosemary Cuttings
If you’re taking cuttings from an existing rosemary plant, here’s how to do it:
1. **Choose Healthy Stems:** Select stems that are about 4-6 inches long and free from any signs of disease or pests.
2. **Make the Cut:** Use clean, sharp scissors or pruning shears to make a clean cut just below a leaf node (the point where a leaf grows from the stem).
3. **Remove Lower Leaves:** Strip off the leaves from the bottom 1-2 inches of the stem. This will encourage root growth.
4. **Optional: Dip in Rooting Hormone:** If you’re using rooting hormone, dip the cut end of the stem into the powder or liquid.
5. **Prepare the Cuttings:** Place the prepared cuttings in a glass of water. Change the water every day or two to keep it fresh.
Setting Up Your Hydroponic System
Now for the fun part – putting everything together!
1. **Prepare the Container:** Clean your container thoroughly with soap and water. This will help prevent algae growth.
2. **Add Nutrient Solution:** Fill the container with water, leaving a few inches of space at the top. Add the hydroponic nutrient solution according to the manufacturer’s instructions. Be sure to measure carefully! Too much or too little nutrient solution can harm your plants.
3. **Check the pH:** Use your pH meter or test strips to check the pH of the nutrient solution. Rosemary prefers a pH between 5.5 and 6.5. If the pH is too high, you can lower it with a pH-down solution. If it’s too low, you can raise it with a pH-up solution.
4. **Assemble the Net Pots:** Fill the net pots with your chosen hydroponic growing medium (coco coir, rockwool, or clay pebbles). Moisten the growing medium with water.
5. **Plant the Rosemary Cuttings:** Gently insert the rosemary cuttings into the net pots, making sure the bottom of the stem is in contact with the growing medium. If you started the cuttings in water, carefully transfer them to the net pots, being mindful of the delicate roots.
6. **Place the Net Pots in the Container:** Arrange the net pots in the container so that the bottom of the net pots are submerged in the nutrient solution. The water level should be high enough to keep the growing medium moist, but not so high that the stems are constantly submerged.
7. **Install the Air Pump and Air Stone:** Place the air stone at the bottom of the container and connect it to the air pump with tubing. Turn on the air pump to oxygenate the nutrient solution. You should see bubbles rising to the surface.
8. **Position the Grow Lights (If Using):** If you’re using grow lights, position them about 6-12 inches above the rosemary plants. Adjust the height as the plants grow.
Caring for Your Hydroponic Rosemary
Once your system is set up, it’s time to nurture your rosemary plants.
1. **Light:** Rosemary needs at least 6-8 hours of light per day. If you’re using grow lights, set them on a timer to provide consistent light.
2. **Nutrient Solution:** Monitor the nutrient solution regularly. Check the pH and nutrient levels every week and adjust as needed. Change the nutrient solution every 2-3 weeks to prevent nutrient buildup.
3. **Water Level:** Keep an eye on the water level in the container and add more water as needed to maintain the correct level.
4. **Air Circulation:** Good air circulation is important to prevent fungal diseases. Make sure there’s adequate ventilation in the room where you’re growing your rosemary. A small fan can help improve air circulation.
5. **Pruning:** Prune your rosemary plants regularly to encourage bushier growth. Simply snip off the tips of the stems. You can use the pruned rosemary for cooking or drying.
6. **Pest Control:** Keep an eye out for pests such as aphids or spider mites. If you spot any pests, treat them with an organic insecticide or insecticidal soap.
Troubleshooting
Even with the best care, you might encounter some problems along the way. Here are a few common issues and how to address them:
* **Yellowing Leaves:** This could be a sign of nutrient deficiency, overwatering, or insufficient light. Check the pH and nutrient levels of the solution, make sure the plants are getting enough light, and ensure the growing medium isn’t waterlogged.
* **Slow Growth:** This could be due to insufficient light, low nutrient levels, or a pH imbalance. Make sure the plants are getting enough light, check the pH and nutrient levels, and adjust as needed.
* **Root Rot:** This is caused by a lack of oxygen in the nutrient solution. Make sure your air pump and air stone are working properly and that the water level isn’t too high.
* **Algae Growth:** Algae can grow in the nutrient solution if it’s exposed to too much light. Use a dark-colored container to block out light and keep the system clean.
Harvesting Your Rosemary
After a few weeks, your rosemary plants should be ready for harvesting!
1. **Harvesting:** Simply snip off sprigs of rosemary as needed. The more you harvest, the bushier the plant will become.
2. **Drying:** If you want to dry your rosemary for later use, tie the sprigs together and hang them upside down in a cool, dry place. Once they’re completely dry, you can store them in an airtight container.
Section: Advanced Tips and Tricks
Want to take your hydroponic rosemary growing to the next level? Here are a few advanced tips and tricks:
* **Experiment with Different Nutrient Solutions:** There are many different hydroponic nutrient solutions available, so experiment to find one that works best for your rosemary plants.
* **Use a Timer for the Air Pump:** You don’t need to run the air pump constantly. You can use a timer to turn it on and off for a few hours each day.
* **Consider a Recirculating System:** For larger-scale hydroponic growing, consider using a recirculating system. This will help conserve water and nutrients.
* **Monitor Electrical Conductivity (EC):** EC measures the total amount of dissolved salts in the nutrient solution. Monitoring EC can help you fine-tune your nutrient levels.
* **Propagate New Plants:** Once your rosemary plants are established, you can take cuttings to propagate new plants. This is a great way

Conclusion
So, there you have it! Mastering hydroponic rosemary growing indoors is not just a fun experiment; it’s a game-changer for any herb enthusiast. Forget battling unpredictable weather, soil-borne diseases, and the constant need for repotting. With this simple DIY setup, you can enjoy a thriving rosemary plant year-round, right in the comfort of your home. Imagine the convenience of snipping fresh, fragrant sprigs whenever you need them, adding a burst of flavor to your culinary creations or infusing your home with its invigorating aroma.
This method offers unparalleled control over your rosemary’s environment, allowing you to fine-tune the nutrient solution and lighting to optimize growth. You’ll be amazed at how quickly your rosemary takes off, producing lush, healthy foliage that’s far superior to anything you might find at the grocery store. Plus, the satisfaction of nurturing a plant from start to finish using your own ingenuity is incredibly rewarding.
Don’t be afraid to experiment! Once you’ve mastered the basic hydroponic setup, you can explore different nutrient solutions to see which one yields the best results for your rosemary. Consider adding a small air pump and air stone to further oxygenate the water, promoting even healthier root development. You can also try different lighting options, such as LED grow lights, to tailor the light spectrum to your rosemary’s specific needs.
For a fun variation, try propagating rosemary cuttings directly in your hydroponic system. Simply take a healthy cutting from an existing rosemary plant, remove the lower leaves, and place it in your nutrient solution. With a little patience, you’ll have a brand new rosemary plant ready to thrive. You can even expand your indoor herb garden by adding other herbs like basil, mint, or thyme to your hydroponic system. The possibilities are endless!
We wholeheartedly encourage you to give this DIY hydroponic rosemary growing indoors trick a try. It’s easier than you think, and the results are well worth the effort. Not only will you have a constant supply of fresh rosemary, but you’ll also gain a deeper understanding of plant science and the joys of indoor gardening.
We’re confident that you’ll be thrilled with the results. But don’t just take our word for it! We want to hear about your experiences. Share your photos, tips, and questions in the comments below. Let’s build a community of hydroponic rosemary growers and learn from each other. Happy growing!
Frequently Asked Questions (FAQ)
What exactly is hydroponics, and why is it good for growing rosemary indoors?
Hydroponics is a method of growing plants without soil, using mineral nutrient solutions in water. It’s particularly well-suited for indoor rosemary cultivation because it eliminates many of the challenges associated with traditional soil-based gardening. You have complete control over the nutrients your rosemary receives, ensuring optimal growth. It also reduces the risk of soil-borne diseases and pests, which can be a major problem for indoor plants. Furthermore, hydroponics can be more water-efficient than traditional gardening, as the nutrient solution is recirculated. This makes hydroponic rosemary growing indoors a sustainable and efficient way to enjoy fresh herbs year-round.
What kind of container should I use for my hydroponic rosemary setup?
The ideal container depends on the size of your rosemary plant and your available space. A dark-colored, opaque container is generally recommended to prevent algae growth. A plastic storage bin, a repurposed bucket, or even a large glass jar can work well. The key is to ensure that the container is clean and food-grade if possible. The size should be adequate to accommodate the root system of your rosemary plant as it grows. A container with a capacity of 2-5 gallons is usually sufficient for a single rosemary plant.
What type of nutrient solution should I use for hydroponic rosemary?
Rosemary thrives on a balanced nutrient solution specifically formulated for herbs or leafy greens. Look for hydroponic nutrient solutions that contain essential macronutrients like nitrogen (N), phosphorus (P), and potassium (K), as well as micronutrients like iron (Fe), manganese (Mn), and zinc (Zn). Follow the manufacturer’s instructions carefully when mixing the nutrient solution, as over-fertilizing can damage your rosemary plant. A general-purpose hydroponic nutrient solution will often work well, but you can also find solutions specifically designed for herbs. Regularly monitor the pH of your nutrient solution, aiming for a range of 5.5 to 6.5 for optimal rosemary growth.
How much light does hydroponic rosemary need indoors?
Rosemary requires plenty of light to thrive, ideally 6-8 hours of direct sunlight per day. If you don’t have access to sufficient natural light, you’ll need to supplement with artificial grow lights. LED grow lights are a popular choice for hydroponic gardening, as they are energy-efficient and provide a full spectrum of light that plants need for photosynthesis. Position the grow lights close enough to your rosemary plant to provide adequate illumination, but not so close that they burn the leaves. Monitor your rosemary’s growth and adjust the lighting as needed to ensure it’s receiving enough light.
How often should I change the nutrient solution in my hydroponic rosemary system?
The frequency of nutrient solution changes depends on the size of your container, the growth rate of your rosemary plant, and the concentration of the nutrient solution. As a general rule, you should change the nutrient solution every 1-2 weeks. This helps to prevent the buildup of salts and other impurities that can harm your rosemary plant. When changing the nutrient solution, thoroughly rinse out the container to remove any debris or algae. Regularly monitor the nutrient solution for any signs of discoloration or cloudiness, which may indicate contamination.
Can I use tap water for my hydroponic rosemary system?
While tap water can be used, it’s best to test it first to ensure that it’s suitable for hydroponics. Tap water often contains chlorine or chloramine, which can be harmful to plants. If your tap water contains high levels of these chemicals, you can let it sit out for 24 hours to allow them to dissipate. Alternatively, you can use a water filter to remove these chemicals. Rainwater or distilled water are also excellent choices for hydroponic gardening, as they are free of impurities.
How do I prevent algae growth in my hydroponic rosemary system?
Algae growth is a common problem in hydroponic systems, but it can be easily prevented. The most important thing is to keep your nutrient solution out of direct sunlight, as light promotes algae growth. Use a dark-colored, opaque container to block light from reaching the nutrient solution. You can also add a small amount of hydrogen peroxide to the nutrient solution to kill algae. Regularly clean your container and hydroponic system to remove any algae that may have accumulated.
How do I prune my hydroponic rosemary plant?
Pruning is essential for maintaining the health and shape of your hydroponic rosemary plant. Regularly trim off any dead or yellowing leaves. You can also prune back the stems to encourage bushier growth. When pruning, use clean, sharp scissors or pruning shears to avoid damaging the plant. Pruning also encourages new growth, which means more fresh rosemary for you to enjoy.
What are some common problems I might encounter when growing hydroponic rosemary indoors, and how do I fix them?
Some common problems include nutrient deficiencies, pest infestations, and root rot. Nutrient deficiencies can be identified by yellowing or browning leaves. Adjust the nutrient solution accordingly. Pest infestations can be treated with insecticidal soap or neem oil. Root rot is caused by overwatering or poor aeration. Ensure that your roots are well-oxygenated and avoid overwatering. Regularly inspect your rosemary plant for any signs of problems and address them promptly to prevent them from escalating.
Can I grow other herbs alongside rosemary in the same hydroponic system?
Yes, you can grow other herbs alongside rosemary, but it’s important to choose herbs that have similar nutrient and lighting requirements. Basil, thyme, and oregano are good companions for rosemary. Avoid growing herbs that are very different in size or growth rate, as they may compete for resources. Ensure that each herb has enough space to grow and that they are all receiving adequate light and nutrients.


Leave a Comment