
Kale Growing in Plastic Bottles: Imagine harvesting fresh, vibrant kale right from your windowsill, all thanks to a simple, upcycled plastic bottle! Sounds too good to be true? Well, get ready to be amazed because this DIY project is not only incredibly easy but also a fantastic way to bring the joy of gardening into even the smallest of spaces. For centuries, humans have cultivated kale, valuing it for its nutritional power and resilience. From ancient Roman gardens to modern-day superfood salads, kale has proven its staying power.
But let’s face it, not everyone has a sprawling backyard to dedicate to a vegetable patch. That’s where this clever hack comes in! Kale growing in plastic bottles offers a sustainable and space-saving solution for urban dwellers, apartment residents, or anyone looking to add a touch of green to their lives. I’m going to show you how to transform those discarded plastic bottles into mini-kale gardens, reducing waste and providing you with a constant supply of fresh, healthy greens. Get ready to roll up your sleeves and discover the magic of upcycled gardening – your taste buds (and the planet) will thank you!
Grünkohl Anbauen in Plastikflaschen: Ein DIY-Gartenprojekt für Jedermann
Hallo liebe Gartenfreunde! Habt ihr auch so wenig Platz, aber trotzdem Lust auf frischen, knackigen Grünkohl? Dann habe ich genau das Richtige für euch: Grünkohl anbauen in Plastikflaschen! Das ist nicht nur super platzsparend, sondern auch eine tolle Möglichkeit, Plastikmüll zu recyceln und euren Balkon oder Garten aufzupeppen. Ich zeige euch, wie es geht – Schritt für Schritt!
Was ihr braucht:
* Plastikflaschen: Am besten eignen sich 1,5-Liter- oder 2-Liter-Flaschen. Achtet darauf, dass sie sauber und unbeschädigt sind.
* Grünkohlsamen: Ihr könnt verschiedene Sorten wählen, je nachdem, was euch am besten schmeckt.
* Anzuchterde: Diese ist nährstoffarm und ideal für die Keimung der Samen.
* Blumenerde: Für das spätere Umpflanzen der Keimlinge.
* Schere oder Messer: Zum Zuschneiden der Flaschen.
* Bohrer oder Nagel: Zum Anbringen von Drainagelöchern.
* Gießkanne oder Sprühflasche: Zum Bewässern.
* Etiketten und Stift: Zum Beschriften der Flaschen (optional, aber empfehlenswert).
* Kabelbinder oder Draht: Zum Aufhängen der Flaschen (optional).
Schritt-für-Schritt-Anleitung:
Phase 1: Die Vorbereitung der Plastikflaschen
1. Flaschen reinigen: Zuerst müsst ihr die Plastikflaschen gründlich reinigen. Entfernt alle Etiketten und spült sie mit warmem Wasser und etwas Spülmittel aus. Achtet darauf, dass keine Spülmittelreste zurückbleiben. Lasst die Flaschen gut trocknen.
2. Flaschen zuschneiden: Jetzt kommt der spannende Teil: das Zuschneiden der Flaschen. Es gibt verschiedene Möglichkeiten, wie ihr das machen könnt. Ich bevorzuge es, die Flaschen horizontal zu halbieren. So erhaltet ihr zwei Pflanzgefäße aus einer Flasche. Ihr könnt aber auch nur den oberen Teil abschneiden, um eine Art Topf zu erhalten.
* Variante 1 (Halbierung): Markiert mit einem Stift die Mitte der Flasche und schneidet sie mit einer Schere oder einem Messer durch. Achtung: Seid vorsichtig, damit ihr euch nicht schneidet!
* Variante 2 (Topf): Schneidet den oberen Teil der Flasche ab, etwa 10-15 cm unterhalb des Flaschenhalses.
3. Drainagelöcher bohren: Damit das Wasser gut ablaufen kann und sich keine Staunässe bildet, müsst ihr Drainagelöcher in den Boden der Flaschen bohren. Nehmt einen Bohrer oder einen Nagel und macht 3-4 Löcher in den Boden jeder Flasche.
4. Aufhängung vorbereiten (optional): Wenn ihr die Flaschen aufhängen möchtet, müsst ihr jetzt Löcher für die Aufhängung anbringen. Bohrt oder stecht mit einem Messer zwei Löcher an den Seiten der Flasche, kurz unterhalb des oberen Randes. Durch diese Löcher könnt ihr später Kabelbinder oder Draht ziehen, um die Flaschen aufzuhängen.
Phase 2: Die Aussaat des Grünkohls
1. Anzuchterde einfüllen: Füllt die vorbereiteten Flaschen mit Anzuchterde. Lasst etwa 2-3 cm Platz bis zum Rand. Die Anzuchterde sollte locker und feucht sein.
2. Samen aussäen: Verteilt die Grünkohlsamen gleichmäßig auf der Anzuchterde. Drückt sie leicht an, aber bedeckt sie nicht zu tief. Grünkohl ist ein Lichtkeimer, das heißt, er braucht Licht zum Keimen. Eine dünne Schicht Erde (ca. 0,5 cm) reicht aus.
3. Bewässern: Befeuchtet die Erde vorsichtig mit einer Gießkanne oder einer Sprühflasche. Achtet darauf, dass die Erde nicht zu nass wird. Sie sollte feucht, aber nicht triefend sein.
4. Standort wählen: Stellt die bepflanzten Flaschen an einen hellen und warmen Ort. Ideal ist ein Fensterbrett oder ein Gewächshaus. Die Temperatur sollte zwischen 18 und 22 Grad Celsius liegen.
5. Feuchtigkeit halten: Haltet die Erde feucht, indem ihr sie regelmäßig besprüht. Vermeidet Staunässe.
Phase 3: Die Pflege der Keimlinge
1. Keimung beobachten: Nach etwa 5-10 Tagen sollten die ersten Keimlinge zu sehen sein.
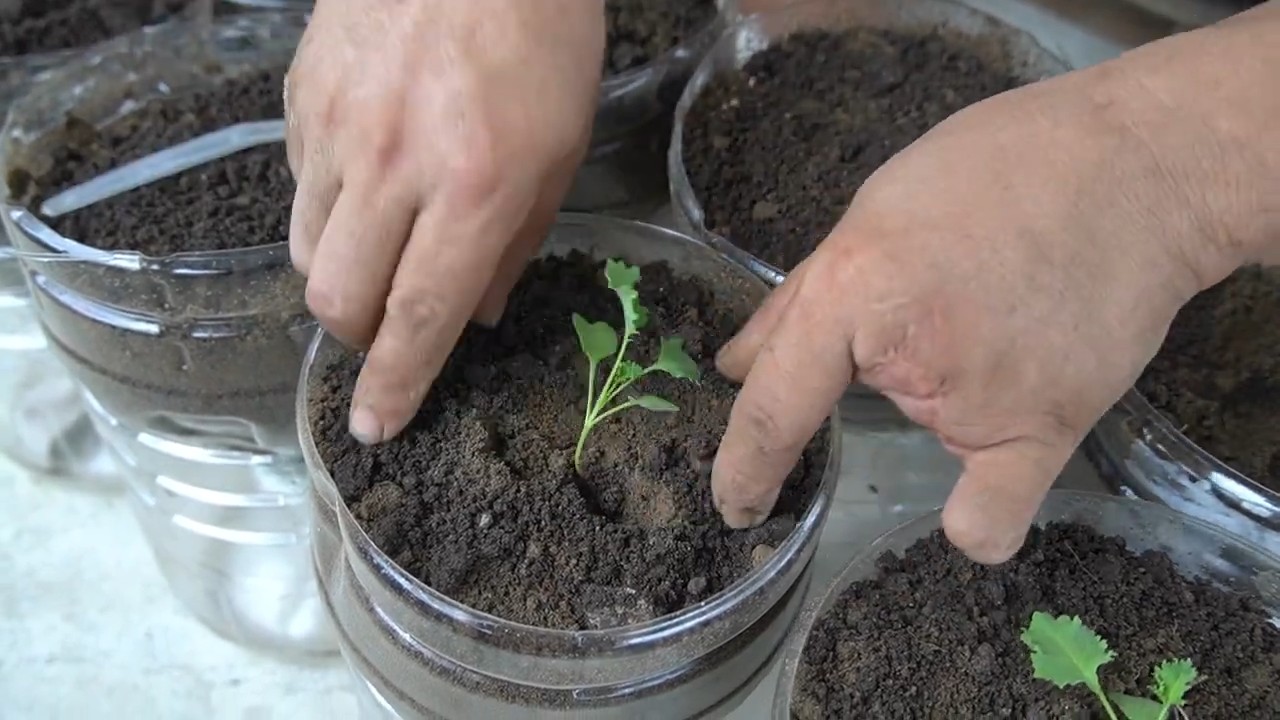
2. Vereinzeln (pikieren): Wenn die Keimlinge etwa 2-3 Blätter haben, ist es Zeit, sie zu vereinzeln. Das bedeutet, dass ihr die schwächeren Keimlinge entfernt, damit die stärkeren genug Platz zum Wachsen haben. Lasst pro Flasche nur 1-2 Keimlinge stehen.
3. Düngen: Beginnt, die Keimlinge mit einem milden Flüssigdünger zu düngen. Haltet euch dabei an die Anweisungen auf der Verpackung.
4. Drehen: Dreht die Flaschen regelmäßig, damit die Keimlinge gleichmäßig Licht bekommen und nicht schief wachsen.
Phase 4: Das Umpflanzen in größere Gefäße
1. Vorbereitung: Wenn die Keimlinge groß genug sind (etwa 10-15 cm hoch), ist es Zeit, sie in größere Gefäße umzupflanzen. Ihr könnt sie entweder in größere Plastikflaschen umpflanzen oder in Töpfe oder Kübel.
2. Blumenerde vorbereiten: Füllt die größeren Gefäße mit Blumenerde. Achtet darauf, dass die Erde locker und nährstoffreich ist.
3. Umpflanzen: Nehmt die Keimlinge vorsichtig aus den kleinen Flaschen und pflanzt sie in die größeren Gefäße um. Achtet darauf, dass die Wurzeln nicht beschädigt werden.
4. Angießen: Gießt die umgepflanzten Grünkohlpflanzen gut an.
Phase 5: Die Pflege der Grünkohlpflanzen
1. Standort: Stellt die Grünkohlpflanzen an einen sonnigen Standort. Grünkohl braucht viel Licht, um gut zu wachsen.
2. Bewässerung: Gießt die Pflanzen regelmäßig, besonders an heißen Tagen. Achtet darauf, dass die Erde nicht austrocknet.
3. Düngung: Düngt die Pflanzen regelmäßig mit einem organischen Dünger. Grünkohl ist ein Starkzehrer und braucht viele Nährstoffe.
4. Schutz vor Schädlingen: Kontrolliert die Pflanzen regelmäßig auf Schädlinge wie Blattläuse oder Kohlweißlinge. Bei Bedarf könnt ihr natürliche Schädlingsbekämpfungsmittel einsetzen.
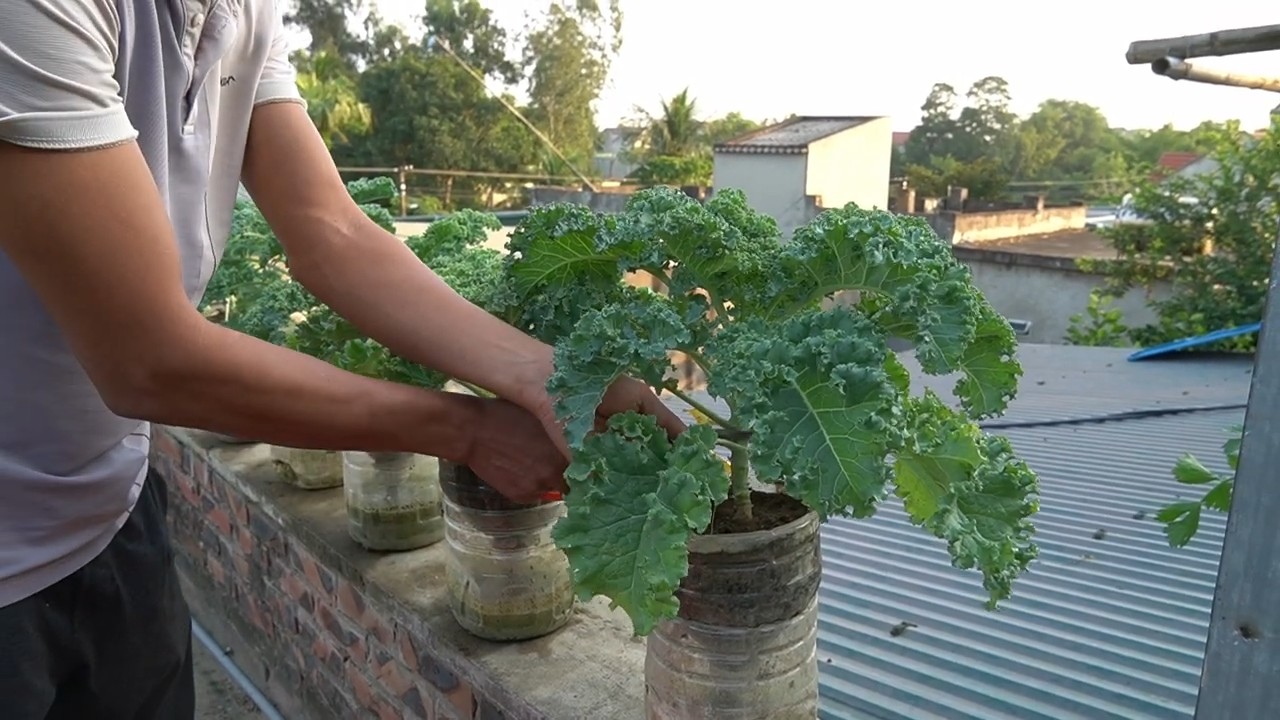
5. Ernte: Nach etwa 8-12 Wochen könnt ihr den Grünkohl ernten. Schneidet die äußeren Blätter ab, die inneren Blätter wachsen weiter. So könnt ihr über einen längeren Zeitraum ernten.
Tipps und Tricks:
* Sortenwahl: Es gibt verschiedene Grünkohlsorten, die sich in Geschmack und Aussehen unterscheiden. Probiert verschiedene Sorten aus, um euren Favoriten zu finden.
* Winterhart: Grünkohl ist sehr winterhart und kann auch bei Frost geerntet werden. Durch den Frost wird er sogar noch süßer.
* Kombination mit anderen Pflanzen: Ihr könnt Grünkohl gut mit anderen Pflanzen wie Ringelblumen oder Kapuzinerkresse kombinieren. Diese Pflanzen halten Schädlinge fern.
* Recycling: Verwendet alte Plastikflaschen, um euren Beitrag zum Umweltschutz zu leisten.
* Beschriftung: Beschriftet die Flaschen mit dem Namen der Grünkohlsorte und dem Aussaatdatum. So behaltet ihr den Überblick.
Ich hoffe, diese Anleitung hilft euch dabei, euren eigenen Grünkohl in Plastikflaschen anzubauen. Es ist ein tolles Projekt, das nicht nur Spaß macht, sondern auch leckeren und gesunden Grünkohl liefert. Viel Erfolg beim Gärtnern!
Conclusion
So, there you have it! Growing kale in plastic bottles isn’t just a quirky gardening experiment; it’s a genuinely effective and rewarding way to cultivate fresh, nutritious greens, even with limited space or resources. We’ve explored how this method transforms discarded plastic into a thriving vertical garden, reducing waste and providing you with a sustainable source of delicious kale.
But why is this DIY trick a must-try? Firstly, it’s incredibly space-efficient. Forget sprawling garden beds; plastic bottle kale gardens can be hung on balconies, fences, or even stacked creatively in small yards. Secondly, it’s budget-friendly. Reusing plastic bottles minimizes costs, making gardening accessible to everyone. Thirdly, it’s a fantastic way to teach children about recycling, gardening, and healthy eating habits. They can actively participate in the process, from planting the seeds to harvesting the kale.
Beyond the basic method, there’s plenty of room for customization. Consider painting the bottles to add a splash of color to your garden. Experiment with different types of kale, such as curly kale, lacinato kale (dinosaur kale), or red Russian kale, to discover your favorites. You can also integrate companion planting by adding herbs like basil or thyme to the bottles, which can help deter pests and enhance the flavor of your kale. For those living in colder climates, you can even bring your plastic bottle kale garden indoors during the winter months, ensuring a year-round supply of fresh greens.
Furthermore, think about the environmental impact. By repurposing plastic bottles, you’re actively contributing to waste reduction and promoting a more sustainable lifestyle. Each bottle saved from the landfill is a small victory for the planet.
Don’t be afraid to experiment with different bottle sizes and arrangements. Larger bottles can accommodate more mature kale plants, while smaller bottles are perfect for starting seedlings. You can also create tiered systems or vertical walls using wire or rope to maximize space and create a visually appealing display.
We’re confident that you’ll find growing kale in plastic bottles to be a surprisingly simple and satisfying experience. The fresh, homegrown taste of kale is unmatched, and knowing that you’ve contributed to a more sustainable environment makes it even more rewarding.
So, grab those plastic bottles, gather your kale seeds, and get ready to embark on this exciting gardening adventure! We encourage you to try this DIY trick and share your experiences with us. Post photos of your plastic bottle kale gardens on social media using #PlasticBottleKale and tell us about your successes, challenges, and creative variations. We can’t wait to see what you create! Let’s build a community of eco-conscious gardeners, one plastic bottle at a time. Happy gardening!
FAQ
What type of plastic bottles are best for growing kale?
Ideally, you should use food-grade plastic bottles, such as those that previously contained water, juice, or soda. Avoid bottles that held harsh chemicals or cleaning products, as these may leach harmful substances into the soil. PET (polyethylene terephthalate) bottles, commonly used for water and soda, are generally considered safe. Make sure to thoroughly clean the bottles with soap and water before using them. Also, consider the size of the bottle. Larger bottles (2-liter or larger) are better for mature kale plants, while smaller bottles are suitable for seedlings or smaller varieties of kale.
How often should I water my kale plants in plastic bottles?
The watering frequency depends on several factors, including the weather, the size of the bottle, and the type of soil you’re using. Generally, you should water your kale plants when the top inch of soil feels dry to the touch. During hot, sunny weather, you may need to water them daily, while during cooler, cloudy weather, you may only need to water them every few days. Ensure that the bottles have adequate drainage holes to prevent waterlogging, which can lead to root rot. A good rule of thumb is to water thoroughly until water drains out of the bottom of the bottle.
What kind of soil should I use for growing kale in plastic bottles?
A well-draining potting mix is essential for growing healthy kale in plastic bottles. Avoid using garden soil, as it can be too heavy and compact, hindering drainage and root growth. A good potting mix should contain a blend of peat moss, perlite, and vermiculite. You can also add compost or other organic matter to enrich the soil and provide essential nutrients. Consider using a potting mix specifically formulated for vegetables, as these often contain slow-release fertilizers that will nourish your kale plants over time.
How much sunlight does kale need when grown in plastic bottles?
Kale thrives in full sun, which means it needs at least 6 hours of direct sunlight per day. However, it can also tolerate partial shade, especially during the hottest part of the day. If you’re growing kale indoors, you may need to supplement natural light with grow lights to ensure that your plants receive enough light. Position your plastic bottle kale garden in a location that receives ample sunlight, such as a south-facing balcony or windowsill. If you notice that your kale plants are becoming leggy or pale, it may be a sign that they’re not getting enough light.
How do I fertilize kale growing in plastic bottles?
Kale is a heavy feeder, meaning it requires a good supply of nutrients to grow and produce healthy leaves. You can fertilize your kale plants with a balanced liquid fertilizer, such as a 10-10-10 or 20-20-20 formula, diluted according to the package instructions. Apply the fertilizer every 2-3 weeks during the growing season. You can also add compost tea or other organic fertilizers to the soil to provide a slow-release source of nutrients. Avoid over-fertilizing, as this can lead to excessive foliage growth and reduced flavor.
How do I protect my kale plants from pests and diseases?
Kale is susceptible to various pests and diseases, including aphids, cabbage worms, and fungal infections. To prevent pest infestations, inspect your plants regularly and remove any pests you find by hand. You can also use insecticidal soap or neem oil to control aphids and other soft-bodied insects. To prevent fungal diseases, ensure that your plants have good air circulation and avoid overwatering. If you notice any signs of disease, such as yellowing leaves or spots, remove the affected leaves immediately. Consider using organic fungicides if the problem persists. Companion planting with herbs like rosemary or thyme can also help deter pests.
When is the best time to harvest kale from my plastic bottle garden?
You can start harvesting kale leaves when they are about 4-6 inches long. Harvest the outer leaves first, leaving the inner leaves to continue growing. This will encourage the plant to produce more leaves. You can harvest kale throughout the growing season, even into the winter months in milder climates. The flavor of kale is often improved by frost, making it sweeter and less bitter. To harvest, simply cut the leaves off at the base of the stem with a sharp knife or scissors.
Can I grow other vegetables in plastic bottles besides kale?
Yes, you can grow a variety of other vegetables in plastic bottles, including lettuce, spinach, herbs, and even strawberries. The key is to choose vegetables that have shallow root systems and don’t require a lot of space. Smaller varieties of tomatoes and peppers can also be grown in larger plastic bottles. Experiment with different vegetables to see what works best in your climate and growing conditions. Remember to adjust the watering and fertilization schedule according to the needs of each vegetable.
How do I overwinter my kale plants in plastic bottles?
In milder climates, kale can often survive the winter with minimal protection. However, in colder climates, you may need to take steps to protect your plants from frost and freezing temperatures. You can move your plastic bottle kale garden indoors to a sunny location or a greenhouse. Alternatively, you can cover the plants with a frost blanket or burlap to provide insulation. Avoid watering the plants excessively during the winter months, as this can lead to root rot. With proper care, your kale plants can survive the winter and continue to produce leaves in the spring.
Is growing kale in plastic bottles safe? Are there any risks of chemicals leaching into the soil?
While the risk is low with food-grade plastic like PET, it’s a valid concern. To minimize any potential leaching, avoid using bottles that have been exposed to high temperatures or direct sunlight for extended periods. Opt for thicker, more durable bottles, as they are less likely to degrade. Lining the inside of the bottles with a layer of landscape fabric can also act as a barrier between the plastic and the soil. Regularly replace the bottles every few years to further reduce the risk of chemical leaching. Ultimately, using food-grade plastic and taking these precautions makes growing kale in plastic bottles a safe and sustainable gardening method.
Leave a Comment