
Microwave hacks and tips – who knew these two words could unlock a world of kitchen wizardry? Let’s be honest, the microwave often gets a bad rap. It’s seen as the quick-fix, the reheater of leftovers, not exactly a culinary powerhouse. But I’m here to tell you, that little box in your kitchen is capable of so much more!
From its accidental discovery during radar research in the 1940s, the microwave has evolved from a bulky, expensive appliance to a kitchen staple. Think about it – generations have relied on it for everything from popping popcorn during movie nights to quickly defrosting dinner after a long day. But are you truly maximizing its potential?
In today’s fast-paced world, time is precious. We’re all looking for ways to streamline our routines, especially in the kitchen. That’s where these microwave hacks and tips come in. I’m going to share some simple, yet game-changing tricks that will not only save you time and effort but also help you get more out of your microwave. Whether you’re a seasoned chef or a kitchen newbie, these tips will transform the way you use this often-underestimated appliance. Get ready to unlock the hidden potential of your microwave and make your life a whole lot easier!
Growing Zucchini: A Beginner’s Guide to Bountiful Harvests
Hey there, fellow gardening enthusiasts! I’m so excited to share my experiences and tips on growing zucchini at home. Zucchini is a fantastic vegetable to cultivate – it’s relatively easy, incredibly productive, and oh-so-versatile in the kitchen. Get ready for an abundance of zucchini bread, grilled zucchini, and so much more!
Choosing Your Zucchini Variety
Before we dive into the nitty-gritty, let’s talk about zucchini varieties. There’s more to zucchini than just the standard dark green type you see in the grocery store. Here are a few popular options:
* Black Beauty: This is your classic dark green zucchini, known for its reliable yields and excellent flavor.
* Golden Zucchini: A vibrant yellow variety that adds a pop of color to your garden and dishes. The taste is similar to green zucchini.
* Costata Romanesco: An Italian heirloom variety with distinctive ridges and a nutty flavor. It’s a bit more challenging to find seeds for, but well worth the effort.
* Round Zucchini (Eight Ball, One Ball): These adorable, softball-sized zucchini are perfect for stuffing.
I personally love growing Black Beauty for its consistent performance and the Golden Zucchini for its visual appeal. Experiment and see which variety you prefer!
Preparing Your Garden Bed
Zucchini plants are hungry and thirsty, so proper soil preparation is key. Here’s what I do to get my garden bed ready:
* Sunlight: Zucchini needs at least 6-8 hours of direct sunlight per day. Choose a location that gets plenty of sunshine.
* Soil: Zucchini thrives in well-drained, fertile soil. Amend your soil with plenty of compost or well-rotted manure. This will improve drainage, add nutrients, and help retain moisture.
* Soil pH: Zucchini prefers a soil pH between 6.0 and 7.5. You can test your soil pH with a home testing kit or send a sample to your local agricultural extension office.
* Spacing: Zucchini plants get quite large, so give them plenty of space. I recommend spacing plants 2-3 feet apart in rows that are 3-4 feet apart. This allows for good air circulation and prevents overcrowding.
Starting Zucchini Seeds
You can either start zucchini seeds indoors or direct sow them in your garden. I usually prefer direct sowing because zucchini seedlings don’t always transplant well.
Direct Sowing Zucchini Seeds
1. Wait for Warm Weather: Zucchini seeds need warm soil to germinate. Wait until the soil temperature is consistently above 60°F (16°C) before planting. This is usually a couple of weeks after the last frost in your area.
2. Prepare the Soil: Loosen the soil in your prepared garden bed and remove any rocks or debris.
3. Plant the Seeds: Sow the seeds about 1 inch deep and 2-3 feet apart. I usually plant 2-3 seeds per hole and then thin them out to the strongest seedling once they germinate.
4. Water Gently: Water the soil gently after planting to avoid disturbing the seeds.
5. Keep the Soil Moist: Keep the soil consistently moist until the seeds germinate. This usually takes 7-10 days.
Starting Zucchini Seeds Indoors (Optional)
If you live in an area with a short growing season, you can start zucchini seeds indoors 3-4 weeks before the last frost.
1. Use Biodegradable Pots: Zucchini seedlings don’t like to have their roots disturbed, so use biodegradable pots that can be planted directly into the garden.
2. Fill the Pots with Seed Starting Mix: Use a high-quality seed starting mix that is light and well-draining.
3. Plant the Seeds: Sow the seeds about 1 inch deep in the pots.
4. Water Gently: Water the soil gently after planting.
5. Provide Warmth and Light: Place the pots in a warm location with plenty of light. A sunny windowsill or a grow light will work well.
6. Harden Off the Seedlings: Before transplanting the seedlings into the garden, you’ll need to harden them off. This means gradually exposing them to outdoor conditions over a period of 7-10 days. Start by placing them outside for a few hours each day in a sheltered location and gradually increase the amount of time they spend outdoors.
7. Transplant Carefully: Once the seedlings are hardened off, transplant them into your prepared garden bed. Plant the entire biodegradable pot directly into the soil to avoid disturbing the roots.
Caring for Your Zucchini Plants
Once your zucchini plants are established, here’s how to keep them happy and healthy:
* Watering: Zucchini plants need consistent moisture, especially during hot weather. Water deeply at the base of the plants, avoiding getting the leaves wet. I usually water my zucchini plants every 2-3 days, or more often during dry spells.
* Fertilizing: Zucchini plants are heavy feeders, so fertilize them regularly with a balanced fertilizer. I like to use a liquid fertilizer diluted to half strength every 2-3 weeks. You can also side-dress the plants with compost or well-rotted manure.
* Mulching: Mulch around the plants with straw, wood chips, or shredded leaves. This will help retain moisture, suppress weeds, and keep the soil cool.
* Pest Control: Zucchini plants can be susceptible to pests such as squash bugs, squash vine borers, and aphids. Inspect your plants regularly for signs of pests and take action promptly. I like to use organic pest control methods such as hand-picking pests, using insecticidal soap, or applying neem oil.
* Pollination: Zucchini plants have separate male and female flowers. The female flowers need to be pollinated in order to produce fruit. If you’re not seeing any fruit develop, you may need to hand-pollinate the flowers. To do this, simply use a small paintbrush to transfer pollen from the male flower to the female flower. You can identify the female flowers by the small zucchini fruit at the base of the flower.
Harvesting Your Zucchini
Zucchini grows quickly, so you’ll need to harvest it regularly.
* Harvest When Young: Harvest zucchini when it’s young and tender, usually when it’s about 6-8 inches long. Larger zucchini can be tough and seedy.
* Use a Sharp Knife: Use a sharp knife to cut the zucchini from the plant, leaving a short stem attached.
* Check Daily: Check your zucchini plants daily during peak season, as they can grow several inches in a single day.
* Don’t Let Them Get Too Big: Overgrown zucchini can be used for zucchini bread or shredded for other recipes, but they won’t be as flavorful as young zucchini.
Dealing with Common Zucchini Problems
Even with the best care, you might encounter some problems while growing zucchini. Here are a few common issues and how to address them:
* Powdery Mildew: This fungal disease appears as a white, powdery coating on the leaves. To prevent powdery mildew, provide good air circulation, avoid overhead watering, and apply a fungicide if necessary.
* Squash Vine Borers: These pests bore into the stems of zucchini plants, causing them to wilt and die. To prevent squash vine borers, wrap the base of the stems with aluminum foil or netting. You can also inject Bacillus thuringiensis (Bt) into the stems to kill the borers.
* Squash Bugs: These pests suck the sap from zucchini leaves, causing them to turn yellow and die. To control squash bugs, hand-pick them from the plants, use insecticidal soap, or apply neem oil.
* Blossom End Rot: This condition causes the blossom end of the zucchini to rot. It’s usually caused by calcium deficiency or inconsistent watering. To prevent blossom end rot, amend your soil with calcium-rich amendments such as bone meal or crushed eggshells, and water consistently.
Recipes and Uses for Your Zucchini
Now for the fun part – using your homegrown zucchini! Here are just a few ideas:
* Zucchini Bread: A classic way to use up a lot of zucchini. There are countless recipes online, so find one that suits your taste.
* Grilled Zucchini: Slice zucchini lengthwise, brush with olive oil, and grill until tender. Season with salt, pepper, and your favorite herbs.
* Zucchini Noodles (Zoodles): Use a spiralizer to turn zucchini into noodles. Serve with your favorite pasta sauce or pesto.
* Stuffed Zucchini: Hollow out zucchini and fill with a mixture of ground meat, rice, vegetables, and cheese. Bake until tender.
* Zucchini Fritters: Grate zucchini, mix with flour, eggs, and seasonings, and fry until golden brown.
* Z
Conclusion
So, there you have it! Mastering these microwave hacks and tips isn’t just about convenience; it’s about unlocking the full potential of this often-underestimated kitchen appliance. From perfectly steamed vegetables to reviving stale bread, these simple techniques can transform your cooking experience and save you valuable time and effort.
We’ve shown you how to prevent explosions, achieve even heating, and even create delicious, quick meals with minimal fuss. These aren’t just tricks; they’re fundamental skills that will elevate your microwave game and make you wonder how you ever lived without them.
But the real beauty of these microwave hacks and tips lies in their adaptability. Feel free to experiment with variations to suit your own tastes and dietary needs. For example, instead of steaming vegetables in a microwave-safe bowl with water, try adding a squeeze of lemon juice or a sprinkle of herbs for extra flavor. When reheating pizza, place a small glass of water in the microwave alongside it to prevent it from becoming dry and rubbery. You can even use the microwave to quickly toast nuts or seeds for a salad topping or snack. The possibilities are truly endless!
Why is this a must-try? Because it simplifies your life. It reduces food waste by allowing you to revive leftovers effectively. It empowers you to create quick, healthy meals even when you’re short on time. And, perhaps most importantly, it demystifies the microwave, turning it from a simple reheating device into a versatile cooking tool.
Don’t be intimidated by the prospect of trying something new. These microwave hacks and tips are designed to be easy and accessible to everyone, regardless of their cooking experience. Start with one or two that resonate with you and gradually incorporate more into your routine. You’ll be amazed at the difference they can make.
We’re confident that once you’ve experienced the benefits of these microwave hacks and tips, you’ll never look at your microwave the same way again. It’s time to ditch the guesswork and embrace the power of informed microwaving.
So, go ahead, give these hacks a try! We’re eager to hear about your experiences. Share your successes, your failures, and any variations you discover in the comments below. Let’s build a community of microwave masters and unlock the full potential of this amazing appliance together! Your feedback will not only help other readers but also inspire us to continue exploring and sharing innovative microwave techniques. Happy microwaving!
Frequently Asked Questions (FAQs)
Q: How do I prevent food from exploding in the microwave?
A: The key to preventing explosions is to release the pressure that builds up inside certain foods during microwaving. Foods with skins, like potatoes, tomatoes, and eggs (never microwave eggs in their shell!), should be pierced several times with a fork before cooking. This allows steam to escape and prevents the buildup of pressure that can lead to messy explosions. Also, be mindful of foods with high water content, as they can also splatter. Covering the food with a microwave-safe lid or vented plastic wrap can help contain splatters, but always ensure there’s a vent for steam to escape.
Q: What’s the best way to reheat leftovers in the microwave without drying them out?
A: Reheating leftovers without drying them out is a common challenge. The best approach is to add a little moisture. For solid foods like pasta or rice, sprinkle a tablespoon or two of water over the food before microwaving. For saucier dishes, you may not need to add extra water. Cover the dish with a microwave-safe lid or vented plastic wrap to trap steam and prevent moisture from escaping. Also, use lower power settings (50-70%) and heat in shorter intervals, stirring or rotating the food in between, to ensure even heating and prevent overcooking. Placing a glass of water in the microwave alongside the food can also help create a more humid environment.
Q: Are all containers microwave-safe? How can I tell?
A: No, not all containers are microwave-safe. Using the wrong container can be dangerous, as it can melt, leach chemicals into your food, or even explode. Look for containers specifically labeled as “microwave-safe.” These containers are made from materials that can withstand the heat of microwaving. Avoid using metal containers, aluminum foil, or containers with metallic trim, as these can cause sparks and damage your microwave. Plastic containers labeled with recycling codes 1, 2, 4, and 5 are generally considered microwave-safe, but always check the manufacturer’s instructions. If you’re unsure, it’s best to err on the side of caution and use glass or ceramic containers that are specifically marked as microwave-safe.
Q: How do I cook vegetables evenly in the microwave?
A: Achieving evenly cooked vegetables in the microwave requires a few simple techniques. First, cut the vegetables into uniform sizes to ensure they cook at the same rate. Place the vegetables in a microwave-safe bowl with a small amount of water (about 2-3 tablespoons). Cover the bowl with a microwave-safe lid or vented plastic wrap. Microwave on high for 2-3 minutes, then stir or rotate the vegetables. Continue microwaving in 1-minute intervals until the vegetables are tender-crisp. Remember that cooking times will vary depending on the type and quantity of vegetables.
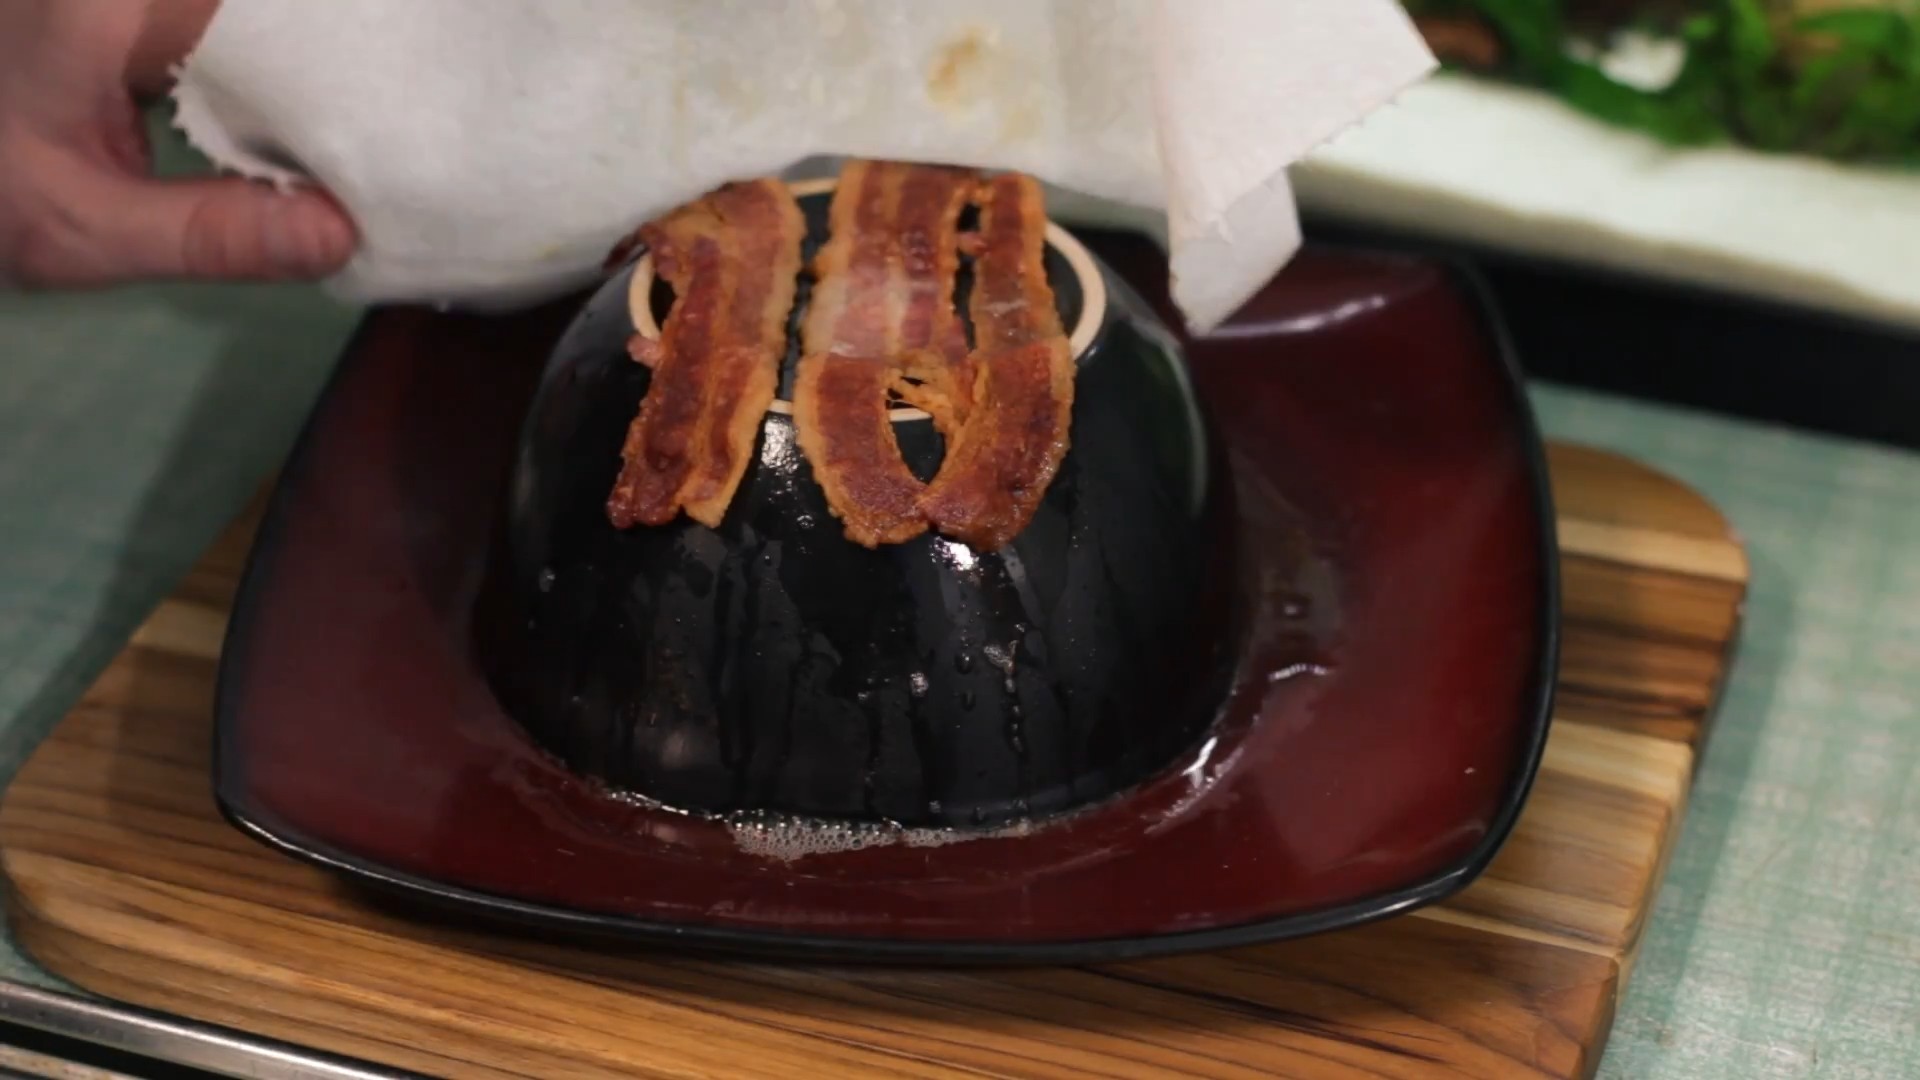
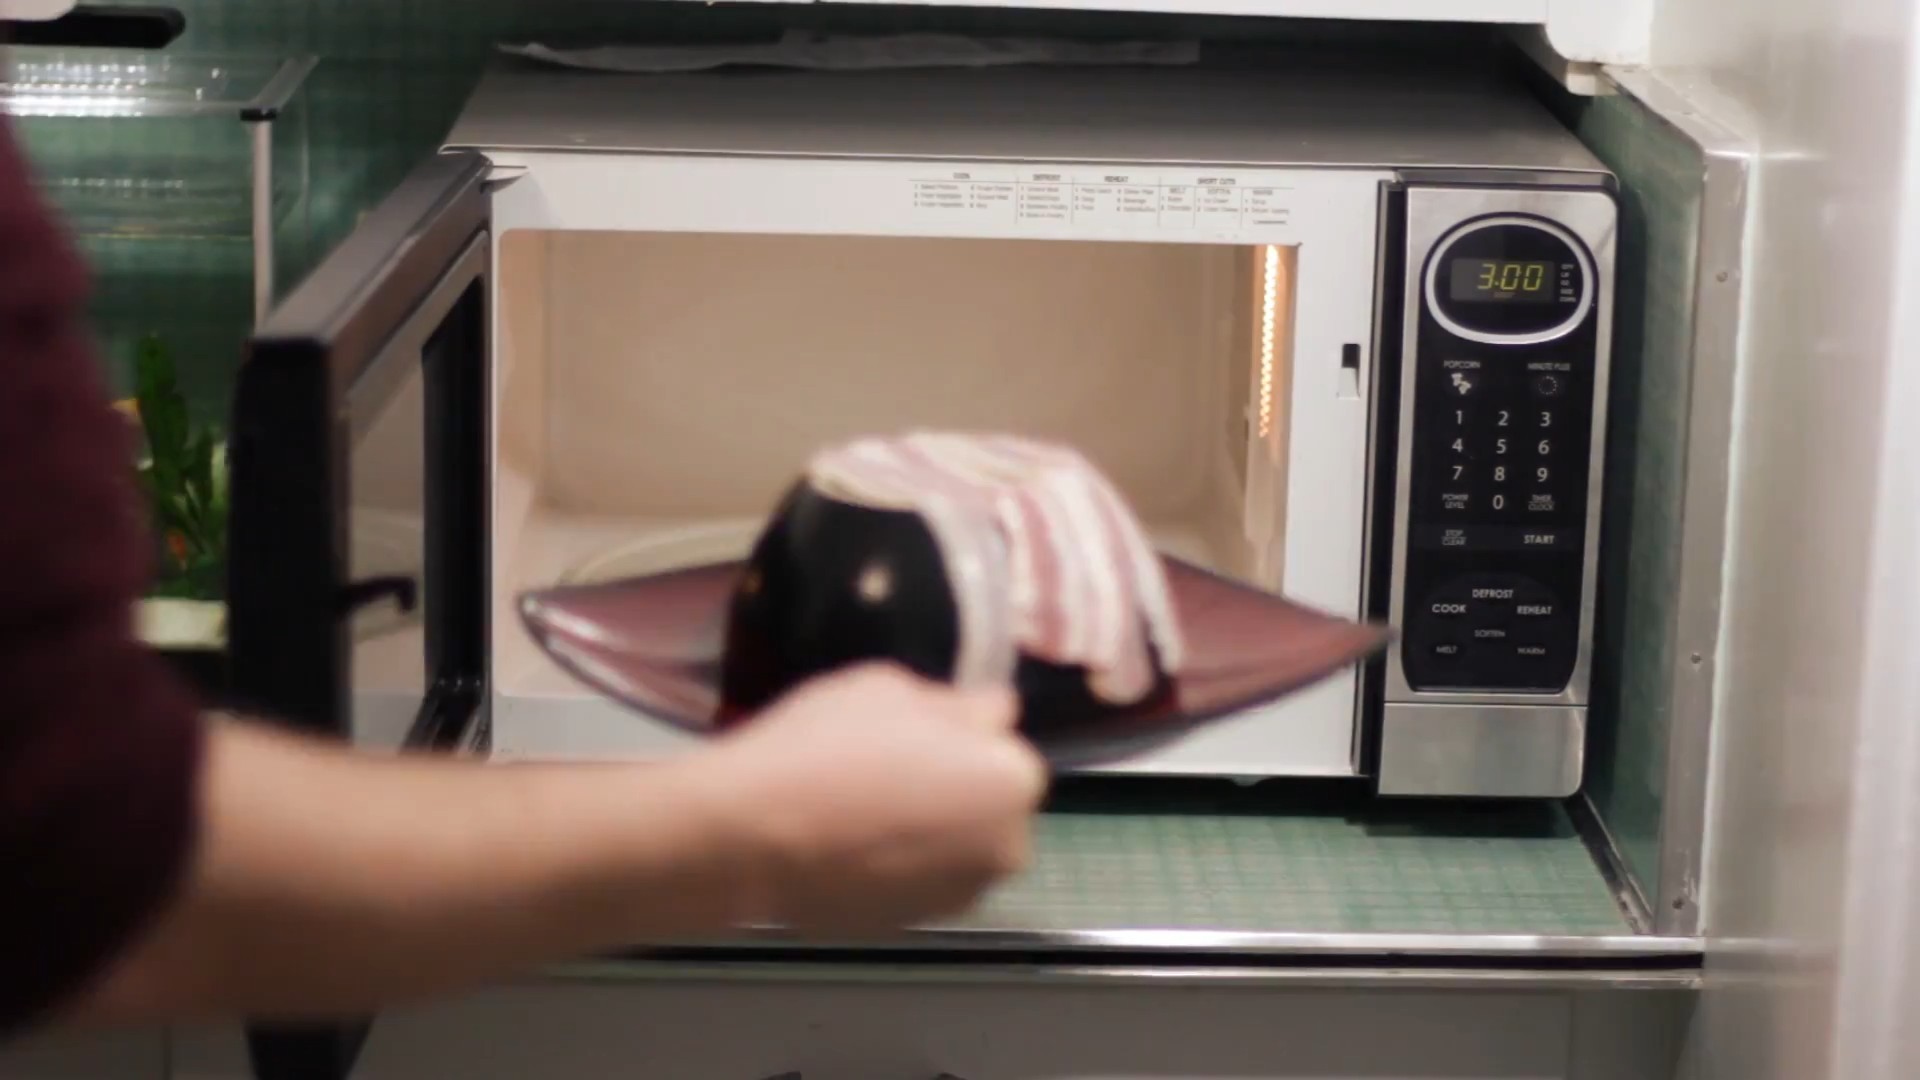
Q: Can I really cook bacon in the microwave? How?
A: Yes, you can absolutely cook bacon in the microwave, and it’s a surprisingly effective method for achieving crispy bacon with less mess. Line a microwave-safe plate with several layers of paper towels. Lay the bacon strips on top of the paper towels, making sure they don’t overlap. Cover the bacon with another layer of paper towels. Microwave on high for 1 minute per slice, but adjust the cooking time based on the thickness of the bacon and the power of your microwave. Check the bacon frequently to prevent it from burning. The paper towels will absorb the grease, resulting in crispy bacon with minimal cleanup.
Q: My microwave smells bad. How can I clean it and get rid of the odor?
A: A smelly microwave is a common problem, but it’s easy to fix. The simplest method is to microwave a mixture of water and vinegar. Combine 1 cup of water with 1 tablespoon of white vinegar in a microwave-safe bowl. Microwave on high for 5 minutes. Let the mixture sit in the microwave for another 5 minutes without opening the door. The steam will loosen any food particles and the vinegar will help neutralize odors. Carefully remove the bowl and wipe down the interior of the microwave with a clean cloth or sponge. For stubborn stains, you can also use a paste of baking soda and water.
Q: Is it safe to microwave food in plastic containers?
A: While some plastic containers are labeled as microwave-safe, there’s always a potential risk of chemicals leaching into your food, especially when heated. It’s generally safer to use glass or ceramic containers whenever possible. If you must use plastic, make sure it’s specifically labeled as “microwave-safe” and avoid microwaving fatty or oily foods in plastic containers, as these can increase the likelihood of chemical leaching. Also, never microwave plastic containers that are cracked, scratched, or damaged.
Q: How do I defrost meat safely in the microwave?
A: Defrosting meat in the microwave is a quick and convenient option, but it’s crucial to do it safely to prevent bacterial growth. Remove the meat from its original packaging and place it in a microwave-safe dish. Use the defrost setting on your microwave and follow the manufacturer’s instructions for defrosting times based on the weight of the meat. It’s essential to cook the meat immediately after defrosting it in the microwave, as some areas may have already started to cook. Never refreeze meat that has been defrosted in the microwave.
Q: What are some quick and easy meals I can make in the microwave?
A: The microwave is surprisingly versatile for creating quick and easy meals. Some popular options include:
* **Microwave Mug Cakes:** Combine cake mix, milk, and oil in a mug and microwave for 1-2 minutes for a single-serving dessert.
* **Microwave Oatmeal:** Combine rolled oats, water or milk, and your favorite toppings in a microwave-safe bowl and microwave for 2-3 minutes for a quick and healthy breakfast.
* **Microwave Quesadillas:** Place a tortilla on a microwave-safe plate, sprinkle with cheese and your favorite fillings, and microwave for 1-2 minutes until the cheese is melted.
* **Microwave Steamed Vegetables:** As mentioned earlier, steaming vegetables in the microwave is a quick and easy way to prepare a healthy side dish.
* **Microwave Scrambled Eggs:** Whisk eggs with milk and seasonings in a microwave-safe bowl and microwave in 30-second intervals, stirring in between, until cooked through.
These are just a few examples, and the possibilities are endless. With a little creativity, you can use your microwave to create a wide variety of delicious and convenient meals.
Leave a Comment