
Multi Surface Cleaner DIY: Are you tired of spending a fortune on cleaning products filled with harsh chemicals? I know I was! That’s why I dove headfirst into the world of homemade cleaners, and let me tell you, it’s been a game-changer. Not only is it incredibly satisfying to whip up your own solutions, but you also know exactly what’s going into them – no more mystery ingredients!
The history of homemade cleaning solutions stretches back centuries, long before the advent of commercially produced products. Our grandmothers and great-grandmothers relied on simple, natural ingredients like vinegar, baking soda, and lemon juice to keep their homes sparkling. These time-tested methods are not only effective but also environmentally friendly.
In today’s world, where we’re increasingly conscious of the impact our choices have on the planet and our health, creating your own multi surface cleaner DIY is more relevant than ever. Think about it: fewer plastic bottles ending up in landfills, reduced exposure to potentially harmful chemicals, and a significant cost savings over time. Plus, it’s a fun and rewarding project! This article will guide you through easy-to-follow recipes and tips for creating your own powerful and safe multi-surface cleaner. Get ready to ditch the store-bought stuff and embrace the power of DIY!
DIY Multi-Surface Cleaner: Sparkling Clean Without the Harsh Chemicals!
Hey everyone! I’m so excited to share my go-to recipe for a multi-surface cleaner that’s not only incredibly effective but also gentle on the environment and your wallet. I’ve been using this for years, and it’s replaced almost all the store-bought cleaners in my house. Seriously, once you try this, you’ll wonder why you ever bought those expensive, chemical-laden sprays!
This cleaner is fantastic for countertops, sinks, appliances (inside and out!), floors (except for unfinished wood – more on that later), bathroom surfaces, and even windows! It’s a true all-rounder.
Why DIY Cleaner?
Before we dive into the recipe, let’s quickly talk about why making your own cleaner is such a great idea:
* It’s Eco-Friendly: You’re reducing plastic waste and avoiding harsh chemicals that can pollute our waterways.
* It’s Cost-Effective: The ingredients are super cheap and last a long time.
* It’s Customizable: You can adjust the scent and strength to your liking.
* It’s Safer: You know exactly what’s in it, so you can avoid allergens and irritants.
Gathering Your Supplies
Okay, let’s get started! Here’s what you’ll need:
* Spray Bottle: A clean, empty spray bottle (16-24 oz is a good size). I like to reuse old cleaning bottles, but you can also buy them online or at most stores.
* White Vinegar: The star of the show! Vinegar is a natural disinfectant and degreaser.
* Water: Distilled water is best to prevent mineral buildup, but tap water works fine too.
* Essential Oils (Optional): These add a pleasant scent and can also boost the cleaning power. My favorites are lemon, tea tree, lavender, and eucalyptus.
* Baking Soda (Optional): For extra scrubbing power on tough stains.
* Funnel (Optional): Makes pouring the ingredients into the spray bottle much easier.
* Measuring Cups/Spoons: For accurate measurements.
The Basic Recipe: Vinegar Power!
This is the foundation of our multi-surface cleaner. It’s simple, effective, and perfect for everyday cleaning.
1. Prepare Your Spray Bottle: Make sure your spray bottle is clean and dry. If you’re reusing an old bottle, rinse it out thoroughly with soap and water.
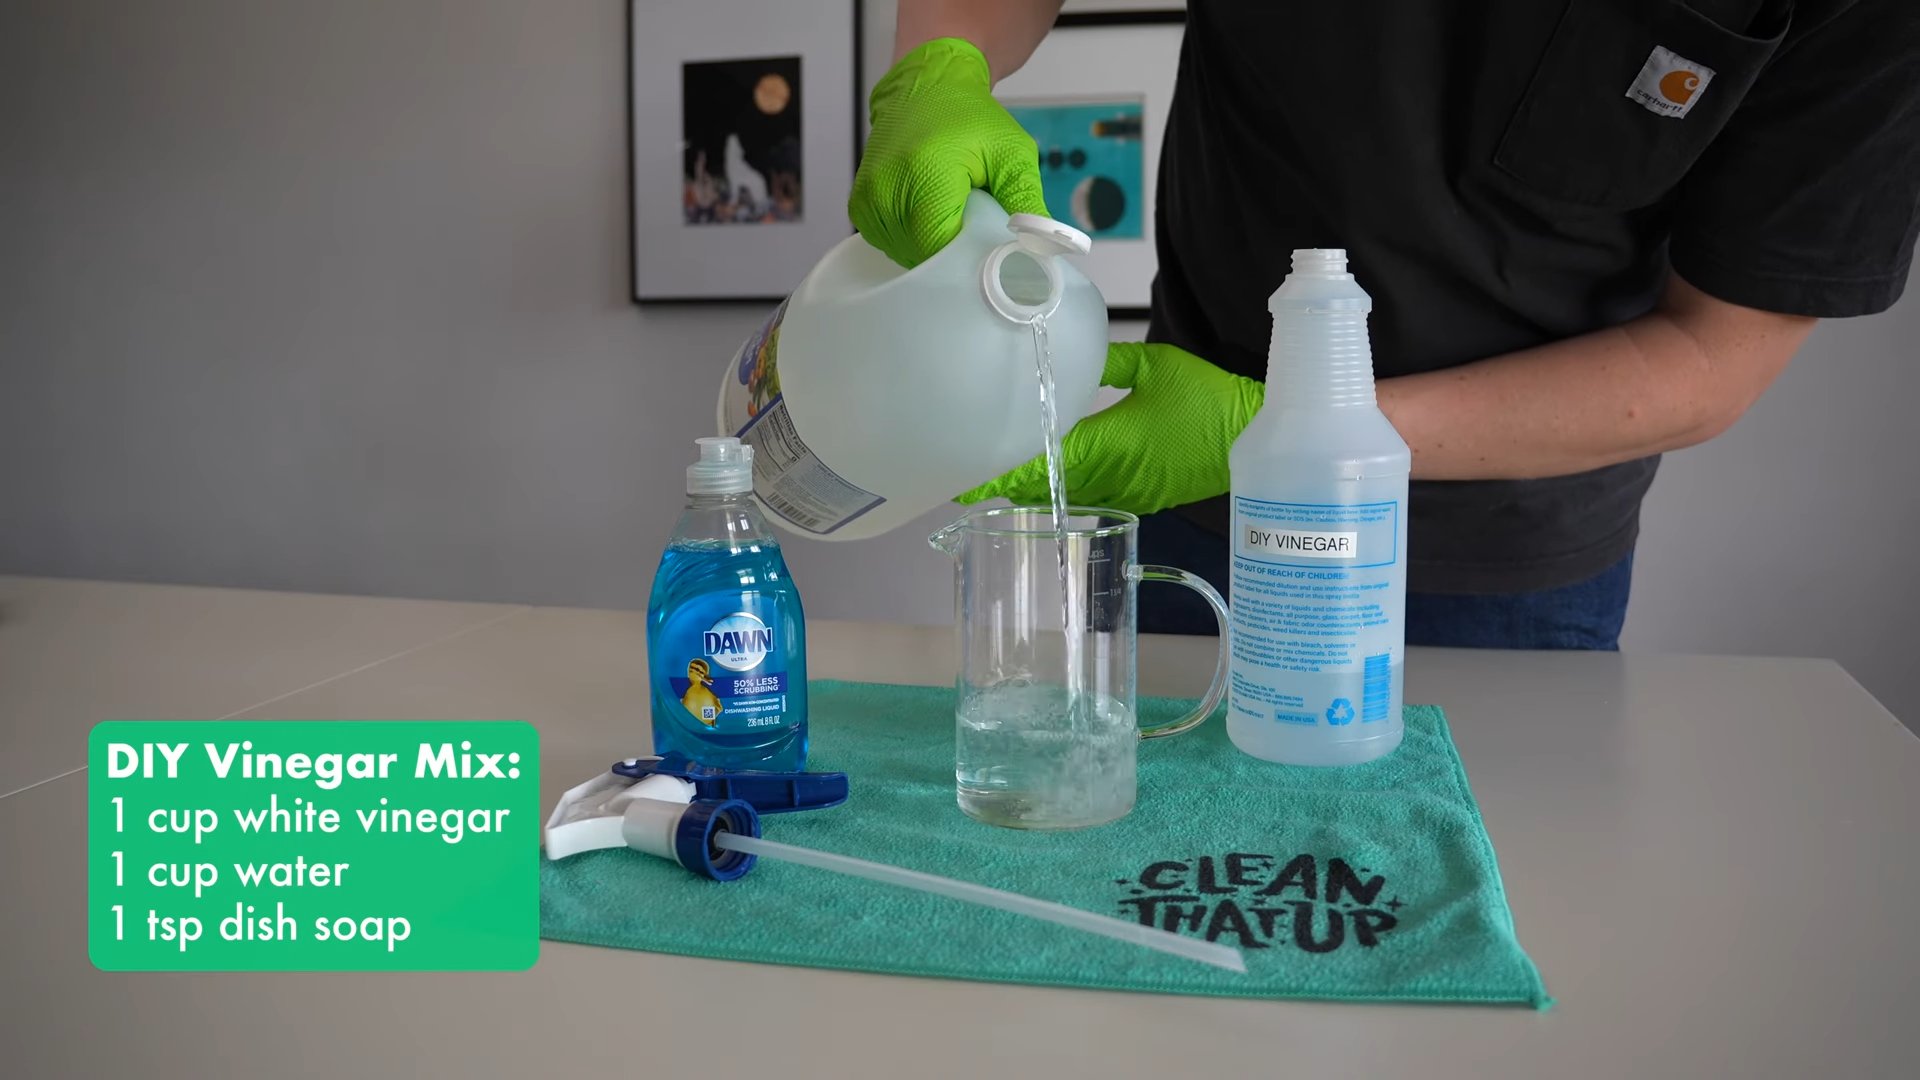
2. Add Vinegar: Pour 1 cup of white vinegar into the spray bottle.
3. Add Water: Fill the rest of the bottle with water, leaving a little space at the top.
4. Add Essential Oils (Optional): If you’re using essential oils, add 10-20 drops of your favorite scent. I usually go for lemon or tea tree for their antibacterial properties.
5. Shake Well: Secure the spray nozzle and shake the bottle well to combine the ingredients.
That’s it! Your basic multi-surface cleaner is ready to go.
Boosting the Cleaning Power: Baking Soda Scrub
For tougher stains and grime, we can add a little baking soda to the mix. This creates a gentle abrasive that helps lift dirt and grease.
1. Follow Steps 1-4 from the Basic Recipe: Prepare your spray bottle with vinegar, water, and essential oils (if using).
2. Add Baking Soda (Carefully!): Slowly add 1 tablespoon of baking soda to the spray bottle. Be careful, as the vinegar and baking soda will react and create fizz. Add it slowly to avoid overflow.
3. Shake Gently: Once the fizzing subsides, gently shake the bottle to combine the ingredients.
Important Note: Because of the baking soda, this mixture might not stay clear. It’s perfectly normal for it to look a little cloudy. Also, the baking soda can sometimes clog the spray nozzle, so you might need to rinse it out occasionally.
Scent Customization: Finding Your Perfect Aroma
One of the best things about making your own cleaner is that you can customize the scent to your liking. Here are some of my favorite essential oil combinations:
* Lemon & Lavender: A fresh and calming scent.
* Tea Tree & Eucalyptus: A powerful antibacterial blend with a refreshing aroma.
* Orange & Cinnamon: A warm and spicy scent, perfect for the holidays.
* Peppermint & Rosemary: An invigorating and energizing scent.
Experiment with different combinations to find your perfect scent! Remember to start with a small amount of essential oil and add more as needed.
Cleaning Different Surfaces: A Quick Guide
While this cleaner is versatile, there are a few things to keep in mind when cleaning different surfaces:
* Countertops: This cleaner works great on most countertops, including granite, quartz, and laminate. However, avoid using it on marble, as the vinegar can etch the surface.
* Sinks: Perfect for cleaning stainless steel, porcelain, and ceramic sinks.
* Appliances: Use it to clean the exterior of your refrigerator, oven, dishwasher, and microwave. You can even use it to clean the inside of your microwave (just spray it on, let it sit for a few minutes, and then wipe clean).
* Floors: This cleaner is safe for most sealed floors, including tile, linoleum, and vinyl. However, avoid using it on unfinished wood floors, as the vinegar can damage the finish. For wood floors, use a diluted solution of water and a mild dish soap.
* Bathrooms: Great for cleaning toilets, showers, and bathtubs. The vinegar helps to dissolve soap scum and hard water stains.
* Windows & Mirrors: This cleaner works surprisingly well on windows and mirrors! Just spray it on and wipe clean with a microfiber cloth.
Tips and Tricks for Sparkling Results
Here are a few extra tips to help you get the most out of your DIY multi-surface cleaner:
* Test in an Inconspicuous Area: Before cleaning a large surface, always test the cleaner in a small, hidden area to make sure it doesn’t damage the finish.
* Use a Microfiber Cloth: Microfiber cloths are great for cleaning because they trap dirt and dust without scratching surfaces.
* Let it Sit: For tough stains, spray the cleaner on the surface and let it sit for a few minutes before wiping clean.
* Rinse if Necessary: If you’re cleaning a surface that comes into contact with food, rinse it with water after cleaning.
* Store in a Cool, Dark Place: Store your cleaner in a cool, dark place to prevent the essential oils from degrading.
* Label Your Bottle: Don’t forget to label your spray bottle so you know what’s inside!
Troubleshooting: Common Issues and Solutions
Even with the best recipes, sometimes things don’t go exactly as planned. Here are a few common issues you might encounter and how to fix them:
* Vinegar Smell: The vinegar smell can be strong at first, but it usually dissipates quickly. If you’re sensitive to the smell, add more essential oils or open a window while you’re cleaning.
* Streaky Surfaces: If you’re getting streaks, try using a clean, dry microfiber cloth to wipe the surface. You might also be using too much cleaner.
* Clogged Spray Nozzle: If your spray nozzle gets clogged, try rinsing it out with warm water. If that doesn’t work, you might need to replace the nozzle.
* Cloudy Mixture: As mentioned earlier, the baking soda can make the mixture cloudy. This is perfectly normal and doesn’t affect the cleaning power.
Beyond the Basics: Advanced Cleaning Solutions
Once you’re comfortable with the basic recipe, you can start experimenting with other ingredients to create more specialized cleaning solutions. Here are a few ideas:
* Castile Soap: Add a tablespoon of castile soap to the basic recipe for extra cleaning power. Castile soap is a gentle, natural soap that’s great for cutting through grease and grime.
* Hydrogen Peroxide: For disinfecting surfaces, add a tablespoon of hydrogen peroxide to the basic recipe. Hydrogen peroxide is a natural disinfectant that’s effective against bacteria and viruses. Important Note: Never mix hydrogen peroxide with vinegar in a closed container, as it can create a dangerous gas. Always add it to the spray bottle just before using.
* Borax: For extra scrubbing power, add a tablespoon of borax to the basic recipe. Borax is a natural mineral that’s great for removing tough stains and mildew. Important Note: Borax can be irritating to the skin, so wear gloves when using it.
A Note on Safety
While this DIY cleaner is much safer than store-bought cleaners, it’s still important to take a few precautions:
* Keep Out of Reach of Children and Pets: Even
Conclusion
So, there you have it! Creating your own Multi Surface Cleaner DIY solution is not just a cost-effective alternative to store-bought options; it’s a powerful way to control the ingredients you bring into your home, reduce your environmental impact, and even tailor the scent to your personal preferences. We’ve walked you through a simple yet effective recipe that utilizes readily available ingredients, transforming your cleaning routine into a more conscious and customizable experience.
But why is this DIY approach a must-try? Beyond the savings and eco-friendliness, it’s about the peace of mind knowing exactly what you’re spraying on your countertops, floors, and other surfaces. No more deciphering long lists of unpronounceable chemicals! You’re in charge, using natural ingredients that are gentle yet effective.
Looking for variations? Absolutely! For a boost in disinfecting power, consider adding a few drops of tea tree oil or eucalyptus oil. These essential oils not only enhance the cleaning capabilities but also impart a refreshing aroma. If you’re dealing with particularly stubborn grime, a splash of white vinegar can work wonders. Just be mindful of using vinegar on certain surfaces like marble or granite, as it can etch the stone. For a citrusy scent, infuse your vinegar with lemon or orange peels for a few weeks before using it in the recipe. This adds a natural fragrance and enhances the cleaning power.
Another fantastic variation involves using castile soap instead of dish soap. Castile soap is a gentle, plant-based soap that’s incredibly versatile. It’s a great option for those with sensitive skin or allergies. Experiment with different essential oil blends to create your signature scent. Lavender and chamomile offer a calming aroma, while peppermint and rosemary provide an invigorating boost.
The beauty of this Multi Surface Cleaner DIY is its adaptability. Feel free to adjust the ratios of ingredients to suit your specific cleaning needs and preferences. If you find the scent too strong, simply dilute the solution with more water. If you need more cleaning power, add a bit more vinegar or castile soap.
We wholeheartedly encourage you to give this DIY cleaner a try. It’s a simple, rewarding project that can transform your cleaning routine. Once you experience the satisfaction of creating your own effective and eco-friendly cleaner, you’ll never look back.
Don’t just take our word for it! We’re eager to hear about your experiences. Share your results, variations, and any tips you discover along the way in the comments section below. Let’s build a community of DIY enthusiasts who are passionate about creating a cleaner, healthier home. We’re confident that you’ll love the results, and we can’t wait to see what you create! Let us know what surfaces you cleaned and how well it worked. Did you try any variations? What were the results? Your feedback is invaluable and will help others discover the magic of homemade cleaning solutions.
Frequently Asked Questions (FAQ)
What surfaces can I safely use this Multi Surface Cleaner DIY on?
This DIY cleaner is generally safe for most non-porous surfaces, including countertops (excluding marble and granite if using vinegar), tile, linoleum, sealed wood floors, stainless steel, glass, and plastic. Always test a small, inconspicuous area first to ensure compatibility, especially on delicate or antique surfaces. Avoid using it on unsealed wood, porous stone, or electronics. When in doubt, consult the manufacturer’s instructions for your specific surface.
How long will this DIY cleaner last?
Because this cleaner doesn’t contain harsh preservatives, it’s best to use it within 1-2 months. Store it in a cool, dark place to prolong its shelf life. You’ll know it’s time to make a fresh batch if you notice any changes in color, odor, or consistency. Labeling the bottle with the date you made it is a helpful way to keep track.
Can I use different essential oils?
Absolutely! Experiment with different essential oils to create your desired scent and cleaning properties. Lavender, lemon, tea tree, eucalyptus, and peppermint are all popular choices. Be sure to use pure essential oils and follow recommended dilution guidelines. Some essential oils are not safe for use around pets or children, so do your research before using them.
Is this cleaner safe for pets and children?
While this DIY cleaner is generally safer than commercial cleaners, it’s still important to exercise caution around pets and children. Keep the cleaner out of their reach and avoid spraying it directly on them. If you’re using essential oils, research their safety for pets and children, as some can be toxic. Always ventilate the area well after cleaning.
Can I use this cleaner on my hardwood floors?
Yes, you can use this cleaner on sealed hardwood floors, but it’s crucial to use it sparingly and avoid excessive moisture. Over-wetting hardwood floors can cause them to warp or damage the finish. Use a microfiber mop and wring it out thoroughly before cleaning. Avoid using vinegar on hardwood floors, as it can dull the finish over time.
What if I don’t have all the ingredients listed?
The basic recipe is very flexible. If you don’t have dish soap, you can substitute castile soap. If you don’t have essential oils, you can leave them out altogether or add a few drops of lemon juice for a fresh scent. The key is to experiment and find what works best for you.
My cleaner is leaving streaks. What am I doing wrong?
Streaking can occur if you’re using too much cleaner or if your water is hard. Try diluting the cleaner with more water or using distilled water. Also, make sure you’re using a clean microfiber cloth to wipe the surface.
Can I use this cleaner in a spray bottle?
Yes, this cleaner is perfect for use in a spray bottle. Be sure to use a clean, empty spray bottle and label it clearly. Avoid using spray bottles that have previously contained harsh chemicals.
How does this Multi Surface Cleaner DIY compare to store-bought cleaners?
This DIY cleaner offers several advantages over store-bought cleaners. It’s more cost-effective, environmentally friendly, and allows you to control the ingredients. It’s also customizable to your specific needs and preferences. While it may not be as powerful as some heavy-duty commercial cleaners, it’s effective for everyday cleaning and maintenance.
What if I have hard water?
Hard water can affect the effectiveness of your DIY cleaner. Consider using distilled water or adding a water softener to your recipe. You may also need to use a bit more cleaner to achieve the desired results.
Can I use this cleaner to clean my bathroom?
Yes, this cleaner is suitable for cleaning most bathroom surfaces, including sinks, countertops, and tile. However, avoid using vinegar on marble or granite countertops. For tougher bathroom grime, such as soap scum, you may need to use a stronger cleaning solution or a specialized bathroom cleaner.
How can I make a larger batch of this cleaner?
Simply multiply the ingredient quantities to make a larger batch. For example, if you want to double the recipe, double the amount of water, dish soap, and essential oils. Be sure to store the cleaner in a properly labeled container.
Is baking soda a good addition to this recipe?
While baking soda is a great cleaning agent, it’s not recommended to add it directly to this recipe, especially if you’re using vinegar. Baking soda and vinegar react to create carbon dioxide and water, which can cause pressure to build up in the spray bottle. If you want to use baking soda, it’s best to apply it separately as a scrubbing agent.
Leave a Comment