
Mushroom Bucket Growing DIY: Ever dreamt of harvesting a bounty of delicious, homegrown mushrooms right in your backyard, or even on your balcony? I know I have! Forget those expensive grocery store prices and the mystery of where your fungi actually came from. This isn’t just about saving money; it’s about connecting with nature and experiencing the pure joy of cultivating your own food.
Mushroom cultivation has a rich history, dating back centuries in various cultures. From ancient Chinese medicinal practices to European culinary traditions, mushrooms have always held a special place. Now, you can tap into that legacy with a simple, effective, and incredibly rewarding Mushroom Bucket Growing DIY project.
Why a bucket, you ask? Well, it’s all about accessibility and ease! Not everyone has a sprawling garden or the time for complex setups. This method is perfect for beginners, apartment dwellers, or anyone looking for a low-maintenance way to enjoy fresh mushrooms. Imagine the satisfaction of serving up a dish made with mushrooms you nurtured from start to finish. Plus, it’s a fantastic conversation starter! So, let’s dive in and unlock the secrets to successful mushroom bucket growing. I’m excited to share all the tips and tricks I’ve learned along the way!
DIY Mushroom Bucket: A Beginner’s Guide to Growing Your Own Fungi!
Hey there, fellow fungi fanatics! Ever dreamt of harvesting your own delicious mushrooms right from your home? Well, you’re in the right place! This guide will walk you through creating your very own mushroom bucket, a super simple and rewarding way to cultivate these tasty treats. I’ll break down each step so even if you’re a complete beginner, you’ll be enjoying homegrown mushrooms in no time.
What You’ll Need: The Mushroom Bucket Shopping List
Before we dive in, let’s gather our supplies. Don’t worry, most of these are easy to find and won’t break the bank.
* A 5-Gallon Bucket with Lid: This is your mushroom kingdom’s home! Make sure it’s clean and food-grade. You can usually find these at hardware stores or even reuse one you already have.
* Mushroom Spawn: This is the “seed” of your mushrooms. Oyster mushrooms are a great choice for beginners because they’re fast-growing and relatively forgiving. You can find spawn online or at specialty gardening stores. Make sure to choose a strain that suits your climate.
* Straw: This will be the substrate, or the food source, for your mushrooms. Wheat straw is ideal, but other types of straw can work too. Just make sure it’s clean and free of mold.
* Lime (Hydrated Lime or Garden Lime): This helps pasteurize the straw and create a more favorable environment for the mushrooms.
* Large Pot or Container: Big enough to submerge the straw in water.
* Drill with a 1/4-inch Drill Bit: For creating ventilation holes in the bucket.
* Gloves: To keep things sanitary and protect your hands.
* Spray Bottle: For misting the mushrooms as they grow.
* Thermometer: To monitor the temperature of the pasteurization process.
* Optional: A small amount of gypsum can be added to the straw to help with nutrient availability.
Phase 1: Preparing the Substrate (Straw Pasteurization)
This is arguably the most crucial step. Pasteurizing the straw eliminates competing organisms and gives your mushroom spawn a head start. Think of it as clearing the playing field for your fungi!
1. Chop the Straw: Using scissors or a knife, chop the straw into smaller pieces, about 2-4 inches long. This makes it easier to pack into the bucket and allows the mushroom mycelium to colonize it more effectively.
2. Lime Bath Preparation: In your large pot or container, mix water with the lime. The ratio is typically 1 tablespoon of hydrated lime per gallon of water. Stir well until the lime is dissolved. This creates a highly alkaline solution that will kill off unwanted bacteria and fungi.
3. Submerge the Straw: Pack the chopped straw into the lime water, making sure it’s completely submerged. You might need to weigh it down with a brick or a heavy object to keep it from floating.
4. Pasteurization Time: Let the straw soak in the lime water for 12-24 hours. This gives the lime enough time to work its magic. I usually leave it overnight.
5. Drain the Straw: After the soaking period, carefully drain the lime water from the straw. You can use a colander or a large strainer for this. Be careful, as the water will be alkaline and can irritate your skin. Wear gloves!
6. Cool and Drain: Allow the straw to cool down to room temperature and drain excess water. You want the straw to be damp, not soaking wet. Squeeze a handful of straw – it should feel like a wrung-out sponge.
Phase 2: Inoculating the Bucket (Planting the Mushroom Seeds)
Now for the fun part – introducing the mushroom spawn to its new home!
1. Drill Ventilation Holes: Using your drill and 1/4-inch drill bit, create ventilation holes around the sides of the bucket. Space them about 4-6 inches apart and in a staggered pattern. These holes will allow for air exchange, which is essential for mushroom growth. I usually drill about 10-12 holes per bucket.
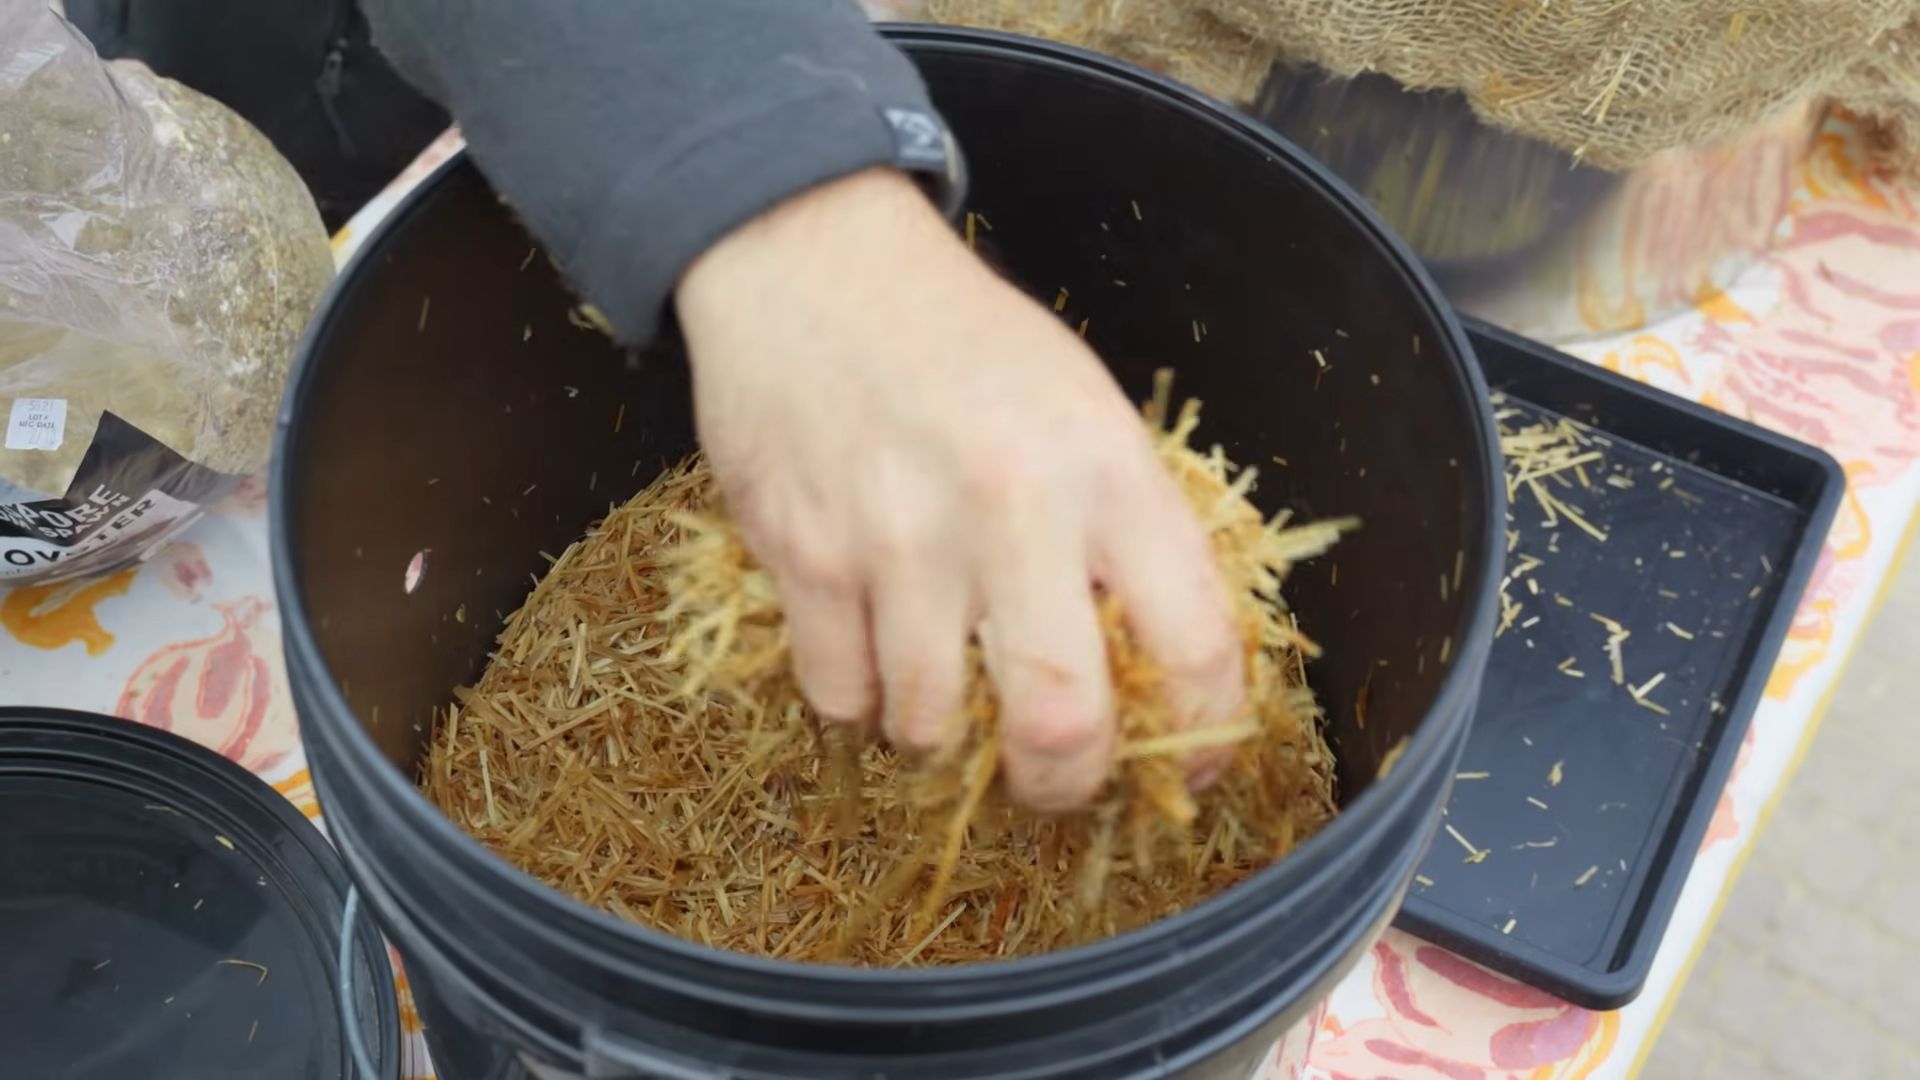
2. Layering Time: Now, we’ll create layers of straw and mushroom spawn inside the bucket. Start with a layer of straw at the bottom, about 2-3 inches thick.
3. Spawn Sprinkle: Sprinkle a generous amount of mushroom spawn over the straw layer. Aim for about a handful of spawn per layer.
4. Repeat: Continue layering straw and spawn, working your way up to the top of the bucket. Make sure the final layer is straw.
5. Top it Off: Once the bucket is filled, gently press down on the top layer of straw to compact it slightly.
6. Lid On: Place the lid on the bucket. It doesn’t need to be airtight, but it should be snug enough to keep out pests.
Phase 3: Incubation (The Waiting Game)
This is where patience comes in. The mycelium needs time to colonize the straw before mushrooms will start to form.
1. Find the Right Spot: Place the bucket in a dark, humid, and well-ventilated area. A basement, closet, or shed works well. The ideal temperature for oyster mushroom colonization is between 65-75°F (18-24°C).
2. Monitor the Temperature: Use your thermometer to monitor the temperature of the incubation area. If it’s too warm, the mycelium might not grow properly.
3. Wait and Watch: Over the next 2-3 weeks, the mycelium will spread throughout the straw. You might see white, fuzzy growth appearing on the straw through the ventilation holes. This is a good sign!
4. Humidity Check: While the bucket is incubating, you don’t need to water it directly. However, make sure the surrounding area is humid. You can mist the area around the bucket with water if needed.
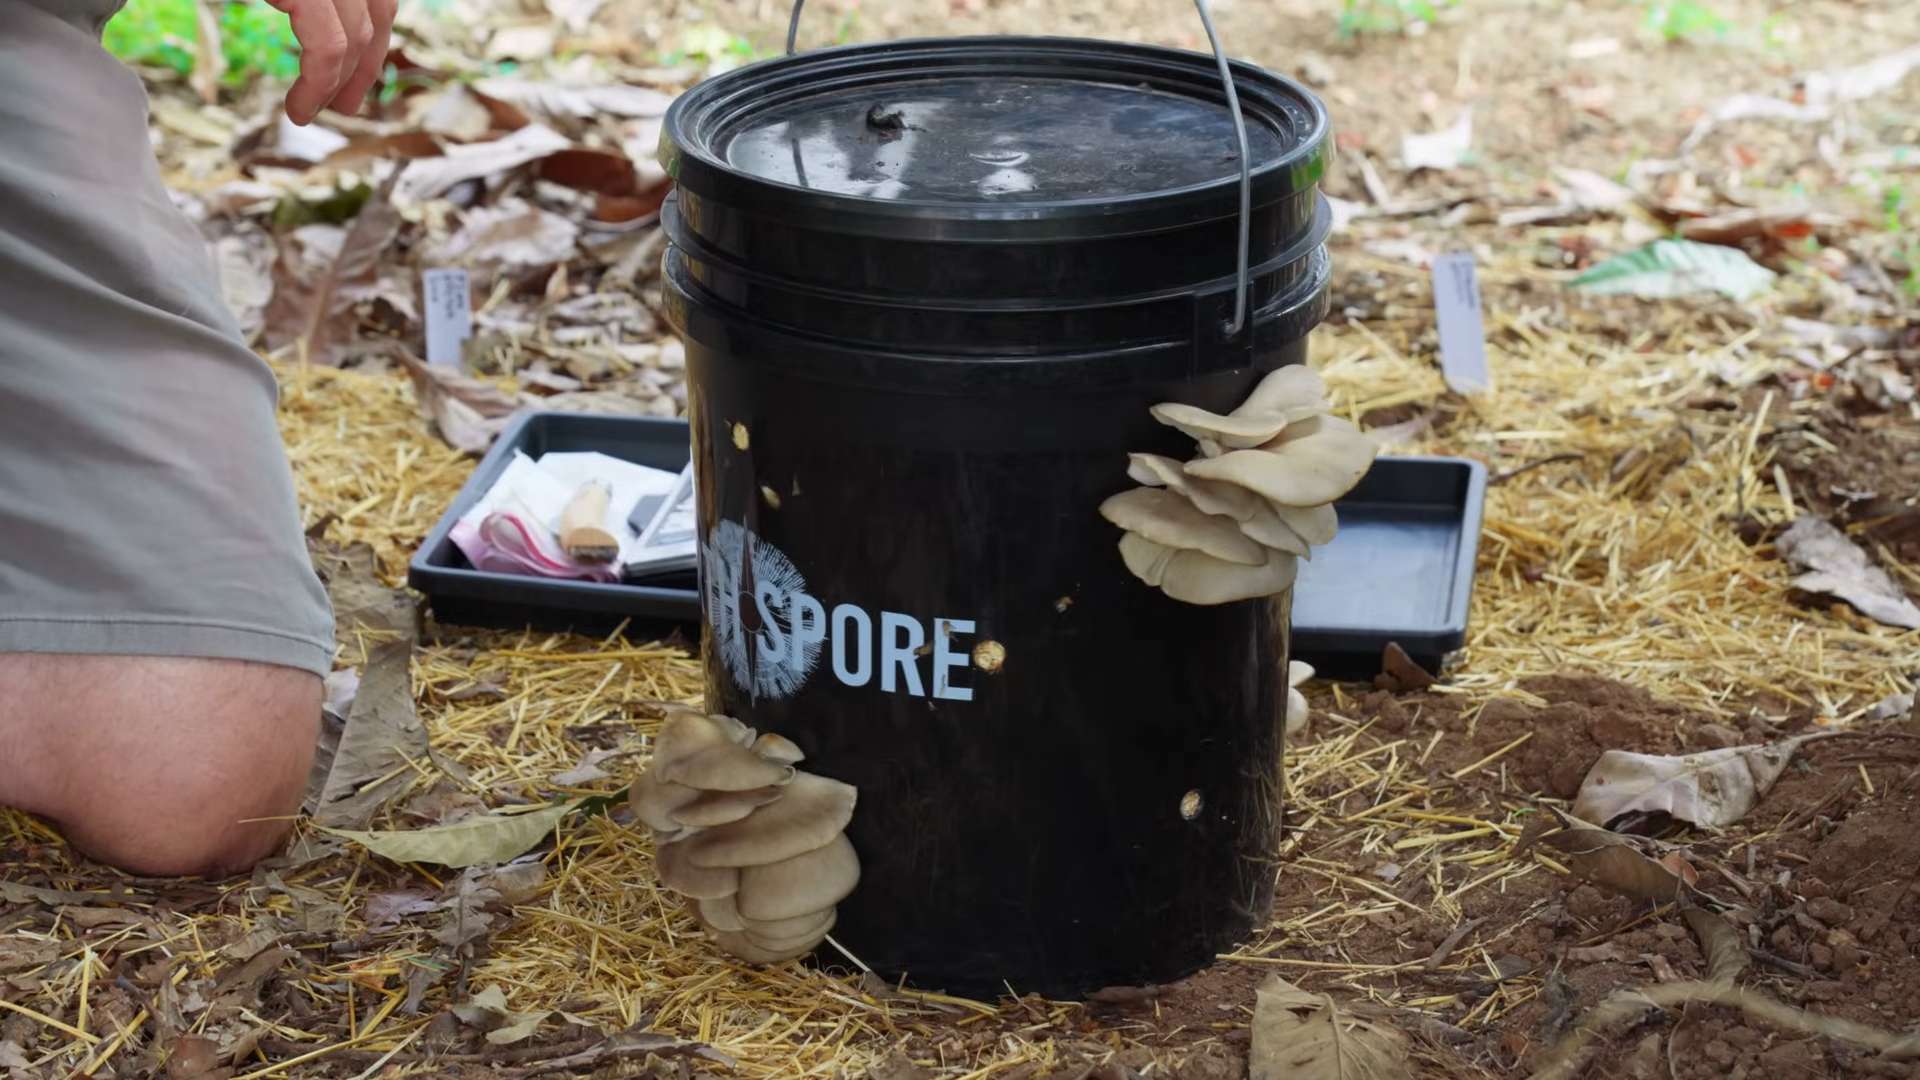
Phase 4: Fruiting (Mushroom Time!)
The moment you’ve been waiting for! Time to encourage those mushrooms to pop out.
1. Light Exposure: Once the straw is fully colonized (you’ll see a dense network of white mycelium), it’s time to introduce light. Move the bucket to a location with indirect light. Direct sunlight can dry out the mushrooms.
2. Increase Humidity: Mushrooms need high humidity to fruit properly. Mist the bucket and the surrounding area with water several times a day. You can also place a plastic bag loosely over the bucket to create a humidity tent, but make sure to leave some openings for air circulation.
3. Ventilation is Key: While humidity is important, good ventilation is also crucial. Make sure the area around the bucket is well-ventilated to prevent mold growth.
4. Primordia Formation: After a few days, you should start to see small mushroom “pins” or primordia forming around the ventilation holes. These are the baby mushrooms!
5. Mushroom Growth: Over the next few days, the primordia will grow rapidly into mature mushrooms.
6. Harvest Time: Harvest the mushrooms when the caps are fully formed but before they start to drop spores. You can gently twist or cut the mushrooms off the bucket.
Phase 5: Subsequent Flushes (More Mushrooms!)
Your mushroom bucket can produce multiple flushes of mushrooms.
1. Soaking: After harvesting a flush, soak the bucket in cold water for 12-24 hours. This rehydrates the straw and encourages another flush of mushrooms.
2. Repeat: Drain the bucket and return it to the fruiting conditions. You should see another flush of mushrooms in a few weeks.
3. Lifespan: A mushroom bucket can typically produce 2-3 flushes of mushrooms before the nutrients in the straw are depleted.
Troubleshooting: Common Issues and Solutions
* No Mushroom Growth: This could be due to several factors, including low humidity, incorrect temperature, or contaminated spawn. Make sure the humidity is high, the temperature is within the ideal range, and the spawn is fresh.
* Mold Growth: Mold can be a problem if the ventilation is poor or the straw wasn’t properly pasteurized. Increase ventilation and make sure the straw is properly pasteurized before inoculating.
* Small Mushrooms: Small mushrooms can be caused by low humidity or insufficient nutrients. Increase humidity and consider adding a small amount of gypsum to the straw during pasteurization.
* Yellowing Mushrooms: Yellowing mushrooms can be a sign of overwatering or lack of ventilation. Reduce watering and increase ventilation.
Tips and Tricks for Success
* Sanitation is Key: Always wash your hands and tools before handling the spawn or straw. This helps prevent contamination.
* Experiment with Different Strains: Try different strains of oyster mushrooms to
Conclusion
So, there you have it! The Mushroom Bucket Growing DIY method is more than just a fun project; it’s a gateway to fresh, delicious mushrooms right in your own home. Forget those expensive, often lackluster mushrooms from the grocery store. With a little effort and some readily available materials, you can cultivate a thriving mushroom colony that provides a continuous harvest for weeks, even months.
Why is this a must-try? Because it’s empowering! You’re taking control of your food source, reducing your carbon footprint by eliminating transportation costs, and learning a fascinating new skill. Plus, the taste of homegrown mushrooms is simply unparalleled. The freshness and flavor intensity are a world apart from anything you can buy commercially.
But the beauty of this Mushroom Bucket Growing DIY project lies in its adaptability. Feel free to experiment with different mushroom varieties. Oyster mushrooms are a fantastic starting point due to their resilience and rapid growth, but once you’ve mastered the basics, why not try shiitake, lion’s mane, or even wine cap mushrooms? Each variety offers a unique flavor profile and texture, adding exciting diversity to your culinary creations.
Consider also experimenting with different substrates. While straw is a common and effective choice, you can also use coffee grounds, cardboard, or even sawdust, depending on the specific mushroom variety you’re growing. Research the ideal substrate for your chosen mushroom to maximize your yields.
Another variation to consider is the location of your mushroom bucket. While a dark, humid space is generally recommended, you can adjust the environment to suit your needs. If your basement is too dry, try placing a humidifier nearby or misting the bucket regularly. If it’s too warm, consider moving the bucket to a cooler location.
Don’t be afraid to get creative and personalize your Mushroom Bucket Growing DIY setup! The most important thing is to provide your mushrooms with the right conditions for growth: moisture, darkness, and a suitable substrate.
We wholeheartedly encourage you to embark on this rewarding journey. It’s a fantastic way to connect with nature, learn new skills, and enjoy the unparalleled flavor of homegrown mushrooms.
And most importantly, we want to hear about your experiences! Share your successes, your challenges, and your creative adaptations in the comments below. Let’s build a community of mushroom enthusiasts and learn from each other. Post pictures of your mushroom buckets, share your favorite recipes using your homegrown mushrooms, and let us know what you’ve learned along the way. Your insights could inspire others to take the plunge and discover the joys of Mushroom Bucket Growing DIY. So, grab a bucket, some straw, and some mushroom spawn, and get ready to grow your own delicious mushrooms!
Frequently Asked Questions (FAQ)
What type of mushrooms are best for bucket growing?
Oyster mushrooms are generally considered the best choice for beginners due to their fast growth, resilience, and ability to thrive on a variety of substrates like straw. They are also relatively forgiving of minor environmental fluctuations. Other good options include shiitake mushrooms (which require a more specific substrate like hardwood sawdust) and wine cap mushrooms (which can be grown outdoors in wood chips). Lion’s mane mushrooms are also gaining popularity, but they can be a bit more challenging to cultivate. Research the specific needs of each mushroom variety before you begin.
How long does it take to grow mushrooms in a bucket?
The time it takes to grow mushrooms in a bucket varies depending on the mushroom variety, the substrate used, and the environmental conditions. Oyster mushrooms typically begin to fruit within 2-3 weeks of inoculation, while shiitake mushrooms may take several months. Maintaining optimal humidity and temperature is crucial for faster growth. Once the mushrooms start fruiting, you can expect to harvest them for several weeks, or even months, depending on the size of your bucket and the health of your mycelium.
What is the best substrate for mushroom bucket growing?
The best substrate depends on the type of mushroom you are growing. Straw is a popular and readily available option for oyster mushrooms. Hardwood sawdust is preferred for shiitake mushrooms. Wine cap mushrooms thrive in wood chips. Coffee grounds can also be used as a supplement to other substrates, providing additional nutrients. Ensure the substrate is properly pasteurized or sterilized to eliminate competing molds and bacteria before inoculating it with mushroom spawn.
How do I pasteurize or sterilize the substrate?
Pasteurization and sterilization are crucial steps to prevent contamination. For straw, pasteurization is usually sufficient. You can pasteurize straw by soaking it in hot water (around 160-180°F) for 1-2 hours. For sawdust, sterilization is recommended. This can be done by pressure cooking the sawdust in a pressure cooker for 90 minutes at 15 PSI. Allow the substrate to cool completely before inoculating it with mushroom spawn.
How much mushroom spawn do I need?
The amount of mushroom spawn needed depends on the size of your bucket and the type of mushroom you are growing. A general rule of thumb is to use about 5-10% spawn by weight of the substrate. For example, if you have 10 pounds of straw, you would need 0.5-1 pound of mushroom spawn. Using more spawn can help the mycelium colonize the substrate faster and reduce the risk of contamination.
What are the ideal environmental conditions for mushroom bucket growing?
Most mushrooms prefer a dark, humid environment with temperatures between 60-75°F. Maintain humidity levels of 80-90% by misting the bucket regularly or using a humidifier. Avoid direct sunlight, as it can dry out the substrate and inhibit mushroom growth. Good ventilation is also important to prevent the buildup of carbon dioxide.
How often should I water my mushroom bucket?
Water your mushroom bucket regularly to maintain high humidity levels. Mist the inside of the bucket with water once or twice a day, or more often if the environment is dry. Avoid overwatering, as this can lead to mold growth. The substrate should be moist but not soggy.
How do I know when the mushrooms are ready to harvest?
Mushrooms are typically ready to harvest when the caps have fully expanded and the edges are still slightly curled downwards. The gills should be visible but not yet releasing spores. Harvest the mushrooms by gently twisting them off the substrate.
Can I get multiple flushes from a mushroom bucket?
Yes, you can typically get multiple flushes (harvests) from a mushroom bucket. After harvesting the first flush, continue to maintain the humidity and temperature. The mycelium will eventually produce another flush of mushrooms. You can expect to get 2-3 flushes from a single bucket.
What do I do with the spent substrate after harvesting?
The spent substrate is a valuable resource! It can be used as compost in your garden, as a soil amendment, or even as animal feed. The mycelium has broken down the substrate, making it more readily available to plants.
What if my mushroom bucket gets contaminated with mold?
If your mushroom bucket gets contaminated with mold, it’s best to discard it to prevent the mold from spreading. Prevention is key, so ensure you properly pasteurize or sterilize the substrate and maintain good hygiene throughout the process.
Where can I buy mushroom spawn?
Mushroom spawn can be purchased online from reputable mushroom suppliers. You can also find it at some garden centers or agricultural supply stores. Ensure you purchase spawn from a reliable source to ensure its quality and viability.
Is Mushroom Bucket Growing DIY safe?
Yes, Mushroom Bucket Growing DIY is generally safe, but it’s important to take precautions. Always wash your hands thoroughly before and after handling the substrate and spawn. Avoid inhaling mushroom spores, as they can cause allergic reactions in some individuals. If you have any concerns, consult with a healthcare professional.
Leave a Comment