
Mushroom Farming Recycled Bottles: Imagine transforming your trash into treasure, not just in a symbolic way, but literally growing delicious and nutritious food from discarded plastic! For centuries, mushroom cultivation has been revered across cultures, from ancient Chinese medicinal practices to gourmet French cuisine. But what if I told you that you could bring this fascinating tradition into your own home, using something as simple as recycled bottles?
In today’s world, where sustainability is more crucial than ever, finding innovative ways to reduce waste and produce our own food is incredibly empowering. That’s where this DIY guide comes in! We’re diving deep into the world of mushroom farming recycled bottles, showing you how to create your own mini-mushroom farm using readily available materials. Forget expensive kits and complicated setups. This method is budget-friendly, space-saving, and perfect for beginners.
Why should you try this? Well, beyond the satisfaction of upcycling and growing your own food, mushrooms are packed with essential vitamins and minerals, making them a healthy and delicious addition to any meal. Plus, it’s a fantastic way to learn about the fascinating life cycle of fungi and connect with nature, even in the heart of the city. So, grab those empty bottles, and let’s embark on this exciting journey together! I promise, you’ll be amazed at how easy and rewarding it is to grow your own mushrooms using this simple, sustainable method.
Pilzzucht in recycelten Flaschen: Dein DIY-Guide für zu Hause
Hallo Pilzfreunde! Habt ihr euch jemals gefragt, wie ihr eure eigenen köstlichen Pilze zu Hause züchten könnt, ohne viel Platz oder Geld zu investieren? Dann seid ihr hier genau richtig! In diesem Artikel zeige ich euch, wie ihr mit recycelten Plastikflaschen eure eigene kleine Pilzfarm aufbauen könnt. Es ist einfacher als ihr denkt und macht unglaublich viel Spaß!
Was du brauchst: Die Zutaten für dein Pilz-Abenteuer
Bevor wir loslegen, hier eine Liste der Dinge, die du für dein Pilzzucht-Projekt benötigst:
* Recycelte Plastikflaschen: Am besten eignen sich 1,5- oder 2-Liter-Flaschen. Je mehr, desto mehr Pilze!
* Pilzbrut: Das ist das “Saatgut” für deine Pilze. Du kannst sie online oder in Gartencentern kaufen. Austernpilze (Pleurotus ostreatus) sind eine gute Wahl für Anfänger, da sie relativ einfach zu züchten sind.
* Substrat: Das ist das Nährmedium, auf dem deine Pilze wachsen werden. Stroh, Kaffeesatz, Sägespäne oder eine Mischung daraus sind gute Optionen.
* Kalk: Um den pH-Wert des Substrats anzupassen.
* Wasser: Zum Befeuchten des Substrats.
* Sprühflasche: Zum Befeuchten der Pilze während des Wachstums.
* Bohrer oder Messer: Zum Erstellen von Löchern in den Flaschen.
* Klebeband oder Heißkleber (optional): Zum Abdichten der Flaschen, falls nötig.
* Handschuhe: Um Kontamination zu vermeiden.
* Desinfektionsmittel: Um die Flaschen und Werkzeuge zu reinigen.
Vorbereitung ist alles: Die Flaschen und das Substrat
Bevor wir mit dem eigentlichen Befüllen der Flaschen beginnen, müssen wir ein paar Vorbereitungen treffen. Das ist wichtig, um sicherzustellen, dass unsere Pilze in einer sauberen und optimalen Umgebung wachsen können.
1. Die Flaschen reinigen und vorbereiten
1. Reinigung: Wasche die Plastikflaschen gründlich mit warmem Seifenwasser aus. Achte darauf, alle Rückstände zu entfernen. Spüle sie anschließend gründlich mit klarem Wasser aus.
2. Desinfektion: Sprühe die Innenseite der Flaschen mit Desinfektionsmittel ein und lasse sie an der Luft trocknen. Das hilft, unerwünschte Mikroorganismen abzutöten.
3. Löcher bohren: Bohre oder schneide mit einem Messer kleine Löcher (ca. 1 cm Durchmesser) in die Seiten der Flaschen. Diese Löcher dienen der Belüftung und ermöglichen es den Pilzen, herauszuwachsen. Verteile die Löcher gleichmäßig über die Flasche. Ich empfehle, etwa 5-7 Löcher pro Flasche zu machen.
2. Das Substrat vorbereiten
Die Vorbereitung des Substrats ist ein entscheidender Schritt. Es muss ausreichend feucht und frei von Verunreinigungen sein.
1. Substrat auswählen: Wähle das Substrat, das du verwenden möchtest. Stroh ist eine gute Wahl, da es leicht verfügbar und relativ einfach zu verarbeiten ist. Kaffeesatz ist eine nachhaltige Option, die reich an Nährstoffen ist. Sägespäne sollten von unbehandeltem Holz stammen.
2. Pasteurisierung (für Stroh und Sägespäne): Um das Substrat zu pasteurisieren, tauche es in einen großen Topf mit kochendem Wasser ein. Lasse es für etwa 60-90 Minuten köcheln. Dadurch werden schädliche Mikroorganismen abgetötet.
3. Abkühlen und Abtropfen: Lasse das Substrat abkühlen und tropfe es gut ab. Es sollte feucht, aber nicht nass sein. Ein guter Test ist, eine Handvoll Substrat zu nehmen und leicht auszudrücken. Es sollten nur wenige Tropfen Wasser herauskommen.
4. Kalk hinzufügen (optional): Wenn du Stroh oder Sägespäne verwendest, kannst du etwas Kalk hinzufügen, um den pH-Wert zu erhöhen. Das hilft, das Wachstum von unerwünschten Schimmelpilzen zu verhindern. Mische etwa 1-2 Esslöffel Kalk pro Kilogramm Substrat.
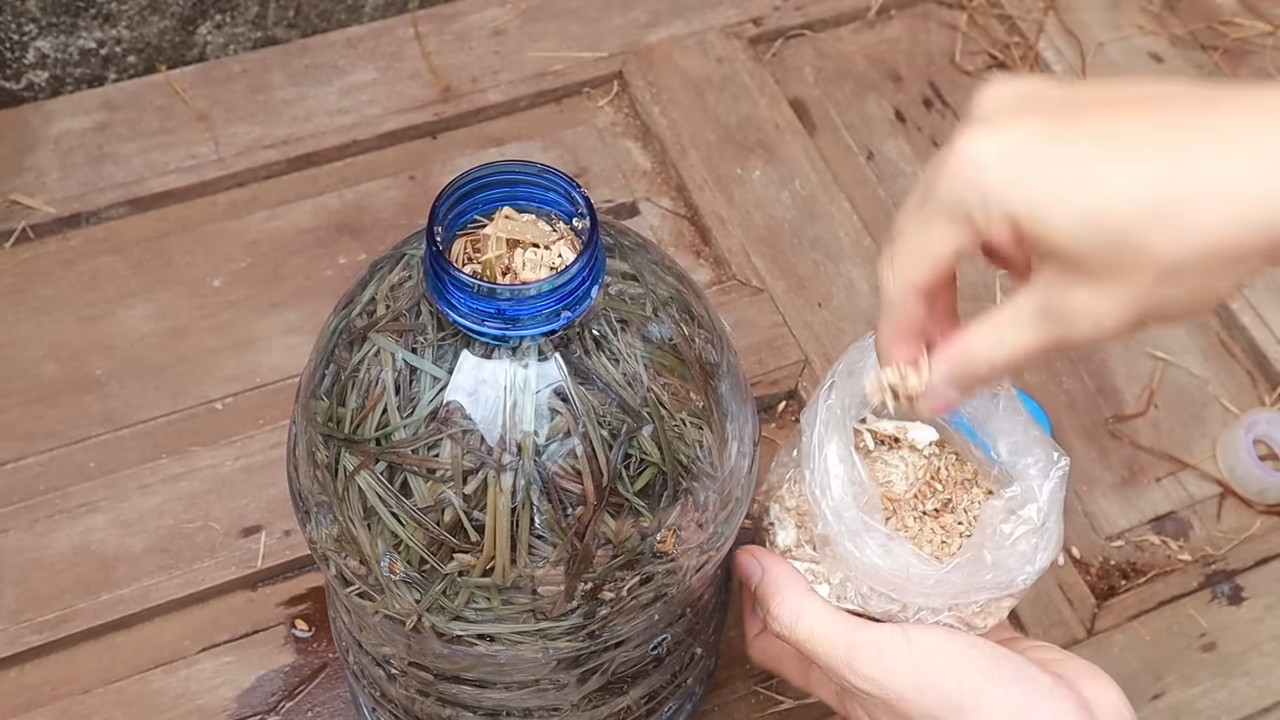
Die Flaschen befüllen: Der Start deiner Pilzzucht
Jetzt kommt der spaßige Teil: das Befüllen der Flaschen mit dem vorbereiteten Substrat und der Pilzbrut.
1. Schichtweise befüllen: Beginne damit, eine Schicht Substrat in die Flasche zu füllen. Drücke es leicht an.
2. Pilzbrut hinzufügen: Gib eine Schicht Pilzbrut auf das Substrat. Verteile sie gleichmäßig.
3. Wiederholen: Wiederhole die Schritte 1 und 2, bis die Flasche fast voll ist. Lasse oben etwa 5-7 cm Platz.
4. Abschlussschicht: Schließe mit einer Schicht Substrat ab. Drücke es leicht an.
5. Verschließen (optional): Wenn du möchtest, kannst du die Öffnung der Flasche mit Klebeband oder Heißkleber verschließen. Das hilft, die Feuchtigkeit zu halten und Kontamination zu verhindern. Achte aber darauf, dass noch etwas Luftaustausch möglich ist.
Die Inkubationsphase: Warten und Beobachten
Nachdem die Flaschen befüllt sind, beginnt die Inkubationsphase. In dieser Zeit wächst das Myzel (das Pilzgeflecht) durch das Substrat.
1. Standort wählen: Stelle die befüllten Flaschen an einen dunklen, kühlen und gut belüfteten Ort. Eine Temperatur von 20-24°C ist ideal.
2. Beobachten: Überprüfe die Flaschen regelmäßig. Nach einigen Tagen solltest du sehen, wie sich ein weißes, flaumiges Myzel auf dem Substrat ausbreitet.
3. Geduld haben: Die Inkubationsphase kann je nach Pilzart und Umgebungstemperatur 2-4 Wochen dauern.
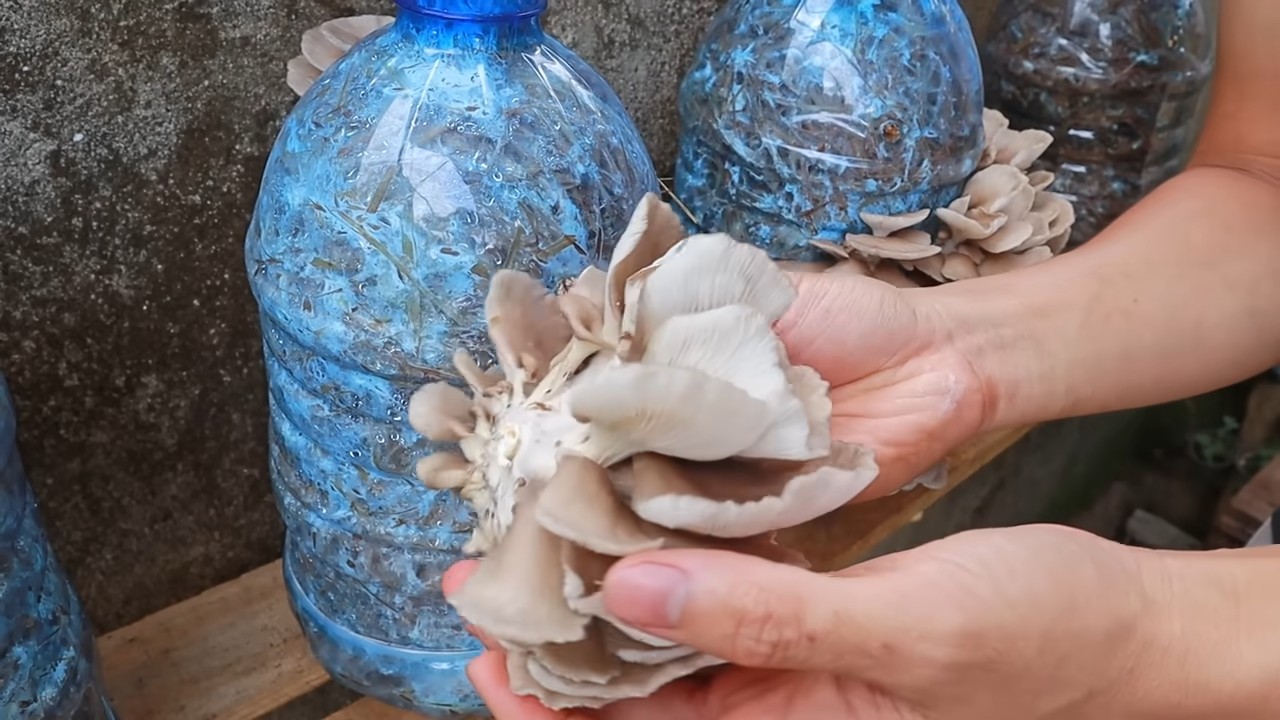
Die Fruchtungsphase: Endlich Pilze!
Sobald das Myzel das gesamte Substrat durchdrungen hat, beginnt die Fruchtungsphase. Jetzt können wir endlich unsere eigenen Pilze ernten!
1. Standort wechseln: Stelle die Flaschen an einen helleren Ort, aber vermeide direkte Sonneneinstrahlung. Eine höhere Luftfeuchtigkeit ist jetzt wichtig.
2. Befeuchten: Besprühe die Flaschen und die Umgebung regelmäßig mit Wasser, um die Luftfeuchtigkeit zu erhöhen.
3. Belüftung: Sorge für ausreichend Belüftung, um Schimmelbildung zu vermeiden.
4. Pilze wachsen sehen: Nach einigen Tagen sollten sich kleine Pilzköpfe an den Löchern bilden.
5. Ernten: Ernte die Pilze, wenn sie ausgewachsen sind, aber bevor sie ihre Sporen abwerfen. Schneide sie vorsichtig mit einem Messer ab.
Pflege und weitere Ernten: So geht’s weiter
Auch nach der ersten Ernte kannst du noch weitere Pilze ernten.
1. Befeuchten: Besprühe die Flaschen weiterhin regelmäßig mit Wasser.
2. Ruhephase: Gönne den Flaschen nach jeder Ernte eine Ruhephase von einigen Tagen.
3. Weitere Ernten: Du kannst in der Regel 2-3 Ernten pro Flasche erzielen.
4. Entsorgung: Wenn die Pilzproduktion nachlässt, kannst du das Substrat kompostieren.
Tipps und Tricks für eine erfolgreiche Pilzzucht
Hier sind noch ein paar zusätzliche Tipps, die dir helfen können, deine Pilzzucht zu optimieren:
* Sauberkeit ist wichtig: Achte auf Sauberkeit, um Kontamination zu vermeiden. Reinige deine Hände, Werkzeuge und Arbeitsflächen gründlich.
* Luftfeuchtigkeit kontrollieren: Eine hohe Luftfeuchtigkeit ist entscheidend für die Fruchtung. Du kannst die Luftfeuchtigkeit erhöhen, indem du die Flaschen regelmäßig besprühst oder sie in einem Gewächshaus oder einer Plastiktüte aufbewahrst.
* Belüftung sicherstellen: Sorge für ausreichend Belüftung, um Schimmelbildung zu vermeiden.
* Verschiedene Substrate ausprobieren: Experimentiere mit verschiedenen Substraten, um
Conclusion
So, there you have it! Transforming recycled bottles into a thriving mushroom farm isn’t just a quirky DIY project; it’s a sustainable, cost-effective, and incredibly rewarding way to cultivate your own delicious fungi. We’ve walked you through the process, highlighting the simplicity and accessibility of this method. Forget expensive mushroom growing kits or relying solely on store-bought varieties. With a little ingenuity and some readily available materials, you can become a mushroom farmer right in your own home.
The beauty of this DIY mushroom farming technique lies in its adaptability. Feel free to experiment with different types of mushrooms. Oyster mushrooms are a fantastic starting point due to their resilience and rapid growth, but don’t let that limit you. Explore shiitake, lion’s mane, or even wine cap mushrooms once you’ve gained some experience. Each variety offers a unique flavor profile and texture, adding exciting diversity to your culinary creations.
Beyond the type of mushroom, consider the substrate you use. While coffee grounds are a popular and effective choice, you can also experiment with straw, sawdust, or even cardboard. Remember to properly sterilize your substrate to prevent contamination and ensure a healthy mushroom yield. Different substrates will influence the flavor and texture of your mushrooms, so experimentation is key to finding your perfect combination.
Furthermore, think about the environment you create for your mushroom farm. Maintaining consistent humidity and temperature is crucial for successful growth. A simple humidity tent made from a plastic bag or a repurposed container can work wonders. Consider using a small humidifier or misting the bottles regularly to keep the humidity levels optimal. The ideal temperature will vary depending on the mushroom species, so research the specific requirements for your chosen variety.
This DIY mushroom farming project is more than just a way to grow food; it’s a statement about sustainability and resourcefulness. By repurposing recycled bottles, you’re reducing waste and contributing to a more environmentally conscious lifestyle. You’re also gaining a deeper understanding of the natural world and the fascinating process of fungal growth.
We strongly encourage you to give this DIY mushroom farming trick a try. It’s a fun, educational, and ultimately delicious experience. Don’t be afraid to get your hands dirty and experiment with different techniques. The rewards are well worth the effort.
Once you’ve harvested your first batch of homegrown mushrooms, we want to hear about it! Share your experiences, tips, and photos with us in the comments section below. Let us know what worked well for you, what challenges you encountered, and any creative variations you came up with. Your feedback will help other aspiring mushroom farmers and contribute to a thriving community of DIY enthusiasts. Let’s cultivate a world where fresh, sustainable mushrooms are accessible to everyone!
Frequently Asked Questions (FAQ)
What types of mushrooms are best for growing in recycled bottles?
Oyster mushrooms are generally considered the easiest and most forgiving for beginners. They are fast-growing, relatively resistant to contamination, and thrive on a variety of substrates. Other good options include shiitake, lion’s mane, and wine cap mushrooms, but these may require more experience and attention to detail. Research the specific needs of each mushroom variety before starting.
What is the best substrate to use for mushroom farming in bottles?
Used coffee grounds are a popular and readily available choice. They are rich in nutrients and provide a good environment for mushroom growth. However, you can also use straw, sawdust, cardboard, or a combination of these materials. Ensure that the substrate is properly sterilized before inoculation to prevent contamination. Sterilization can be achieved by pasteurizing the substrate in hot water or using a pressure cooker. The ideal substrate will depend on the type of mushroom you are growing.
How do I sterilize the substrate to prevent contamination?
Sterilization is crucial to prevent unwanted molds and bacteria from outcompeting your mushrooms. For coffee grounds, pasteurization is usually sufficient. This involves heating the coffee grounds to around 160-180°F (71-82°C) for about an hour. For straw, sawdust, or cardboard, a more thorough sterilization method, such as using a pressure cooker, is recommended. Follow the manufacturer’s instructions for your pressure cooker to ensure proper sterilization.
How do I maintain the proper humidity and temperature for my mushroom farm?
Mushrooms thrive in humid environments. You can create a humidity tent by placing a plastic bag or a repurposed container over the bottles. Mist the inside of the tent regularly to maintain high humidity levels. A small humidifier can also be used. The ideal temperature will vary depending on the mushroom species. Oyster mushrooms generally prefer temperatures between 60-75°F (15-24°C). Research the specific temperature requirements for your chosen variety.
How long does it take for mushrooms to grow in recycled bottles?
The time it takes for mushrooms to grow will depend on the mushroom species, the substrate used, and the environmental conditions. Oyster mushrooms typically start pinning (forming small mushroom buds) within a week or two of inoculation and can be harvested within a few days of pinning. Other varieties may take longer. Be patient and monitor your mushroom farm regularly.
How do I know when my mushrooms are ready to harvest?
Mushrooms are typically ready to harvest when the caps have fully expanded but before they start to release spores. The edges of the caps may start to curl upwards slightly. Gently twist or cut the mushrooms from the substrate.
Can I reuse the substrate after harvesting mushrooms?
Yes, you can often get multiple flushes (harvests) from the same substrate. After harvesting the first flush, rehydrate the substrate by soaking it in water for a few hours. Then, drain the excess water and return the bottles to their growing environment. You may get smaller yields with subsequent flushes. Eventually, the substrate will become depleted of nutrients and will need to be replaced.
What if my mushroom farm gets contaminated with mold?
Contamination is a common problem in mushroom farming. If you notice mold growing in your bottles, it’s important to remove the contaminated areas immediately. You can try to salvage the remaining substrate by carefully removing the mold and spraying the area with a diluted hydrogen peroxide solution. However, if the contamination is widespread, it’s best to discard the entire batch to prevent the mold from spreading to other areas.
Is mushroom farming in recycled bottles safe?
Yes, mushroom farming in recycled bottles is generally safe as long as you follow proper hygiene and sterilization practices. Always wash your hands thoroughly before handling the substrate or mushrooms. Ensure that the bottles are clean and free of any harmful chemicals. Only consume mushrooms that you have positively identified as edible. If you are unsure about the identity of a mushroom, do not eat it.
Where can I find mushroom spawn or culture to inoculate my bottles?
Mushroom spawn or culture can be purchased online from reputable suppliers. You can also find them at some garden centers or agricultural supply stores. Choose a supplier that specializes in mushroom cultivation and offers high-quality spawn or culture. Make sure to select the appropriate spawn or culture for the type of mushroom you want to grow.

Leave a Comment