
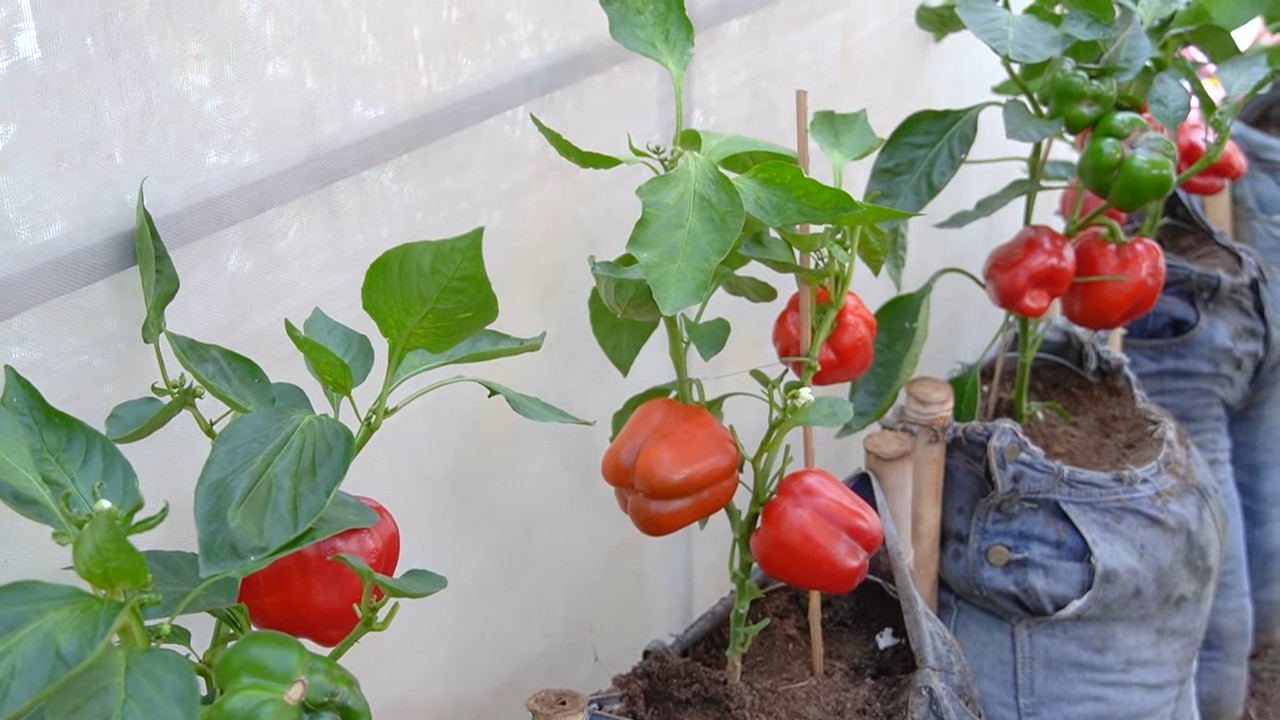
Old jeans pepper harvest – who knew these three words could unlock a world of sustainable gardening magic? I’m so excited to share this incredibly clever and eco-friendly DIY trick with you! For generations, resourceful gardeners have sought innovative ways to maximize their yields and minimize waste. From ancient composting techniques to modern hydroponics, the spirit of ingenuity has always been at the heart of successful gardening.
But let’s face it, gardening can sometimes feel overwhelming, especially when you’re trying to be mindful of your environmental impact. That’s where this upcycling hack comes in! Imagine transforming your worn-out denim into a thriving pepper patch. Not only are you giving your old jeans a new lease on life, but you’re also creating a unique and visually appealing growing space.
This old jeans pepper harvest method is perfect for anyone looking to add a touch of rustic charm to their garden while also reducing textile waste. Plus, it’s surprisingly easy to do! Whether you’re a seasoned gardener or just starting out, this DIY project is a fantastic way to boost your pepper production and embrace a more sustainable lifestyle. So, grab those old jeans, and let’s get growing!
DIY Upcycled Denim Pepper Planters: From Old Jeans to Bountiful Harvest!
Hey there, fellow gardening enthusiasts! Are you looking for a fun, eco-friendly, and totally unique way to grow your peppers this season? Well, look no further! I’m going to show you how to transform those old, worn-out jeans sitting in the back of your closet into adorable and functional pepper planters. Not only will you be giving your denim a new lease on life, but you’ll also be adding a touch of rustic charm to your garden or patio. Let’s get started!
What You’ll Need:
* An old pair of jeans (the sturdier, the better!)
* Potting soil (enough to fill your planters)
* Pepper seedlings (your favorite varieties!)
* Scissors or a rotary cutter
* Sewing machine (optional, but recommended for durability)
* Heavy-duty thread (denim thread is ideal)
* Pins
* Measuring tape or ruler
* Waterproof fabric liner (optional, but helps retain moisture)
* Gravel or pebbles (for drainage)
* Safety pins or clips (to hold fabric in place while sewing)
* Gloves (to protect your hands while working with soil)
* A large bowl or bucket (to help shape the planter)
Planning and Preparation:
Before we dive into the sewing, let’s do a little planning. This will ensure your planters are the right size and shape for your pepper plants.
* Decide on the size: Consider the mature size of your pepper plants. Larger plants will need larger planters. A good rule of thumb is to allow at least 12 inches in diameter for each plant.
* Choose your jeans: Darker denim tends to hold up better to the elements. Avoid jeans with large holes or tears in the areas you’ll be using for the planter body.
* Wash your jeans: This will remove any dirt or debris and prevent shrinkage after you’ve sewn your planters.
* Gather your supplies: Having everything on hand before you start will make the process much smoother.
Creating the Planter Body:
This is where the magic happens! We’ll be transforming the legs of your jeans into sturdy containers for your pepper plants.
1. Cut the legs: Lay your jeans flat and use your scissors or rotary cutter to cut off the legs. The length will determine the height of your planter. I usually aim for around 15-18 inches, but you can adjust this based on your preference. Remember to cut both legs to the same length.
2. Turn inside out: Turn each leg inside out. This will hide the seams and give your planter a cleaner look.
3. Sew the bottom: This is crucial for creating a closed container.
* Option 1 (Sewing Machine): Pin the bottom edge of the leg together, making sure the raw edges are aligned. Using your sewing machine and heavy-duty thread, sew a straight line across the bottom. Reinforce the seam by sewing a second line right next to the first.
* Option 2 (Hand Sewing): If you don’t have a sewing machine, you can hand-sew the bottom using a sturdy backstitch. This will take longer, but it’s still a viable option. Make sure to use strong thread and reinforce the seam well.
4. Reinforce the bottom (Optional but Recommended): For added durability, you can create a small square or circle of denim to sew onto the bottom of the planter. This will provide extra support and prevent the bottom from sagging when filled with soil. Cut a piece of denim slightly larger than the bottom of the leg. Pin it to the bottom, centering it carefully. Sew around the perimeter of the denim patch, reinforcing the seam.
5. Turn right side out: Carefully turn the planter right side out. You should now have a denim cylinder with a closed bottom.
Adding Drainage and Liner (Optional):
Proper drainage is essential for healthy pepper plants. A liner can also help retain moisture and prevent the denim from rotting.
1. Add drainage: Place a layer of gravel or pebbles at the bottom of the planter. This will allow excess water to drain away from the roots. Aim for a layer that’s about 2-3 inches thick.
2. Insert the liner (Optional): If you’re using a liner, cut a piece of waterproof fabric (like pond liner or heavy-duty plastic) to fit inside the planter. Make sure the liner is slightly taller than the planter so you can fold it over the top edge. Secure the liner to the inside of the planter using safety pins or clips. Fold the excess liner over the top edge of the denim and secure it with more pins or clips. You can also glue the liner to the denim using a waterproof adhesive, but this is optional.
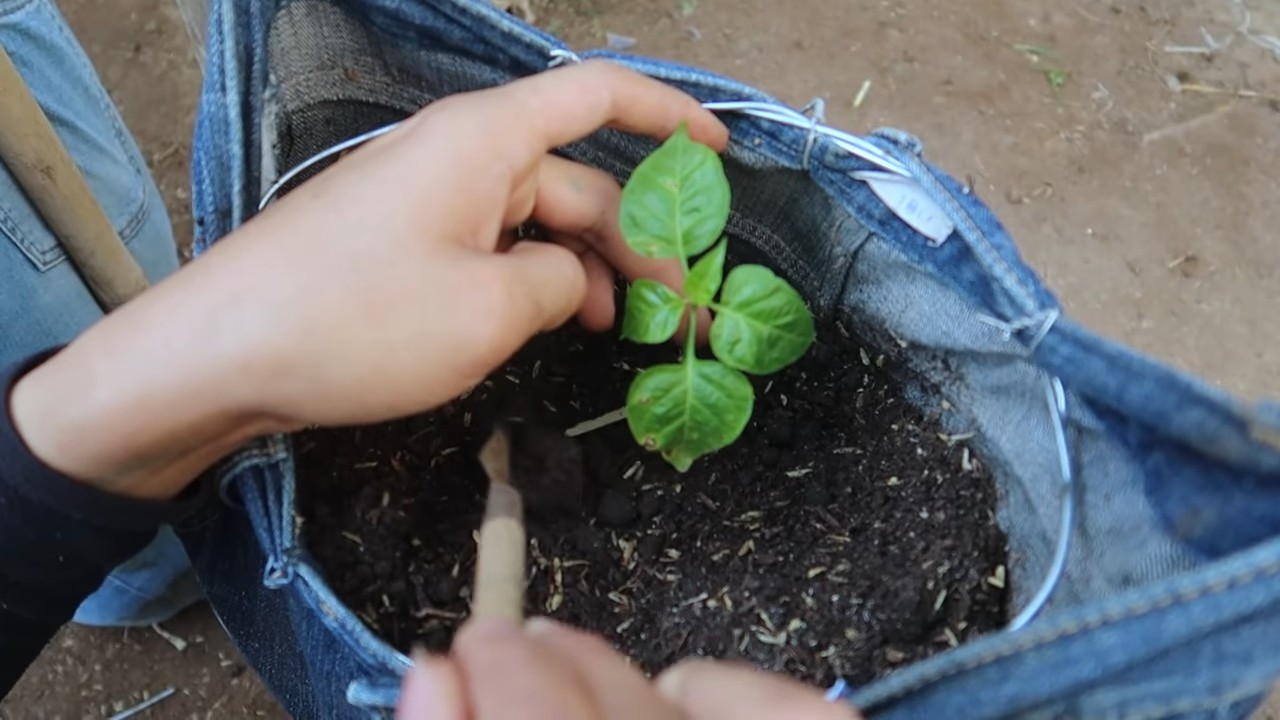
Planting Your Peppers:
Now for the fun part! It’s time to bring your pepper plants to their new denim homes.
1. Fill with soil: Carefully fill the planter with potting soil, leaving a few inches of space at the top. Gently pat down the soil to remove any air pockets.
2. Plant your seedlings: Dig a small hole in the center of the planter for each pepper seedling. Gently remove the seedling from its container and loosen the roots slightly. Place the seedling in the hole and backfill with soil. Make sure the top of the root ball is level with the surrounding soil.
3. Water thoroughly: Water the newly planted seedlings thoroughly until the water drains out of the bottom of the planter. This will help settle the soil and encourage root growth.
Adding Finishing Touches:
These little details will make your denim pepper planters even more special.
1. Cuff the top (Optional): For a more polished look, you can cuff the top edge of the planter. Simply fold the top edge down a few inches and secure it with pins or clips. You can also sew the cuff in place for a more permanent look.
2. Add embellishments (Optional): Get creative and personalize your planters! You can add patches, buttons, embroidery, or even paint to make them truly unique.
3. Position your planters: Place your denim pepper planters in a sunny location that receives at least 6-8 hours of direct sunlight per day. Make sure the planters are stable and won’t tip over in windy conditions.
Caring for Your Denim Pepper Planters:
With a little care and attention, your denim pepper planters will thrive and provide you with a bountiful harvest.
* Watering: Water your pepper plants regularly, especially during hot, dry weather. Check the soil moisture by sticking your finger into the soil. If the top inch feels dry, it’s time to water. Avoid overwatering, as this can lead to root rot.
* Fertilizing: Feed your pepper plants with a balanced fertilizer every few weeks. Follow the instructions on the fertilizer package.
* Pruning: Prune your pepper plants regularly to encourage bushier growth and more fruit production. Remove any dead or yellowing leaves.
* Pest control: Keep an eye out for pests like aphids, whiteflies, and spider mites. Treat any infestations promptly with insecticidal soap or neem oil.
* Support: As your pepper plants grow, they may need support to prevent them from falling over. Use stakes or cages to provide support.
Troubleshooting:
Even with the best care, you may encounter some challenges along the way. Here are a few common problems and how to solve them:
* Yellowing leaves: This could be a sign of overwatering, underwatering, or nutrient deficiency. Adjust your watering schedule and fertilize your plants as needed.
* Stunted growth: This could be caused by poor soil, lack of sunlight, or pest infestation. Make sure your plants are getting enough sunlight and nutrients, and treat any pests promptly.
* Blossom drop: This is a common problem with peppers, especially during hot weather. Make sure your plants are getting enough water and fertilizer. You can also try hand-pollinating the flowers to improve fruit set.
Enjoy Your Harvest!
With a little effort, you can transform your old jeans into beautiful and productive pepper planters. Not only will you be giving your denim a new life, but you’ll also be enjoying fresh, homegrown peppers all season long. Happy gardening!
Conclusion
So, there you have it! Transforming your old jeans into a practical and stylish pepper harvesting apron is not just a fun upcycling project; it’s a game-changer for any gardener, especially those with bountiful pepper harvests. This DIY trick offers a sustainable and cost-effective alternative to store-bought aprons, allowing you to repurpose materials you already own while creating a personalized tool perfectly suited to your needs.
Why is this a must-try? Because it’s practical, eco-friendly, and undeniably cool. Imagine strolling through your garden, hands free, effortlessly collecting your vibrant peppers into a sturdy, custom-made apron. No more juggling baskets or struggling with overflowing pockets. This apron keeps your peppers safe and secure, preventing bruising and ensuring they arrive in the kitchen in perfect condition. Plus, you’re reducing textile waste and giving new life to an old pair of jeans – a win-win for you and the environment.
But the beauty of this project lies in its adaptability. Feel free to experiment with different jean styles and embellishments. Got a pair of jeans with interesting pockets or patches? Incorporate them into your design for added character. Want to add extra functionality? Consider sewing on additional pockets for your gardening tools, seed packets, or even your phone. You could even line the pockets with a waterproof material for added protection against moisture.
For a more rustic look, leave the raw edges of the denim exposed. If you prefer a cleaner finish, hem the edges with a sewing machine or even use fabric glue for a no-sew option. You can also personalize your apron with fabric paint, embroidery, or iron-on patches. Let your creativity run wild and create a pepper harvesting apron that truly reflects your style.
Don’t limit yourself to just peppers! This apron is equally useful for harvesting other fruits and vegetables like tomatoes, cucumbers, beans, or even herbs. It’s a versatile gardening companion that will quickly become an indispensable part of your harvesting routine.
We wholeheartedly encourage you to give this DIY trick a try. It’s a rewarding project that combines creativity, sustainability, and practicality. And most importantly, it makes harvesting your delicious peppers a breeze.
Once you’ve created your own upcycled denim pepper harvesting apron, we’d love to see it! Share your creations and experiences with us on social media using #DIYPepperApron and #UpcycledGardening. Let’s inspire others to embrace sustainable gardening practices and transform their old jeans into something amazing. We can’t wait to see what you come up with! Happy harvesting!
Frequently Asked Questions (FAQ)
What kind of jeans work best for this project?
Almost any pair of jeans can be used, but sturdier denim will generally result in a more durable apron. Jeans with a higher cotton content tend to be more robust. Consider the size of the jeans as well. Larger jeans will naturally yield a larger apron with bigger pockets. If you’re looking for a smaller, more compact apron, a smaller pair of jeans might be more suitable. Also, consider the condition of the jeans. While minor wear and tear can add character, avoid using jeans with significant rips or holes in areas that will be used for the pockets or apron body.
Do I need to be an experienced sewer to make this apron?
Not at all! While basic sewing skills are helpful, this project can be adapted for beginners. If you’re not comfortable using a sewing machine, you can hand-stitch the apron together or even use fabric glue for a no-sew option. The key is to take your time and follow the instructions carefully. There are also numerous online tutorials available that can provide step-by-step guidance for beginners. Don’t be afraid to experiment and learn as you go!
How do I clean my denim pepper harvesting apron?
Denim is generally quite durable and easy to clean. For minor dirt or stains, simply spot clean with a damp cloth and mild detergent. For more thorough cleaning, you can machine wash the apron on a gentle cycle with cold water. Avoid using bleach, as it can damage the denim and fade the color. Tumble dry on low heat or hang to dry. To prevent shrinkage, it’s best to avoid high heat. If you’ve added any embellishments like fabric paint or embroidery, be sure to follow the care instructions for those materials as well.
Can I add extra pockets or features to my apron?
Absolutely! This is where you can really get creative and personalize your apron to suit your specific needs. Consider adding extra pockets for your gardening tools, seed packets, or even your phone. You can also add loops for holding small tools like pruning shears or a trowel. If you’re harvesting in wet conditions, you might want to line the pockets with a waterproof material to protect your peppers from moisture. You can also add a drawstring or belt to adjust the fit of the apron. The possibilities are endless!
What if I don’t have any old jeans to use?
If you don’t have any old jeans lying around, don’t worry! You can often find inexpensive jeans at thrift stores or consignment shops. You can also ask friends or family members if they have any jeans they’re willing to donate. Alternatively, you can use other types of denim fabric, such as old denim jackets or skirts. The key is to find a material that is sturdy and durable enough to hold the weight of the peppers.
How do I prevent the denim from fraying?
Fraying is a natural characteristic of denim, but there are several ways to minimize it. You can hem the edges of the denim with a sewing machine or use fabric glue to create a clean finish. You can also use a fray-stopping product, which is a liquid that you apply to the edges of the fabric to prevent fraying. Another option is to embrace the raw edges and let them fray naturally for a more rustic look.
Is this apron only for harvesting peppers?
No, not at all! While this apron is specifically designed for harvesting peppers, it’s a versatile gardening tool that can be used for a variety of other tasks. You can use it to harvest other fruits and vegetables like tomatoes, cucumbers, beans, or even herbs. It’s also great for collecting weeds, carrying tools, or even just keeping your clothes clean while you’re working in the garden.
How can I make this apron more comfortable to wear?
Comfort is key when you’re spending time in the garden. To make your apron more comfortable, consider adding padding to the straps or waistband. You can also use a softer denim fabric for the straps to prevent chafing. Make sure the apron fits properly and isn’t too tight or too loose. You might also want to add a pocket for your phone or a water bottle to keep you hydrated while you’re working.
Leave a Comment