
Patio squash growing tips are exactly what you need to transform your limited outdoor space into a bountiful harvest haven! Have you ever dreamed of picking fresh, sun-ripened squash right from your own patio? It’s more achievable than you think, and I’m here to show you how. For centuries, squash has been a staple crop in many cultures, providing nourishment and playing a significant role in traditional diets. From the ancient civilizations of the Americas to modern-day gardens, this versatile vegetable has proven its resilience and adaptability.
But let’s face it, not everyone has acres of land to dedicate to a sprawling squash patch. That’s where these DIY tricks come in! Many people struggle with limited space, poor soil, or simply the intimidation factor of starting a garden. That’s why I’ve compiled these easy-to-follow patio squash growing tips. Imagine the satisfaction of harvesting your own zucchini, butternut, or even spaghetti squash, all grown right outside your door. Not only will you enjoy fresh, delicious produce, but you’ll also reduce your carbon footprint and connect with nature in a meaningful way. So, let’s ditch the grocery store squash and get our hands dirty! I’m excited to share my favorite tips and tricks for successful patio squash growing, even if you’re a complete beginner.
“`html
Growing Squash in Containers: A Complete DIY Guide
Hey there, fellow gardeners! Want to enjoy fresh, homegrown squash even if you’re short on space? You’re in the right place! Growing squash in containers is totally doable, and I’m here to walk you through every step, from choosing the right variety to harvesting your delicious bounty. Let’s get started!
Choosing the Right Squash Variety
Not all squash varieties are created equal when it comes to container gardening. You’ll want to opt for bush varieties, which are more compact and manageable than their sprawling vine counterparts. Here’s a breakdown:
* Bush Varieties: These are your best bet! They stay relatively compact, making them perfect for pots. Think zucchini, yellow squash, and some smaller acorn squash varieties.
* Vining Varieties: While technically possible, vining varieties like butternut squash and pumpkins require *much* larger containers and a sturdy trellis system. They can be a bit more challenging for beginners.
Here are some specific varieties I’ve had success with:
* Spacemaster Zucchini: A compact zucchini that produces tons of fruit.
* Early Crookneck Yellow Squash: A classic yellow squash that’s early to mature.
* Bush Delicata Squash: A smaller delicata squash that’s perfect for roasting.
* Patio Baby Eggplant (Yes, Eggplant!): While not technically squash, it grows similarly and thrives in containers. I like to include it for variety!
Gathering Your Supplies
Before we dive into planting, let’s make sure you have everything you need. Trust me, having everything on hand will make the process so much smoother.
* Large Container: This is crucial! Squash plants need plenty of room for their roots to grow. I recommend a container that’s at least 24 inches in diameter and 12 inches deep. The bigger, the better!
* High-Quality Potting Mix: Don’t skimp on the potting mix! Use a well-draining mix specifically formulated for containers. Avoid using garden soil, as it can compact and suffocate the roots.
* Squash Seeds or Seedlings: Choose your desired variety and purchase seeds or seedlings from a reputable source.
* Slow-Release Fertilizer: This will provide your plants with a steady supply of nutrients throughout the growing season.
* Watering Can or Hose: Essential for keeping your plants hydrated.
* Trowel or Small Shovel: For planting and transplanting.
* Mulch (Optional): Mulch helps retain moisture and suppress weeds. Straw, wood chips, or shredded bark work well.
* Trellis (Optional, but recommended for some bush varieties): Even bush varieties can get a bit unruly, so a small trellis can provide support and keep the fruit off the ground.
* Gardening Gloves: To protect your hands.
Planting Your Squash
Okay, let’s get our hands dirty! This is the fun part.
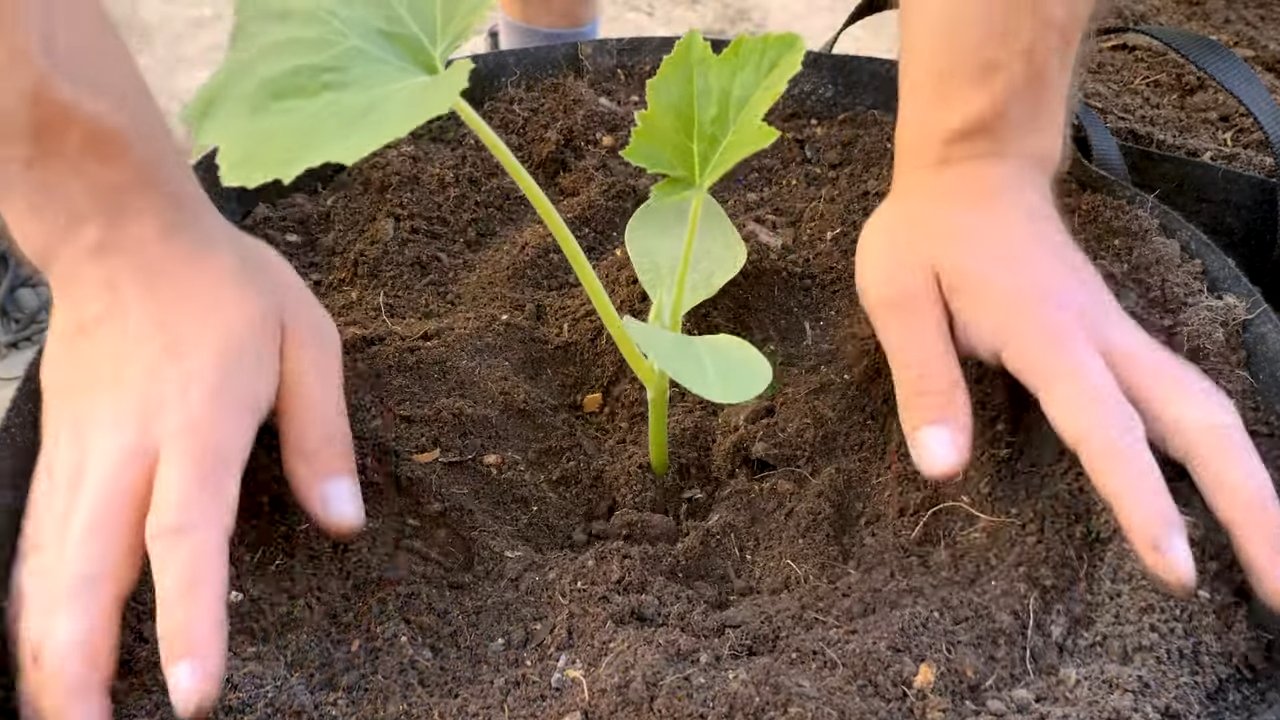
1. Prepare the Container: Make sure your container has drainage holes. If not, drill some! Fill the container with potting mix, leaving a few inches of space at the top.
2. Planting Seeds: If you’re starting from seed, sow 2-3 seeds per container, about 1 inch deep. Water gently. Once the seedlings emerge, thin them to one strong plant per container.
3. Transplanting Seedlings: If you’re using seedlings, gently remove them from their nursery pots. Loosen the roots slightly and plant them in the center of the container, at the same depth they were growing in the nursery pot.
4. Water Thoroughly: After planting, water the container thoroughly until water drains out of the bottom. This helps settle the soil and encourages root growth.
5. Add Slow-Release Fertilizer: Sprinkle slow-release fertilizer around the base of the plant, following the package instructions.
6. Mulch (Optional): Add a layer of mulch around the plant to help retain moisture and suppress weeds.
Caring for Your Container Squash
Now that your squash is planted, it’s time to provide it with the care it needs to thrive.
1. Watering: Squash plants need consistent moisture, especially during hot weather. Water deeply whenever the top inch of soil feels dry to the touch. Avoid overhead watering, as this can lead to fungal diseases. Aim for watering at the base of the plant.
2. Sunlight: Squash plants need at least 6-8 hours of sunlight per day. Place your container in a sunny location.
3. Fertilizing: In addition to the slow-release fertilizer, you can supplement with a liquid fertilizer every 2-3 weeks. Look for a fertilizer that’s high in phosphorus and potassium, which are essential for fruit production.
4. Pollination: Squash plants have separate male and female flowers. Bees and other pollinators are essential for transferring pollen from the male flowers to the female flowers. If you’re not seeing a lot of bee activity, you may need to hand-pollinate.
* Hand-Pollination: To hand-pollinate, use a small paintbrush to collect pollen from the male flower (the one with the long, thin stem). Then, gently brush the pollen onto the stigma of the female flower (the one with the small squash fruit behind it). Do this in the morning, when the flowers are open.
5. Pest and Disease Control: Keep an eye out for common squash pests like squash bugs, squash vine borers, and aphids. You can control these pests with insecticidal soap or neem oil. Also, watch out for fungal diseases like powdery mildew. Improve air circulation and avoid overhead watering to prevent these diseases. If you spot any signs of disease, treat with a fungicide.
6. Pruning (Optional): While not always necessary, you can prune your squash plant to improve air circulation and encourage fruit production. Remove any yellowing or damaged leaves. You can also pinch off the tips of the vines to encourage branching.
7. Support: As your squash plant grows, it may need some support. A small trellis or tomato cage can help keep the plant upright and prevent the fruit from touching the ground.
Harvesting Your Squash
The moment you’ve been waiting for! Harvesting your homegrown squash is incredibly rewarding.
1. Harvest Time: The time it takes for squash to mature depends on the variety. Generally, zucchini and yellow squash are ready to harvest about 50-60 days after planting. Acorn squash and delicata squash take a bit longer, around 80-100 days.
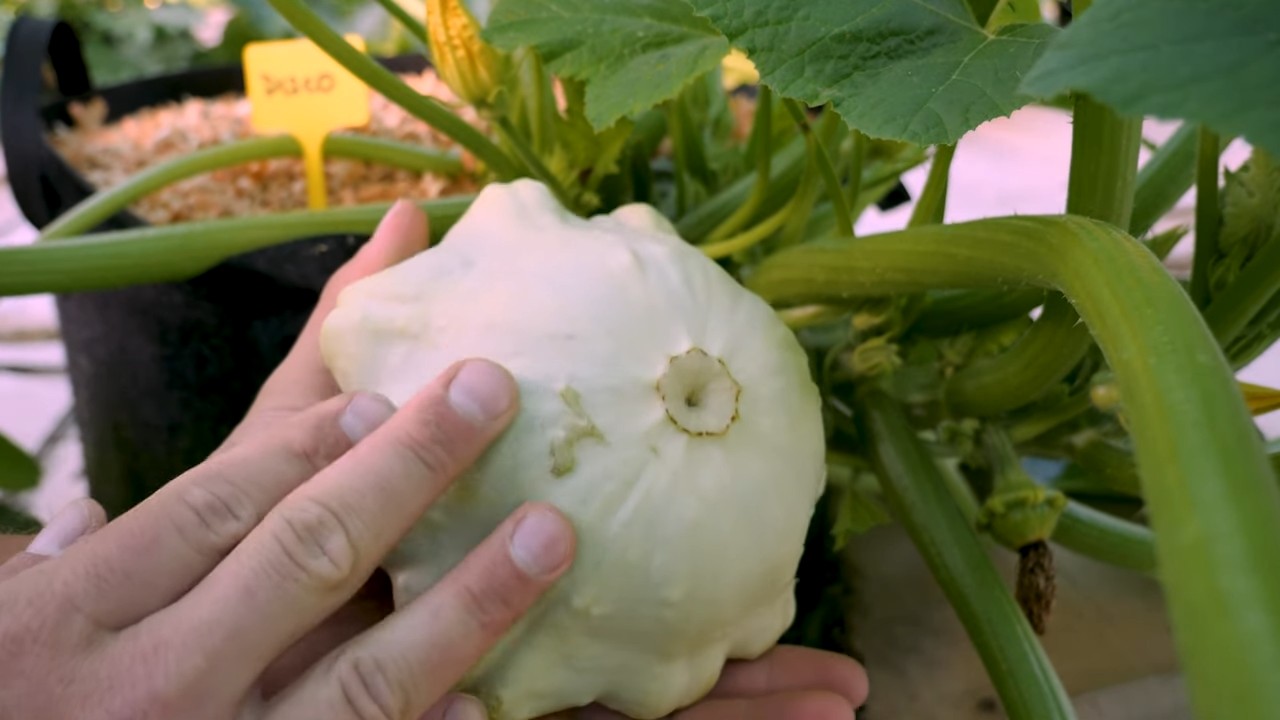
2. Signs of Ripeness: Look for these signs to determine if your squash is ready to harvest:
* Size: The squash should be the size specified for the variety.
* Color: The color should be uniform and vibrant.
* Skin: The skin should be firm and slightly resistant to pressure.
3. Harvesting Technique: Use a sharp knife or pruning shears to cut the squash from the vine, leaving a short stem attached.
4. Storage: Zucchini and yellow squash are best eaten fresh. They can be stored in the refrigerator for up to a week. Acorn squash and delicata squash can be stored in a cool, dry place for several months.
Troubleshooting Common Problems
Even with the best care, you might encounter some challenges along the way. Here are some common problems and how to address them:
* Yellowing Leaves: This could be a sign of overwatering, underwatering, nutrient deficiency, or disease. Check the soil moisture, fertilize if necessary, and inspect for pests or diseases.
* Lack of Fruit Production: This could be due to poor pollination, lack of sunlight, or nutrient deficiency. Hand-pollinate if necessary, ensure the plant is getting enough sunlight, and fertilize with a balanced fertilizer.
* Powdery Mildew: This fungal disease appears as a white, powdery coating on the leaves. Improve air circulation, avoid overhead watering, and treat with a fungicide.
* Squash Bugs: These pests can damage the leaves and fruit. Handpick them off the plant or spray with insecticidal soap.
* Squash Vine Borers: These pests burrow into the stems of the plant, causing it to wilt and die. Wrap the base of the stem with aluminum foil to prevent the borers from entering. If you see signs of infestation, you can try to remove the borers by slitting the stem and extracting them.
Enjoying Your Harvest
Congratulations! You’ve successfully grown squash in containers. Now it’s time to enjoy the fruits (or vegetables!) of your labor. There are endless ways to prepare squash. Here are a few of my favorites:
* Grilled Zucchini: Slice zucchini lengthwise, brush with olive oil, and grill until tender.
* Roasted Acorn Squash: Cut acorn squash in half, scoop out the seeds, and roast with butter and
Conclusion
So, there you have it! Mastering patio squash growing isn’t just about having a green thumb; it’s about understanding the unique needs of these prolific plants and adapting your approach to suit their containerized environment. We’ve explored the essential elements, from selecting the right variety and providing ample sunlight to crafting the perfect soil mix and implementing effective watering and feeding strategies. But the real magic lies in the DIY tricks we’ve uncovered, particularly the self-watering container hack.
Why is this DIY trick a must-try? Because it addresses the most common challenges faced by patio squash growers: inconsistent watering and nutrient deficiencies. Squash plants are thirsty and hungry, and containers dry out quickly, especially during the heat of summer. This DIY self-watering system provides a consistent reservoir of moisture, preventing the dreaded wilting and blossom end rot that can plague your harvest. Furthermore, by incorporating slow-release fertilizer into the water reservoir, you ensure a steady supply of nutrients, promoting vigorous growth and abundant fruit production. It’s a game-changer for anyone serious about maximizing their patio squash yield.
But don’t stop there! Experiment with variations to personalize your self-watering system. Consider adding a layer of mulch to the top of the soil to further reduce evaporation and maintain consistent soil temperature. You could also try different types of containers, such as fabric pots, which offer excellent drainage and aeration. For those in particularly hot climates, consider adding a shade cloth to protect your plants from the harshest afternoon sun. And if you’re feeling adventurous, explore companion planting! Marigolds, for example, can deter pests, while nasturtiums can attract beneficial insects.
Ultimately, the key to successful patio squash growing is observation and adaptation. Pay close attention to your plants’ needs, and don’t be afraid to experiment with different techniques to find what works best for you. The self-watering container is a fantastic starting point, but it’s just one tool in your arsenal.
We wholeheartedly encourage you to try this DIY trick and embark on your own patio squash growing adventure. The satisfaction of harvesting your own homegrown squash is unparalleled, and the flavor is simply unmatched by anything you can buy in the store. Plus, you’ll be amazed at how much you can grow in a relatively small space.
Don’t forget to share your experiences with us! We’d love to hear about your successes, your challenges, and any variations you’ve tried. Post photos of your thriving patio squash plants and your DIY self-watering containers on social media using [Your Hashtag Here]. Let’s build a community of passionate patio squash growers and learn from each other’s experiences. Happy growing!
Frequently Asked Questions (FAQ)
What type of squash is best for patio growing?
Compact bush varieties are ideal for containers. Some excellent choices include:
* Bush Delicata: A smaller version of the classic Delicata squash, known for its sweet, nutty flavor.
* Spaghetti Squash ‘Small Wonder’: A compact spaghetti squash that produces smaller, more manageable fruits.
* Zucchini ‘Patio Choice’: A zucchini specifically bred for container growing, offering high yields in a small space.
* Yellow Crookneck Squash ‘Early Crookneck’: A classic yellow squash that performs well in containers.
* Acorn Squash ‘Table Bush’: A compact acorn squash that produces delicious, single-serving fruits.
How big should my container be for patio squash?
A minimum of 15 gallons is recommended, but 20 gallons or larger is even better. The larger the container, the more room the roots have to grow, and the more moisture the soil can retain. Ensure the container has adequate drainage holes to prevent waterlogging.
What kind of soil should I use for patio squash?
Use a high-quality potting mix that is well-draining and rich in organic matter. Avoid using garden soil, as it can become compacted in containers and hinder drainage. You can amend your potting mix with compost, aged manure, or other organic materials to improve its fertility and water-holding capacity. A good mix would be 60% potting mix, 20% compost, and 20% perlite or vermiculite for drainage.
How often should I water my patio squash?
Squash plants are thirsty and require consistent moisture, especially when fruiting. Water deeply whenever the top inch of soil feels dry to the touch. In hot weather, you may need to water daily or even twice a day. The self-watering container helps to maintain consistent moisture levels, but you should still check the soil regularly to ensure it’s not drying out completely.
How much sunlight do patio squash plants need?
Squash plants need at least 6-8 hours of direct sunlight per day to thrive. Choose a sunny location for your container garden. If you live in a particularly hot climate, consider providing some afternoon shade to prevent the plants from overheating.
What kind of fertilizer should I use for patio squash?
Use a balanced fertilizer (e.g., 10-10-10) or a fertilizer specifically formulated for vegetables. Apply fertilizer according to the package directions. You can also use slow-release fertilizer granules mixed into the soil at planting time. For the self-watering container, consider using a liquid fertilizer diluted in the water reservoir.
How do I prevent pests and diseases on my patio squash?
Inspect your plants regularly for signs of pests or diseases. Common pests include squash bugs, squash vine borers, and aphids. Common diseases include powdery mildew and blossom end rot. Use organic pest control methods, such as insecticidal soap or neem oil, to control pests. Ensure good air circulation around your plants to prevent diseases. Blossom end rot is often caused by calcium deficiency or inconsistent watering, so ensure your soil is well-drained and you are watering consistently.
How do I pollinate my patio squash flowers?
Squash plants have separate male and female flowers. The female flowers have a small fruit at the base, while the male flowers do not. If you are not seeing fruit develop, you may need to hand-pollinate the flowers. To do this, use a small paintbrush to transfer pollen from the male flower to the female flower. The best time to hand-pollinate is in the morning.
When is the best time to harvest my patio squash?
Harvest your squash when it is mature and the skin is firm. The specific harvest time will depend on the variety of squash you are growing. Check the seed packet or plant tag for specific instructions. For summer squash, such as zucchini and yellow squash, harvest when they are young and tender. For winter squash, such as butternut squash and acorn squash, harvest when the skin is hard and the stem is dry.
Can I grow multiple squash plants in one container?
It’s generally best to grow only one squash plant per container, especially if you’re using a smaller container (15-20 gallons). Overcrowding can lead to reduced yields and increased susceptibility to pests and diseases. If you have a very large container (30 gallons or more), you may be able to grow two plants, but be sure to provide adequate spacing and monitor them closely.


Leave a Comment