
Peanut gardening simple hack – ever dreamt of harvesting a bounty of delicious peanuts right from your own backyard? I know I have! It might seem like a daunting task reserved for large farms, but trust me, with a few clever tricks and a little DIY spirit, you can absolutely cultivate your own peanut patch, no matter the size of your garden.
Peanuts, also known as groundnuts, have a fascinating history, dating back thousands of years to South America. They’ve since spread across the globe, becoming a staple in countless cuisines and cultures. Beyond their culinary uses, peanuts are packed with nutrients, making them a healthy and rewarding addition to your diet.
But why bother with a peanut gardening simple hack? Well, store-bought peanuts can be expensive, and let’s be honest, nothing beats the taste of freshly harvested, homegrown goodness. Plus, gardening is a fantastic way to connect with nature, relieve stress, and get some exercise. This DIY article will guide you through a simple, effective method for growing peanuts, even if you’re a beginner gardener. We’ll cover everything from seed selection to harvesting, ensuring you have a successful and satisfying peanut-growing experience. So, grab your gardening gloves, and let’s get started!
Grow Peanuts Like a Pro: My Simple DIY Hack for a Bountiful Harvest!
Hey there, fellow gardening enthusiasts! I’m so excited to share my super simple, yet incredibly effective, DIY hack for growing peanuts. Forget complicated setups and finicky techniques. This method is all about maximizing your yield with minimal effort. Trust me, even if you’re a beginner, you can totally rock this!
What You’ll Need: The Peanut Powerhouse Arsenal
Before we dive into the nitty-gritty, let’s gather our supplies. This is a pretty low-cost project, which is always a win in my book!
* Raw, Unsalted Peanuts in Shells: This is crucial! Make sure they’re raw and unsalted. Roasted peanuts won’t sprout. I usually get mine from a health food store or a bulk bin. Look for peanuts that are plump and healthy-looking.
* Seed Starting Trays or Small Pots: These will be our peanut nurseries. I prefer trays with drainage holes to prevent waterlogging.
* Seed Starting Mix: This is a light and airy soil mix specifically designed for starting seeds. It provides the perfect environment for delicate seedlings.
* Well-Draining Garden Soil: Once the seedlings are ready, they’ll need a good home in your garden. Make sure your soil is well-draining to prevent root rot. Amending your soil with compost or aged manure is always a good idea!
* Gardening Gloves: Protect those precious hands!
* Watering Can or Hose with a Gentle Spray Nozzle: We need to keep the soil moist, but not soggy.
* Optional: Rooting Hormone Powder: This isn’t strictly necessary, but it can help speed up the germination process.
* Optional: Row Covers or Bird Netting: To protect your young plants from hungry critters.
* Optional: Mulch (Straw, Hay, or Wood Chips): To help retain moisture and suppress weeds.
Phase 1: Sprouting Your Peanut Seeds – The Germination Game
This is where the magic begins! We’re going to coax those peanuts into sprouting, giving them a head start before they even hit the garden.
1. Crack Open the Shells (Gently!): Carefully crack open the peanut shells without damaging the peanuts inside. I usually do this by hand, gently squeezing the shell until it cracks. Be careful not to break the peanut itself. We want to keep the thin, papery skin on the peanut intact if possible.
2. Soak the Peanuts (The Hydration Station): Place the peanuts in a bowl of lukewarm water and let them soak for 4-6 hours. This helps to soften the outer layer and encourages germination. I usually do this overnight.
3. Prepare Your Seed Starting Trays (The Peanut Paradise): Fill your seed starting trays or small pots with seed starting mix. Gently press down on the soil to remove any air pockets.
4. Plant the Peanuts (The Burial Ceremony): Make a small indentation in the soil, about 1 inch deep. Place one peanut in each indentation, and cover it gently with soil.
5. Water Thoroughly (The First Drink): Water the trays thoroughly, making sure the soil is evenly moist.
6. Create a Humid Environment (The Greenhouse Effect): Cover the trays with a clear plastic lid or plastic wrap to create a humid environment. This helps to keep the soil moist and warm, which is ideal for germination.
7. Place in a Warm Location (The Sunny Spot): Place the trays in a warm location, such as a sunny windowsill or under grow lights. The ideal temperature for germination is between 70-80°F (21-27°C).
8. Monitor and Water (The Vigilant Watch): Check the trays daily and water as needed to keep the soil moist. Don’t let the soil dry out completely.
9. Wait Patiently (The Anticipation): Germination usually takes 7-10 days, but it can take longer depending on the temperature and humidity. Be patient! You’ll see little sprouts emerging soon enough.
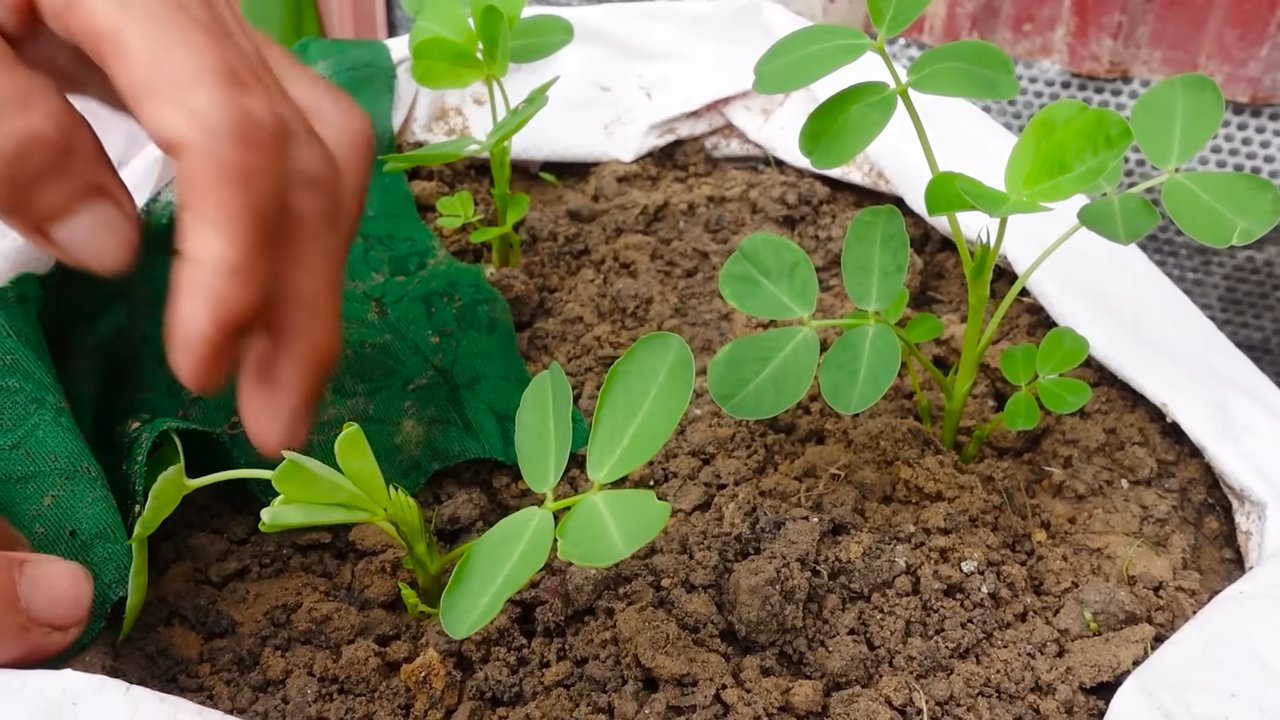
Phase 2: Transplanting Your Peanut Seedlings – Moving to the Big Leagues
Once your seedlings have developed a few sets of true leaves (those are the leaves that look like miniature versions of the adult leaves), they’re ready to be transplanted into your garden.
1. Choose a Sunny Location (The Prime Real Estate): Peanuts need at least 6-8 hours of sunlight per day, so choose a location in your garden that gets plenty of sun.
2. Prepare the Soil (The Foundation): Make sure your soil is well-draining and amended with compost or aged manure. Peanuts prefer slightly acidic soil with a pH of 6.0-6.5.
3. Dig Holes (The New Homes): Dig holes that are slightly larger than the root balls of your seedlings. Space the holes about 12-18 inches apart.
4. Gently Remove Seedlings (The Delicate Operation): Carefully remove the seedlings from the seed starting trays, being careful not to damage the roots. I like to use a small trowel to gently lift the seedlings out.
5. Plant the Seedlings (The Settling In): Place the seedlings in the holes and cover the roots with soil. Gently press down on the soil to remove any air pockets.
6. Water Thoroughly (The Welcome Drink): Water the seedlings thoroughly after transplanting.
7. Mulch (The Protective Layer): Apply a layer of mulch around the plants to help retain moisture and suppress weeds. Straw, hay, or wood chips work well.
8. Protect from Pests (The Defense Strategy): If you’re concerned about pests, you can cover your young plants with row covers or bird netting.
Phase 3: Caring for Your Peanut Plants – The Nurturing Process
Now that your peanut plants are in the ground, it’s time to provide them with the care they need to thrive.
1. Water Regularly (The Hydration Schedule): Water your peanut plants regularly, especially during dry periods. Peanuts need about 1 inch of water per week. Avoid overwatering, as this can lead to root rot.
2. Fertilize (The Nutritional Boost): Fertilize your peanut plants with a balanced fertilizer every 4-6 weeks. Look for a fertilizer that is high in phosphorus and potassium, which are essential for peanut production. I like to use a liquid fertilizer diluted to half strength.
3. Weed Regularly (The Clean Sweep): Keep your peanut patch free of weeds. Weeds compete with peanut plants for nutrients and water. Hand-pulling weeds is the best option, as herbicides can damage peanut plants.
4. “Hilling” the Plants (The Mound Building): As the peanut plants grow, they will produce “pegs” that grow downwards from the base of the plant. These pegs are what will eventually develop into peanuts. To encourage peanut production, you can “hill” the plants by mounding soil around the base of the plants. This helps to keep the pegs covered with soil, which is essential for peanut development. I usually do this every few weeks.
5. Watch for Pests and Diseases (The Health Check): Keep an eye out for pests and diseases. Common peanut pests include aphids, spider mites, and leafhoppers. Common peanut diseases include leaf spot and root rot. If you notice any signs of pests or diseases, take action immediately. There are many organic and non-organic options available for controlling pests and diseases.
6. Be Patient (The Long Game): Peanuts take about 120-150 days to mature, so be patient! You’ll know they’re ready to harvest when the leaves start to turn yellow and the plants start to die back.
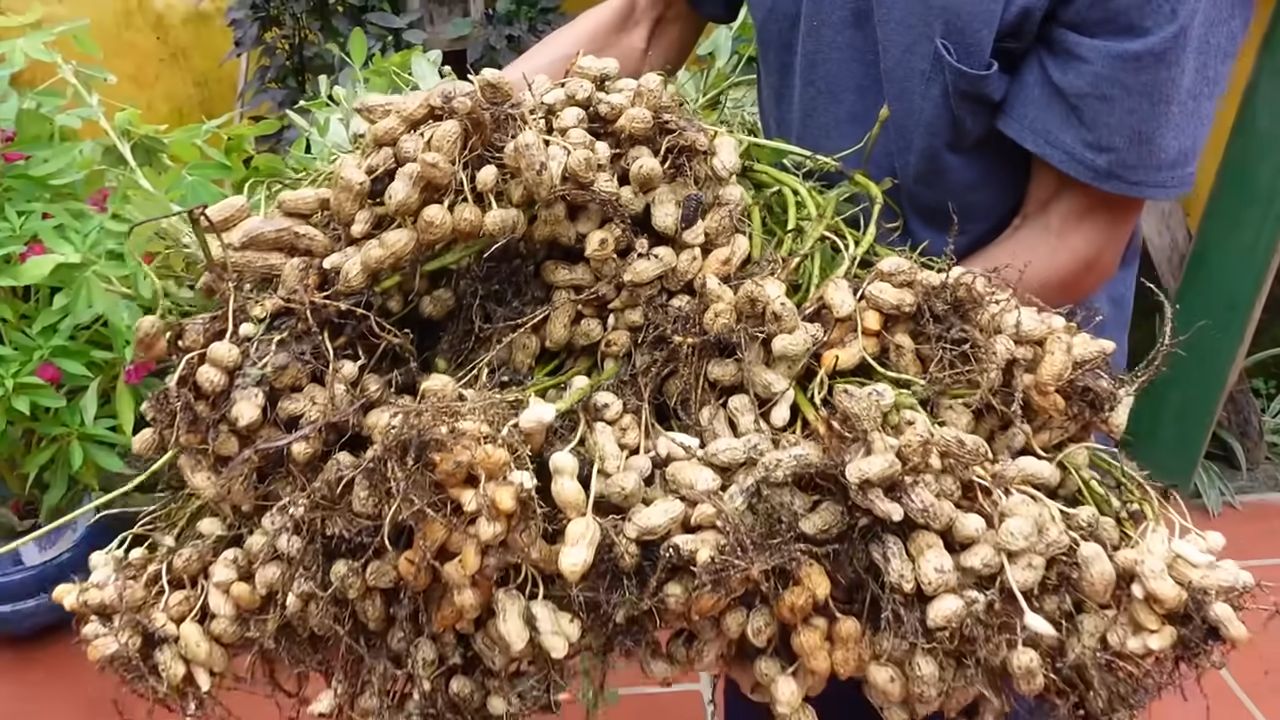
Phase 4: Harvesting Your Peanut Crop – The Grand Finale!
This is the most rewarding part! After all your hard work, it’s time to reap the fruits (or rather, the nuts!) of your labor.
1. Dig Up the Plants (The Excavation): Once the leaves have turned yellow and the plants have started to die back, it’s time to harvest your peanuts. Use a garden fork or shovel to carefully dig up the plants.
2. Shake Off the Soil (The Cleaning Process): Gently shake off the soil from the roots and peanuts.
3. Dry the Peanuts (The Curing Stage): Hang the plants upside down in a warm, dry, well-ventilated place for 2-3 weeks to dry. This allows the peanuts to cure and develop their flavor. I usually hang them in my garage.
4. Pick the Peanuts (The Separation): Once the plants are dry, pick the peanuts off the plants.
5. Store the Peanuts (The Preservation): Store the peanuts in a cool, dry place in an airtight container. They can be stored for several months.
My Secret Weapon: The “Peanut Pillow” Hack
Okay
Conclusion
So, there you have it! This simple, yet incredibly effective, peanut gardening hack is more than just a shortcut; it’s a game-changer for anyone looking to cultivate a bountiful harvest of delicious, homegrown peanuts. We’ve walked you through the process, highlighting the ease and accessibility of this method, even for those with limited space or gardening experience.
Why is this a must-try? Because it drastically improves your chances of success. By providing a controlled environment for initial germination and early growth, you’re giving your peanut plants the strongest possible start. This translates to healthier plants, increased yields, and ultimately, a more rewarding gardening experience. Forget the frustration of seeds failing to sprout or seedlings struggling to survive – this hack minimizes those risks and sets you up for peanut-growing triumph.
But the beauty of this method lies not only in its effectiveness but also in its adaptability. Feel free to experiment with different types of containers. While we’ve suggested using plastic containers, you could also try repurposed yogurt tubs, seedling trays, or even biodegradable pots. Just ensure they have adequate drainage to prevent waterlogging.
Consider exploring different peanut varieties as well. Virginia peanuts, known for their large size, are a popular choice, but Runner peanuts, with their consistent shape and flavor, are also excellent for roasting and snacking. Spanish peanuts, with their smaller size and reddish skins, are perfect for candies and peanut butter. Each variety offers a unique flavor profile and growing characteristic, so don’t be afraid to branch out and discover your personal favorite.
Furthermore, you can tailor the soil mix to your specific needs. While a well-draining potting mix is generally recommended, you can amend it with compost or other organic matter to further enrich the soil and provide your peanut plants with essential nutrients. Just remember to avoid overly acidic soils, as peanuts prefer a slightly alkaline to neutral pH.
We wholeheartedly encourage you to give this peanut gardening hack a try. It’s a simple, cost-effective way to elevate your gardening game and enjoy the satisfaction of harvesting your own homegrown peanuts. Imagine the delicious possibilities: fresh-roasted peanuts, homemade peanut butter, or even adding them to your favorite Asian-inspired dishes. The possibilities are endless!
More importantly, we want to hear about your experiences! Share your successes, challenges, and any variations you’ve tried in the comments section below. Your insights can help other gardeners learn and improve their own peanut-growing endeavors. Let’s create a community of peanut enthusiasts, sharing tips and tricks to make peanut gardening accessible and enjoyable for everyone. So, grab your peanut seeds, gather your supplies, and get ready to embark on a rewarding gardening adventure. Happy peanut growing!
Frequently Asked Questions (FAQ)
What type of peanuts should I use for this method?
You can use any type of raw, unsalted peanut seeds for this method. Virginia, Runner, and Spanish peanuts are all excellent choices. Just make sure the peanuts are specifically labeled as “seeds” or “for planting” to ensure they haven’t been treated with any chemicals that could inhibit germination. Avoid using roasted or salted peanuts, as they will not sprout.
How long does it take for peanut seeds to germinate using this method?
Generally, peanut seeds will germinate within 7-14 days when using this method. However, the exact germination time can vary depending on factors such as temperature, humidity, and the freshness of the seeds. Maintaining a consistently warm and moist environment will help speed up the germination process.
What kind of soil should I use for transplanting the seedlings?
A well-draining potting mix is ideal for transplanting peanut seedlings. You can also create your own mix by combining equal parts of garden soil, compost, and perlite or vermiculite. The key is to ensure the soil is loose and airy, allowing for proper root development and drainage. Avoid using heavy clay soils, as they can become waterlogged and suffocate the roots.
How often should I water the peanut plants after transplanting?
Water your peanut plants regularly, especially during dry periods. The soil should be kept consistently moist, but not waterlogged. Check the soil moisture level by sticking your finger about an inch into the soil. If it feels dry, it’s time to water. Avoid overhead watering, as this can increase the risk of fungal diseases. Instead, water at the base of the plants.
How much sunlight do peanut plants need?
Peanut plants require at least 6-8 hours of direct sunlight per day to thrive. Choose a sunny location in your garden or on your balcony where the plants will receive ample sunlight throughout the day. If you’re growing peanuts indoors, you may need to supplement with artificial lighting, such as grow lights.
When is the best time to harvest peanuts?
Peanuts are typically ready to harvest about 120-150 days after planting. A good indicator of maturity is when the foliage starts to turn yellow and the inner shells of the peanuts begin to show dark veins. You can also dig up a few plants and check the peanuts themselves. If the peanuts are plump and the shells are hard, they’re ready to harvest.
What are some common pests and diseases that affect peanut plants?
Some common pests that can affect peanut plants include aphids, spider mites, and leafhoppers. Diseases such as leaf spot and root rot can also be a problem. Regularly inspect your plants for signs of pests or diseases and take appropriate action if necessary. Organic pest control methods, such as insecticidal soap or neem oil, can be effective for controlling pests. Proper watering and drainage can help prevent fungal diseases.
Can I grow peanuts in containers using this method?
Yes, absolutely! This method is particularly well-suited for growing peanuts in containers. Choose a container that is at least 12 inches deep and wide to allow for adequate root development. Make sure the container has drainage holes to prevent waterlogging. You can use the same soil mix and watering techniques as you would for growing peanuts in the ground.
What if my peanut plants don’t produce any peanuts?
There are several reasons why peanut plants might not produce peanuts. Insufficient sunlight, poor soil fertility, inadequate watering, and pest or disease problems can all contribute to low yields. Make sure your plants are receiving enough sunlight, water, and nutrients. Regularly inspect them for pests and diseases and take appropriate action if necessary. You can also try adding a fertilizer specifically formulated for peanuts to boost yields.
How do I cure and store my harvested peanuts?
After harvesting your peanuts, you’ll need to cure them to reduce their moisture content and prevent spoilage. To cure peanuts, spread them out in a single layer on a screen or wire rack in a well-ventilated area. Allow them to dry for several weeks, or until the shells are brittle and the peanuts rattle inside. Once cured, you can store your peanuts in an airtight container in a cool, dry place for several months. You can also freeze them for longer storage.
Leave a Comment