
Peanut harvesting, no garden? Sounds impossible, right? Well, get ready to have your gardening world turned upside down! I’m here to tell you that you absolutely can enjoy the satisfaction of growing and harvesting your own peanuts, even without a traditional garden plot. For centuries, peanuts have been a staple crop, not just for their delicious flavor, but also for their nutritional value and versatility. From ancient South American civilizations to modern-day snack enthusiasts, peanuts have nourished and delighted people across the globe.
But what if you live in an apartment, have limited space, or simply don’t have the time or inclination for a full-blown garden? That’s where these clever DIY tricks come in! I’ll show you how to cultivate these tasty legumes in containers, raised beds, or even hanging baskets. Imagine the joy of plucking fresh peanuts straight from your own “mini-farm,” knowing exactly where they came from and how they were grown. Plus, it’s a fantastic way to teach kids about where their food comes from and get them excited about healthy eating. So, let’s dive into the world of peanut harvesting, no garden required, and unlock the secrets to growing your own delicious peanuts, no matter where you live!
Growing Peanuts Indoors: From Seed to Snack Without a Garden!
Hey there, fellow DIY enthusiasts! Ever thought about growing your own peanuts? I know, I know, it sounds like a farm-sized operation, but trust me, you can totally do it indoors, even if you don’t have a garden! I’m going to walk you through the whole process, step-by-step, so you can enjoy fresh, homegrown peanuts right from your living room. Get ready to get your hands dirty (a little bit!) and learn a super cool and rewarding DIY project.
What You’ll Need: Your Peanut-Growing Arsenal
Before we dive in, let’s gather our supplies. This is a pretty straightforward project, so you probably have a lot of this stuff already.
* Raw, Unsalted Peanuts in Shells: This is crucial! You need raw peanuts, not roasted or boiled. Look for them at health food stores or online. Make sure they are unsalted, as the salt can inhibit germination.
* Large Container: A plastic tub, a large pot (at least 12 inches in diameter and depth), or even a repurposed storage container will work. The bigger, the better, as peanut plants need room to spread their roots.
* Well-Draining Potting Mix: Regular potting mix is fine, but make sure it drains well. You can add perlite or vermiculite to improve drainage.
* Grow Lights (Optional, but Recommended): While peanuts can grow indoors with natural light, grow lights will significantly improve your yield, especially if you don’t have a super sunny spot.
* Watering Can or Spray Bottle: For gentle watering.
* Heat Mat (Optional): Peanuts germinate best in warm soil, so a heat mat can speed up the process.
* Small Pots or Seedling Trays: For starting the peanut seeds.
* Patience: This is key! Growing peanuts takes time and care.
Phase 1: Germinating Your Peanut Seeds
This is where the magic begins! We need to wake up those little peanuts and get them ready to grow.
1. Soaking the Peanuts: Gently crack open the peanut shells, being careful not to damage the peanuts inside. Remove the peanuts from the shells. Place the peanuts in a bowl of lukewarm water and let them soak for 24 hours. This helps soften the outer layer and encourages germination.
2. Preparing the Seedling Pots: Fill your small pots or seedling trays with moist potting mix.
3. Planting the Peanuts: Make a small hole (about 1 inch deep) in the center of each pot. Place one peanut in each hole and cover it gently with soil.
4. Watering and Warming: Water the soil gently until it’s moist but not soggy. If you’re using a heat mat, place the pots on the mat.
5. Waiting for Sprouts: Keep the soil consistently moist and warm. You should see sprouts emerging in about 7-10 days. Be patient! Sometimes it can take a little longer.
Phase 2: Transplanting and Setting Up Your Peanut Paradise
Once your peanut seedlings have a few leaves, it’s time to move them to their permanent home.
1. Preparing the Large Container: Fill your large container with well-draining potting mix, leaving a few inches of space at the top.
2. Carefully Transplanting: Gently remove the peanut seedlings from their small pots, being careful not to damage the roots.
3. Spacing the Plants: Plant the seedlings in the large container, spacing them about 6-8 inches apart. This gives them enough room to grow and spread their roots.
4. Watering After Transplanting: Water the soil thoroughly after transplanting.
5. Setting Up the Grow Lights (If Using): Position your grow lights about 6-12 inches above the plants. Adjust the height as the plants grow.
Phase 3: Caring for Your Peanut Plants
Now comes the ongoing care. This is where you’ll nurture your peanut plants and watch them thrive.
1. Watering: Water your peanut plants regularly, keeping the soil consistently moist but not soggy. Overwatering can lead to root rot, so make sure the soil drains well. I usually check the soil moisture by sticking my finger about an inch deep. If it feels dry, it’s time to water.
2. Lighting: If you’re using grow lights, keep them on for about 12-16 hours per day. If you’re relying on natural light, place your peanut plants in the sunniest spot you can find.
3. Fertilizing: Feed your peanut plants with a balanced liquid fertilizer every 2-3 weeks. Follow the instructions on the fertilizer label.
4. “Pegging”: This is a crucial part of peanut growth. After the peanut plants flower (small, yellow flowers), they will send down “pegs” into the soil. These pegs are actually the stems that will develop into peanuts underground.
* Maintaining Loose Soil: Make sure the soil around the base of the plants is loose and easy for the pegs to penetrate. You can gently loosen the soil with a small trowel or your fingers.
* Adding Soil (If Needed): As the plants grow and produce more pegs, you may need to add more soil to the container to give the pegs enough room to develop.
5. Pest Control: Keep an eye out for pests like aphids or spider mites. If you spot any, you can try spraying the plants with insecticidal soap or neem oil.
6. Humidity: Peanuts like moderate humidity. If your indoor environment is very dry, you can increase the humidity by placing a tray of water near the plants or using a humidifier.
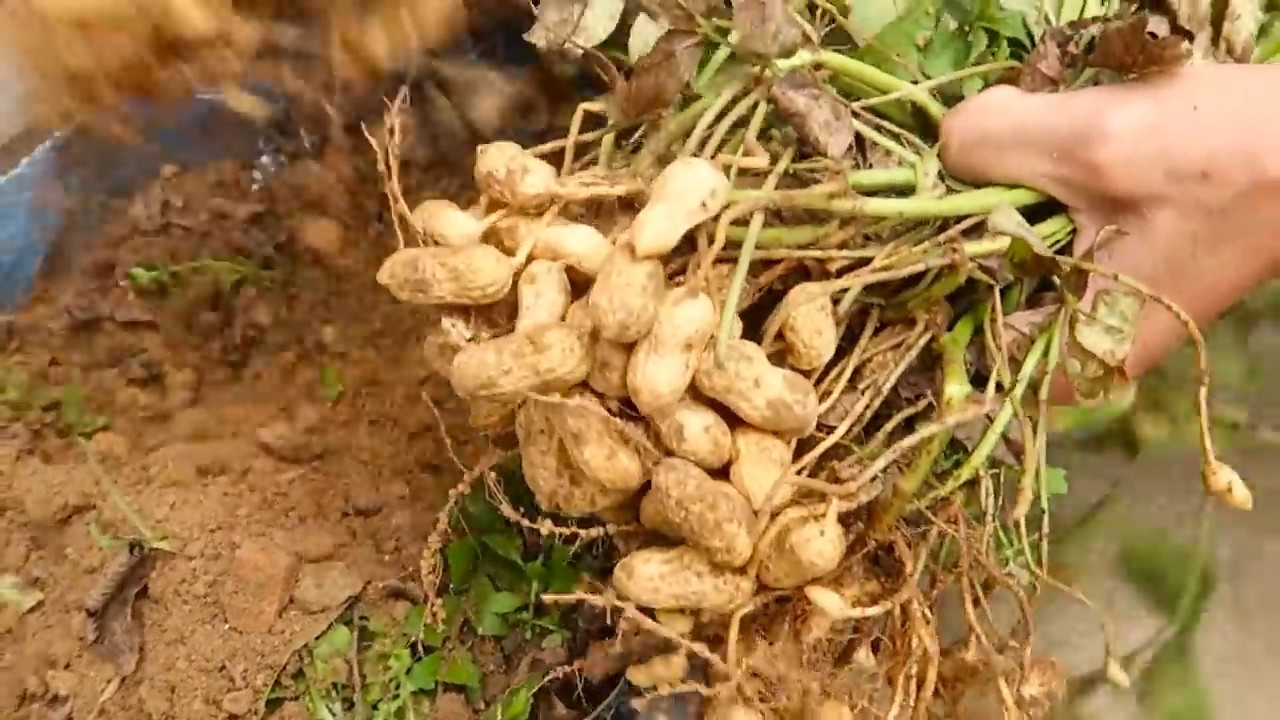
Phase 4: Harvesting Your Homegrown Peanuts
This is the moment you’ve been waiting for! Harvesting your peanuts is a rewarding experience.
1. Knowing When to Harvest: Peanuts typically take about 120-150 days to mature. You’ll know they’re ready to harvest when the leaves start to turn yellow and the plant begins to die back.
2. Carefully Digging Up the Plants: Gently dig up the entire plant, being careful not to damage the peanuts.
3. Removing the Peanuts: Shake off the excess soil and carefully remove the peanuts from the roots.
4. Washing the Peanuts: Wash the peanuts thoroughly with water to remove any remaining soil.
5. Curing the Peanuts: This is an important step to ensure the peanuts are properly dried and stored.
* Air Drying: Spread the peanuts out in a single layer on a screen or tray in a well-ventilated area. Let them air dry for about 2-3 weeks, turning them occasionally.
* Oven Drying (Optional): If you want to speed up the drying process, you can dry the peanuts in the oven at a low temperature (around 100-120°F) for several hours.
6. Storing the Peanuts: Once the peanuts are completely dry, store them in an airtight container in a cool, dry place. They should last for several months.
Troubleshooting: Common Peanut-Growing Problems
Even with the best care, you might encounter a few challenges along the way. Here are some common problems and how to address them:
* Poor Germination: If your peanut seeds aren’t germinating, make sure they’re raw and unsalted. Also, ensure the soil is warm and moist. You can try using a heat mat to improve germination rates.
* Yellowing Leaves: Yellowing leaves can be a sign of overwatering, underwatering, or nutrient deficiency. Adjust your watering schedule and fertilize your plants regularly.
* Lack of Pegging: If your peanut plants aren’t producing pegs, make sure the soil around the base of the plants is loose and easy for the pegs to penetrate. You may also need to add more soil to the container.
* Pest Infestations: Keep an eye out for pests like aphids or spider mites. Spray the plants with insecticidal soap or neem oil to control infestations.
Enjoying Your Homegrown Peanuts
Now that you’ve harvested and cured your peanuts, it’s time to enjoy the fruits (or rather, nuts!) of your labor. You can roast them in the oven, boil them, or eat them raw. They’re delicious and nutritious, and you’ll have the satisfaction of knowing you grew them yourself!
Roasting Peanuts: Preheat your oven to 350°F (175°C). Spread the peanuts out in a single layer on a baking sheet. Roast for 15-20 minutes, or until they’re golden brown and fragrant. Let them cool before eating.
Boiling Peanuts: This is a Southern delicacy! Boil the peanuts in heavily salted water for several hours
Conclusion
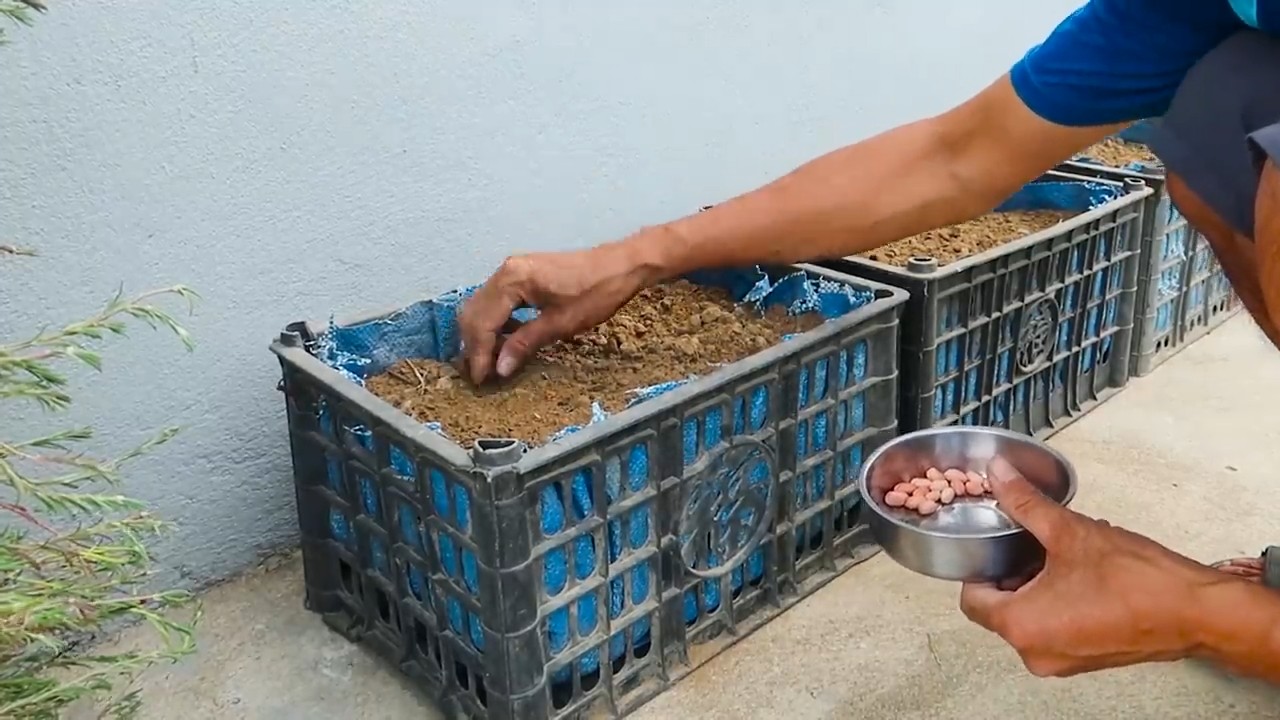
So, you’ve harvested your peanuts and now you’re staring at a pile of peanut plants, wondering what to do next without a sprawling garden to cure them in. Don’t despair! This no-garden peanut curing method is a game-changer, a must-try for anyone who’s ever felt limited by space or traditional techniques. It’s efficient, it’s adaptable, and most importantly, it delivers delicious, homegrown peanuts ready for roasting, boiling, or snacking straight from the shell.
Why is this method a must-try? Because it democratizes peanut harvesting. You no longer need acres of land or perfect weather conditions to enjoy the fruits (or rather, the legumes) of your labor. This approach allows you to cure your peanuts effectively, even in apartments, balconies, or small patios. It minimizes the risk of mold and rot, common problems with traditional field curing, and gives you greater control over the drying process.
But don’t stop there! Experiment with variations to suit your specific environment and preferences. Try using different types of containers for drying – mesh bags, plastic crates with ventilation holes, or even repurposed laundry baskets. Adjust the drying time based on the humidity levels in your area. If you live in a particularly dry climate, you might need to mist the peanuts lightly during the initial stages of curing to prevent them from drying out too quickly. Conversely, in humid climates, ensure ample airflow to prevent mold growth.
Consider adding herbs or spices to the curing process for a unique flavor infusion. A sprinkle of sea salt, a dash of chili powder, or even a few sprigs of rosemary can add a delightful twist to your homegrown peanuts. You could also try smoking the peanuts after they’ve been partially cured for a smoky, savory treat.
The key to successful peanut curing, regardless of the method, is patience and observation. Check your peanuts regularly for signs of mold or excessive dryness. Adjust the drying conditions as needed to ensure a consistent and even cure. Remember, the goal is to reduce the moisture content of the peanuts to a safe level for storage and consumption.
We wholeheartedly encourage you to give this no-garden peanut curing method a try. It’s a rewarding experience that connects you to the food you eat and empowers you to grow your own delicious snacks, regardless of your living situation. Once you’ve mastered this technique, you’ll be amazed at how easy it is to enjoy fresh, homegrown peanuts year after year.
And most importantly, we want to hear about your experience! Share your tips, tricks, and variations in the comments below. Let us know what worked for you, what challenges you encountered, and what delicious creations you came up with using your homegrown peanuts. Your feedback will help other readers learn and improve their own peanut curing techniques. Let’s build a community of peanut enthusiasts, sharing our knowledge and celebrating the joy of homegrown goodness! So go ahead, harvest those peanuts and get curing! You won’t regret it. This DIY peanut curing method is a game changer.
Frequently Asked Questions (FAQ)
What are the signs that my peanuts are properly cured?
Properly cured peanuts will have a brittle shell and the kernels inside will be loose and easily rattle when shaken. The skin of the peanut should be papery and easily slip off. The most reliable test is to crack open a few peanuts and taste them. They should have a nutty flavor and not be soft or mushy. If they are still soft, they need more drying time. Avoid peanuts that taste moldy or musty, as this indicates spoilage.
How long does it typically take to cure peanuts using this no-garden method?
The curing time can vary depending on the humidity, temperature, and airflow in your environment. Generally, it takes between 2 to 4 weeks for peanuts to fully cure using this method. Check them regularly, especially during the first week, and adjust the drying conditions as needed. Remember, patience is key!
Can I use a dehydrator to speed up the curing process?
Yes, you can use a dehydrator to speed up the curing process, but you need to be careful not to overheat the peanuts. Set the dehydrator to a low temperature (around 95-105°F or 35-40°C) and monitor the peanuts closely. Dehydrating can significantly reduce the curing time, potentially down to a few days. However, it’s crucial to ensure even drying and prevent the peanuts from becoming too brittle.
What if I don’t have good airflow in my curing area?
Good airflow is essential for preventing mold growth during the curing process. If you don’t have natural airflow, consider using a small fan to circulate the air around the peanuts. Position the fan so that it gently blows air across the peanuts without directly blasting them. You can also try elevating the peanuts on a wire rack to improve airflow from below.
How should I store my cured peanuts?
Once your peanuts are fully cured, store them in an airtight container in a cool, dry, and dark place. A pantry or cupboard is ideal. Properly stored cured peanuts can last for several months. You can also freeze cured peanuts for longer storage. Freezing will not affect the flavor or texture of the peanuts.
What if I see mold growing on my peanuts during the curing process?
If you see mold growing on your peanuts, immediately remove the affected peanuts to prevent the mold from spreading. Increase the airflow around the remaining peanuts and ensure they are not overcrowded. If the mold is widespread, it’s best to discard the entire batch to avoid consuming contaminated peanuts. Prevention is key, so ensure good airflow and proper drying conditions from the start.
Can I cure peanuts in the shell or do I need to remove them first?
This method is designed for curing peanuts in the shell. Curing peanuts in the shell helps to protect the kernels from drying out too quickly and prevents them from becoming brittle. It also allows the peanuts to retain their natural flavor and moisture.
What are some creative ways to use my homegrown peanuts?
The possibilities are endless! You can roast them for a classic snack, boil them for a Southern delicacy, or grind them into homemade peanut butter. You can also add them to salads, stir-fries, or desserts. Get creative and experiment with different recipes to discover your favorite ways to enjoy your homegrown peanuts. Consider making peanut brittle, peanut cookies, or even peanut sauce for noodles.
Is it safe to eat peanuts that I’ve grown myself?
Yes, it is generally safe to eat peanuts that you’ve grown yourself, as long as you follow proper harvesting and curing techniques. However, it’s important to be aware of the risk of aflatoxin contamination, which is a type of mold that can grow on peanuts. Proper curing and storage are essential for minimizing this risk. If you have any concerns, consult with a food safety expert.
What if my peanuts are taking longer than expected to cure?
If your peanuts are taking longer than expected to cure, it could be due to several factors, such as high humidity, low temperature, or poor airflow. Try increasing the airflow around the peanuts, moving them to a warmer location, or using a dehumidifier to reduce the humidity in the curing area. Be patient and continue to monitor the peanuts regularly until they are fully cured.
Leave a Comment