
Potato Growing Hack: Unlock the Secrets to Bountiful Harvests Right in Your Backyard!
Have you ever dreamed of harvesting a mountain of potatoes from your own garden, enough to feed your family and impress your neighbors? I know I have! For centuries, potatoes have been a staple food, deeply woven into the culinary traditions of cultures around the globe. From the Andes Mountains, where they were first cultivated, to the Irish countryside, where they became a cornerstone of the diet, potatoes have nourished generations. But what if I told you that you don’t need acres of land or years of experience to grow your own impressive potato crop?
That’s where this potato growing hack comes in! We’re diving into a simple, yet incredibly effective DIY method that will revolutionize the way you think about growing potatoes. In today’s fast-paced world, many of us are looking for ways to connect with nature, eat healthier, and save money. Growing your own potatoes ticks all those boxes! This DIY trick is perfect for beginners and seasoned gardeners alike, offering a fun and rewarding way to enjoy fresh, homegrown potatoes. So, grab your gardening gloves, and let’s get started on this exciting journey to potato-growing success!
Kartoffeln anbauen leicht gemacht: Mein DIY-Turm für eine reiche Ernte
Hallo liebe Gartenfreunde! Ich freue mich riesig, euch heute meinen absoluten Lieblings-DIY-Hack für den Kartoffelanbau vorzustellen: den Kartoffelturm! Wenn ihr, wie ich, wenig Platz im Garten habt oder einfach nur eine coole und effiziente Methode sucht, um Kartoffeln anzubauen, dann seid ihr hier genau richtig. Mit diesem Turm könnt ihr auf kleinstem Raum eine riesige Ernte erzielen. Und das Beste daran? Es ist super einfach und macht richtig Spaß!
Was ist ein Kartoffelturm und warum solltest du einen bauen?
Ein Kartoffelturm ist im Grunde ein vertikaler Pflanzbehälter, der es ermöglicht, Kartoffeln in Schichten anzubauen. Anstatt die Kartoffeln einfach in Reihen im Boden zu pflanzen, werden sie in einem Turm aus Erde und organischem Material geschichtet. Wenn die Kartoffelpflanzen wachsen, werden weitere Schichten hinzugefügt, wodurch die Pflanzen immer wieder neue Wurzeln bilden und mehr Knollen produzieren können.
Die Vorteile eines Kartoffelturms sind enorm:
* Platzsparend: Ideal für kleine Gärten, Balkone oder Terrassen.
* Hohe Erträge: Durch die Schichtung können mehr Kartoffeln auf kleiner Fläche angebaut werden.
* Einfache Ernte: Kein mühsames Ausgraben der Kartoffeln mehr! Der Turm kann einfach abgebaut werden, um die reifen Knollen zu ernten.
* Weniger Unkraut: Der Turm minimiert das Unkrautwachstum.
* Gute Drainage: Der Turm sorgt für eine gute Drainage, was für gesunde Kartoffeln wichtig ist.
* Ein echter Hingucker: Ein Kartoffelturm ist nicht nur nützlich, sondern auch ein dekoratives Element im Garten.
Materialien und Werkzeuge, die du brauchst
Bevor wir loslegen, hier eine Liste der Materialien und Werkzeuge, die du für deinen Kartoffelturm benötigst:
* Drahtgitter oder Maschendraht: Ich empfehle ein Drahtgitter mit einer Maschenweite von ca. 5-10 cm. Die Höhe sollte mindestens 1 Meter betragen, je nachdem, wie hoch du deinen Turm bauen möchtest.
* Pflanzfolie oder Jute: Zum Auskleiden des Drahtgitters, um die Erde im Turm zu halten.
* Pflanzkartoffeln: Am besten zertifizierte Pflanzkartoffeln, um sicherzustellen, dass sie gesund und krankheitsfrei sind. Wähle eine Sorte, die dir schmeckt und für den Anbau im Topf geeignet ist.
* Erde: Eine Mischung aus Gartenerde, Kompost und etwas Sand ist ideal.
* Stroh oder Heu: Zum Abdecken der Kartoffeln und zur Feuchtigkeitsspeicherung.
* Kompost oder organischer Dünger: Für eine gute Nährstoffversorgung der Kartoffeln.
* Gießkanne oder Schlauch: Zum Bewässern des Turms.
* Drahtschneider oder Zange: Zum Zuschneiden des Drahtgitters.
* Handschuhe: Zum Schutz deiner Hände.
* Maßband: Zum Abmessen des Drahtgitters.
* Kabelbinder oder Draht: Zum Verbinden der Enden des Drahtgitters.
Schritt-für-Schritt-Anleitung: So baust du deinen eigenen Kartoffelturm
Jetzt geht’s ans Eingemachte! Hier ist eine detaillierte Anleitung, wie du deinen eigenen Kartoffelturm baust:
1. Das Drahtgitter vorbereiten
1. Abmessen und Zuschneiden: Miss das Drahtgitter ab, um die gewünschte Höhe und den Durchmesser deines Turms zu bestimmen. Ich empfehle einen Durchmesser von ca. 60-80 cm. Schneide das Drahtgitter mit dem Drahtschneider oder der Zange zu.
2. Formen des Zylinders: Biege das Drahtgitter zu einem Zylinder. Achte darauf, dass die Enden gut übereinander liegen.
3. Verbinden der Enden: Verbinde die Enden des Drahtgitters mit Kabelbindern oder Draht, um den Zylinder zu fixieren. Stelle sicher, dass die Verbindung stabil ist.
2. Den Turm auskleiden
1. Zuschneiden der Pflanzfolie oder Jute: Schneide die Pflanzfolie oder Jute so zu, dass sie die Innenseite des Drahtgitterzylinders vollständig auskleidet. Lasse oben und unten etwas Überstand.
2. Befestigen der Auskleidung: Befestige die Pflanzfolie oder Jute an der Innenseite des Drahtgitters. Du kannst dafür Kabelbinder, Draht oder auch eine Heißklebepistole verwenden. Achte darauf, dass die Auskleidung gut sitzt und keine Löcher hat.
3. Den Turm befüllen und bepflanzen
1. Erste Schicht Erde: Fülle den Boden des Turms mit einer ca. 20 cm hohen Schicht Erde. Die Erde sollte locker und gut durchlässig sein.
2. Kartoffeln legen: Lege die Pflanzkartoffeln auf die Erdschicht. Achte darauf, dass die Kartoffeln ausreichend Platz haben (ca. 20-30 cm Abstand). Die Triebe sollten nach oben zeigen.
3. Mit Erde bedecken: Bedecke die Kartoffeln mit einer weiteren Schicht Erde (ca. 10 cm).
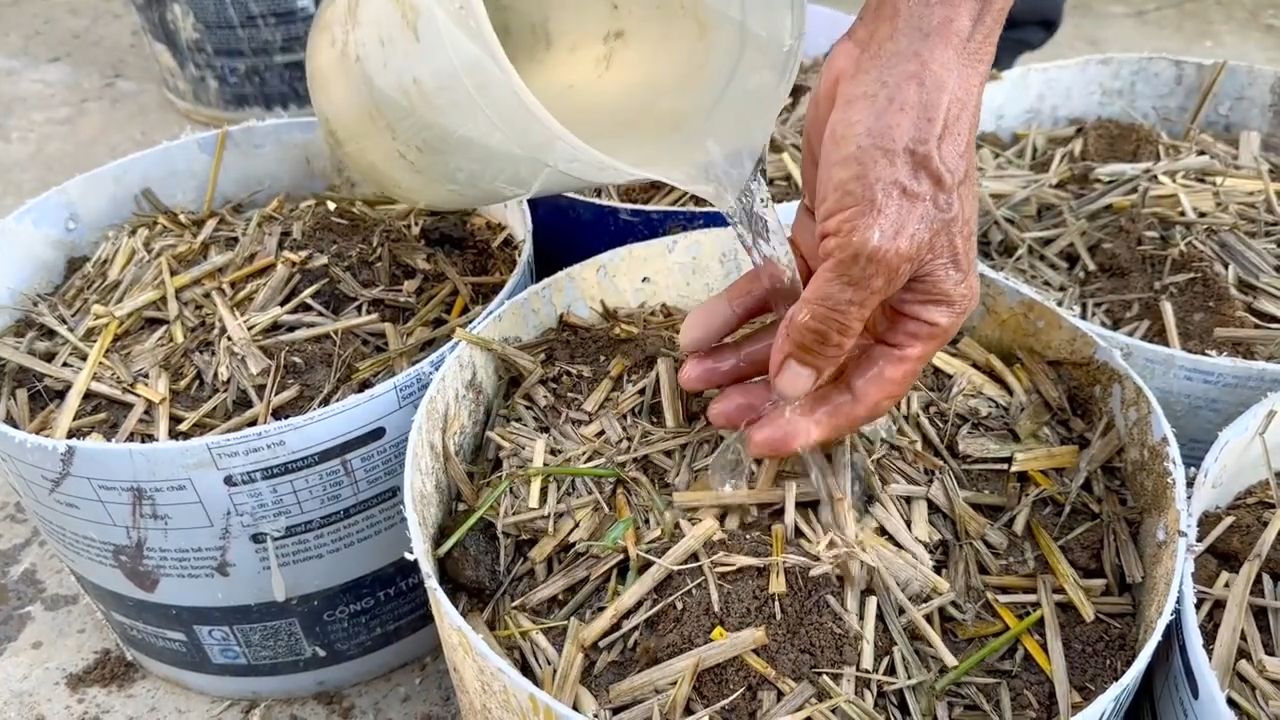
4. Gießen: Gieße die Erde vorsichtig an, damit sie sich setzt.
5. Weitere Schichten: Wenn die Kartoffelpflanzen ca. 20 cm hoch gewachsen sind, fülle eine weitere Schicht Erde in den Turm, so dass nur noch die obersten Blätter herausschauen. Wiederhole diesen Vorgang, bis der Turm fast voll ist.
4. Pflege des Kartoffelturms
1. Bewässerung: Achte darauf, dass die Erde im Turm immer feucht ist, aber nicht zu nass. Gieße regelmäßig, besonders an heißen Tagen.
2. Düngung: Dünge die Kartoffeln regelmäßig mit Kompost oder organischem Dünger, um eine gute Nährstoffversorgung zu gewährleisten.
3. Unkraut entfernen: Entferne regelmäßig Unkraut, das im Turm wächst.
4. Schutz vor Schädlingen: Kontrolliere die Kartoffelpflanzen regelmäßig auf Schädlinge und Krankheiten. Bei Bedarf kannst du biologische Schädlingsbekämpfungsmittel einsetzen.
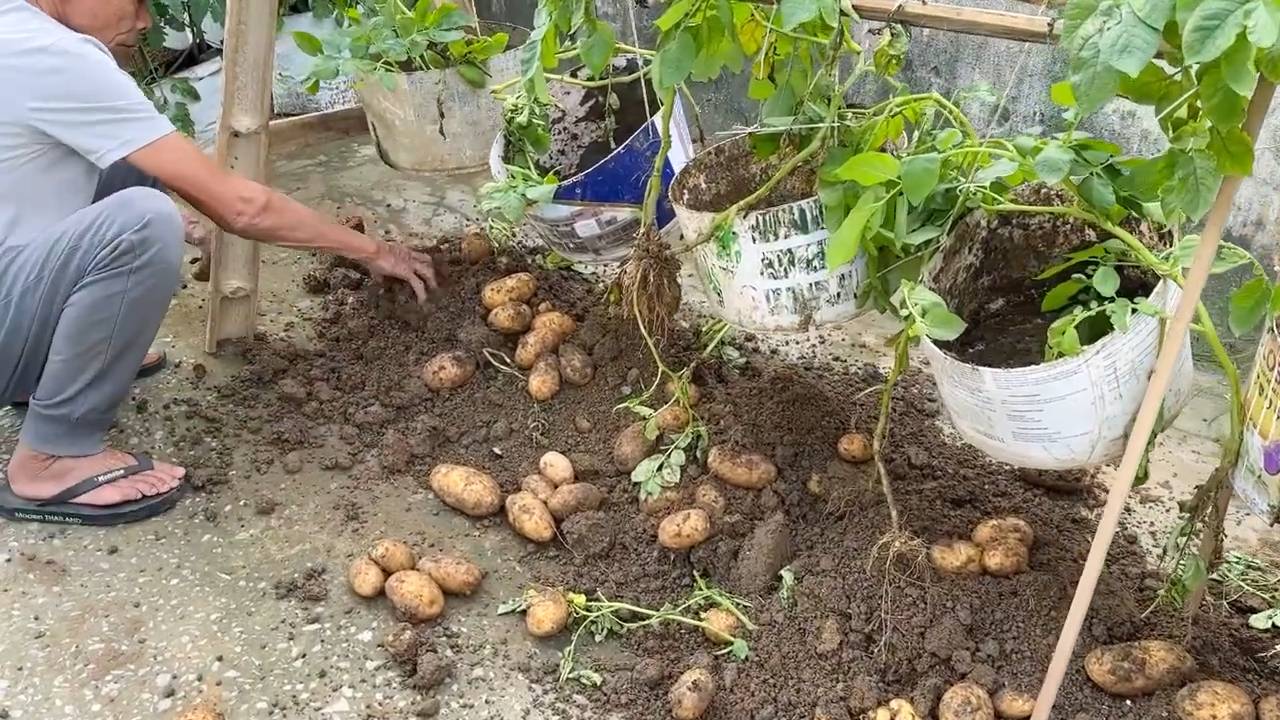
5. Die Ernte
1. Erntezeitpunkt: Die Kartoffeln sind erntereif, wenn die Blätter der Pflanzen gelb werden und absterben.
2. Ernten: Um die Kartoffeln zu ernten, kannst du den Turm einfach abbauen. Entferne die Kabelbinder oder den Draht, der das Drahtgitter zusammenhält, und nimm die Pflanzfolie oder Jute ab. Die Kartoffeln liegen dann frei und können einfach aufgesammelt werden.
Tipps und Tricks für eine erfolgreiche Kartoffelernte im Turm
* Die richtige Kartoffelsorte: Wähle eine Kartoffelsorte, die für den Anbau im Topf geeignet ist. Frühkartoffeln sind oft eine gute Wahl.
* Vorkeimen der Kartoffeln: Lege die Pflanzkartoffeln einige Wochen vor dem Pflanzen an einen hellen und kühlen Ort, damit sie vorkeimen. Das beschleunigt das Wachstum.
* Gute Drainage: Achte darauf, dass der Turm eine gute Drainage hat, um Staunässe zu vermeiden. Du kannst am Boden des Turms eine Schicht Kies oder Blähton einfüllen.
* Sonniger Standort: Kartoffeln brauchen viel Sonne, um gut zu wachsen. Stelle den Turm an einen sonnigen Standort.
* Mulchen: Bedecke die Erde im Turm mit Stroh oder Heu, um die Feuchtigkeit zu speichern und das Unkrautwachstum zu reduzieren.
* Regelmäßige Kontrolle: Kontrolliere die Kartoffelpflanzen regelmäßig auf Schädlinge und Krankheiten.
Häufige Fehler vermeiden
* Zu wenig Sonne: Kartoffeln brauchen mindestens 6 Stunden Sonne pro Tag.
* Staunässe: Vermeide Staunässe, da
Conclusion
So, there you have it! This simple yet ingenious potato growing hack is more than just a gardening trend; it’s a game-changer for anyone looking to maximize their yield, minimize space, and enjoy the unparalleled satisfaction of harvesting their own homegrown potatoes. Forget sprawling gardens and back-breaking digging. This method offers a streamlined, efficient, and frankly, fun way to cultivate these versatile tubers, even if you only have a balcony or a small patio.
Why is this a must-try? Because it democratizes potato growing. It removes the barriers of entry for urban dwellers, apartment residents, and anyone intimidated by traditional gardening. It’s also incredibly resource-efficient. You’re using vertical space, reducing the need for extensive tilling, and minimizing the risk of soilborne pests and diseases. Plus, the visual appeal of a tower of potato plants is undeniable – a conversation starter and a testament to your green thumb (or soon-to-be green thumb!).
But don’t just take our word for it. The beauty of this potato growing hack lies in its adaptability. Feel free to experiment with different container sizes, potato varieties, and even soil amendments. Want to add a layer of compost tea every few weeks for an extra nutrient boost? Go for it! Curious about using straw instead of soil for the layering process? Give it a try! The possibilities are endless, and the learning process is part of the fun.
Consider these variations to tailor the method to your specific needs and preferences:
* Container Choice: While a large trash can or grow bag works well, you can also use stacked tires, wooden pallets, or even repurposed laundry baskets lined with burlap. Just ensure adequate drainage.
* Potato Variety: Experiment with different potato varieties to discover your favorites. Early-season varieties like Yukon Gold or Red Norland are excellent choices for quicker harvests. Fingerling potatoes also thrive in this method.
* Soil Amendments: Enhance your soil mix with compost, worm castings, or bone meal to provide essential nutrients for healthy potato growth.
* Pest Control: Regularly inspect your plants for pests like aphids or potato beetles. Use organic pest control methods like neem oil or insecticidal soap to keep them at bay.
* Watering: Monitor the moisture level of the soil and water thoroughly when the top inch feels dry. Avoid overwatering, which can lead to rot.
We are confident that once you experience the joy of harvesting your own bountiful crop of potatoes using this method, you’ll be hooked. It’s a rewarding and sustainable way to connect with nature and enjoy the fruits (or rather, tubers) of your labor.
So, what are you waiting for? Gather your supplies, choose your favorite potato variety, and embark on this exciting gardening adventure. We encourage you to document your progress, share your successes (and even your challenges!), and inspire others to embrace this innovative approach to potato growing. Share your photos and stories on social media using relevant hashtags like #PotatoTower, #DIYGardening, #HomegrownPotatoes, and #PotatoGrowingHack. Let’s build a community of potato enthusiasts and learn from each other’s experiences. Happy growing!
Frequently Asked Questions (FAQ)
Q: What kind of potatoes should I use for this growing method?
A: You can use almost any variety of potato for this method, but some tend to perform better than others. Early-season varieties like Yukon Gold, Red Norland, and fingerling potatoes are popular choices because they mature relatively quickly. Avoid using potatoes from the grocery store that may have been treated to prevent sprouting. Instead, opt for certified seed potatoes from a reputable garden center or online supplier. These are specifically grown for planting and are free from diseases. If you only have access to grocery store potatoes, look for organic ones that are starting to sprout “eyes.” You can cut these potatoes into pieces, ensuring each piece has at least one or two eyes, and let them cure (dry out) for a few days before planting.
Q: How much sunlight do the potato plants need?
A: Potatoes need at least six to eight hours of direct sunlight per day to thrive. Choose a location for your potato tower that receives ample sunlight throughout the day. If you live in a particularly hot climate, some afternoon shade may be beneficial to prevent the plants from overheating. If you don’t have a sunny spot outdoors, you can try growing potatoes indoors under grow lights, but you’ll need to ensure the lights are powerful enough and provide the correct spectrum of light for optimal growth.
Q: What kind of soil should I use?
A: Potatoes prefer well-draining, slightly acidic soil. A good mix consists of equal parts garden soil, compost, and peat moss or coco coir. The compost provides essential nutrients, while the peat moss or coco coir helps retain moisture and improve drainage. Avoid using heavy clay soil, as it can become waterlogged and lead to rot. You can also add perlite or vermiculite to the soil mix to further improve drainage. Consider testing your soil’s pH level and amending it with sulfur if it’s too alkaline.
Q: How often should I water the potato plants?
A: Water your potato plants regularly, especially during hot and dry weather. The soil should be consistently moist but not waterlogged. Check the moisture level of the soil by sticking your finger about an inch deep. If the soil feels dry, it’s time to water. Avoid watering the foliage directly, as this can increase the risk of fungal diseases. Instead, water at the base of the plants. During periods of heavy rain, you may need to reduce watering frequency.
Q: How do I know when the potatoes are ready to harvest?
A: The timing of the harvest depends on the potato variety and the growing conditions. Generally, early-season varieties are ready to harvest in about 70-80 days, while late-season varieties may take 100 days or more. A good indicator that the potatoes are ready is when the foliage starts to turn yellow and die back. You can also gently dig around the base of the plant to check the size of the potatoes. If they are the size you desire, you can harvest them. To harvest, carefully tip over the container or cut open the grow bag and gently remove the potatoes from the soil.
Q: Can I reuse the soil from my potato tower?
A: While you can technically reuse the soil, it’s generally recommended to amend it with fresh compost and other nutrients before planting again. Potatoes are heavy feeders and deplete the soil of nutrients. Amending the soil will help ensure that your next crop has the nutrients it needs to thrive. You should also avoid planting potatoes in the same location year after year, as this can increase the risk of soilborne diseases. Crop rotation is a good practice to maintain soil health.
Q: What are some common problems I might encounter, and how can I fix them?
A: Some common problems include:
* Aphids: These small insects can suck the sap from the plants, causing them to weaken. Control aphids with insecticidal soap or neem oil.
* Potato Beetles: These beetles can defoliate the plants. Handpick them off the plants or use an organic insecticide like spinosad.
* Early Blight: This fungal disease causes dark spots on the leaves. Prevent early blight by ensuring good air circulation and avoiding overhead watering. Treat with a fungicide if necessary.
* Potato Scab: This disease causes rough, scabby patches on the potatoes. Prevent potato scab by maintaining a slightly acidic soil pH and avoiding overwatering.
Q: Can I grow potatoes in containers indoors?
A: Yes, you can grow potatoes in containers indoors, but it requires careful attention to lighting and temperature. You’ll need to provide at least 12-14 hours of artificial light per day using grow lights. The temperature should be between 60-70°F (15-21°C). Ensure the container has adequate drainage and use a well-draining potting mix. Indoor potato plants may not produce as many potatoes as outdoor plants, but it’s still a fun and rewarding experience.
Q: Is this potato growing hack suitable for all climates?
A: This method is generally suitable for most climates, but you may need to make some adjustments depending on your specific growing conditions. In hot climates, provide some afternoon shade to prevent the plants from overheating. In cooler climates, you may need to start the potatoes indoors or use a cold frame to protect them from frost. The key is to monitor the plants closely and adjust your care accordingly.
Leave a Comment