
Potato harvesting without a garden might sound like an impossible dream, but trust me, it’s absolutely achievable! Imagine enjoying the taste of freshly dug, homegrown potatoes without ever having to till a single row in a traditional garden. Sounds good, right?
For centuries, potatoes have been a staple food source, playing a vital role in cultures worldwide. From the Andean highlands where they originated to the humble family dinner table, potatoes have nourished generations. But what if you live in an apartment, have limited space, or simply don’t have the time for extensive gardening? Does that mean you have to miss out on the joy of growing your own food?
Absolutely not! That’s where this DIY guide comes in. We’re going to explore innovative and space-saving techniques that allow you to experience the satisfaction of potato harvesting without a garden. Think container gardening, vertical growing, and even using grow bags – all designed to bring the farm-to-table experience right to your doorstep.
Why do you need this? Because everyone deserves access to fresh, healthy food, regardless of their living situation. Plus, there’s something incredibly rewarding about nurturing a plant from seed (or in this case, a seed potato!) to harvest. So, let’s ditch the limitations and dive into the exciting world of growing potatoes, no garden required!
Growing Potatoes in a Bag: A Gardener’s Guide for Small Spaces
Hey there, fellow gardening enthusiasts! Ever dreamt of harvesting a mountain of potatoes but lack the sprawling garden to do it? Well, I’m here to tell you that you absolutely can grow potatoes, even without a traditional garden plot! The secret? Growing them in bags! It’s a fantastic method for small spaces, balconies, patios, or even just to get a head start on the season. Plus, the harvest is incredibly satisfying. Let’s dive into how you can create your own potato paradise in a bag.
What You’ll Need
Before we get our hands dirty, let’s gather our supplies. This is a relatively inexpensive project, and you might already have some of these items lying around.
* Seed Potatoes: These are potatoes specifically grown for planting. You can find them at your local garden center or online. Choose a variety that suits your taste and climate. I personally love Yukon Gold for their creamy texture and all-purpose use.
* Large Grow Bag or Container: Aim for a bag that’s at least 24 inches in diameter and 24 inches deep. Fabric grow bags are ideal because they allow for good drainage and aeration. You can also use a large plastic container, but make sure it has drainage holes.
* Potting Mix: A well-draining potting mix is crucial. Avoid using garden soil, as it can become compacted in a container. I like to use a mix of compost, peat moss (or coco coir), and perlite.
* Fertilizer: A balanced, slow-release fertilizer will provide your potatoes with the nutrients they need to thrive. Look for a fertilizer with an NPK ratio (nitrogen, phosphorus, potassium) of around 10-10-10.
* Watering Can or Hose: Essential for keeping your potato plants hydrated.
* Optional: Straw or Mulch: This helps retain moisture and suppress weeds.
Preparing Your Seed Potatoes
This step is important for maximizing your potato yield. Chitting, or sprouting, your seed potatoes before planting gives them a head start.
* What is Chitting?: Chitting is the process of encouraging your seed potatoes to sprout before planting. This gives them a head start and can result in an earlier and larger harvest.
* How to Chit: A few weeks before planting, place your seed potatoes in a cool, bright location (but not in direct sunlight). Egg cartons or trays work well for this. You’ll notice small “eyes” or sprouts starting to form.
* Cutting (Optional): If your seed potatoes are large (bigger than an egg), you can cut them into pieces, ensuring that each piece has at least one or two eyes. Let the cut pieces dry for a day or two before planting to prevent rot. I usually don’t cut mine unless they are exceptionally large.
Planting Your Potatoes
Now for the fun part! Let’s get those potatoes in the ground (or, in this case, the bag!).
1. Fill the Bag: Start by filling your grow bag or container with about 4-6 inches of potting mix. Mix in a handful of slow-release fertilizer.
2. Plant the Seed Potatoes: Place your chitted seed potatoes on top of the soil, with the sprouts facing upwards. Space them about 8-12 inches apart if you’re planting multiple potatoes in the same bag.
3. Cover with Soil: Cover the seed potatoes with another 4-6 inches of potting mix.
4. Water Thoroughly: Water the soil well until it’s evenly moist.
5. Location, Location, Location: Place your bag in a sunny location. Potatoes need at least 6-8 hours of sunlight per day.
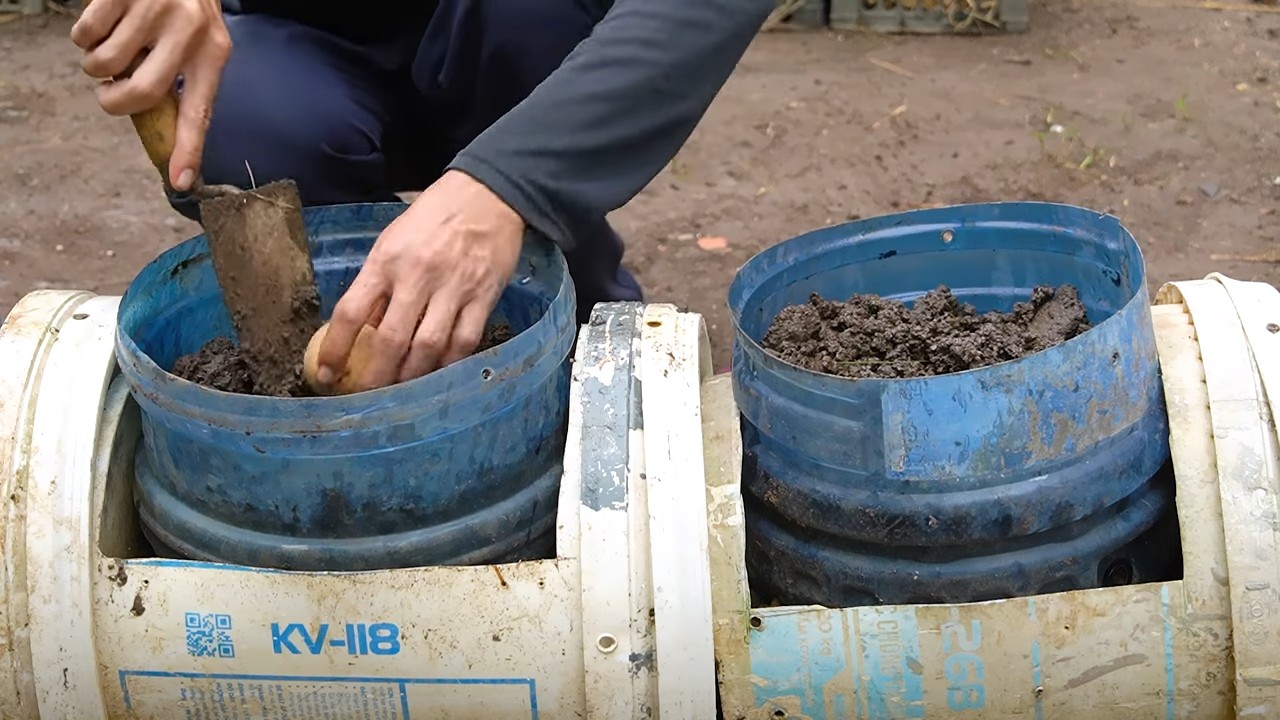
The “Hilling” Process: Encouraging More Potatoes
This is where the magic happens! Hilling is the key to maximizing your potato harvest in a bag. Potatoes grow along the buried stem, so by adding more soil as the plant grows, you encourage the formation of more potatoes.
1. Wait for Growth: As your potato plants grow, you’ll notice the stems emerging from the soil.
2. Add More Soil: When the stems reach about 6-8 inches tall, add more potting mix to the bag, covering the stems up to about halfway. Leave the top leaves exposed.
3. Repeat: Continue this process every few weeks as the plants grow, until you’ve filled the bag almost to the top. This is called “hilling.”
4. Water Regularly: Keep the soil consistently moist, but not waterlogged. Check the soil moisture by sticking your finger into the soil. If it feels dry an inch or two down, it’s time to water.
Caring for Your Potato Plants
Consistent care is essential for a bountiful harvest.
* Watering: Potatoes need consistent moisture, especially during tuber formation. Water deeply whenever the top inch of soil feels dry. Avoid overwatering, as this can lead to rot.
* Fertilizing: Continue to fertilize your potato plants every few weeks with a balanced fertilizer. You can also use a liquid fertilizer diluted according to the package instructions.
* Pest Control: Keep an eye out for common potato pests like aphids, potato beetles, and flea beetles. Handpick them off the plants or use an organic insecticide if necessary. I’ve found that a strong blast of water from the hose can often dislodge aphids.
* Sunlight: Ensure your potato plants are getting at least 6-8 hours of sunlight per day. If they’re not getting enough sun, the stems may become leggy and the yield may be reduced.
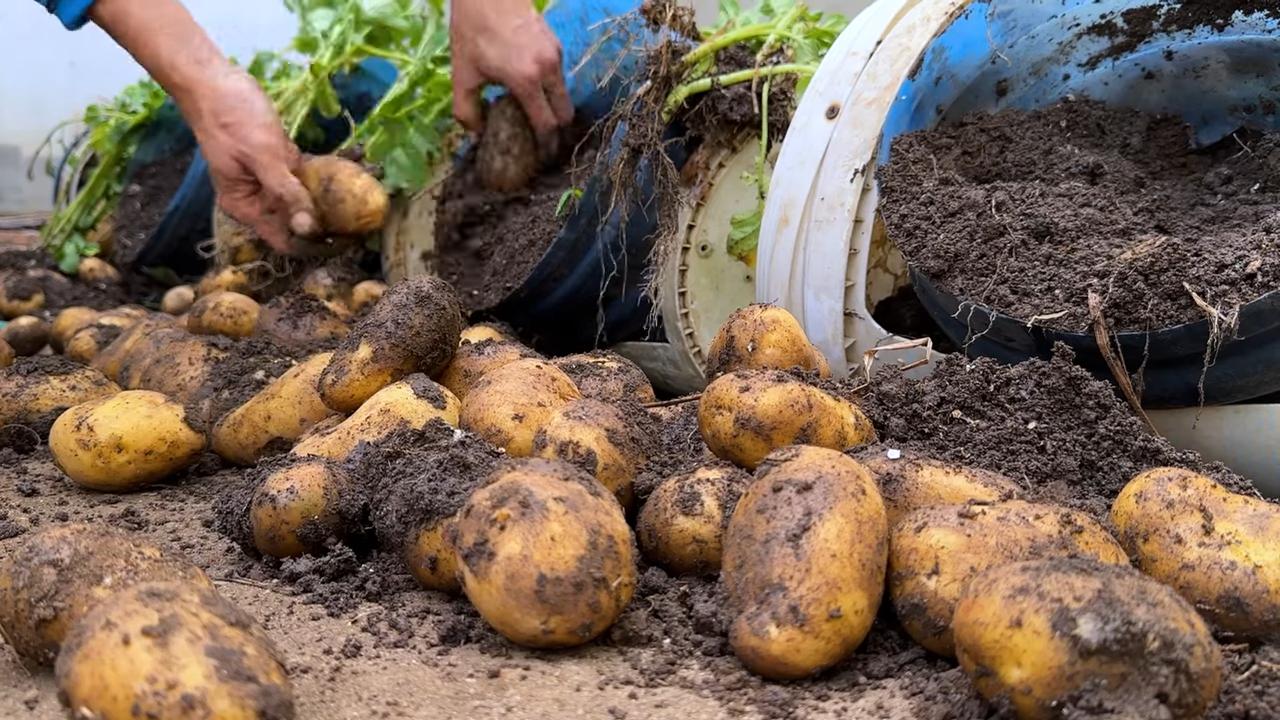
Harvesting Your Potatoes
The moment we’ve all been waiting for! Harvesting your potatoes is a rewarding experience.
1. When to Harvest: You can start harvesting “new potatoes” (small, tender potatoes) about 2-3 weeks after the plants flower. For larger, mature potatoes, wait until the foliage starts to die back and turn yellow or brown. This usually takes about 80-100 days from planting.
2. The Easy Harvest: This is the best part about growing potatoes in a bag! Simply tip the bag over and sift through the soil to collect your potatoes. It’s like a treasure hunt!
3. Gently Dig: If you prefer, you can also carefully dig around the base of the plants to harvest the potatoes. Be careful not to damage the tubers.
4. Curing (Optional): If you plan to store your potatoes for a longer period, you can cure them by spreading them out in a cool, dark, and well-ventilated place for about a week. This helps to toughen the skin and prevent rot.
Troubleshooting
Even with the best planning, things can sometimes go awry. Here are a few common problems and how to address them.
* Potato Blight: This fungal disease can cause brown spots on the leaves and stems. To prevent blight, ensure good air circulation around your plants and avoid overhead watering. If blight does occur, remove affected foliage immediately and treat with a fungicide.
* Scab: This disease causes rough, scabby patches on the potato skin. It’s more common in alkaline soils. To prevent scab, maintain a slightly acidic soil pH (around 6.0).
* Pests: As mentioned earlier, keep an eye out for common potato pests. Early detection and treatment are key to preventing serious damage.
Choosing the Right Potato Variety
The type of potato you choose to grow will depend on your personal preferences and climate. Here are a few popular varieties:
* Yukon Gold: A versatile, all-purpose potato with a creamy texture and buttery flavor.
* Red Pontiac: A red-skinned potato with a waxy texture, ideal for boiling and salads.
* Russet Burbank: A classic baking potato with a fluffy texture.
* Fingerling Potatoes: These small, elongated potatoes have a unique flavor and texture.
Tips for Success
Here are a few extra tips to help you achieve a bumper potato harvest:
* Use Quality Seed Potatoes: Start with healthy, disease-free seed potatoes from a reputable source.
* Don’t Overwater: Overwatering can lead to rot and other problems.
* Provide Adequate Sunlight: Potatoes need at least 6-8 hours of sunlight per day.
* Fertilize Regularly: Potatoes are heavy feeders and need consistent fertilization.
* Rotate Your Crops: Avoid planting potatoes in the same location year after year to prevent soilborne diseases.
* Enjoy the Process!: Gardening should be fun! Don’t be afraid to experiment and learn from your mistakes.
Growing potatoes in a bag is a rewarding and accessible way to enjoy fresh, homegrown potatoes, even if you don’t have a traditional garden. With a little bit of care and attention, you can harvest a bountiful crop of delicious potatoes right from your patio or balcony. Happy gardening!
Conclusion
So, there you have it! Harvesting potatoes without a garden might seem like a daunting task, but with this simple DIY trick, you can enjoy freshly dug potatoes even if you’re short on space or don’t have a traditional garden plot. This method is not only incredibly efficient but also surprisingly rewarding. Imagine the satisfaction of pulling up those earthy treasures, knowing you cultivated them yourself, regardless of your limited space.
This DIY potato harvesting trick is a must-try because it democratizes potato growing. It removes the barrier of needing a large garden, making it accessible to apartment dwellers, balcony gardeners, and anyone with a sunny patio. It’s also a fantastic way to introduce children to the wonders of gardening and where their food comes from. Plus, the potatoes you harvest yourself will undoubtedly taste better than anything you can buy in the store – fresher, earthier, and imbued with the pride of your own efforts.
But the beauty of this method lies in its adaptability. Feel free to experiment with different container sizes. Larger containers will generally yield more potatoes, but smaller containers are easier to move around. You can also try different potato varieties. Some varieties, like fingerling potatoes or new potatoes, are particularly well-suited for container growing. Consider adding companion plants to your container, such as marigolds to deter pests or basil to improve the flavor of your potatoes.
Another variation to consider is the type of growing medium you use. While a standard potting mix works well, you can also experiment with adding compost, peat moss, or even coconut coir to improve drainage and nutrient retention. Just be sure to choose a mix that is well-draining to prevent your potatoes from rotting.
Don’t be afraid to get creative with your containers! While plastic containers are a popular choice, you can also use burlap sacks, old tires (though be mindful of potential leaching), or even repurposed laundry baskets. The key is to ensure that the container has adequate drainage and is large enough to accommodate the growing potato plants.
We wholeheartedly encourage you to give this DIY potato harvesting trick a try. It’s a fun, easy, and rewarding way to grow your own food, even without a traditional garden. And once you’ve harvested your first batch of homegrown potatoes, we’d love to hear about your experience! Share your photos, tips, and tricks in the comments below. Let’s build a community of urban potato growers and inspire others to embrace the joy of homegrown food, no matter their living situation. Remember, even without a garden, you can still enjoy the delicious taste of freshly harvested potatoes. So, grab a container, some seed potatoes, and get growing! You’ll be amazed at what you can achieve.
Frequently Asked Questions (FAQ)
What kind of potatoes are best for growing in containers?
While you can grow almost any type of potato in a container, some varieties are better suited than others. Smaller, earlier-maturing varieties like fingerling potatoes, new potatoes (such as Yukon Gold or Red Pontiac), and other “baby” potato types tend to thrive in containers. These varieties don’t require as much space or time to mature, making them ideal for container gardening. However, don’t let that limit you! If you have a favorite potato variety, feel free to give it a try. Just be sure to choose a container that is large enough to accommodate the plant’s growth.
How much sunlight do potato plants need?
Potato plants need at least six to eight hours of direct sunlight per day to thrive. Choose a location for your container that receives plenty of sunlight throughout the day. If you live in a particularly hot climate, you may need to provide some afternoon shade to prevent the plants from overheating. If you don’t have a sunny spot, you can supplement with grow lights.
How often should I water my potato plants in containers?
Potato plants in containers need consistent moisture, but they don’t like to be waterlogged. Water your plants deeply whenever the top inch of soil feels dry to the touch. Avoid overwatering, as this can lead to root rot. During hot, dry weather, you may need to water your plants more frequently. Ensure your container has good drainage to prevent water from pooling at the bottom.
How do I “hill” my potato plants in a container?
“Hilling” is the process of adding more soil around the stems of the potato plants as they grow. This encourages the plants to produce more potatoes along the buried stems. To hill your potato plants in a container, simply add a few inches of soil around the stems every few weeks as the plants grow taller. Leave the top few sets of leaves exposed. Continue hilling until the container is almost full.
When do I harvest my potatoes?
The timing of your potato harvest will depend on the variety of potatoes you are growing. Generally, you can start harvesting new potatoes about 70-80 days after planting. These potatoes will be smaller and have thinner skins. For mature potatoes, wait until the foliage starts to yellow and die back. This usually takes about 90-120 days. To harvest, simply tip the container over and gently remove the potatoes from the soil.
What if I don’t have seed potatoes? Can I use potatoes from the grocery store?
While you can technically try to grow potatoes from grocery store potatoes, it’s generally not recommended. Grocery store potatoes are often treated with chemicals to prevent them from sprouting, which can inhibit their growth. Additionally, they may carry diseases that can affect your potato crop. It’s best to use certified seed potatoes, which are specifically grown for planting and are guaranteed to be disease-free. You can purchase seed potatoes from garden centers or online retailers.
What kind of fertilizer should I use for my potato plants?
Potato plants benefit from regular fertilization. Use a balanced fertilizer with a ratio of 10-10-10 or 14-14-14. Apply the fertilizer according to the package directions. You can also supplement with organic fertilizers like compost tea or fish emulsion. Avoid over-fertilizing, as this can lead to excessive foliage growth at the expense of potato production.
How do I prevent pests and diseases from affecting my potato plants?
To prevent pests and diseases, start with healthy seed potatoes and use a well-draining potting mix. Monitor your plants regularly for signs of pests or diseases. Common potato pests include aphids, potato beetles, and flea beetles. You can control these pests with insecticidal soap or neem oil. Common potato diseases include early blight and late blight. To prevent these diseases, ensure good air circulation around your plants and avoid overhead watering. If you notice any signs of disease, remove the affected foliage immediately.
Can I reuse the soil from my potato container for other plants?
Yes, you can reuse the soil from your potato container for other plants, but it’s a good idea to amend it first. Potatoes are heavy feeders, so the soil may be depleted of nutrients. Add compost, aged manure, or other organic matter to replenish the nutrients. You should also check the soil for any signs of disease or pests before reusing it. If you suspect any problems, it’s best to discard the soil and start with fresh potting mix.
What do I do with the potato plants after harvesting?
After harvesting your potatoes, you can compost the potato plants. They are a great source of nitrogen for your compost pile. Alternatively, you can till them into your garden soil as a green manure. This will help to improve the soil structure and add nutrients back into the soil.

Leave a Comment