
Regrow Green Onions Kitchen Scraps: Ever feel a pang of guilt tossing those little green onion roots into the trash? I know I have! What if I told you that you could transform those kitchen scraps into a never-ending supply of fresh, flavorful green onions, right on your windowsill? It’s not magic, it’s simple science, and it’s a fantastic way to embrace sustainable living.
The practice of regrowing vegetables from scraps isn’t new. In fact, resourceful gardeners have been doing it for generations! Think back to victory gardens during wartime, where every scrap counted. Today, with a renewed focus on reducing waste and connecting with our food, this age-old technique is experiencing a major resurgence.
Why should you learn this easy DIY trick? Well, for starters, it saves you money! No more last-minute grocery store runs just for a few green onions. Plus, it’s incredibly satisfying to watch something grow from what would otherwise be discarded. But more importantly, learning to regrow green onions kitchen scraps is a gateway to a deeper understanding of the natural world and a more sustainable lifestyle. So, grab those green onion roots, and let’s get started on this fun and rewarding project!

Regrowing Green Onions From Kitchen Scraps: A Gardener’s Delight!
Hey there, fellow green thumb enthusiasts! Are you tired of constantly buying green onions at the grocery store, only to use a small portion and watch the rest wilt away in your fridge? Well, I’ve got a fantastic, super-easy DIY hack for you: regrowing green onions from the scraps you’d normally toss in the compost! It’s a fun, sustainable way to have fresh green onions on hand whenever you need them, and it’s incredibly rewarding to watch them sprout back to life. Let’s dive in!
What You’ll Need
Before we get started, let’s gather our supplies. The beauty of this project is that you probably already have most of these items lying around:
* Green Onion Scraps: This is the star of the show! You’ll need the white bulb ends of your green onions, with about an inch or two of the green stalks still attached.
* A Glass or Jar: Any small glass or jar will do. I like to use mason jars, but even an old yogurt container will work in a pinch.
* Water: Tap water is perfectly fine.
* A Sunny Spot: Green onions love sunlight, so find a bright windowsill or countertop.
* Optional: Potting Soil and a Small Pot: If you want to transition your green onions to soil for longer-term growth, you’ll need these.
* Optional: Liquid Fertilizer: A diluted liquid fertilizer can give your green onions a boost, but it’s not essential.
The Water Propagation Method: Step-by-Step
This is the simplest and quickest way to regrow your green onions. It’s perfect for beginners and yields surprisingly fast results.
1. Prepare Your Green Onion Scraps: After you’ve used the green parts of your green onions in your cooking, don’t throw away the white bulb ends! Trim the roots slightly if they are excessively long or mushy. You want to keep about 1-2 inches of the green stalk attached to the white bulb.
2. Place the Scraps in Water: Fill your glass or jar with enough water to cover the white bulb ends of the green onions, but try to keep the green stalks above the waterline. Too much water on the green parts can lead to rot.
3. Find a Sunny Spot: Place your jar of green onion scraps on a sunny windowsill or countertop. Green onions thrive in bright light, so the more sunlight they get, the faster they’ll grow.
4. Change the Water Regularly: This is crucial! Change the water every 1-2 days to prevent bacteria growth and keep the water fresh. This will also provide the green onions with a constant supply of nutrients. I usually do this every morning while I’m making my coffee.
5. Watch Them Grow! Within a few days, you should start to see new green shoots emerging from the tops of the stalks. It’s amazing how quickly they grow! You can harvest the new green shoots as needed for your cooking. Just snip them off with scissors, leaving about an inch of the green stalk intact so they can continue to grow.
6. Continue the Cycle: As long as you keep changing the water and providing sunlight, your green onions will continue to regrow. You can keep them in water indefinitely, harvesting the green shoots as needed.
Transitioning to Soil: For Long-Term Growth
While the water propagation method is great for quick regrowth, transitioning your green onions to soil will allow them to grow larger and stronger, and potentially even produce flowers and seeds.
When to Transition
I usually transition my green onions to soil when they have grown several inches of new green shoots and have developed a good root system in the water. This usually takes about 1-2 weeks.
How to Plant
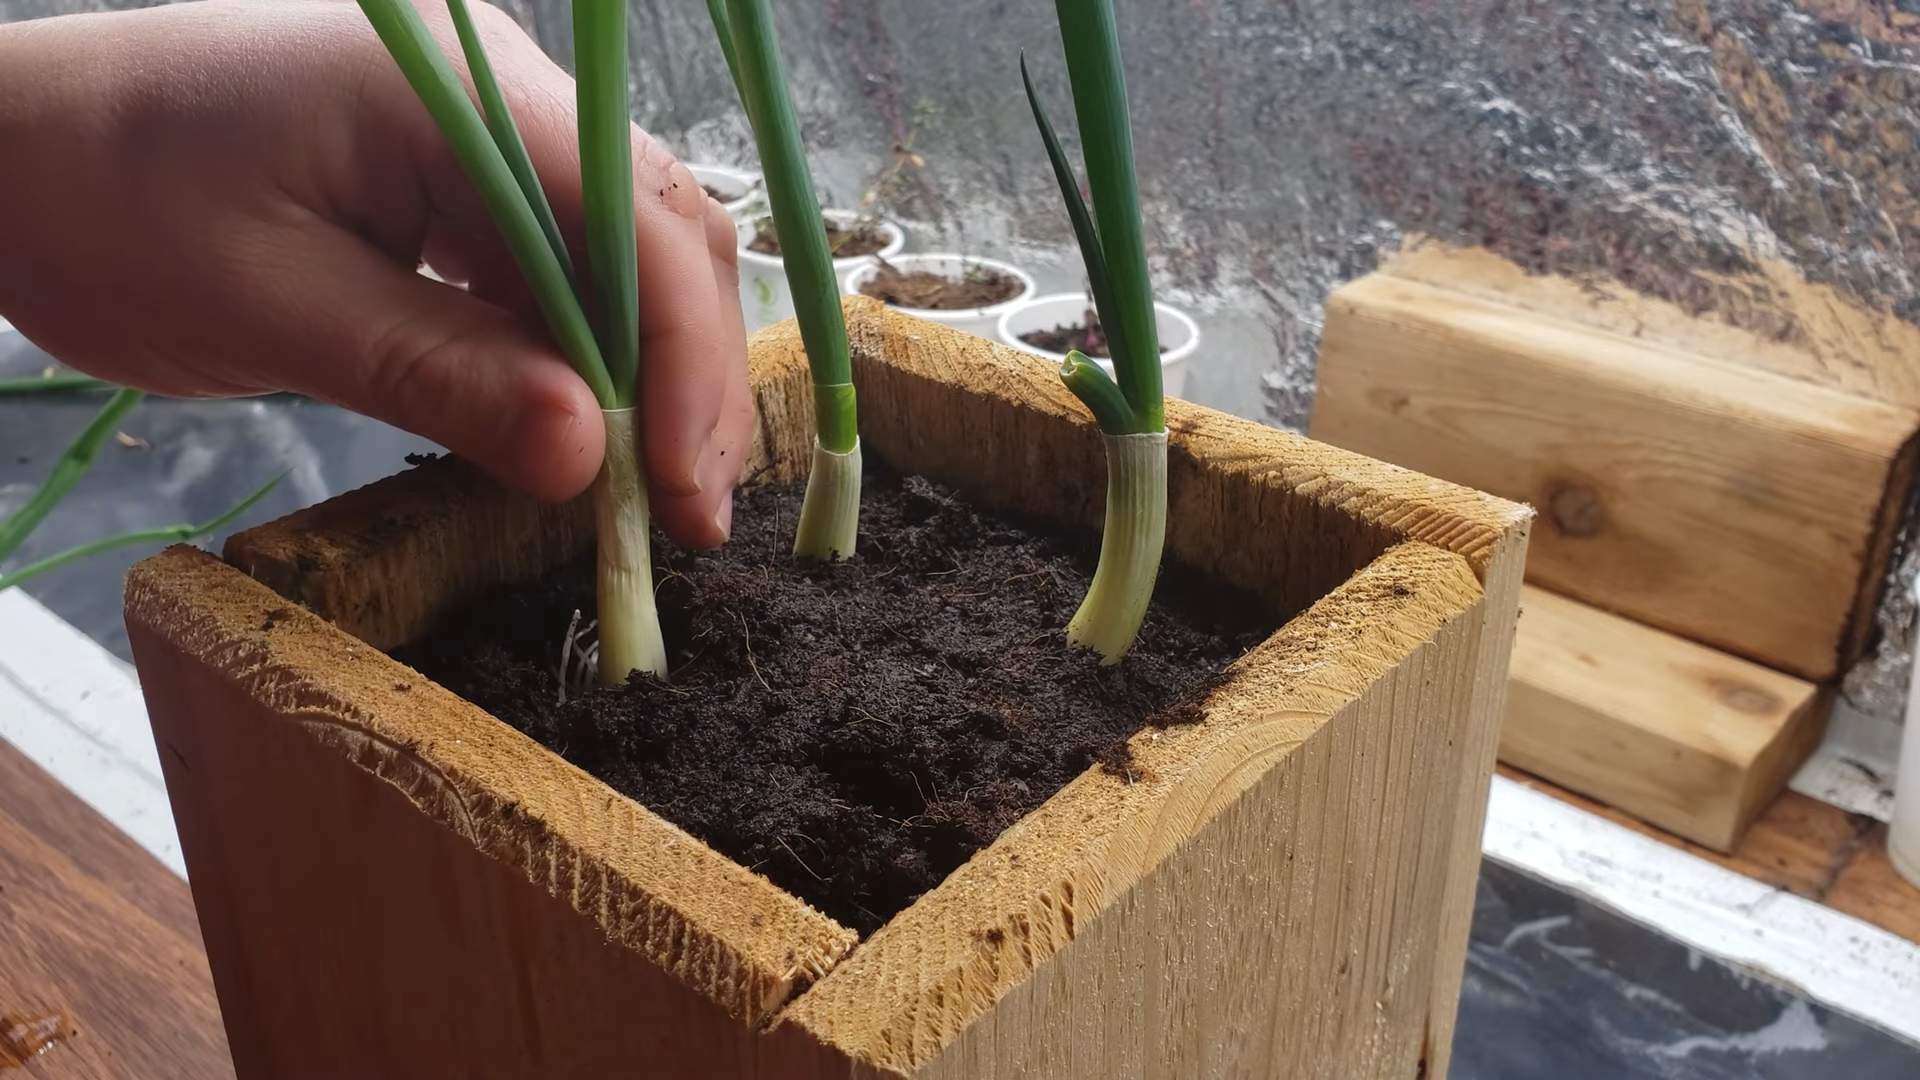
1. Prepare Your Pot: Choose a small pot with drainage holes. Fill it with a good quality potting soil. I like to use a mix of potting soil and compost for added nutrients.
2. Carefully Remove the Green Onions from the Water: Gently remove the green onion scraps from the water, being careful not to damage the roots.
3. Plant the Green Onions: Make a small hole in the soil and plant the green onion bulb, burying it up to the base of the green stalks. Gently pat the soil around the bulb to secure it in place.
4. Water Thoroughly: Water the pot thoroughly after planting, making sure the soil is evenly moist.
5. Place in a Sunny Spot: Place the pot in a sunny spot, just like you did with the water propagation method.
6. Water Regularly: Water the green onions regularly, keeping the soil moist but not soggy. Allow the top inch of soil to dry out between waterings.
7. Fertilize (Optional): If you want to give your green onions a boost, you can fertilize them every few weeks with a diluted liquid fertilizer. Follow the instructions on the fertilizer packaging.
Troubleshooting and Tips
Even with the simplest DIY projects, sometimes things don’t go exactly as planned. Here are a few common issues you might encounter and how to fix them:
* Rotting: If the bulb ends of your green onions start to rot, it’s usually due to bacteria growth in the water. Make sure you’re changing the water regularly (every 1-2 days). You can also try adding a drop or two of hydrogen peroxide to the water to kill bacteria. If the rot is severe, you may need to start with fresh green onion scraps.
* Slow Growth: If your green onions aren’t growing as quickly as you’d like, it could be due to lack of sunlight or nutrients. Make sure they’re getting plenty of sunlight and consider adding a diluted liquid fertilizer to the water or soil.
* Yellowing Leaves: Yellowing leaves can be a sign of overwatering or underwatering. Make sure the soil is moist but not soggy, and allow the top inch of soil to dry out between waterings.
* Pests: Green onions are generally pest-resistant, but occasionally they can be affected by aphids or other small insects. If you notice any pests, you can try spraying them with a mixture of water and dish soap.
Harvesting Your Homegrown Green Onions
The best part of this whole process is, of course, harvesting your own fresh green onions!
* When to Harvest: You can start harvesting your green onions as soon as the new green shoots are long enough to use. I usually wait until they’re at least 6-8 inches long.
* How to Harvest: Simply snip off the green shoots with scissors, leaving about an inch of the green stalk intact so they can continue to grow. You can harvest from the same plant multiple times.
* Using Your Harvest: Use your homegrown green onions in all your favorite recipes! They’re delicious in salads, soups, stir-fries, and as a garnish for just about anything.
Why I Love This Hack
I absolutely love this DIY hack for so many reasons:
* It’s Sustainable: It reduces food waste and saves you money on groceries.
* It’s Easy: It’s a simple project that anyone can do, even if you don’t have a green thumb.
* It’s Rewarding: It’s incredibly satisfying to watch your green onions regrow from scraps.
* It’s Convenient: You always have fresh green onions on hand whenever you need them.
So, there you have it! Regrowing green onions from kitchen scraps is a fun, easy, and sustainable way to add fresh flavor to your cooking. Give it a try, and I promise you’ll be amazed at how easy it is to have a never-ending supply of green onions right in your own kitchen! Happy gardening!
Conclusion
So, there you have it! Regrowing green onions from kitchen scraps is not just a fun little experiment; it’s a genuinely practical way to reduce food waste, save money, and have fresh, flavorful green onions readily available whenever you need them. It’s a small act with a surprisingly big impact, both on your wallet and the environment.
Think about it: no more last-minute trips to the grocery store for a single bunch of green onions. No more throwing away those perfectly good roots. Instead, you’ll have a continuous supply of fresh, vibrant green onions right on your windowsill or in your garden. It’s a win-win situation!
But the benefits don’t stop there. This simple DIY trick is also incredibly versatile. While water propagation is a great starting point, you can easily transition your regrown green onions to soil for even more robust growth. Consider experimenting with different types of containers, from repurposed jars to dedicated herb planters. You can even try different soil mixes to see what works best for your growing conditions.
For those who love a little extra flavor, why not try regrowing different varieties of green onions? Scallions, chives, and even leeks can be regrown using similar methods, adding a delightful range of flavors to your culinary creations. Imagine the possibilities!
And don’t be afraid to get creative with how you use your freshly regrown green onions. Sprinkle them on salads, soups, tacos, stir-fries, or omelets. Use them as a garnish for grilled meats or fish. Incorporate them into dips, sauces, and dressings. The possibilities are endless!
Regrowing green onions is also a fantastic way to get kids involved in gardening and teach them about the importance of sustainability. It’s a hands-on learning experience that can spark their curiosity and foster a lifelong appreciation for nature.
We truly believe that this DIY trick is a must-try for anyone who loves to cook, garden, or simply wants to live a more sustainable lifestyle. It’s easy, rewarding, and incredibly satisfying to watch those little green shoots emerge from what was once considered kitchen waste.
So, what are you waiting for? Grab those green onion scraps, find a jar, and get started today! We’re confident that you’ll be amazed at how easy and rewarding it is to regrow your own green onions.
And most importantly, we want to hear about your experience! Share your photos, tips, and stories in the comments below. Let us know what worked for you, what challenges you faced, and any creative variations you tried. Together, we can create a community of green onion growers and inspire others to embrace this simple yet powerful DIY trick. Happy growing!
Frequently Asked Questions (FAQ)
How long does it take to regrow green onions?
Generally, you’ll start to see new growth within a few days of placing the green onion scraps in water. Significant growth, enough to harvest, usually takes about 1-2 weeks. The speed of growth can depend on factors like sunlight, water quality, and temperature. Once planted in soil, the growth rate may increase.
What part of the green onion do I need to regrow it?
You only need the white bulb end with the roots attached. Cut off the green part of the green onion, leaving about 1-2 inches of the white base with the roots intact. This is the portion that will regenerate and produce new green shoots.
Can I regrow green onions in soil instead of water?
Yes, absolutely! While water propagation is a great way to start, transplanting the green onion scraps to soil will often result in more robust and faster growth. Once the roots have developed in water (usually after a week or so), you can plant them in a pot with well-draining soil. Make sure to bury the white bulb, leaving the green shoots exposed.
How often should I change the water when regrowing green onions in water?
It’s best to change the water every 1-2 days to prevent bacteria growth and keep the water fresh. This will help ensure healthy growth and prevent the green onion scraps from rotting.
How much sunlight do regrowing green onions need?
Green onions thrive in bright, indirect sunlight. Place them near a sunny window where they can receive at least 6 hours of sunlight per day. If you don’t have a sunny window, you can supplement with a grow light.
Can I regrow green onions indefinitely?
While you can regrow green onions multiple times from the same base, the growth may eventually slow down or become less vigorous. After several harvests, the base may become depleted of nutrients. At this point, it’s best to start with fresh green onion scraps.
What kind of soil is best for regrowing green onions?
A well-draining potting mix is ideal for regrowing green onions in soil. You can also amend the soil with compost or other organic matter to provide additional nutrients. Avoid using heavy clay soil, as it can retain too much moisture and lead to root rot.
How often should I water green onions that are planted in soil?
Water the green onions regularly, keeping the soil consistently moist but not waterlogged. Check the soil moisture by sticking your finger into the soil. If the top inch feels dry, it’s time to water.
Can I use fertilizer when regrowing green onions?
Yes, you can use a diluted liquid fertilizer to promote growth. Apply the fertilizer every 2-3 weeks, following the instructions on the fertilizer package. Avoid over-fertilizing, as this can damage the plants.
What if my green onions start to turn yellow or brown?
Yellowing or browning leaves can indicate several issues, such as overwatering, underwatering, lack of sunlight, or nutrient deficiencies. Adjust your watering schedule, ensure the plants are receiving enough sunlight, and consider adding fertilizer if necessary. If the problem persists, check for pests or diseases.
Can I regrow other types of onions besides green onions?
Yes, you can try regrowing other types of onions, such as scallions, chives, and even leeks, using similar methods. However, the success rate may vary depending on the type of onion and the growing conditions.
Are there any pests or diseases that can affect regrowing green onions?
Common pests that can affect green onions include aphids, thrips, and onion maggots. Diseases such as onion rot and downy mildew can also occur. Inspect your plants regularly for signs of pests or diseases and take appropriate action if necessary.
How do I harvest regrown green onions?
You can harvest the green onions by simply cutting off the green shoots as needed. Leave about 1-2 inches of the green shoots intact to allow for continued growth. Avoid cutting the entire plant down to the base, as this can prevent regrowth.
Can I grow green onions indoors year-round?
Yes, you can grow green onions indoors year-round as long as you provide them with adequate sunlight, water, and nutrients. This makes it a great option for those who live in colder climates or have limited outdoor space.
What are some creative ways to use regrown green onions?
Regrown green onions can be used in a variety of dishes, including salads, soups, tacos, stir-fries, omelets, and dips. They can also be used as a garnish for grilled meats or fish. Get creative and experiment with different ways to incorporate them into your favorite recipes!
Leave a Comment