
Soil bag carrot size – sounds like a riddle, right? Well, it’s actually the secret to unlocking a bountiful carrot harvest, even if you’re short on space! Forget sprawling gardens; we’re diving into the world of container gardening, where a simple soil bag can become your personal carrot patch. For centuries, humans have cultivated carrots, from their humble beginnings as wild, forked roots to the vibrant orange delights we know today. But what if you don’t have the luxury of acres to dedicate to these crunchy treats?
That’s where this DIY trick comes in. Many people struggle with growing root vegetables in small spaces, often ending up with stunted, disappointing carrots. But fear not! I’m here to show you how to maximize your yield using a readily available and inexpensive resource: the humble soil bag. This method is perfect for apartment dwellers, balcony gardeners, or anyone looking for a fun and easy way to grow their own food. Get ready to transform a simple soil bag into a thriving carrot haven, and enjoy the satisfaction of harvesting your own delicious, homegrown carrots. Let’s get started!
DIY Carrot Growing in a Soil Bag: A Beginner’s Guide
Hey there, fellow gardening enthusiasts! Ever dreamt of pulling fresh, vibrant carrots straight from your own backyard (or balcony!)? Well, you don’t need a sprawling garden to make that dream a reality. Today, I’m going to walk you through a super simple and rewarding DIY project: growing carrots in a soil bag! It’s perfect for beginners, apartment dwellers, or anyone looking for a fun and space-saving gardening solution.
Why Grow Carrots in a Soil Bag?
Before we dive in, let’s talk about why this method is so awesome:
* Space-Saving: Soil bags take up minimal space compared to traditional garden beds.
* Easy to Move: You can easily relocate your carrot patch to chase the sun or protect it from harsh weather.
* Great Drainage: Soil bags generally provide excellent drainage, which is crucial for healthy carrot growth.
* Beginner-Friendly: It’s a simple and straightforward project that’s perfect for newbie gardeners.
* Cost-Effective: You can often find soil bags on sale, making it a budget-friendly way to grow your own food.
What You’ll Need
Alright, let’s gather our supplies. Here’s what you’ll need to get started:
* A Large Soil Bag: Choose a bag that’s at least 24 inches deep. The deeper, the better, as carrots need plenty of room to grow downwards. Look for bags specifically designed for gardening, as they often have drainage holes. If you’re reusing a soil bag, make sure it’s clean and free of any debris.
* Carrot Seeds: Select a variety of carrot seeds that are suitable for your climate and growing season. Nantes and Chantenay varieties are generally good choices for beginners, as they’re relatively short and stocky.
* Potting Mix: While the soil bag already contains soil, it’s a good idea to amend it with some extra potting mix to improve drainage and aeration. Look for a mix that’s specifically formulated for vegetables.
* Slow-Release Fertilizer: Carrots are heavy feeders, so adding a slow-release fertilizer will provide them with the nutrients they need to thrive. Choose a fertilizer that’s balanced, with equal amounts of nitrogen, phosphorus, and potassium (e.g., 10-10-10).
* Watering Can or Hose: You’ll need a way to water your carrots regularly.
* Scissors or a Knife: For cutting drainage holes in the bag (if needed).
* Gloves (Optional): To keep your hands clean.
Step-by-Step Instructions: Planting Your Carrots
Okay, let’s get our hands dirty! Here’s how to plant your carrots in a soil bag:
1. Prepare the Soil Bag:
* First, lay the soil bag flat on the ground in a sunny location. Carrots need at least 6-8 hours of sunlight per day.
* If your soil bag doesn’t already have drainage holes, use scissors or a knife to cut several holes in the bottom of the bag. This is crucial to prevent waterlogging, which can lead to root rot. I usually make about 6-8 holes, spaced evenly across the bottom.
* Gently massage the soil bag to loosen the soil inside. This will help with drainage and aeration.
2. Amend the Soil:
* Carefully cut open the top of the soil bag. I usually make a U-shaped cut, leaving a flap of soil bag attached. This flap can be used to cover the soil later on, if needed.
* Remove about one-third of the soil from the bag and set it aside in a bucket or wheelbarrow.
* Mix the removed soil with an equal amount of potting mix. This will improve drainage and aeration.
* Add the slow-release fertilizer to the soil mixture, following the instructions on the fertilizer package. I usually use about 1 tablespoon of fertilizer per gallon of soil.
* Return the soil mixture to the soil bag, filling it to within a few inches of the top.
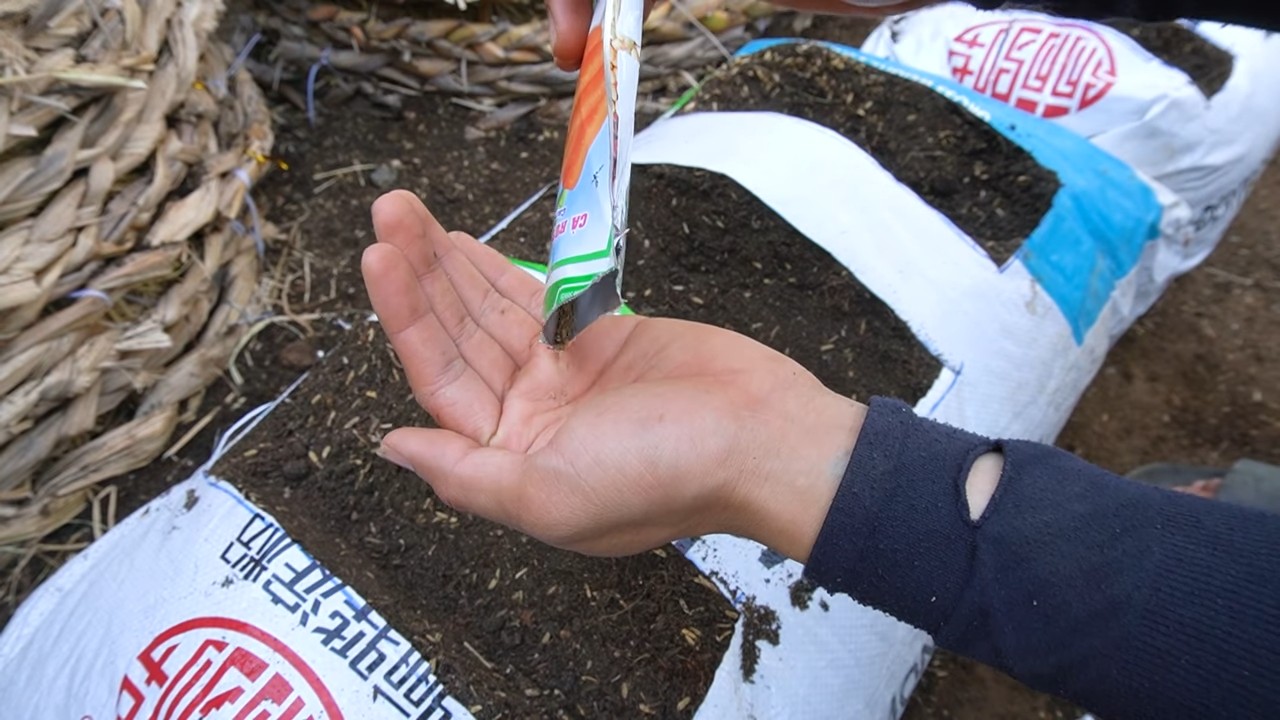
3. Sow the Carrot Seeds:
* Now comes the fun part: planting the seeds! Carrots need to be planted about 1/4 to 1/2 inch deep.
* I like to use my finger to create shallow furrows in the soil, spaced about 2-3 inches apart.
* Sprinkle the carrot seeds evenly along the furrows. Don’t sow them too thickly, as this will make it difficult to thin them later on.
* Gently cover the seeds with a thin layer of soil.
4. Water Thoroughly:
* After planting, water the soil bag thoroughly with a watering can or hose. The soil should be moist but not soggy.
* Be careful not to wash away the seeds when watering. I like to use a gentle shower setting on my watering can.
5. Label and Protect:
* Label the soil bag with the date and the variety of carrot seeds you planted. This will help you keep track of your progress.
* If you live in an area with heavy rain or strong winds, you may want to protect your soil bag with a row cover or a piece of plastic.
Caring for Your Carrots
Now that your carrots are planted, it’s time to provide them with the care they need to thrive.
1. Watering:
* Carrots need consistent moisture to grow properly. Water the soil bag regularly, especially during dry spells.
* Check the soil moisture by sticking your finger into the soil. If the top inch of soil is dry, it’s time to water.
* Avoid overwatering, as this can lead to root rot. The soil should be moist but not soggy.
* Water deeply and less frequently, rather than shallowly and more often. This will encourage the roots to grow deeper.
2. Thinning:
* Once the carrot seedlings emerge, you’ll need to thin them out. This is important to give the remaining carrots enough space to grow.
* When the seedlings are about 2 inches tall, thin them to about 1-2 inches apart.
* When they’re about 4 inches tall, thin them again to about 3-4 inches apart.
* To thin the seedlings, gently pull them out of the soil. Be careful not to disturb the roots of the remaining carrots.
* You can eat the thinned seedlings as microgreens!
3. Weeding:
* Keep the soil bag free of weeds. Weeds compete with carrots for nutrients and water.
* Hand-pull weeds carefully, being careful not to disturb the roots of the carrots.
* Mulching around the carrots can help to suppress weed growth.
4. Fertilizing:
* Carrots are heavy feeders, so they’ll benefit from regular fertilization.
* Apply a liquid fertilizer every 2-3 weeks, following the instructions on the fertilizer package.
* Choose a fertilizer that’s balanced, with equal amounts of nitrogen, phosphorus, and potassium.
5. Pest and Disease Control:
* Keep an eye out for pests and diseases. Common carrot pests include carrot rust flies and aphids.
* If you notice any pests or diseases, take action immediately. You can use organic pesticides or fungicides to control them.
* Good air circulation can help to prevent fungal diseases.
Harvesting Your Carrots
The moment we’ve all been waiting for! Here’s how to harvest your carrots:
1. Check for Maturity:
* Carrots are typically ready to harvest 60-80 days after planting, depending on the variety.
* Check the seed packet for the specific maturity date of your carrot variety.
* You can also check for maturity by gently pulling back the soil around the top of the carrot to see how big it is.
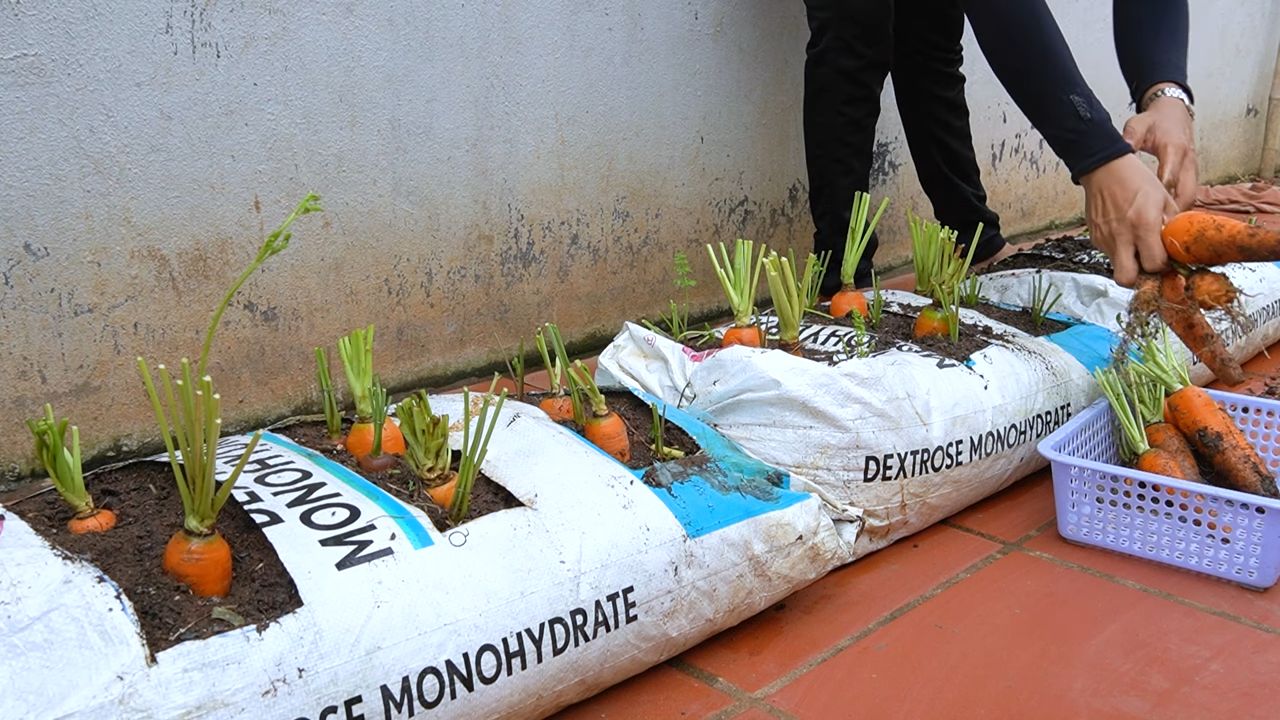
2. Harvesting:
* To harvest your carrots, gently loosen the soil around the base of the carrot with a trowel or fork.
* Grasp the carrot firmly by the greens and pull it straight up out of the soil.
* If the carrot is difficult to pull, try wiggling it back and forth to loosen it.
* Brush off any excess soil from the carrot.
3. Storing:
* Store your harvested carrots in the refrigerator.
* Cut off the greens, leaving about 1 inch of stem attached.
* Place the carrots in a plastic bag or container and store them in the crisper drawer of your refrigerator.
* Carrots can be stored in the refrigerator for several weeks.
Troubleshooting Tips
* Carrots
Conclusion
So, there you have it! Transforming a simple soil bag into a thriving mini-carrot garden is not just a fun project; it’s a game-changer for anyone looking to enjoy fresh, homegrown carrots without the constraints of a traditional garden plot. We’ve walked you through the process, highlighting the ease, affordability, and sheer joy of nurturing your own little carrot patch.
Why is this DIY trick a must-try? Because it democratizes gardening. You don’t need acres of land, specialized tools, or years of experience. All you need is a bag of soil, some carrot seeds, a little bit of sunshine, and a dash of enthusiasm. It’s perfect for apartment dwellers, balcony gardeners, or anyone who wants to introduce children to the magic of growing their own food. Plus, the satisfaction of harvesting your own sweet, crunchy carrots, grown with your own hands (and a soil bag!), is simply unparalleled.
But the beauty of this method lies in its adaptability. Feel free to experiment! Want to try different carrot varieties? Go for it! Nantes, Chantenay, or even rainbow carrots would thrive in this environment. Consider adding companion plants like radishes or onions around the edges of the bag to deter pests and improve soil health. You could even try succession planting, sowing new seeds every few weeks to ensure a continuous harvest throughout the growing season.
Don’t be afraid to get creative with your soil bag garden. You can decorate the bag with paint or markers, turning it into a personalized piece of garden art. You can also experiment with different soil types, adding compost or other amendments to improve drainage and nutrient content. The possibilities are endless!
Ultimately, this DIY soil bag carrot garden is more than just a gardening project; it’s an invitation to connect with nature, to learn about the life cycle of plants, and to experience the simple pleasure of growing your own food. It’s a sustainable, eco-friendly way to enjoy fresh produce, reduce your carbon footprint, and add a touch of green to your life.
We wholeheartedly encourage you to give this DIY trick a try. It’s a rewarding experience that will bring you joy, fresh carrots, and a newfound appreciation for the power of nature. And once you’ve harvested your first batch of homegrown carrots, we’d love to hear about your experience! Share your photos, tips, and stories with us in the comments below. Let’s create a community of soil bag carrot gardeners and inspire others to embrace the joy of growing their own food. Happy gardening!
Frequently Asked Questions (FAQ)
What kind of soil should I use for my soil bag carrot garden?
The best soil for growing carrots in a soil bag is a well-draining, loose soil mix that is rich in organic matter. A good starting point is a general-purpose potting mix, but you can improve it by adding compost, peat moss, or perlite. Carrots need loose soil to develop properly; compacted soil can lead to stunted or misshapen roots. Avoid using heavy clay soil, as it will hinder root growth. Look for a mix that is specifically formulated for vegetables or one that is labeled as “seed starting mix.” This will ensure that your carrots have the nutrients they need to thrive.
How often should I water my soil bag carrot garden?
Watering frequency depends on several factors, including the weather, the type of soil you’re using, and the size of your soil bag. Generally, you should water your carrot plants when the top inch of soil feels dry to the touch. During hot, dry weather, you may need to water daily, while during cooler, wetter periods, you may only need to water every few days. When watering, make sure to soak the soil thoroughly, allowing the water to drain out of the bottom of the bag. Avoid overwatering, as this can lead to root rot. A good rule of thumb is to water deeply and less frequently, rather than shallowly and more often.
How much sunlight do carrots need in a soil bag?
Carrots need at least six hours of direct sunlight per day to thrive. Choose a location for your soil bag garden that receives plenty of sunlight throughout the day. If you live in a particularly hot climate, you may want to provide some afternoon shade to prevent the soil from drying out too quickly. If you don’t have a sunny spot, you can supplement with grow lights. Position the lights a few inches above the plants and keep them on for 12-14 hours per day.
When is the best time to plant carrots in a soil bag?
The best time to plant carrots depends on your climate. In general, carrots are a cool-season crop and should be planted in early spring or late summer. In areas with mild winters, you can even plant carrots in the fall for a winter harvest. Check your local planting calendar for specific dates. When planting, make sure the soil temperature is at least 45 degrees Fahrenheit. You can use a soil thermometer to check the temperature.
How do I prevent pests and diseases in my soil bag carrot garden?
There are several things you can do to prevent pests and diseases in your soil bag carrot garden. First, choose disease-resistant carrot varieties. Second, practice good sanitation by removing any dead or decaying plant matter from the area. Third, water your plants properly to avoid overwatering or underwatering. Fourth, monitor your plants regularly for signs of pests or diseases. If you spot any problems, take action immediately. Common carrot pests include carrot rust flies, aphids, and nematodes. Common carrot diseases include leaf blight and root rot. You can use organic pesticides or fungicides to control pests and diseases.
How long does it take for carrots to grow in a soil bag?
Carrots typically take 60-80 days to mature, depending on the variety and growing conditions. Check the seed packet for specific information. You can start harvesting carrots when they reach the desired size. To harvest, gently loosen the soil around the carrot and pull it out of the bag.
Can I reuse the soil bag after harvesting my carrots?
Yes, you can reuse the soil bag after harvesting your carrots, but it’s important to replenish the nutrients in the soil. Add compost, aged manure, or other organic matter to the soil to improve its fertility. You may also want to consider rotating your crops, planting different vegetables in the soil bag each season. This will help prevent the buildup of pests and diseases.
What are some variations I can try with my soil bag carrot garden?
There are many variations you can try with your soil bag carrot garden. You can experiment with different carrot varieties, companion plants, soil types, and watering techniques. You can also try growing other root vegetables in soil bags, such as radishes, beets, or turnips. Get creative and have fun!
What if my carrots are small or misshapen?
Small or misshapen carrots can be caused by several factors, including compacted soil, lack of nutrients, overcrowding, or pests. Make sure your soil is loose and well-draining, and that you are providing your plants with adequate nutrients. Thin out your seedlings to prevent overcrowding. Monitor your plants for pests and diseases.
How do I store my harvested carrots?
To store your harvested carrots, remove the greens and wash the carrots thoroughly. Dry them completely and store them in a plastic bag in the refrigerator. Carrots can last for several weeks in the refrigerator. You can also freeze carrots for longer storage. To freeze carrots, blanch them in boiling water for a few minutes, then cool them in ice water. Drain them well and store them in freezer bags.


Leave a Comment