
Soil Free Luffa Growing: Ever dreamt of harvesting your own natural sponges right from your backyard, but thought you didn’t have the space or the right soil? Well, get ready to ditch those limitations because I’m about to share a game-changing DIY trick that will have you growing luffas without a single speck of soil!
Luffa sponges, also known as loofahs, have a rich history, dating back centuries in Asian and African cultures, where they were used for everything from bathing and scrubbing to filtering water. Imagine bringing that sustainable tradition into your own home, knowing you’re using a completely natural and biodegradable product.
But why Soil Free Luffa Growing? Traditional luffa cultivation can be challenging, requiring specific soil conditions and plenty of space. This DIY method opens up the possibility for anyone, regardless of their gardening experience or living situation, to enjoy the benefits of homegrown luffas. Whether you have a small balcony, a tiny patio, or just want to try something new and eco-friendly, this guide will walk you through the simple steps to cultivate these amazing sponges using readily available materials. Get ready to impress your friends and family with your innovative gardening skills and enjoy the satisfaction of creating your own sustainable cleaning supplies!
Growing Luffa Sponges Without Soil: A Fun DIY Project!
Hey there, fellow gardening enthusiasts! Ever thought about growing your own luffa sponges? It’s a super rewarding experience, and guess what? You don’t even need soil! I’m going to walk you through how to grow luffa sponges hydroponically – it’s easier than you might think, and a really cool way to get fresh, natural sponges right from your own backyard (or balcony!).
What You’ll Need
Before we dive in, let’s gather our supplies. Here’s a list of everything you’ll need to get started:
* Luffa Seeds: Make sure you get good quality seeds from a reputable source.
* Net Pots: These will hold your luffa seedlings. I recommend 3-inch or 4-inch net pots.
* Hydroponic Growing Medium: Rockwool cubes, coco coir, or clay pebbles (LECA) are all great options. I personally prefer rockwool for starting seeds.
* Hydroponic Nutrient Solution: You’ll need a balanced nutrient solution specifically formulated for hydroponics. Look for one that’s suitable for fruiting vegetables.
* Reservoir: A large container to hold your nutrient solution. The size will depend on how many luffa plants you’re growing. A 5-gallon bucket works well for a single plant.
* Air Pump and Air Stone: To oxygenate the nutrient solution. This is crucial for healthy root growth.
* Water Pump (Optional but Recommended): To circulate the nutrient solution. This helps prevent stagnation and ensures even nutrient distribution.
* Timer (Optional but Recommended): To automate the water pump.
* Grow Lights (If Growing Indoors): Luffas need plenty of sunlight, so if you’re growing indoors, you’ll need strong grow lights.
* Trellis or Support Structure: Luffa vines are vigorous climbers, so you’ll need something for them to climb on.
* pH Meter or pH Testing Kit: To monitor and adjust the pH of the nutrient solution.
* pH Up and pH Down Solutions: To adjust the pH of the nutrient solution.
* Seed Starting Tray and Dome: For germinating the seeds.
* Clean Water: For mixing the nutrient solution and rinsing the system.
Germinating Your Luffa Seeds
This is the first and arguably most important step. Getting your seeds to sprout is key!
1. Soak the Seeds: Before planting, soak your luffa seeds in warm water for 24 hours. This helps soften the seed coat and encourages germination. I usually put them in a small bowl on the counter.
2. Prepare Your Growing Medium: If you’re using rockwool, pre-soak the cubes in pH-balanced water (around 5.5-6.0) for a few hours. This helps remove any alkalinity and prepares them for the seedlings. If you’re using coco coir, rinse it thoroughly to remove any excess salts.
3. Plant the Seeds: Place one or two luffa seeds in each rockwool cube or coco coir pellet, about ½ inch deep.
4. Create a Humid Environment: Place the cubes or pellets in a seed starting tray and cover it with a dome. This helps maintain humidity and promotes germination.
5. Provide Warmth and Light: Place the tray in a warm location (around 75-85°F) and provide light. If you’re using grow lights, keep them a few inches above the dome. If you’re using natural sunlight, make sure the tray gets plenty of indirect light.
6. Monitor and Water: Check the tray daily and make sure the growing medium stays moist but not soggy. You can use a spray bottle to mist the cubes or pellets with water as needed.
7. Wait for Germination: Luffa seeds can take anywhere from 7 to 21 days to germinate, so be patient! Once the seedlings emerge, remove the dome and provide them with more light.
Setting Up Your Hydroponic System
Now that your seedlings are sprouting, let’s get your hydroponic system ready.
1. Prepare the Reservoir: Clean your reservoir thoroughly with soap and water. Rinse it well to remove any soap residue.
2. Mix the Nutrient Solution: Follow the instructions on your hydroponic nutrient solution to mix it properly. Start with a diluted solution (about half strength) to avoid burning the young seedlings.
3. Check and Adjust the pH: Use your pH meter or testing kit to check the pH of the nutrient solution. Luffas prefer a pH between 6.0 and 6.5. Adjust the pH as needed using pH up or pH down solutions. Add small amounts at a time and re-check the pH after each adjustment.
4. Install the Air Pump and Air Stone: Place the air stone in the bottom of the reservoir and connect it to the air pump. This will oxygenate the nutrient solution and prevent root rot.
5. Install the Water Pump (Optional): If you’re using a water pump, place it in the reservoir and connect it to a timer. Set the timer to run the pump for 15 minutes every hour. This will circulate the nutrient solution and ensure even nutrient distribution.
Transplanting Your Seedlings
Once your seedlings have a few sets of true leaves (the leaves that look like miniature luffa leaves), it’s time to transplant them into your hydroponic system.
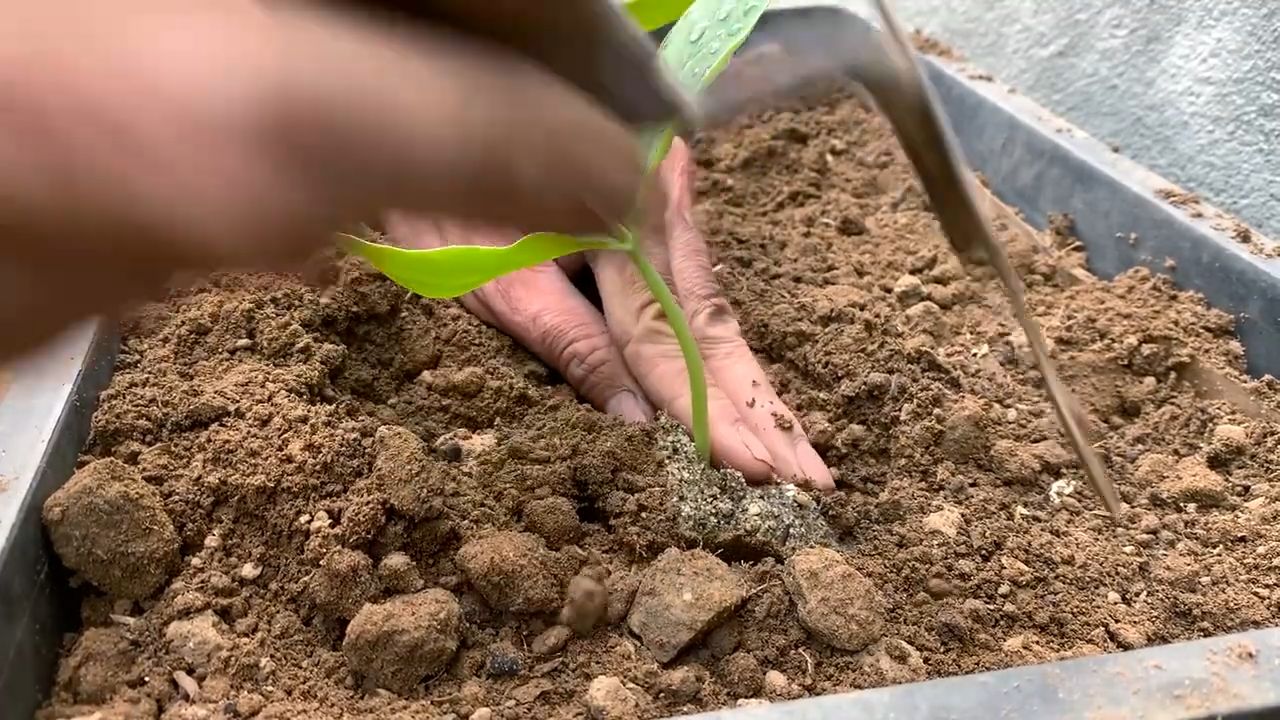
1. Gently Remove the Seedlings: Carefully remove the seedlings from the seed starting tray. Be gentle to avoid damaging the roots.
2. Place the Seedlings in Net Pots: Place each seedling in a net pot and fill the pot with your chosen hydroponic growing medium (rockwool, coco coir, or clay pebbles). Make sure the roots are covered but the base of the stem is exposed.
3. Place the Net Pots in the Reservoir: Place the net pots in the reservoir, making sure the bottom of the pots are submerged in the nutrient solution. If the water level is too low, you can add more nutrient solution.
Caring for Your Luffa Plants
Now that your luffa plants are in the hydroponic system, it’s time to provide them with the care they need to thrive.
1. Provide Plenty of Light: Luffas need at least 6-8 hours of direct sunlight per day. If you’re growing indoors, use strong grow lights to supplement the natural light.
2. Monitor the Nutrient Solution: Check the nutrient solution regularly (at least once a week) and adjust the pH and nutrient levels as needed. As the plants grow, they will need more nutrients, so you may need to increase the concentration of the nutrient solution.
3. Watering and Circulation: Ensure the roots are consistently exposed to the nutrient solution. If you’re not using a water pump, manually circulate the solution a few times a day.
4. Provide Support: Luffa vines are vigorous climbers and can grow up to 30 feet long. Provide them with a strong trellis or support structure to climb on. I use a sturdy fence in my backyard.
5. Pruning: Prune the luffa vines as needed to encourage branching and fruit production. Remove any yellowing or dead leaves.
6. Pollination: Luffa plants have separate male and female flowers. The female flowers have a small luffa fruit behind them. If you’re growing indoors or if there aren’t many pollinators in your area, you may need to hand-pollinate the flowers. To do this, use a small brush to transfer pollen from the male flowers to the female flowers.
Harvesting Your Luffa Sponges
This is the best part! After all your hard work, it’s time to harvest your luffa sponges.
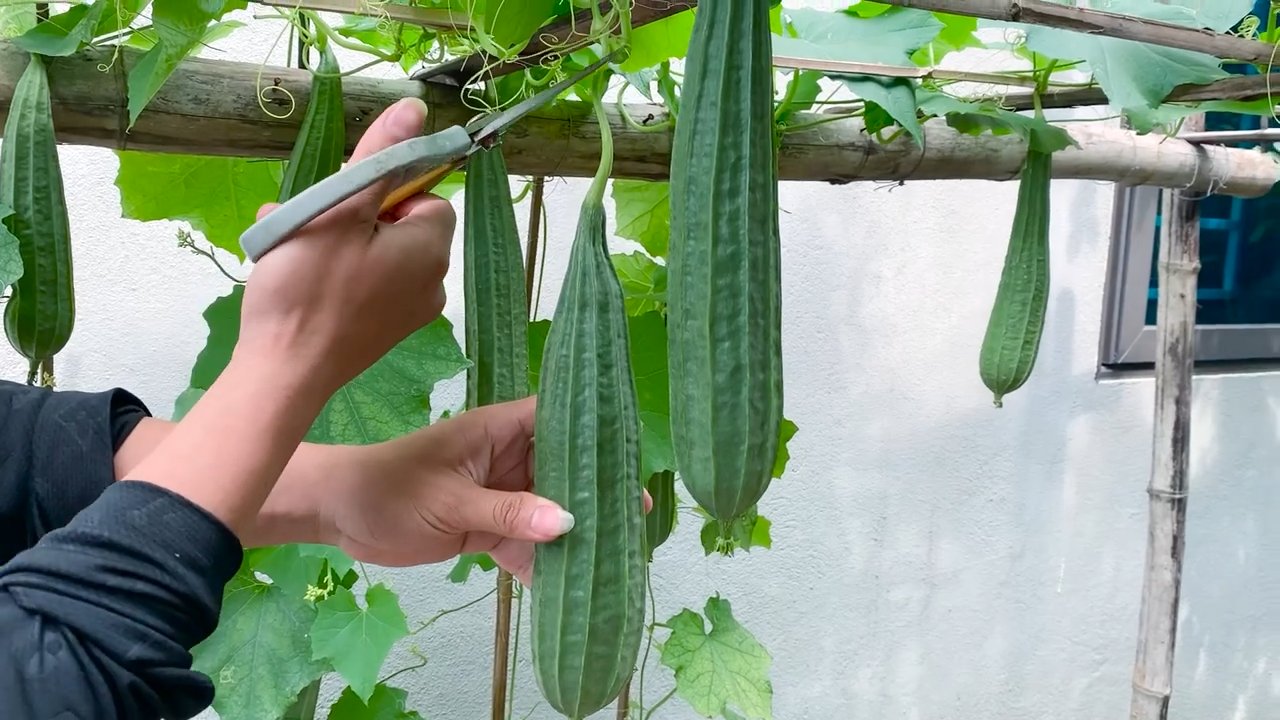
1. Wait for Maturity: Luffa fruits are ready to harvest when they turn yellow or brown and the skin becomes dry and brittle. You should be able to easily press your fingernail into the skin.
2. Cut the Luffa Fruits: Use a sharp knife or pruning shears to cut the luffa fruits from the vine.
3. Peel the Skin: Peel off the outer skin of the luffa fruit. This can be a bit messy, so I recommend doing it outdoors or over a trash can. You can also soak the luffa fruits in water for a few days to make the skin easier to peel.
4. Remove the Seeds: Shake out the seeds from the luffa sponge. You can save these seeds for planting next year.
5. Rinse and Dry: Rinse the luffa sponge thoroughly with water to remove any remaining pulp or seeds. Then, hang it up to dry in a well-ventilated area.
6. Enjoy Your Homemade Luffa Sponge! Once
Conclusion
So, there you have it! Growing luffa without soil might seem unconventional, but as you’ve seen, it’s a surprisingly effective and rewarding method. This DIY trick isn’t just about bypassing the mess and potential issues of traditional soil-based gardening; it’s about unlocking a new level of control and efficiency in your luffa cultivation. Think about it: no more battling soilborne diseases, no more wrestling with nutrient deficiencies hidden beneath the surface, and a significantly reduced risk of pest infestations. This method allows you to directly manage the plant’s environment, providing precisely what it needs, when it needs it.
But the benefits extend beyond just ease of management. Soil-free luffa growing often leads to faster growth rates and larger, more robust luffa sponges. The consistent access to nutrients and the optimized growing conditions create an environment where your luffa vines can truly thrive. Plus, it’s an incredibly space-saving solution, perfect for urban gardeners or anyone with limited outdoor space. Imagine a vertical garden bursting with lush luffa vines, all grown without a single speck of soil!
Why is this a must-try? Because it simplifies the process, maximizes your yield, and opens up a world of possibilities for growing luffa in even the most challenging environments. It’s a game-changer for both novice and experienced gardeners alike.
Now, let’s talk about variations. While the basic principles remain the same, you can experiment with different hydroponic systems to find what works best for you. Deep water culture (DWC) is a popular choice, where the luffa roots are suspended in a nutrient-rich solution. Alternatively, you could explore nutrient film technique (NFT), where a shallow stream of nutrient solution constantly flows over the roots. For a simpler approach, consider using a wicking system, where the nutrient solution is drawn up to the roots through a wick.
Another exciting variation is to integrate aquaponics into your soil-free luffa growing setup. By combining aquaculture (raising fish) with hydroponics, you can create a closed-loop system where the fish waste provides nutrients for the luffa plants, and the plants filter the water for the fish. It’s a sustainable and incredibly efficient way to grow luffa and raise fish simultaneously!
Don’t be afraid to experiment with different nutrient solutions as well. While commercially available hydroponic nutrients are a great starting point, you can also explore organic options like compost tea or worm castings extract. Just be sure to monitor the pH and nutrient levels regularly to ensure your luffa plants are getting everything they need.
We wholeheartedly encourage you to give this DIY trick a try. It’s a rewarding experience that will not only provide you with an abundance of natural luffa sponges but also deepen your understanding of plant physiology and hydroponic gardening. Embrace the challenge, get creative with your setup, and most importantly, have fun!
Once you’ve embarked on your soil-free luffa growing journey, we’d love to hear about your experiences. Share your successes, your challenges, and any tips or tricks you’ve discovered along the way. Post pictures of your thriving luffa vines, your innovative hydroponic setups, and your bountiful harvests. Let’s create a community of soil-free luffa enthusiasts and learn from each other. Your insights could inspire others to take the plunge and discover the joys of growing luffa without soil. So, go ahead, get your hands wet (but not dirty!), and let the soil-free luffa growing adventure begin! Remember, mastering the art of soil free luffa growing is within your reach.
FAQ
What exactly are the benefits of growing luffa without soil?
Growing luffa without soil offers a multitude of advantages. Firstly, it eliminates the risk of soilborne diseases and pests, which can be a major headache for traditional gardeners. Secondly, it allows for precise control over nutrient delivery, ensuring that your luffa plants receive exactly what they need, when they need it. This often leads to faster growth rates and larger, more robust luffa sponges. Thirdly, it’s a space-saving solution, perfect for urban gardeners or anyone with limited outdoor space. Finally, it reduces water waste, as the nutrient solution can be recirculated and reused.
What kind of hydroponic system is best for growing luffa?
The best hydroponic system for growing luffa depends on your budget, space, and level of experience. Deep water culture (DWC) is a popular and relatively simple option, where the luffa roots are suspended in a nutrient-rich solution. Nutrient film technique (NFT) is another effective method, where a shallow stream of nutrient solution constantly flows over the roots. Wicking systems are a simpler, low-tech option, where the nutrient solution is drawn up to the roots through a wick. Ultimately, the best system is the one that you can manage effectively and that provides your luffa plants with consistent access to nutrients and water.
What type of nutrient solution should I use for soil-free luffa growing?
You can use commercially available hydroponic nutrient solutions specifically formulated for fruiting vegetables. These solutions typically contain a balanced blend of macronutrients (nitrogen, phosphorus, potassium) and micronutrients (iron, manganese, zinc, etc.). Alternatively, you can explore organic options like compost tea or worm castings extract. However, it’s important to monitor the pH and nutrient levels regularly to ensure your luffa plants are getting everything they need. A pH range of 6.0 to 6.5 is generally ideal for hydroponic luffa growing.
How often should I change the nutrient solution?
The frequency of nutrient solution changes depends on the size of your reservoir, the growth rate of your luffa plants, and the type of hydroponic system you’re using. As a general rule, you should change the nutrient solution every 1-2 weeks. However, it’s important to monitor the nutrient levels and pH regularly and adjust the frequency of changes accordingly. If the nutrient levels drop significantly or the pH drifts outside the ideal range, it’s time for a change.
How do I support the luffa vines in a soil-free setup?
Luffa vines are vigorous climbers and require strong support. You can use a trellis, netting, or even a sturdy fence to provide support for the vines. Be sure to choose a support structure that is strong enough to handle the weight of the mature vines and the developing luffa fruits. You may also need to prune the vines regularly to prevent them from becoming too heavy or overgrown.
Can I grow luffa indoors without soil?
Yes, you can grow luffa indoors without soil, but you’ll need to provide adequate lighting. Luffa plants require at least 6-8 hours of direct sunlight per day, or the equivalent in artificial light. LED grow lights are a great option for indoor luffa growing, as they are energy-efficient and provide a full spectrum of light that is beneficial for plant growth. You’ll also need to ensure that your indoor growing environment is well-ventilated to prevent fungal diseases.
How long does it take to grow luffa from seed to harvest in a soil-free system?
The time it takes to grow luffa from seed to harvest in a soil-free system depends on several factors, including the variety of luffa, the growing conditions, and the climate. Generally, it takes about 90-120 days from seed to harvest. However, with optimized growing conditions and a well-managed hydroponic system, you may be able to shorten the growing time.
How do I know when my luffa is ready to harvest?
Luffa is ready to harvest when the skin turns yellow or brown and the fruit feels lightweight. The stem connecting the luffa to the vine will also start to dry out. To harvest, simply cut the luffa from the vine, leaving a few inches of stem attached.
How do I process the luffa after harvesting?
To process the luffa after harvesting, soak it in water for a few days to loosen the skin. Then, peel off the skin and shake out the seeds. Rinse the luffa thoroughly and allow it to dry completely. Once dry, you can use it as a natural sponge for bathing, cleaning, or exfoliating.
What are some common problems I might encounter when growing luffa without soil, and how can I fix them?
Some common problems you might encounter when growing luffa without soil include nutrient deficiencies, pH imbalances, and pest infestations. Nutrient deficiencies can be identified by yellowing leaves or stunted growth. To fix this, adjust the nutrient solution according to the manufacturer’s instructions. pH imbalances can also cause nutrient deficiencies. To fix this, use a pH meter to monitor the pH of the nutrient solution and adjust it as needed using pH up or pH down solutions. Pest infestations can be controlled with organic pesticides or by introducing beneficial insects. Regular monitoring of your luffa plants is key to identifying and addressing problems early on.

Leave a Comment