
Spring Radish Gardening: Your Guide to a Bountiful Harvest
Spring radish gardening is more than just planting seeds; it’s about connecting with nature and enjoying the freshest, most vibrant radishes you’ve ever tasted! I’ve always loved the satisfying crunch of a homegrown radish, and that’s why I’m so excited to share my favorite spring radish gardening tricks and DIY solutions with you. This isn’t just about growing food; it’s about experiencing the rewarding process of nurturing life from seed to plate.
For centuries, radishes have held a significant place in culinary traditions across the globe. From ancient Egypt to modern-day kitchens, these humble root vegetables have provided a delightful burst of flavor and a welcome addition to countless dishes. Their quick growing cycle makes them a perfect introduction to gardening, especially for beginners. And let’s be honest, who doesn’t love the satisfaction of harvesting their own crisp, spicy radishes just weeks after planting?
Why Spring Radish Gardening Matters
In today’s fast-paced world, many of us crave a connection to nature and a deeper understanding of where our food comes from. Spring radish gardening offers precisely that. It’s a fantastic way to introduce children to the wonders of growing their own food, teaching them about patience, responsibility, and the magic of seeing a tiny seed transform into a delicious vegetable. Plus, homegrown radishes are undeniably tastier and fresher than anything you’ll find in the supermarket – a fact that will become abundantly clear once you try your first harvest!
This article is packed with practical spring radish gardening tips and DIY projects to help you achieve a bountiful harvest. We’ll cover everything from seed starting and soil preparation to pest control and harvesting techniques. Get ready to embark on your spring radish gardening journey and experience the joy of growing your own delicious, healthy food!
Growing Spring Radishes: A DIY Guide to a Bountiful Harvest
I love spring radishes! They’re so crisp and peppery, and nothing beats a fresh radish pulled straight from the garden. This guide will walk you through everything you need to know to grow your own delicious spring radishes, from seed to plate.
Phase 1: Planning and Preparation
- Choose your radish variety: There are tons of varieties available, each with different flavors and maturity times. I recommend starting with an easy-to-grow variety like ‘French Breakfast’ or ‘Cherry Belle’ for beginners. Consider the size you prefer – some are small and round, others are long and slender.
- Select your location: Radishes need full sun (at least 6 hours a day) to thrive. Choose a spot in your garden that gets plenty of sunlight. Make sure the soil is well-drained – radishes hate soggy conditions, which can lead to root rot.
- Prepare the soil: Radishes need loose, fertile soil. Amend your soil with compost or other organic matter to improve drainage and fertility. Work the soil to a depth of about 8-10 inches. You can use a garden fork or tiller for this. Remove any rocks or debris.
- Gather your supplies: You’ll need radish seeds, a garden trowel or hand rake, a watering can, and possibly some row markers or garden twine.
Phase 2: Sowing the Seeds
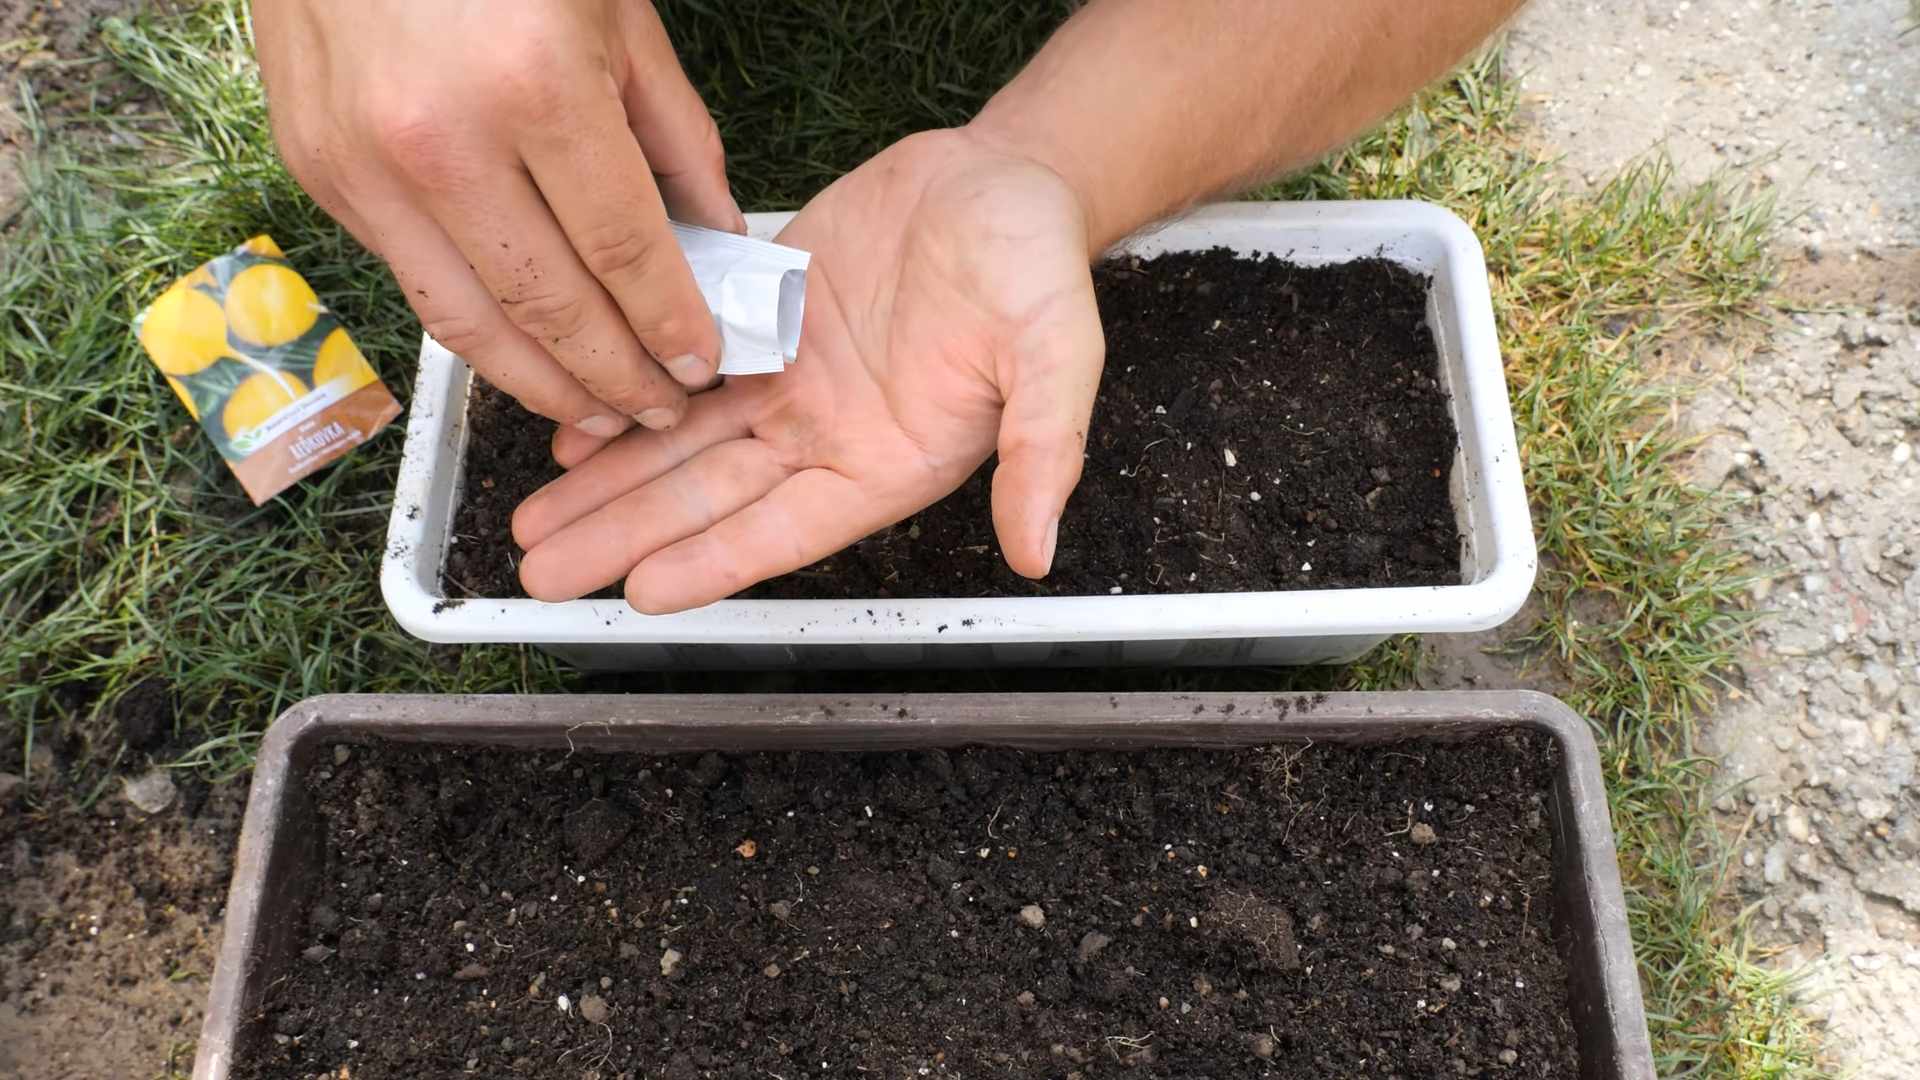
- Timing is key: Spring radishes are a cool-season crop. Sow seeds directly outdoors about 2-3 weeks before the last expected frost in your area. You can also start them indoors 4-6 weeks before the last frost, but it’s usually easier to direct sow.
- Create seed rows: Use a garden trowel or hand rake to create shallow furrows, about ½ inch deep, spaced about 1 inch apart. If you’re planting in a larger area, you can space the rows 12-18 inches apart.
- Sow the seeds: Plant the seeds about ½ inch apart in the furrows. Don’t overcrowd them, as this will lead to smaller radishes. I usually plant 2-3 seeds per inch, knowing some may not germinate.
- Cover the seeds: Gently cover the seeds with soil, using your hands or a trowel to lightly press the soil over them. Don’t bury them too deep.
- Water gently: Water the seeds thoroughly after planting, using a gentle spray to avoid disturbing the soil. Keep the soil consistently moist, but not soggy, throughout the germination period.
Phase 3: Caring for Your Radishes
- Thinning: Once the seedlings emerge (usually within a week or two), thin them to about 2 inches apart. This gives the remaining radishes enough space to grow to their full size. Carefully pull out the smaller, weaker seedlings, leaving the strongest ones behind. You can even eat the thinned seedlings – they’re quite tasty!
- Watering: Keep the soil consistently moist, especially during dry periods. Radishes need regular watering to prevent them from becoming tough and woody. Water deeply and less frequently rather than shallowly and often.
- Weed control: Regularly remove weeds from around your radish plants. Weeds compete with radishes for water and nutrients, reducing the yield. Mulching can help suppress weeds.
- Pest and disease control: Radishes are relatively pest-free, but keep an eye out for flea beetles, which can damage the leaves. If you see flea beetles, cover your plants with a row cover or use an insecticidal soap.
- Monitoring growth: Check your radishes regularly for signs of maturity. The time it takes for them to mature depends on the variety you chose, but it’s usually between 20-40 days. You can gently pull up a few radishes to check their size. If they feel firm and are the desired size, they’re ready to harvest.
Phase 4: Harvesting and Enjoying Your Radishes
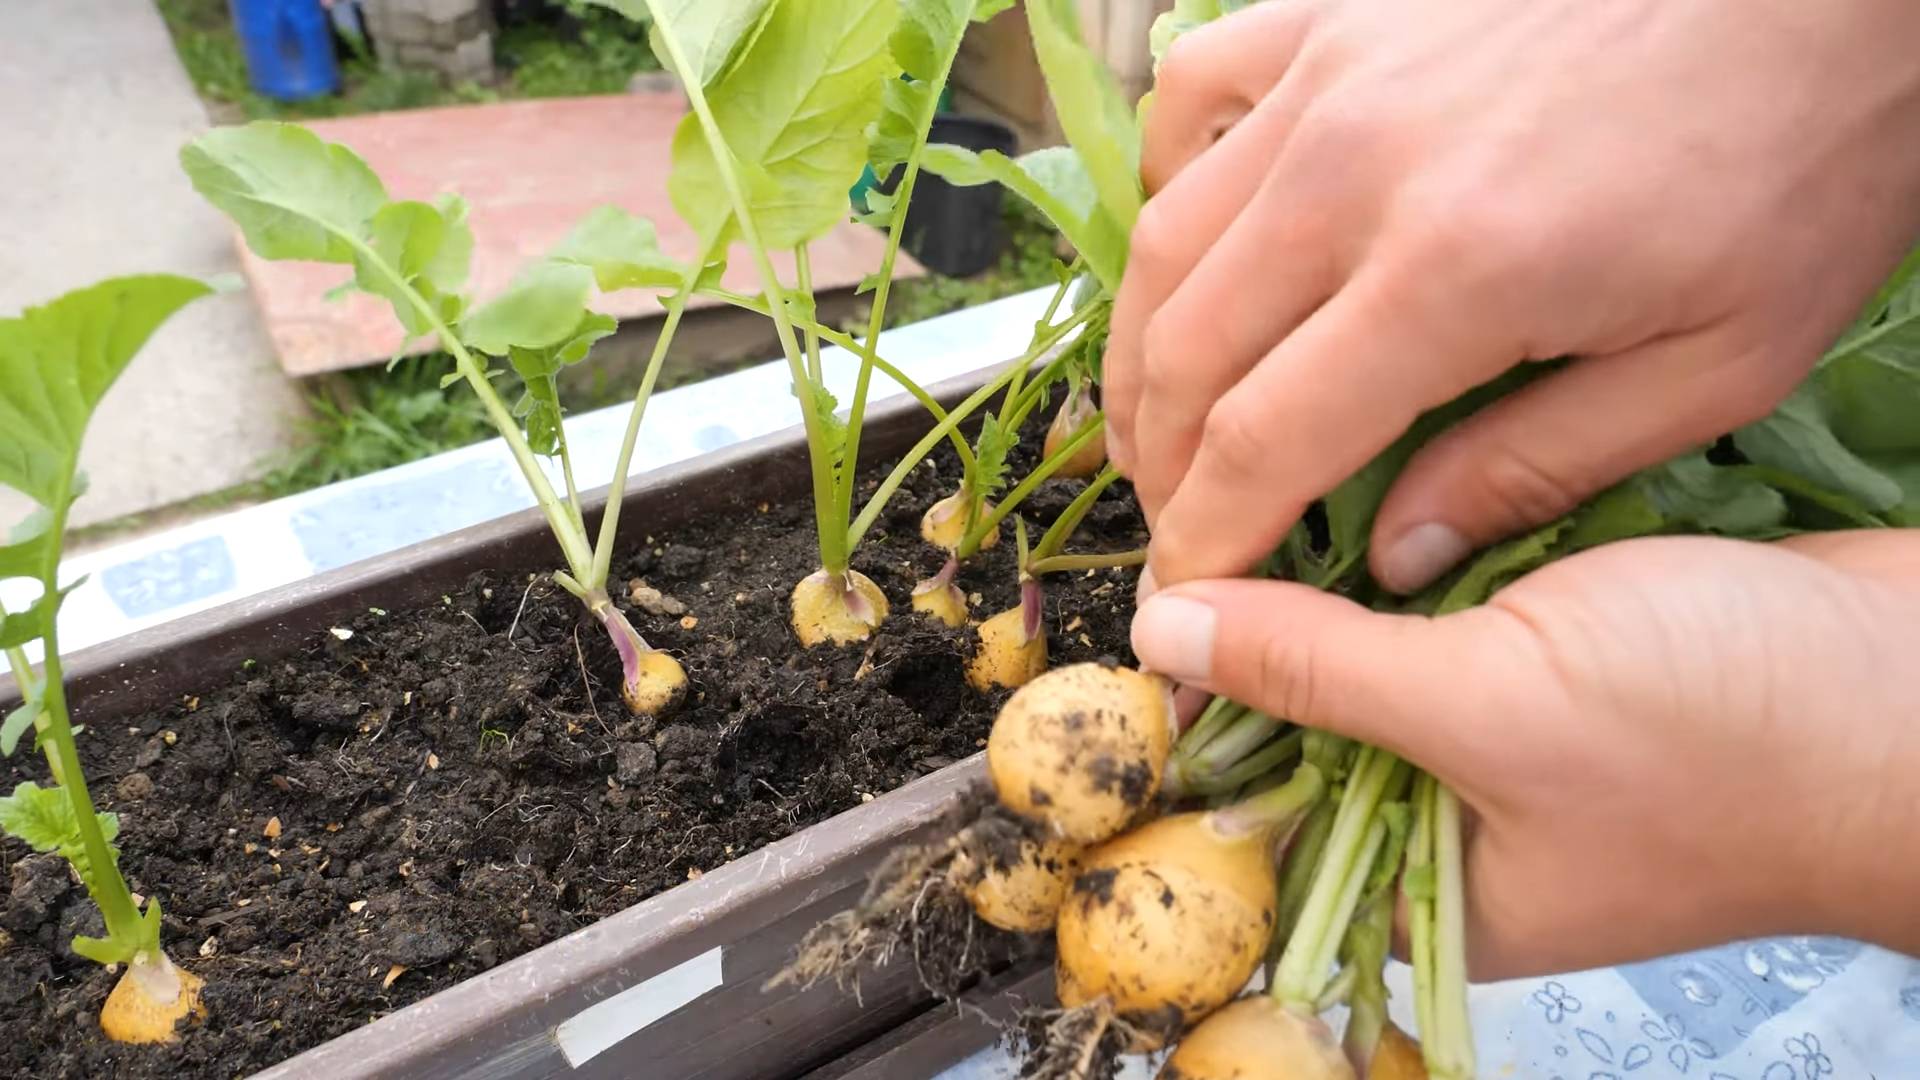
- Harvesting: Once your radishes reach the desired size, gently pull them from the ground. Avoid pulling too hard, as this can damage the roots. If the radishes are difficult to pull, use a garden trowel to loosen the soil around them.
- Cleaning: Wash the radishes gently under cool water to remove any soil. Trim off the tops and any damaged roots.
- Storing: Ra
I love spring radishes! They’re so crisp and peppery, and nothing beats a fresh radish pulled straight from the garden. This guide will walk you through everything you need to know to grow your own delicious spring radishes, from seed to plate.
Phase 1: Planning and Preparation
- Choose your radish variety: There are tons of varieties available, each with different flavors and maturity times. I recommend starting with an easy-to-grow variety like ‘French Breakfast’ or ‘Cherry Belle’ for beginners. Consider the size you prefer – some are small and round, others are long and slender.
- Select your location: Radishes need full sun (at least 6 hours a day) to thrive. Choose a spot in your garden that gets plenty of sunlight. Make sure the soil is well-drained – radishes hate soggy conditions, which can lead to root rot.
- Prepare the soil: Radishes need loose, fertile soil. Amend your soil with compost or other organic matter to improve drainage and fertility. Work the soil to a depth of about 8-10 inches. You can use a garden fork or tiller for this. Remove any rocks or debris.
- Gather your supplies: You’ll need radish seeds, a garden trowel or hand rake, a watering can, and possibly some row markers or garden twine.
Phase 2: Sowing the Seeds
- Timing is key: Spring radishes are a cool-season crop. Sow seeds directly outdoors about 2-3 weeks before the last expected frost in your area. You can also start them indoors 4-6 weeks before the last frost, but it’s usually easier to direct sow.
- Create seed rows: Use a garden trowel or hand rake to create shallow furrows, about ½ inch deep, spaced about 1 inch apart. If you’re planting in a larger area, you can space the rows 12-18 inches apart.
- Sow the seeds: Plant the seeds about ½ inch apart in the furrows. Don’t overcrowd them, as this will lead to smaller radishes. I usually plant 2-3 seeds per inch, knowing some may not germinate.
- Cover the seeds: Gently cover the seeds with soil, using your hands or a trowel to lightly press the soil over them. Don’t bury them too deep.
- Water gently: Water the seeds thoroughly after planting, using a gentle spray to avoid disturbing the soil. Keep the soil consistently moist, but not soggy, throughout the germination period.
Phase 3: Caring for Your Radishes
- Thinning: Once the seedlings emerge (usually within a week or two), thin them to about 2 inches apart. This gives the remaining radishes enough space to grow to their full size. Carefully pull out the smaller, weaker seedlings, leaving the strongest ones behind. You can even eat the thinned seedlings – they’re quite tasty!
- Watering: Keep the soil consistently moist, especially during dry periods. Radishes need regular watering to prevent them from becoming tough and woody. Water deeply and less frequently rather than shallowly and often.
- Weed control: Regularly remove weeds from around your radish plants. Weeds compete with radishes for water and nutrients, reducing the yield. Mulching can help suppress weeds.
- Pest and disease control: Radishes are relatively pest-free, but keep an eye out for flea beetles, which can damage the leaves. If you see flea beetles, cover your plants with a row cover or use an insecticidal soap.
- Monitoring growth: Check your radishes regularly for signs of maturity. The time it takes for them to mature depends on the variety you chose, but it’s usually between 20-40 days. You can gently pull up a few radishes to check their size. If they feel firm and are the desired size, they’re ready to harvest.
Phase 4: Harvesting and Enjoying Your Radishes
- Harvesting: Once your radishes reach the desired size, gently pull them from the ground. Avoid pulling too hard, as this can damage the roots. If the radishes are difficult to pull, use a garden trowel to loosen the soil around them.
- Cleaning: Wash the radishes gently under cool water to remove any soil. Trim off the tops and any damaged roots.
- Storing: Radishes are best eaten fresh, but you can store them in the refrigerator for a few days. Wrap them in a damp paper towel to keep them crisp.
- Enjoying your harvest: Enjoy your homegrown radishes! They’re delicious eaten raw with a little salt and butter, added to salads, or used in stir-fries. You’ve earned a delicious reward for your hard work!
Tips for Success:
- Choose the right time to plant: Planting too early or too late can affect the quality of your radishes.
- Maintain consistent moisture: Avoid letting the soil dry out completely.
- Don’t over-fertilize: Too much fertilizer can lead to bitter-tasting radishes.
- Harvest promptly: Overgrown radishes become tough and woody.
Troubleshooting:
- Pithy radishes: This is often caused by inconsistent watering or hot weather. Ensure consistent moisture and provide some shade during the hottest part of the day.
- Splitting radishes: This can happen due to inconsistent watering or rapid growth. Maintain even moisture levels and avoid over-fertilizing.
- Small radishes: This is often due to overcrowding or poor soil conditions. Ensure proper spacing and amend the soil with compost if necessary.
Conclusion
So there you have it – a comprehensive guide to achieving bountiful spring radish harvests using simple, effective DIY techniques. This isn’t just about growing radishes; it’s about connecting with nature, understanding the subtle nuances of plant growth, and experiencing the unparalleled satisfaction of harvesting your own crisp, flavorful radishes. The beauty of this Spring Radish Gardening approach lies in its accessibility. Whether you have a sprawling backyard or a small balcony container, you can adapt these methods to suit your space. The minimal investment in time and resources yields maximum rewards – a vibrant garden bursting with delicious, homegrown produce. You’ll be amazed at the difference between store-bought radishes and those you’ve nurtured from seed, experiencing a depth of flavor and freshness that’s simply unmatched.
Beyond the core techniques outlined, the possibilities for experimentation are endless. Consider incorporating companion planting, using different radish varieties to extend your harvest season, or exploring creative ways to use your radish greens – they’re packed with nutrients and add a peppery kick to salads and stir-fries. For those with limited space, vertical gardening techniques, such as using stacked planters or hanging baskets, can significantly increase your yield. Don’t be afraid to experiment with different soil compositions and watering schedules to find what works best in your specific environment. The journey of Spring Radish Gardening is as rewarding as the destination.
We strongly encourage you to embark on this rewarding journey. The process of nurturing your radish plants from seed to harvest is incredibly fulfilling, and the taste of your homegrown radishes will be a testament to your efforts. Share your experiences with us! We’d love to hear about your successes, challenges, and any innovative techniques you discover along the way. Post your photos on social media using #SpringRadishGardening and tag us – we can’t wait to see your flourishing gardens and delicious harvests. Remember, even small successes contribute to a larger community of home gardeners, inspiring others to embrace the joy of growing their own food. So, grab your seeds, prepare your soil, and get ready to experience the magic of Spring Radish Gardening. It’s a journey that will enrich your life in more ways than you might imagine.
Frequently Asked Questions
Q: When is the best time to plant spring radishes?
A: The ideal time to plant spring radishes is in early spring, after the last frost. The soil should be workable and consistently above freezing temperatures. This typically falls between late March and early May, depending on your geographic location. You can check your local frost dates for the most accurate planting window.
Q: What type of soil is best for growing radishes?
A: Radishes thrive in loose, well-drained soil that is rich in organic matter. Heavy clay soils can lead to cracked or misshapen roots. Amend heavy clay soils with compost or other organic materials to improve drainage and aeration. Sandy soils may require more frequent watering to maintain consistent moisture levels.
Q: How often should I water my radishes?
A: Consistent moisture is crucial for successful radish growth. Water regularly, keeping the soil evenly moist but not waterlogged. The frequency of watering will depend on your climate and soil type. During hot, dry periods, you may need to water daily, while in cooler, wetter conditions, watering every other day or even less frequently might suffice. Always check the soil moisture before watering – stick your finger a couple of inches into the soil; if it feels dry, it’s time to water.
Q: How long does it take for radishes to mature?
A: The time it takes for radishes to mature varies depending on the variety. Many spring radish varieties mature in as little as 21-28 days, while others may take up to 40-50 days. Check the seed packet for specific maturity information for the variety you’ve chosen. Harvesting at the right time is crucial for optimal flavor and texture; overripe radishes can become tough and woody.
Q: What should I do if my radishes are bolting?
A: Bolting, where the radish plant prematurely sends up a flower stalk, is often caused by hot weather or inconsistent watering. To prevent bolting, plant your radishes in cooler weather, ensure consistent soil moisture, and consider using shade cloth during particularly hot periods. While bolted radishes are still edible, they will be less tender and flavorful.
Q: Can I grow radishes in containers?
A: Absolutely! Radishes are well-suited for container gardening. Choose containers at least 6 inches deep to accommodate root growth. Use a well-draining potting mix and ensure adequate watering. Containers allow for greater control over soil conditions and watering, making them a great option for those with limited space.
Q: What are some common pests and diseases that affect radishes?
A: Radishes are relatively pest-resistant, but they can be susceptible to flea beetles, aphids, and root maggots. Regularly inspect your plants for signs of infestation. Consider using row covers to protect young seedlings from flea beetles. For more serious infestations, consult your local garden center for appropriate pest control solutions. Fungal diseases, such as root rot, can occur in poorly drained soils. Ensure good soil drainage and avoid overwatering to minimize the risk of fungal diseases.
Q: What can I do with my radish greens?
A: Don’t discard those radish greens! They’re packed with nutrients and have a delicious peppery flavor. Use them in salads, stir-fries, or as a garnish. They can also be sautéed or added to soups and stews. The greens are best used when the radishes are young and tender.


Leave a Comment