
Stress-Free Tomato Growing – sounds like a dream, right? I know, I know, visions of lush, red tomatoes bursting with flavor can quickly turn into a nightmare of blight, pests, and stunted growth. But what if I told you that achieving that bountiful harvest doesn’t have to be a constant battle? This isn’t just another gardening guide; it’s your secret weapon to unlocking the joy of growing tomatoes without the overwhelm.
For centuries, tomatoes have held a special place in our hearts and on our plates. Originating in South America, they journeyed across continents, becoming a staple in cuisines worldwide. From the sun-drenched fields of Italy to the vibrant gardens of Mexico, the tomato’s versatility and deliciousness have captivated cultures for generations. But let’s be honest, sometimes getting those perfect tomatoes feels more like a Herculean task than a relaxing hobby.
That’s where these DIY tricks and hacks come in! We all crave fresh, homegrown produce, but the time and effort involved can be daunting. This article is designed to equip you with simple, effective strategies to minimize stress and maximize your tomato yield. Whether you’re a seasoned gardener or just starting out, these tips will help you navigate common challenges, prevent problems before they arise, and ultimately, enjoy the satisfaction of stress-free tomato growing. I’m excited to share these secrets with you, so let’s dive in and transform your tomato-growing experience!
Stress-Free Tomato Growing: A DIY Guide to Bumper Crops
Hey there, fellow gardeners! Are you dreaming of juicy, sun-ripened tomatoes bursting with flavor, but dreading the potential for pests, diseases, and general tomato-growing headaches? Well, you’ve come to the right place! I’m going to share my tried-and-true method for growing tomatoes that minimizes stress and maximizes your harvest. This isn’t just about planting a seed and hoping for the best; it’s about setting your tomatoes up for success from the very beginning.
Choosing the Right Tomato Variety
Before we even get our hands dirty, let’s talk about variety. This is crucial! Not all tomatoes are created equal, and choosing the right one for your climate and growing conditions can make a huge difference.
* Consider your climate: Do you have long, hot summers, or shorter, cooler ones? Determinate varieties (bush tomatoes) are great for shorter seasons because they ripen all their fruit at once. Indeterminate varieties (vining tomatoes) produce fruit throughout the season and are better suited for longer growing periods.
* Think about disease resistance: Look for varieties labeled with letters like V, F, N, T, and A. These indicate resistance to common tomato diseases like Verticillium wilt, Fusarium wilt, Nematodes, Tobacco Mosaic Virus, and Alternaria.
* Choose your flavor profile: Do you prefer sweet cherry tomatoes, tangy heirlooms, or meaty slicers? There’s a tomato for every taste!
* My personal favorites: For cherry tomatoes, I love ‘Sungold’ (super sweet!) and ‘Black Cherry’ (rich and complex). For slicers, ‘Brandywine’ (heirloom flavor) and ‘Early Girl’ (reliable and early) are always winners.
Starting Your Tomato Seeds Indoors (Optional, but Recommended)
Starting your seeds indoors gives you a head start on the growing season, especially if you live in a cooler climate. I highly recommend it!
* When to start: About 6-8 weeks before the last expected frost in your area.
* What you’ll need:
* Seed starting trays or small pots
* Seed starting mix (not regular potting soil!)
* Tomato seeds
* A spray bottle
* A heat mat (optional, but helpful)
* A grow light (essential if you don’t have a very sunny window)
Step-by-Step Instructions:
1. Moisten the seed starting mix: Add water to the mix until it’s damp but not soggy.
2. Fill the trays or pots: Gently fill each cell or pot with the moistened mix.
3. Sow the seeds: Plant 2-3 seeds per cell or pot, about 1/4 inch deep.
4. Cover the seeds: Lightly cover the seeds with more seed starting mix.
5. Water gently: Use a spray bottle to mist the surface of the soil.
6. Provide warmth: Place the trays or pots on a heat mat (if using) and cover them with a humidity dome or plastic wrap to retain moisture.
7. Provide light: Once the seeds germinate (sprout), remove the humidity dome and place the trays under a grow light or in a very sunny window.
8. Water regularly: Keep the soil consistently moist, but not waterlogged.
9. Thin the seedlings: Once the seedlings have their first true leaves (the second set of leaves), thin them to one plant per cell or pot by snipping off the weaker seedlings at the soil line.
10. Fertilize lightly: Start fertilizing the seedlings with a diluted liquid fertilizer (follow the instructions on the fertilizer label) about once a week.
Preparing Your Garden Bed
Now, let’s get your garden bed ready for those tomato plants! Proper soil preparation is key to healthy, productive plants.
* Choose a sunny location: Tomatoes need at least 6-8 hours of direct sunlight per day.
* Amend the soil: Tomatoes are heavy feeders, so they need rich, well-drained soil.
* Add compost: Incorporate plenty of compost into the soil to improve drainage, aeration, and nutrient content. I usually add a few inches of compost to the top of the soil and then till it in.
* Consider adding other amendments: Depending on your soil type, you may also want to add other amendments like aged manure, bone meal (for phosphorus), or Epsom salts (for magnesium).
* Test your soil pH: Tomatoes prefer a slightly acidic soil pH of around 6.0-6.8. You can test your soil pH with a soil testing kit. If your soil is too alkaline, you can amend it with sulfur. If it’s too acidic, you can add lime.
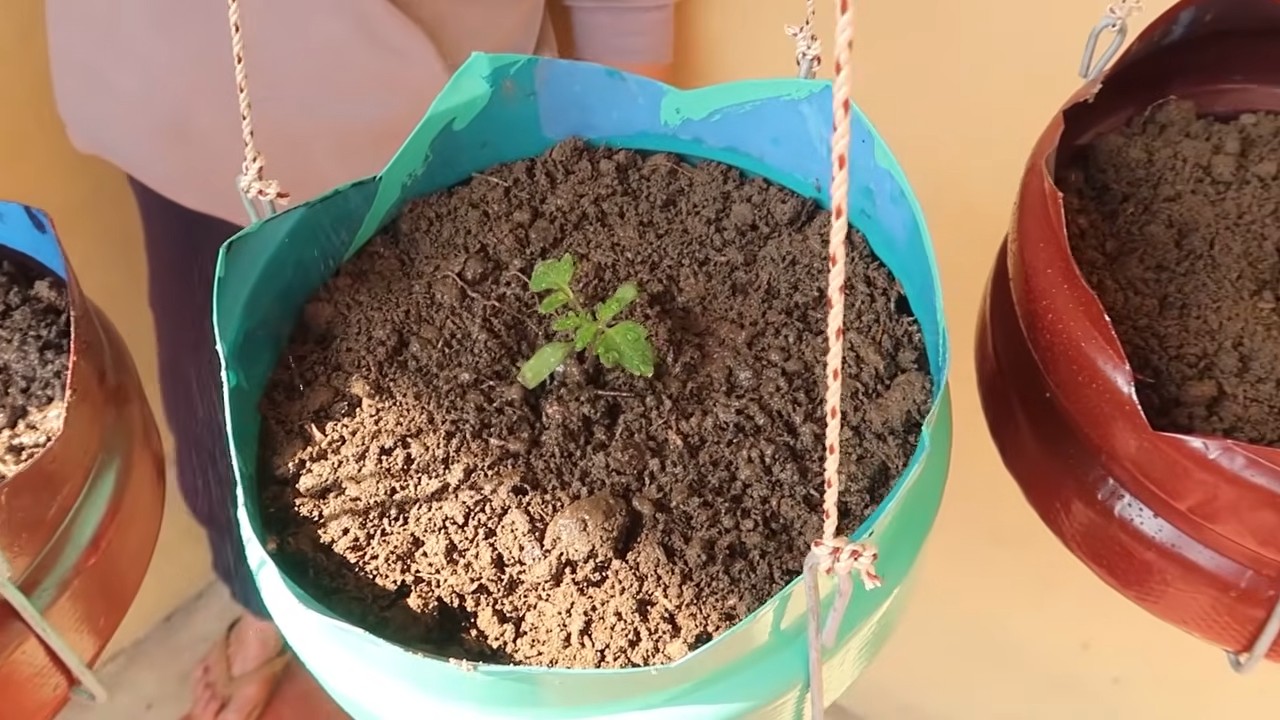
Transplanting Your Tomato Seedlings
The big day! Time to move those little seedlings into their permanent home.
* Harden off the seedlings: Before transplanting, you need to “harden off” the seedlings to acclimate them to outdoor conditions. Gradually expose them to longer periods of sunlight and cooler temperatures over a week or two.
* Choose a cloudy day: Transplanting on a cloudy day will help reduce stress on the seedlings.
* Dig the holes: Dig holes that are deep enough to bury the bottom third of the tomato plant’s stem. This encourages the plant to develop more roots along the buried stem, resulting in a stronger, healthier plant.
* Add fertilizer to the holes: I like to add a handful of slow-release tomato fertilizer or bone meal to each hole.
* Plant the seedlings: Gently remove the seedlings from their trays or pots and place them in the holes.
* Bury the stem: As mentioned, bury the bottom third of the stem.
* Water thoroughly: Water the seedlings well after transplanting.
* Mulch around the plants: Mulch helps retain moisture, suppress weeds, and regulate soil temperature. I like to use straw, shredded leaves, or wood chips.
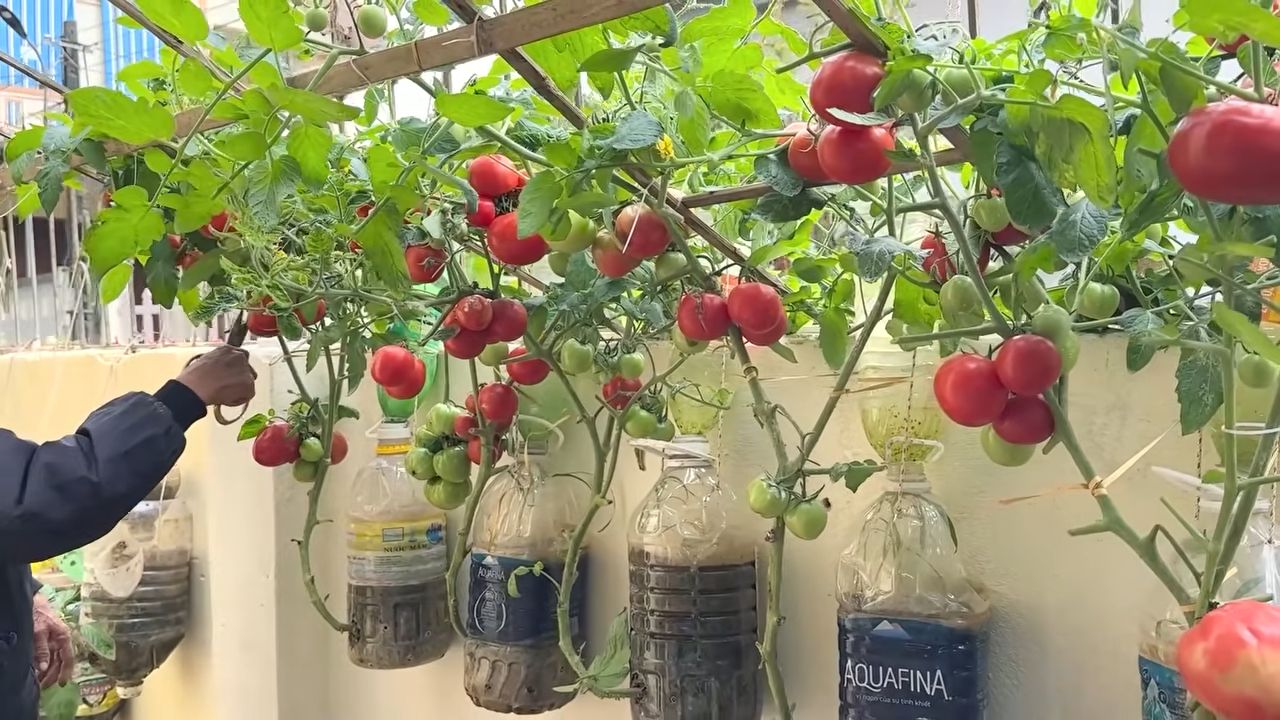
Supporting Your Tomato Plants
Tomato plants, especially indeterminate varieties, need support to keep them off the ground and prevent the fruit from rotting.
* Choose your support method: There are several options for supporting tomato plants:
* Cages: Tomato cages are easy to use and provide good support for bushier varieties.
* Stakes: Staking is a good option for single-stemmed plants.
* Trellises: Trellises are great for vining tomatoes and can add a decorative element to your garden.
* Install the supports early: It’s best to install the supports when you transplant the seedlings to avoid damaging the plants later.
* Tie the plants to the supports: As the plants grow, tie them to the supports with soft twine or plant ties.
Watering and Fertilizing
Consistent watering and fertilization are essential for healthy tomato plants and a bountiful harvest.
* Water deeply and regularly: Water deeply at the base of the plants, rather than overhead, to avoid wetting the foliage and encouraging disease. Aim for about 1-2 inches of water per week, depending on the weather.
* Fertilize regularly: Tomatoes are heavy feeders, so they need regular fertilization. Use a tomato-specific fertilizer or a balanced fertilizer with a higher phosphorus content. Follow the instructions on the fertilizer label. I usually fertilize every 2-3 weeks.
* Watch for signs of nutrient deficiencies: Yellowing leaves, stunted growth, or blossom end rot can indicate nutrient deficiencies. Adjust your fertilization accordingly.
Pruning Your Tomato Plants
Pruning can help improve air circulation, reduce disease, and encourage fruit production.
* Prune suckers: Suckers are the small shoots that grow in the “V” between the main stem and the branches. Remove these suckers to encourage the plant to focus its energy on fruit production.
* Remove yellowing or diseased leaves: Remove any yellowing or diseased leaves to prevent the spread of disease.
* Top the plants (optional): If you live in a cooler climate with a shorter growing season, you can top the plants (cut off the top of the main stem) in late summer to encourage the remaining fruit to ripen.
Dealing with Pests and Diseases
Unfortunately, tomatoes are susceptible to a variety of pests and diseases. But don’t worry, with a little vigilance, you can keep your plants healthy and productive.
* Common pests:
* Aphids: Small, sap-sucking insects that can cause distorted growth. Control them with insecticidal soap or a strong spray of water.
* Tomato hornworms: Large, green caterpillars that can defoliate plants. Handpick them off the plants or use Bacillus thuringiensis (Bt).
* Whiteflies: Small, white, flying insects that can transmit diseases. Control them with insecticidal soap or
Conclusion
So, there you have it! This simple, yet incredibly effective, DIY trick for stress-free tomato growing is a game-changer for both novice and experienced gardeners alike. We’ve walked you through the process, highlighting how burying your tomato seedlings deeper than usual encourages a robust root system, leading to healthier, more productive plants. This isn’t just about getting more tomatoes; it’s about cultivating stronger, more resilient plants that can withstand common garden challenges like drought, pests, and diseases.
Think about it: fewer hours spent watering, less worry about blossom end rot, and a bountiful harvest of juicy, flavorful tomatoes. This method truly embodies the spirit of working smarter, not harder, in the garden. By taking this one simple step during planting, you’re setting your tomato plants up for success from the very beginning.
But the beauty of gardening lies in experimentation! Feel free to adapt this technique to suit your specific needs and growing conditions. For example, if you’re gardening in particularly heavy clay soil, consider amending the soil with compost and other organic matter before planting to improve drainage. You could also try using different types of organic fertilizers at planting time to give your seedlings an extra boost. Some gardeners swear by adding a handful of bone meal to the planting hole to provide a slow-release source of phosphorus, which is essential for root development.
Another variation to consider is the type of tomato you’re growing. While this deep-planting method works well for most tomato varieties, it’s particularly beneficial for indeterminate tomatoes, which tend to grow tall and require staking or caging. The extra root system provides the stability they need to support their vigorous growth. For determinate tomatoes, which are bushier and more compact, deep planting can still be beneficial, but you may not see as dramatic a difference in growth.
Don’t be afraid to experiment with different depths as well. While burying up to two-thirds of the stem is generally recommended, you can adjust this based on the size of your seedling and the length of its stem. The key is to ensure that the lowest set of leaves is just above the soil surface.
Ultimately, the best way to discover the full potential of this DIY trick is to try it for yourself. We are confident that you’ll be amazed by the results. Imagine the satisfaction of harvesting your own homegrown tomatoes, knowing that you played a key role in their success.
We encourage you to embrace this stress-free tomato growing method and share your experiences with us! Let us know in the comments below how it worked for you, what variations you tried, and any tips you have for other gardeners. Your insights could help others achieve their own tomato-growing dreams. Happy gardening!
Frequently Asked Questions
What exactly does burying the tomato plant stem do?
Burying the tomato plant stem allows the buried portion of the stem to develop into roots. Tomato plants have the unique ability to grow roots from any part of their stem that is in contact with soil. By burying a significant portion of the stem, you are essentially creating a much larger root system than the plant would naturally develop if planted at the same depth as it was in its container. This expanded root system allows the plant to absorb more water and nutrients from the soil, leading to stronger growth, increased resilience to stress, and ultimately, a higher yield of tomatoes. The extra roots also help to anchor the plant more securely in the ground, making it less susceptible to wind damage.
Will burying the stem cause the plant to rot?
This is a common concern, but as long as you follow a few simple guidelines, the risk of rot is minimal. The key is to ensure that the soil is well-draining and that you avoid overwatering. Tomato plants prefer consistently moist soil, but they don’t like to sit in standing water. When planting, amend the soil with compost or other organic matter to improve drainage. Also, avoid splashing water onto the buried stem when watering, as this can create a moist environment that encourages fungal growth. If you live in a particularly humid climate, you may want to consider using a fungicide as a preventative measure. However, in most cases, simply ensuring good drainage and avoiding overwatering will be sufficient to prevent rot.
Can I use this method for all types of tomato plants?
Yes, this method is generally safe and effective for all types of tomato plants, including both determinate and indeterminate varieties. However, as mentioned earlier, it’s particularly beneficial for indeterminate tomatoes, which tend to grow tall and require staking or caging. The extra root system provides the stability they need to support their vigorous growth. For determinate tomatoes, which are bushier and more compact, deep planting can still be beneficial, but you may not see as dramatic a difference in growth. Regardless of the type of tomato you’re growing, it’s always a good idea to monitor your plants closely and adjust your watering and fertilization practices as needed.
How deep should I bury the tomato plant stem?
The general recommendation is to bury up to two-thirds of the stem, leaving only the top few sets of leaves above the soil surface. However, you can adjust this based on the size of your seedling and the length of its stem. The key is to ensure that the lowest set of leaves is just above the soil surface. If you’re planting a particularly tall and leggy seedling, you may even be able to bury more than two-thirds of the stem. Just be careful not to bury the leaves themselves, as this can cause them to rot.
What kind of soil should I use when planting tomatoes using this method?
The ideal soil for tomatoes is well-draining, fertile, and slightly acidic. Before planting, amend the soil with compost or other organic matter to improve drainage and add nutrients. You can also add a slow-release fertilizer to the planting hole to give your seedlings an extra boost. Avoid using heavy clay soil, as this can retain too much water and lead to root rot. If you have clay soil, amend it with plenty of organic matter to improve drainage. You can also consider planting your tomatoes in raised beds or containers to ensure good drainage.
How often should I water tomato plants that have been planted deeply?
Tomato plants that have been planted deeply generally require less frequent watering than those that have been planted at a shallower depth. This is because the expanded root system allows them to access more water from the soil. However, it’s still important to monitor your plants closely and water them when the top inch of soil feels dry to the touch. Avoid overwatering, as this can lead to root rot. When watering, water deeply and thoroughly, allowing the water to soak into the soil. Avoid splashing water onto the leaves, as this can encourage fungal diseases.
What if my tomato plant is already established? Can I still bury part of the stem?
While it’s best to use this method when initially planting your tomato seedlings, you can still try burying part of the stem of an established plant, although it requires a bit more care. Gently dig around the base of the plant, being careful not to damage the existing roots. Then, carefully bend the stem down and bury a portion of it in the soil, ensuring that the leaves are above the surface. Water well and monitor the plant closely for any signs of stress. It’s important to note that this method may not be as effective for established plants as it is for seedlings, but it can still help to improve their root system and overall health.
Will this method protect my tomatoes from pests and diseases?
While this deep-planting method primarily focuses on enhancing root development and overall plant health, a stronger, healthier plant is naturally more resistant to pests and diseases. A robust root system allows the plant to better absorb nutrients and water, making it less susceptible to stress and more capable of fighting off infections. However, this method is not a substitute for other pest and disease control measures. You should still monitor your plants regularly for signs of pests or diseases and take appropriate action as needed. This may include using organic pesticides, fungicides, or other control methods.

Leave a Comment