
Tomato harvest tips are essential for any home gardener dreaming of juicy, sun-ripened tomatoes bursting with flavor. Imagine biting into a perfectly ripe tomato, the taste a world away from the bland, store-bought variety. That dream can be your reality! But knowing when and how to harvest your tomatoes is the key to unlocking that deliciousness.
For centuries, tomatoes have been a staple in cuisines around the world, from the vibrant sauces of Italy to the refreshing salsas of Mexico. Originally cultivated in South America, these vibrant fruits (yes, they’re technically fruits!) have become a symbol of summer and home-grown goodness. But all that hard work nurturing your tomato plants can be undone if you don’t harvest them correctly.
That’s where this DIY guide comes in! I’m going to share my favorite tomato harvest tips and tricks to ensure you get the most out of your garden. We’ll cover everything from identifying the perfect ripeness to proper harvesting techniques that prevent damage and encourage continued production. Stop letting your precious tomatoes go to waste or, worse, picking them too early and missing out on their full flavor potential. Let’s dive in and make this your best tomato harvest yet!

DIY Tomato Cage Trellis Upgrade for a Bountiful Harvest
Okay, tomato lovers, let’s talk about getting the most out of your tomato plants! We all know the frustration of watching our precious tomatoes sprawl all over the ground, susceptible to pests, diseases, and just plain getting lost in the foliage. The flimsy wire cages you buy at the garden center? They’re just not up to the task, especially for indeterminate varieties that grow like crazy all season long. So, I’m going to show you how to build a super sturdy, customizable tomato cage trellis that will support your plants from seedling to harvest, maximizing your yield and keeping your tomatoes healthy and happy.
Why Upgrade Your Tomato Cages?
Before we dive in, let’s quickly cover why this DIY upgrade is so worthwhile:
* Superior Support: Forget those flimsy cages that topple over in the first strong wind. This trellis system provides robust support for even the heaviest tomato plants laden with fruit.
* Improved Air Circulation: By keeping the foliage off the ground and well-supported, you’ll drastically improve air circulation around your plants. This helps prevent fungal diseases like blight and septoria leaf spot.
* Easier Harvesting: No more crawling around on your hands and knees to find ripe tomatoes! The open structure of the trellis makes harvesting a breeze.
* Increased Sunlight Exposure: With better support, your plants will receive more sunlight, leading to increased fruit production and better ripening.
* Customizable Design: You can easily adapt this design to fit your specific garden space and the size of your tomato plants.
* Cost-Effective: While there’s an initial investment in materials, this trellis system will last for years, saving you money in the long run compared to constantly replacing flimsy cages.
* Looks Great: Let’s be honest, a well-supported tomato plant is a beautiful sight in the garden!
Materials You’ll Need
Here’s what you’ll need to gather before we get started. Don’t worry, most of these items are readily available at your local hardware store:
* 4×4 Lumber Posts (8 feet long): The number of posts you need will depend on how many tomato plants you want to support. I recommend spacing them about 4-6 feet apart. These will be the main vertical supports for your trellis.
* 2×4 Lumber Boards (8 feet long): These will be used for the horizontal supports that connect the posts and provide the framework for the trellis. Again, the quantity depends on the number of posts.
* Concrete Mix: For setting the posts securely in the ground.
* Gravel: To improve drainage around the base of the posts.
* Exterior Wood Screws (3-inch): For attaching the 2x4s to the 4×4 posts.
* Heavy-Duty Wire Mesh or Cattle Panel: This will be the actual trellis material that the tomato plants will climb on. Choose a mesh size that’s appropriate for your tomato variety. I prefer cattle panel because it’s super strong and durable.
* Wire Cutters: For cutting the wire mesh or cattle panel to size.
* Heavy-Duty Staples or U-Nails: For attaching the wire mesh to the 2×4 frame.
* Measuring Tape: Essential for accurate measurements.
* Level: To ensure your posts are perfectly vertical.
* Shovel or Post Hole Digger: For digging the holes for the posts.
* Wheelbarrow or Mixing Tub: For mixing the concrete.
* Gloves: To protect your hands.
* Safety Glasses: Always wear safety glasses when working with power tools and concrete.
* Drill with Screwdriver Bits: For driving in the screws.
* Staple Gun (optional): Makes attaching the wire mesh much easier.
Step-by-Step Instructions: Building Your Tomato Cage Trellis
Okay, let’s get building! This project might seem a little intimidating at first, but I promise it’s totally manageable, even for beginner DIYers. Just take it one step at a time, and you’ll have a fantastic tomato trellis in no time.
Phase 1: Setting the Posts
This is the most crucial step, as the stability of your entire trellis depends on how well the posts are set.
1. Plan Your Layout: Decide where you want to place your tomato plants and mark the locations for your posts. Remember to space them 4-6 feet apart. Use a measuring tape to ensure accurate spacing.
2. Dig the Post Holes: Dig holes that are at least 2 feet deep and 10-12 inches in diameter. The deeper the holes, the more stable your trellis will be. A post hole digger makes this task much easier, but a shovel will work too.
3. Add Gravel: Pour a few inches of gravel into the bottom of each hole. This will help with drainage and prevent the posts from rotting.
4. Position the Posts: Place a 4×4 post into each hole. Use a level to ensure the post is perfectly vertical. You may need to use temporary braces to hold the posts in place while the concrete sets.
5. Mix the Concrete: Follow the instructions on the concrete mix bag to prepare the concrete. Add water gradually until you achieve a thick, oatmeal-like consistency.
6. Pour the Concrete: Carefully pour the concrete into the holes around the posts, filling them to within a few inches of the ground level.
7. Tamp the Concrete: Use a piece of wood or a metal rod to tamp the concrete down, removing any air pockets.
8. Check for Level: Double-check that the posts are still level after pouring the concrete. Adjust as needed.
9. Let the Concrete Cure: Allow the concrete to cure for at least 24-48 hours before proceeding to the next step. This is crucial for ensuring the posts are firmly set. I know it’s tempting to rush, but trust me, patience is key here!
Phase 2: Constructing the Frame
Now that the posts are securely in place, we can build the frame that will support the wire mesh.
1. Measure and Cut the 2x4s: Measure the distance between the posts and cut the 2×4 lumber to the appropriate length. You’ll need to cut enough 2x4s to create horizontal supports at the top, middle, and bottom of the posts.
2. Attach the Top Support: Position a 2×4 horizontally across the top of two adjacent posts. Use a level to ensure it’s straight. Secure the 2×4 to the posts using 3-inch exterior wood screws. Drive at least two screws into each post.
3. Attach the Middle Support: Repeat the process to attach a 2×4 horizontally across the middle of the posts. I usually place this support about 3 feet from the ground.
4. Attach the Bottom Support: Attach the final 2×4 horizontally across the bottom of the posts, about 1 foot from the ground.
5. Repeat for All Posts: Continue attaching the 2x4s to all the posts, creating a sturdy rectangular frame.
Phase 3: Attaching the Wire Mesh
This is where your tomato trellis really starts to take shape!
1. Measure and Cut the Wire Mesh: Measure the height and width of the frame and cut the wire mesh or cattle panel to the appropriate size. Be sure to wear gloves and safety glasses when working with wire mesh, as the cut edges can be sharp.
2. Position the Wire Mesh: Carefully position the wire mesh against the frame, ensuring it’s centered and aligned properly.
3. Attach the Wire Mesh: Use heavy-duty staples or U-nails to attach the wire mesh to the 2×4 frame. If you’re using a staple gun, make sure it’s set to the appropriate depth to avoid damaging the wood. Space the staples or U-nails about 6-8 inches apart.
4. Secure the Edges: Pay special attention to securing the edges of the wire mesh, as these are the areas that are most likely to come loose.
5. Inspect for Sharp Edges: Once the wire mesh is attached, inspect it for any sharp edges that could injure you or your plants. Use wire cutters to trim any sharp points.
Tips for Success
* Use Pressure-Treated Lumber: Pressure-treated lumber is more resistant to rot and decay, which will extend the lifespan of your trellis.
* Pre-Drill Holes: Pre-drilling holes before driving in the screws will prevent the wood from splitting.
* Consider Adding a Top Rail: For extra stability, you can add a top rail by attaching a 2×4 horizontally across the top of the posts, connecting them all together.
* Paint or Stain the Trellis: Painting or staining
Conclusion
So, there you have it! Mastering these simple yet effective tomato harvest tips can truly transform your gardening experience and ensure you reap the rewards of your hard work. No more prematurely picked, bland tomatoes or fruit left to rot on the vine. By paying attention to the subtle signs of ripeness – the color, the feel, and the gentle tug – you’ll be enjoying the most flavorful, juicy tomatoes imaginable.
This isn’t just about picking tomatoes; it’s about maximizing your yield, minimizing waste, and savoring the peak of freshness. Think of the possibilities! Imagine vibrant salads bursting with homegrown flavor, rich and savory sauces made from sun-ripened goodness, and the satisfaction of sharing your bounty with friends and family.
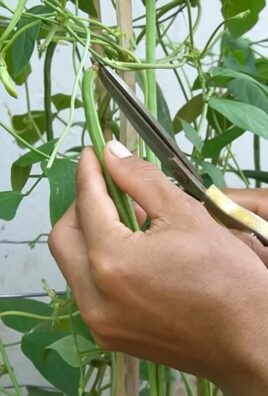
But the learning doesn’t stop here. Experiment with different harvesting techniques based on your specific tomato variety. For instance, heirloom tomatoes, known for their delicate skins, might require an even gentler touch than your standard hybrids. Consider using clean pruning shears to snip the stem close to the fruit, minimizing any damage to the plant and preventing the spread of disease.
And don’t be afraid to get creative with your harvest! If you find yourself with a glut of green tomatoes at the end of the season, don’t despair. They can be transformed into delicious fried green tomatoes, tangy chutneys, or even pickled for a unique and flavorful condiment.
We wholeheartedly encourage you to put these tomato harvest tips into practice and witness the difference they make in your garden. Remember, gardening is a journey of continuous learning and experimentation. The more you observe your plants and adapt your techniques, the more successful you’ll become.
We’re confident that these tips will empower you to become a tomato-harvesting pro. But more importantly, we want to hear about your experiences! Share your successes, your challenges, and any variations you discover along the way. Did you find a particular harvesting method that works exceptionally well for your specific tomato variety? Did you discover a creative way to use your green tomatoes? Let us know in the comments below! Your insights could help other gardeners and contribute to a thriving community of tomato enthusiasts. Happy harvesting!
Frequently Asked Questions (FAQ)
What are the key indicators that a tomato is ready to be harvested?
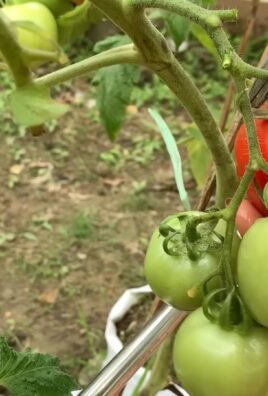
The most reliable indicators are color, feel, and ease of detachment. A ripe tomato will have a deep, uniform color specific to its variety (red, yellow, orange, purple, etc.). It should feel slightly soft to the touch but not mushy. When gently twisted, it should easily detach from the vine without requiring excessive force. If you have to tug hard, it’s likely not quite ripe yet.
Is it better to harvest tomatoes in the morning or evening?
Harvesting in the morning, after the dew has dried, is generally recommended. This is because the tomatoes will be cooler and firmer, making them less susceptible to bruising or damage during handling. Avoid harvesting during the hottest part of the day, as the tomatoes may be stressed and more prone to spoilage.
What should I do if I have a lot of green tomatoes at the end of the season?
Don’t worry, green tomatoes are not a waste! They can be used in a variety of delicious recipes. Fried green tomatoes are a classic Southern dish, and green tomatoes can also be used to make chutneys, pickles, relishes, and even added to salsas for a tangy kick. You can also try ripening them indoors by placing them in a paper bag with a ripe banana or apple, which releases ethylene gas that promotes ripening.
How should I store my harvested tomatoes?
The best way to store freshly harvested tomatoes depends on their ripeness. Ripe tomatoes should be stored at room temperature, away from direct sunlight, for optimal flavor. Refrigeration can dull their flavor and alter their texture. However, if you need to extend their shelf life, you can refrigerate them, but be sure to bring them back to room temperature before eating for the best taste. Green tomatoes should be stored at room temperature in a single layer, away from direct sunlight, to encourage ripening.
Can I harvest tomatoes after a frost?
Yes, you can harvest tomatoes after a light frost, but the quality may be affected. If the tomatoes have been exposed to freezing temperatures, they may become soft and mushy. Harvest them immediately and use them as soon as possible. Discard any tomatoes that are severely damaged or show signs of rot.
What are some common mistakes people make when harvesting tomatoes?
One common mistake is harvesting tomatoes too early, before they have fully ripened. This results in bland, flavorless tomatoes. Another mistake is harvesting too late, allowing the tomatoes to become overripe and susceptible to pests and diseases. Using excessive force when harvesting can also damage the plant and the fruit. Always handle tomatoes gently to avoid bruising.
How can I prevent my tomatoes from cracking?
Tomato cracking is often caused by inconsistent watering, especially after a period of drought. To prevent cracking, water your tomato plants regularly and consistently, especially during hot, dry weather. Mulching around the plants can also help retain moisture in the soil. Choose tomato varieties that are less prone to cracking.
What if my tomatoes have blossom-end rot?
Blossom-end rot is a physiological disorder caused by a calcium deficiency in the developing fruit. It’s characterized by a dark, leathery spot on the bottom of the tomato. To prevent blossom-end rot, ensure your soil has adequate calcium levels and maintain consistent watering. You can also add calcium supplements to the soil or spray the plants with a calcium solution.
How do I know if my tomato plant has a disease?
Look for signs of disease such as yellowing or browning leaves, spots on the leaves or fruit, wilting, or stunted growth. Common tomato diseases include early blight, late blight, and Septoria leaf spot. If you suspect your plant has a disease, identify the specific disease and take appropriate action, such as removing infected leaves, applying a fungicide, or improving air circulation around the plants.
Can I save seeds from my harvested tomatoes to plant next year?
Yes, you can save seeds from your harvested tomatoes, but it’s important to note that hybrid tomatoes may not produce true-to-type offspring. If you want to save seeds, choose open-pollinated or heirloom varieties. To save seeds, scoop out the seeds and pulp from a ripe tomato and place them in a jar with a little water. Let the mixture ferment for a few days, then rinse the seeds and dry them thoroughly before storing them in a cool, dry place.
Leave a Comment