
Upside Down Eggplant Growing: Ever dreamt of a garden overflowing with plump, juicy eggplants, but feel limited by space or pesky garden pests? I get it! We’ve all been there, staring at our tiny balconies or battling slugs with a vengeance. But what if I told you there’s a quirky, space-saving, and surprisingly effective way to cultivate these purple beauties?
For centuries, gardeners have experimented with innovative techniques to maximize yields and overcome environmental challenges. While the exact origins of upside-down gardening are debated, the spirit of resourcefulness and ingenuity that drives it is timeless. Think of it as a modern twist on ancient hanging gardens, bringing a touch of vertical charm to your own little green space.
But why should you consider upside down eggplant growing? Well, besides the sheer novelty and conversation-starting appeal, this method offers some serious advantages. By suspending your eggplant, you’re naturally deterring ground-dwelling pests like snails and cutworms. Plus, it’s a fantastic solution for those with limited garden space, allowing you to grow a bountiful harvest on a balcony, patio, or even a sunny windowsill. So, ditch the traditional garden bed and get ready to flip your gardening game upside down – literally! I’m excited to share my favorite DIY tricks and hacks to help you achieve eggplant-growing success, no matter your experience level.
Kopfstehende Aubergine: Dein DIY-Guide für eine ungewöhnliche Ernte
Hey Gartenfreunde! Habt ihr schon mal darüber nachgedacht, Auberginen kopfüber anzubauen? Klingt verrückt, oder? Aber glaubt mir, es ist nicht nur ein Hingucker, sondern kann auch echt praktisch sein. Ich zeige euch, wie ihr das ganz einfach selbst machen könnt. Lasst uns loslegen!
Warum Auberginen kopfüber anbauen?
Bevor wir ins Detail gehen, kurz die Vorteile:
* Platzsparend: Ideal für Balkone, Terrassen oder kleine Gärten.
* Weniger Schädlinge: Die Früchte hängen frei und sind weniger anfällig für Bodenschädlinge.
* Bessere Belüftung: Hilft, Pilzkrankheiten vorzubeugen.
* Einfache Ernte: Die Auberginen hängen direkt vor deiner Nase!
* Ein echter Hingucker: Deine Nachbarn werden staunen!
Was du brauchst: Die Materialliste
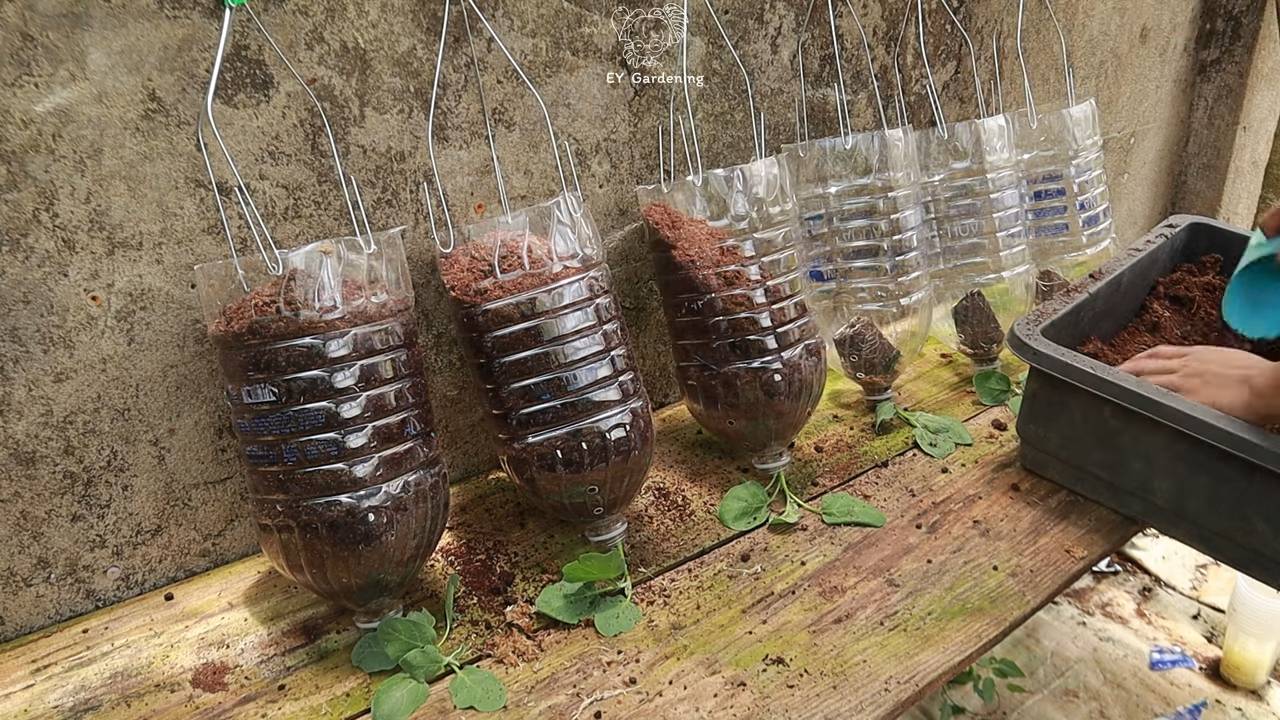
* Ein stabiler Eimer oder Pflanzkübel: Am besten aus Plastik, da er leichter ist. Mindestens 10 Liter Fassungsvermögen.
* Eine junge Auberginenpflanze: Wähle eine gesunde Pflanze mit kräftigen Blättern.
* Hochwertige Blumenerde: Achte auf eine gute Drainage.
* Eine Schere oder ein Messer: Zum Schneiden des Lochs im Eimer.
* Ein Stück Stoff oder Jute: Um die Pflanze beim Einsetzen zu schützen.
* Eine Aufhängung: Eine Kette, ein starkes Seil oder ein Haken, um den Eimer aufzuhängen.
* Gießkanne: Für die Bewässerung.
* Optional: Langzeitdünger für eine optimale Nährstoffversorgung.
Schritt-für-Schritt-Anleitung: So geht’s!
1. Den Eimer vorbereiten:
* Zuerst musst du ein Loch in den Boden des Eimers schneiden. Der Durchmesser sollte etwa 5-7 cm betragen, je nach Größe des Stiels deiner Auberginenpflanze. Das Loch sollte groß genug sein, damit der Stiel hindurchpasst, aber nicht so groß, dass die Erde herausfällt.
* Wichtig: Achte darauf, dass die Kanten des Lochs glatt sind, damit der Stiel der Pflanze nicht beschädigt wird. Du kannst die Kanten eventuell mit Schleifpapier glätten.
2. Die Pflanze vorbereiten:
* Nimm die Auberginenpflanze vorsichtig aus ihrem Topf. Schüttele die Erde leicht ab, aber versuche, die Wurzeln nicht zu beschädigen.
* Befeuchte die Wurzeln leicht, damit sie beim Einsetzen nicht austrocknen.
3. Die Pflanze einsetzen:
* Lege das Stück Stoff oder Jute um den Stiel der Auberginenpflanze, direkt unterhalb der Blätter. Das dient als Schutz und verhindert, dass Erde in den Eimer fällt.
* Führe den Stiel der Pflanze vorsichtig durch das Loch im Boden des Eimers. Achte darauf, dass die Blätter außerhalb des Eimers bleiben.
* Tipp: Wenn du Schwierigkeiten hast, die Pflanze durch das Loch zu bekommen, kannst du das Loch etwas vergrößern oder die Blätter vorsichtig zusammenbinden.
4. Den Eimer befüllen:
* Fülle den Eimer vorsichtig mit Blumenerde. Achte darauf, dass die Wurzeln der Auberginenpflanze gut bedeckt sind.
* Drücke die Erde leicht an, aber nicht zu fest. Die Erde sollte locker und luftig sein.
* Lass oben im Eimer etwa 2-3 cm Platz, damit du beim Gießen nicht alles überschwemmst.
5. Die Aufhängung anbringen:
* Befestige die Aufhängung (Kette, Seil oder Haken) am Eimer. Achte darauf, dass die Aufhängung stabil ist und das Gewicht des Eimers tragen kann.
* Wichtig: Die Aufhängung sollte gleichmäßig verteilt sein, damit der Eimer nicht schief hängt.
6. Den Eimer aufhängen:
* Suche einen sonnigen Platz für deine kopfüber hängende Aubergine. Auberginen brauchen mindestens 6-8 Stunden Sonne pro Tag.
* Hänge den Eimer an einem stabilen Haken oder einer Stange auf. Achte darauf, dass der Eimer frei hängt und die Pflanze genügend Platz hat, um zu wachsen.
7. Gießen und Düngen:
* Gieße die Auberginenpflanze regelmäßig, besonders in den ersten Tagen nach dem Einsetzen. Die Erde sollte immer leicht feucht sein, aber nicht nass.
* Dünge die Pflanze regelmäßig mit einem geeigneten Dünger. Ich empfehle einen Langzeitdünger, den du beim Einsetzen in die Erde mischen kannst. Alternativ kannst du auch regelmäßig Flüssigdünger verwenden.
Pflege und Wartung: Damit deine Aubergine prächtig gedeiht
* Gießen: Wie gesagt, regelmäßiges Gießen ist wichtig. Überprüfe die Erde täglich und gieße, wenn sie sich trocken anfühlt. An heißen Tagen musst du möglicherweise zweimal täglich gießen.
* Düngen: Auberginen sind Starkzehrer und brauchen ausreichend Nährstoffe. Dünge sie alle 2-3 Wochen mit einem Flüssigdünger oder verwende einen Langzeitdünger.
* Schädlinge: Kontrolliere deine Pflanze regelmäßig auf Schädlinge wie Blattläuse oder Spinnmilben. Bei Befall kannst du natürliche Schädlingsbekämpfungsmittel verwenden.
* Ausgeizen: Entferne regelmäßig Seitentriebe, die sich in den Blattachseln bilden. Das fördert das Wachstum der Haupttriebe und die Fruchtbildung.
* Stützen: Wenn die Auberginen größer werden, kann es sein, dass die Pflanze zusätzliche Unterstützung benötigt. Du kannst die Triebe mit einem weichen Band an der Aufhängung befestigen.
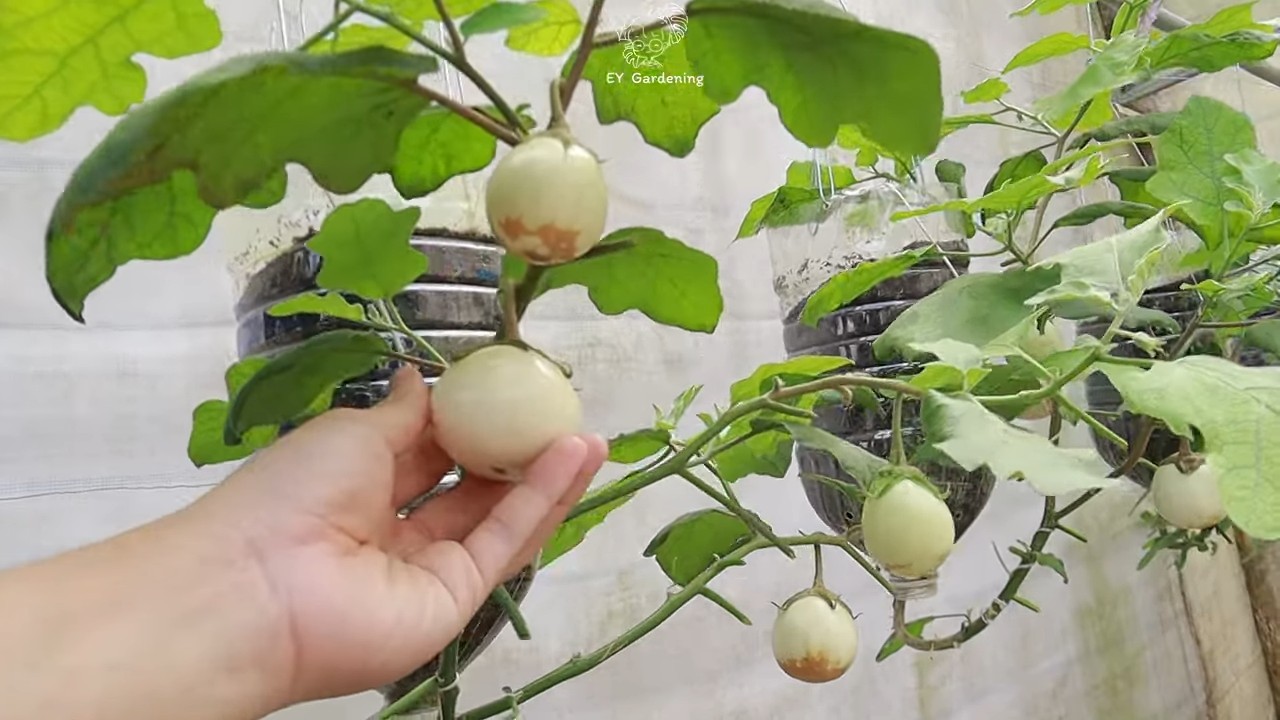
* Ernte: Die Auberginen sind reif, wenn sie eine glänzende, dunkle Farbe haben und sich leicht eindrücken lassen. Schneide die Früchte mit einem scharfen Messer ab.
Häufige Probleme und Lösungen
* Gelbe Blätter: Können ein Zeichen für Überwässerung, Nährstoffmangel oder Schädlingsbefall sein. Überprüfe die Erde, dünge die Pflanze und kontrolliere sie auf Schädlinge.
* Blüten fallen ab: Kann durch zu hohe oder zu niedrige Temperaturen, Wassermangel oder Nährstoffmangel verursacht werden. Sorge für optimale Bedingungen und dünge die Pflanze.
* Kleine Früchte: Können durch unzureichende Bestäubung verursacht werden. Du kannst die Blüten vorsichtig mit einem Pinsel bestäuben, um die Bestäubung zu fördern.
Zusätzliche Tipps und Tricks
* Wähle die richtige Sorte: Nicht alle Auberginensorten eignen sich für den Anbau im Eimer. Wähle eine kompakte Sorte, die nicht zu groß wird.
* Verwende eine dunkle Farbe für den Eimer: Dunkle Farben absorbieren mehr Wärme und fördern das Wachstum der Pflanze.
* Schütze die Pflanze vor starkem Wind: Starker Wind kann die Pflanze beschädigen und die Früchte abwerfen. Hänge den Eimer an einem windgeschützten Ort auf.
* Sei geduldig: Es kann einige Wochen dauern, bis die ersten Auberginen reif sind. Hab Geduld und pflege deine Pflanze gut, dann wirst du mit einer reichen Ernte belohnt!
Ich hoffe, dieser Guide hilft dir dabei, deine eigenen Auberginen kopfüber anzubauen. Es ist wirklich ein tolles Erlebnis und die frischen Auberginen schmecken einfach fantastisch! Viel Spaß beim Gärtnern!
Conclusion
So, there you have it! Growing eggplant upside down isn’t just a quirky gardening trend; it’s a genuinely effective method for maximizing your yield, minimizing pest problems, and adding a unique visual element to your garden. We’ve explored the benefits, walked through the process, and armed you with the knowledge to confidently embark on this exciting gardening adventure.
Why is this a must-try? Because it addresses several common challenges faced by eggplant growers. The elevated position reduces soilborne diseases and keeps those pesky ground-crawling pests at bay. The improved air circulation minimizes fungal issues, and the hanging fruit receives more sunlight, leading to earlier and more abundant harvests. Plus, let’s be honest, a garden adorned with hanging eggplants is a conversation starter!
But the beauty of gardening lies in experimentation. Feel free to adapt this method to your specific needs and preferences. For instance, if you live in a particularly windy area, consider using smaller containers or providing additional support to prevent the plants from swaying excessively. You can also experiment with different eggplant varieties. While smaller, more compact varieties like ‘Fairy Tale’ or ‘Hansel’ are particularly well-suited for upside-down growing, you can certainly try larger varieties, just be sure to provide adequate support as the fruits develop.
Another variation to consider is the type of container you use. While we’ve focused on using buckets or hanging baskets, you can also repurpose other items, such as old tires or even large plastic bottles, as long as they provide adequate drainage and support. Get creative and see what works best for you!
Ultimately, the success of your upside-down eggplant growing venture depends on your dedication and willingness to learn. Don’t be afraid to make mistakes – they’re all part of the learning process. Pay close attention to your plants, monitor their growth, and adjust your watering and fertilizing schedule as needed.
We are confident that you’ll find this method rewarding. The satisfaction of harvesting your own homegrown eggplants, especially when grown in such an unconventional way, is truly unparalleled. So, grab your containers, gather your supplies, and get ready to experience the joy of upside-down eggplant growing!
We encourage you to try this DIY trick and share your experiences with us! Post photos of your upside-down eggplant gardens on social media using #UpsideDownEggplant and tag us so we can see your amazing creations. Let’s build a community of upside-down eggplant enthusiasts and learn from each other’s successes and challenges. Happy gardening!
Frequently Asked Questions (FAQ)
What varieties of eggplant are best suited for upside-down growing?
While almost any eggplant variety can be grown upside down, smaller, more compact varieties tend to thrive best. ‘Fairy Tale,’ ‘Hansel,’ ‘Gretel,’ and ‘Patio Baby’ are excellent choices due to their manageable size and prolific fruit production. These varieties are less likely to become top-heavy and require less support. However, if you’re determined to grow larger varieties like ‘Black Beauty’ or ‘Italian Long,’ be sure to provide ample support to prevent the plant from breaking or the container from tipping over. You might need to use stakes or a trellis to support the weight of the mature plant and its fruits.
How often should I water my upside-down eggplant?
Watering frequency depends on several factors, including the size of your container, the weather conditions, and the type of potting mix you’re using. Generally, upside-down eggplants tend to dry out more quickly than those grown in the ground, so you’ll need to water them more frequently. Check the soil moisture daily by sticking your finger about an inch into the soil. If it feels dry, it’s time to water. Water thoroughly until water drains out of the bottom of the container. Avoid overwatering, as this can lead to root rot. During hot, sunny weather, you may need to water your plants twice a day.
What kind of fertilizer should I use for upside-down eggplants?
Eggplants are heavy feeders, so they require regular fertilization to produce abundant fruit. Start with a balanced fertilizer (e.g., 10-10-10) when you first transplant your seedlings into the containers. Once the plants start to flower, switch to a fertilizer that is higher in phosphorus and potassium (e.g., 5-10-10) to promote fruit development. You can use either a granular fertilizer or a liquid fertilizer. If using a granular fertilizer, follow the instructions on the package and apply it to the soil around the base of the plant. If using a liquid fertilizer, dilute it according to the instructions and water the plants with the solution. Fertilize your eggplants every two to three weeks throughout the growing season.
How do I prevent pests and diseases from affecting my upside-down eggplants?
One of the main advantages of upside-down growing is that it helps to reduce pest and disease problems. However, it’s still important to take precautions to protect your plants. Regularly inspect your plants for signs of pests or diseases, such as aphids, spider mites, or fungal infections. If you spot any problems, take action immediately. You can use insecticidal soap or neem oil to control pests, and copper fungicide to treat fungal diseases. Avoid overcrowding your plants, as this can create a humid environment that is conducive to disease development. Ensure good air circulation around your plants by spacing them adequately and pruning away any dead or diseased leaves.
How much sunlight do upside-down eggplants need?
Eggplants need at least six to eight hours of direct sunlight per day to thrive. Choose a location for your upside-down eggplants that receives plenty of sunlight throughout the day. If you live in a particularly hot climate, you may need to provide some afternoon shade to prevent the plants from getting scorched. You can use shade cloth or move the containers to a shadier location during the hottest part of the day.
Can I grow other vegetables upside down besides eggplants?
Yes, you can grow a variety of other vegetables upside down, including tomatoes, peppers, cucumbers, and herbs. Tomatoes are particularly well-suited for upside-down growing, as they tend to sprawl and benefit from the support provided by the container. Peppers also do well upside down, as they are less susceptible to soilborne diseases. Cucumbers can be grown upside down, but they may require additional support to prevent the vines from breaking. Herbs like basil, mint, and oregano can also be grown upside down, adding a fragrant touch to your garden.
What do I do if my upside-down eggplant plant becomes too heavy?
If your upside-down eggplant plant becomes too heavy, you’ll need to provide additional support to prevent the container from tipping over or the plant from breaking. You can use stakes, trellises, or even ropes to support the weight of the plant and its fruits. Secure the stakes or trellises to the container or to the ground nearby. Tie the plant to the supports using soft twine or plant ties. Be careful not to tie the plant too tightly, as this can damage the stems. You may also need to prune away some of the excess foliage to reduce the weight of the plant.
How do I harvest my upside-down eggplants?
Harvest your eggplants when they are firm, glossy, and have reached their mature size. The skin should be smooth and unblemished. Use a sharp knife or pruning shears to cut the eggplant from the plant, leaving a short stem attached. Avoid pulling the eggplant off the plant, as this can damage the plant. Harvest your eggplants regularly to encourage continued fruit production. Overripe eggplants will become bitter and seedy.


Leave a Comment