
Growing Celery Indoors might seem like a challenge reserved for seasoned gardeners, but I’m here to tell you it’s totally achievable, even if you’re a beginner! Have you ever bought a bunch of celery, used a few stalks, and watched the rest wilt away in your fridge? I know I have, and it’s incredibly frustrating. That’s where this DIY guide comes in – we’re turning kitchen waste into a thriving indoor garden!
Celery, with its crisp texture and refreshing flavor, has been cultivated for centuries. Originating in the Mediterranean, it was initially valued more for its medicinal properties than its culinary uses. Over time, it evolved into the crunchy vegetable we know and love. Now, we’re taking it one step further by bringing the process of growing celery indoors right into our homes.
Why bother with this DIY trick? Well, for starters, it’s a fantastic way to reduce food waste and save money. Imagine having fresh celery on hand whenever you need it, without having to run to the store. Plus, it’s a rewarding and educational experience, especially if you have kids. This guide will walk you through the simple steps of regrowing celery from the base you’d normally discard, providing you with a sustainable and delicious addition to your indoor garden. Let’s get started!
Growing Celery Indoors: A Beginner’s Guide
Hey there, fellow plant enthusiasts! Ever thought about growing your own celery indoors? It’s totally doable, and honestly, there’s something super satisfying about snipping off fresh stalks for your soups, salads, or just a crunchy snack. I’m going to walk you through everything you need to know to successfully cultivate celery right in your home. Let’s get started!
What You’ll Need
Before we dive into the nitty-gritty, let’s gather our supplies. Having everything ready beforehand will make the whole process smoother and more enjoyable.
* Celery Stalk with Root End: You can use a store-bought bunch of celery for this! Just make sure the base (where the roots used to be) is still intact.
* Shallow Dish or Bowl: Something to hold water and the celery base.
* Potting Mix: A well-draining potting mix is crucial. Regular garden soil is usually too dense.
* Pot: Choose a pot that’s at least 8 inches in diameter and depth. Celery needs room for its roots to grow.
* Water: Tap water is fine, but letting it sit out for a day or two to dechlorinate is even better.
* Grow Lights (Optional but Recommended): Celery needs a lot of light, so if you don’t have a sunny window, grow lights are a great investment.
* Spray Bottle: For misting the celery leaves.
* Fertilizer (Optional): A balanced liquid fertilizer can help boost growth.
Reviving the Celery Base
This is where the magic begins! We’re going to coax that celery base into sprouting new roots and leaves.
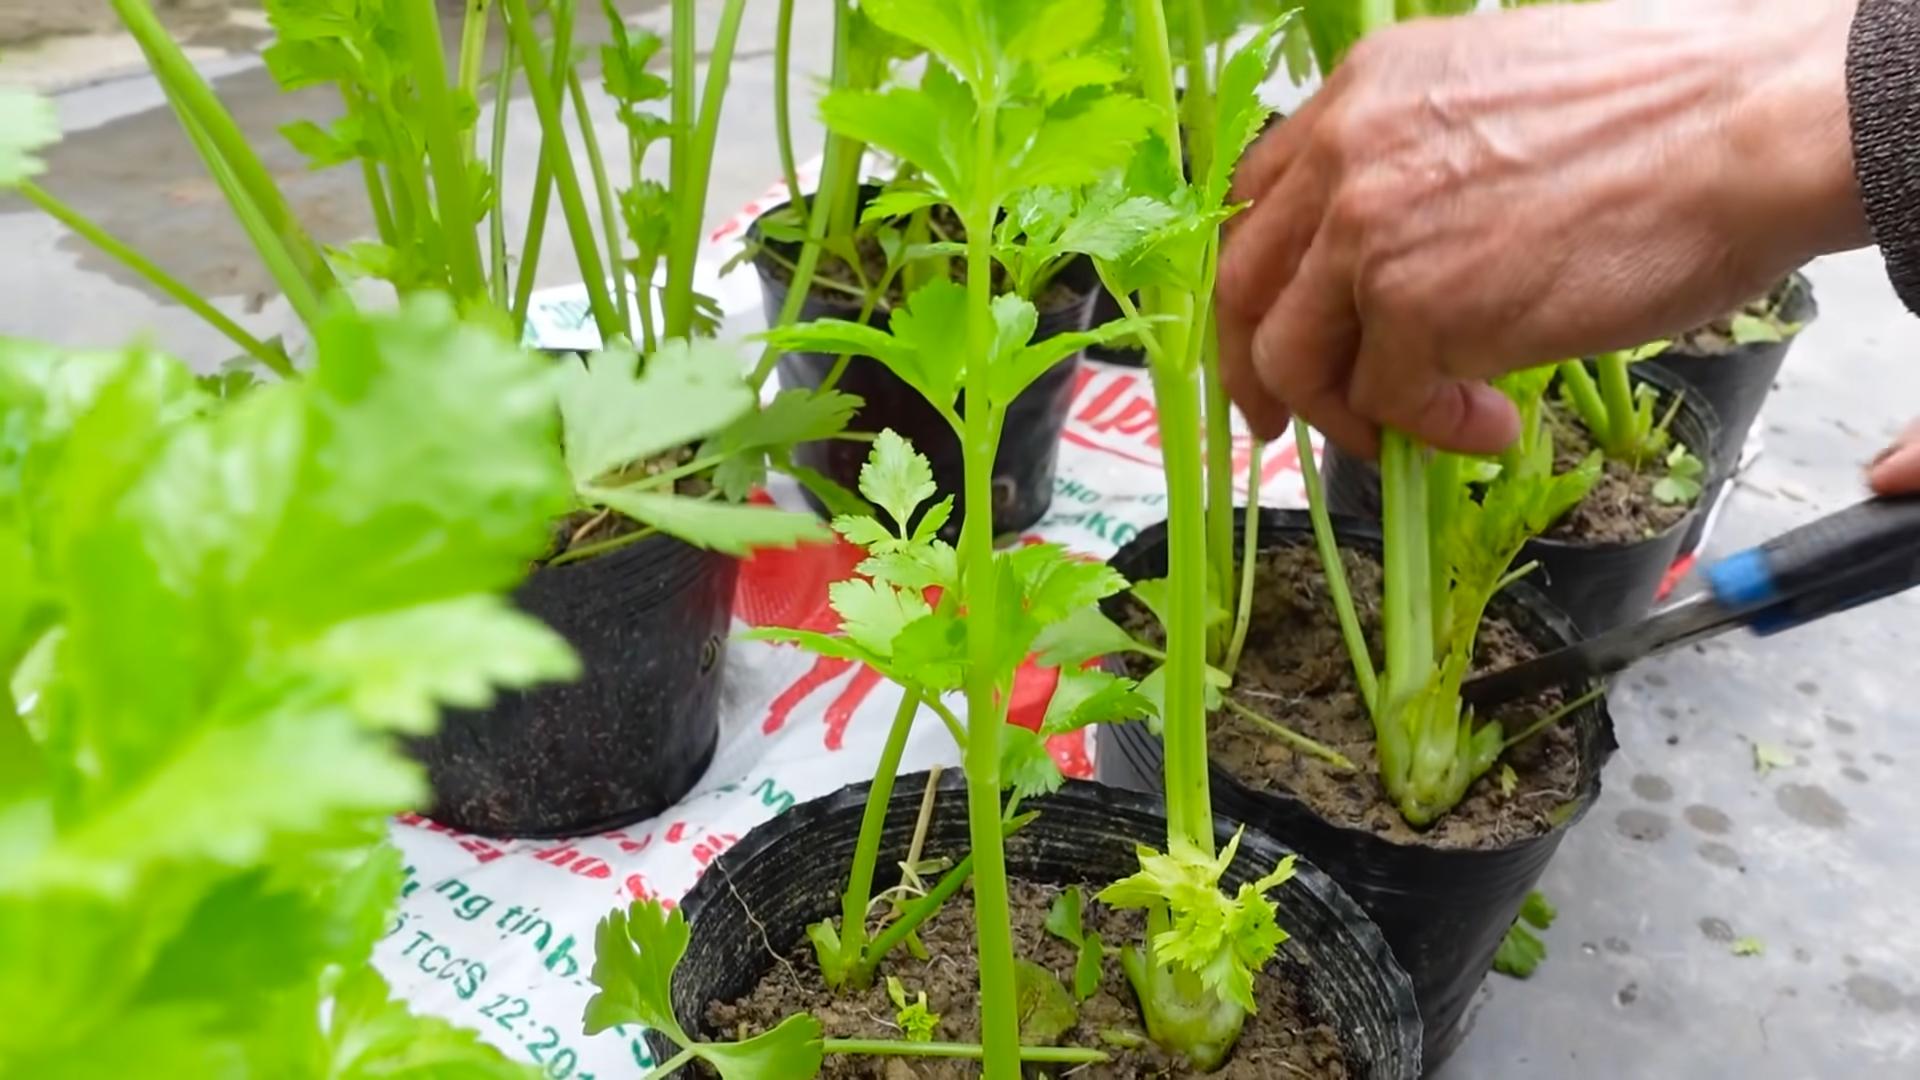
1. Prepare the Celery Base: Once you’ve eaten the celery stalks, don’t toss the base! Carefully cut off the stalks about 2 inches from the bottom. This will leave you with a solid base that looks a bit like a stubby, leafy stump.
2. Place in Water: Put the celery base in your shallow dish or bowl. Add enough water to cover the bottom inch or so of the base. You don’t want to submerge the entire thing, just the bottom part.
3. Find a Sunny Spot: Place the dish in a bright, sunny windowsill. South-facing windows are ideal, but east or west-facing windows can also work. If you don’t have a sunny window, use grow lights. Position the lights a few inches above the celery base.
4. Change the Water Regularly: Every day or two, change the water in the dish. This will prevent bacteria from growing and keep the celery base healthy.
5. Observe and Wait: Within a few days to a week, you should start to see small roots emerging from the bottom of the celery base. You might also notice new green leaves sprouting from the top. This is a sign that your celery is ready to be planted!
Planting Your Celery
Now that your celery base has sprouted roots, it’s time to give it a proper home in a pot.
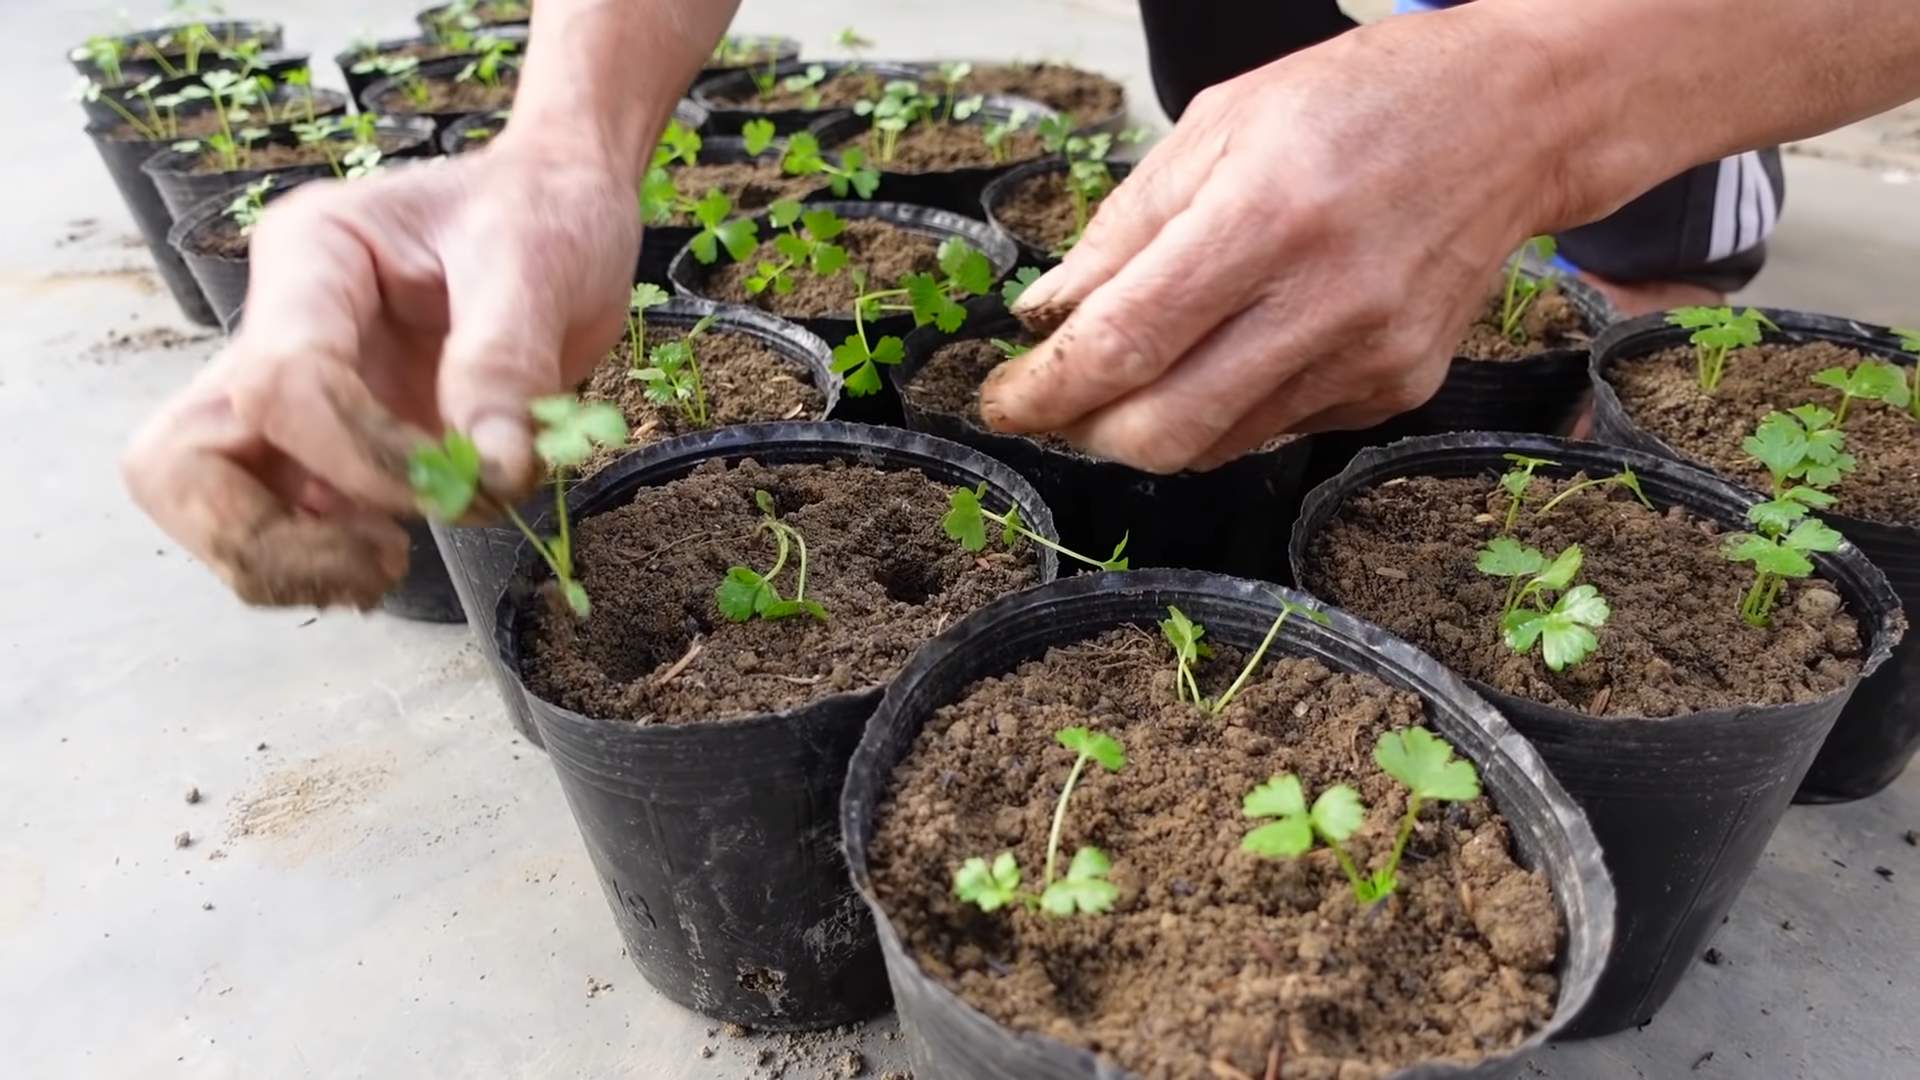
1. Prepare the Pot: Fill your pot with potting mix, leaving about an inch of space at the top. Gently pat down the soil to remove any air pockets.
2. Create a Hole: Use your finger or a small trowel to create a hole in the center of the pot that’s large enough to accommodate the celery base and its roots.
3. Carefully Transplant: Gently remove the celery base from the water dish. Be careful not to damage the delicate roots. Place the celery base into the hole in the pot, making sure the roots are spread out.
4. Cover the Roots: Fill the hole with potting mix, gently covering the roots. The top of the celery base should be just above the soil level.
5. Water Thoroughly: Water the pot thoroughly until water drains out of the bottom. This will help settle the soil and ensure the roots are well-hydrated.
Caring for Your Indoor Celery
Congratulations! You’ve successfully planted your celery. Now, let’s talk about how to keep it happy and healthy.
1. Light: Celery needs at least 6 hours of sunlight per day. If you’re using a sunny window, rotate the pot regularly to ensure all sides of the plant get even exposure. If you’re using grow lights, keep them on for 12-14 hours per day.
2. Watering: Celery likes consistently moist soil, but not soggy. Water when the top inch of soil feels dry to the touch. Avoid overwatering, as this can lead to root rot.
3. Humidity: Celery prefers a humid environment. You can increase humidity by misting the leaves with a spray bottle every day or two. You can also place the pot on a tray filled with pebbles and water. Make sure the bottom of the pot isn’t sitting directly in the water.
4. Temperature: Celery grows best in temperatures between 60-70°F (15-21°C). Avoid placing your celery near drafts or heat sources.
5. Fertilizing (Optional): If you want to give your celery a boost, you can fertilize it every two weeks with a balanced liquid fertilizer. Follow the instructions on the fertilizer label.
6. Pest Control: Keep an eye out for pests like aphids or spider mites. If you spot any, you can try spraying them with insecticidal soap or neem oil.
Harvesting Your Celery
The best part! Harvesting your own homegrown celery.
1. When to Harvest: You can start harvesting celery stalks when they’re about 6-8 inches long.
2. How to Harvest: Use a sharp knife to cut off the outer stalks near the base of the plant. Leave the inner stalks to continue growing.
3. Continuous Harvest: You can continue harvesting celery stalks as needed. The plant will continue to produce new stalks as long as you provide it with proper care.
Troubleshooting
Even with the best care, you might encounter some challenges along the way. Here are a few common problems and how to fix them:
* Yellowing Leaves: This could be a sign of overwatering, underwatering, or nutrient deficiency. Check the soil moisture and adjust your watering accordingly. If the soil is consistently moist, let it dry out a bit before watering again. If the soil is dry, water thoroughly. You can also try fertilizing your celery with a balanced liquid fertilizer.
* Leggy Growth: This means your celery isn’t getting enough light. Move it to a brighter location or use grow lights.
* Slow Growth: This could be due to a variety of factors, including insufficient light, water, or nutrients. Make sure your celery is getting enough light, water, and fertilizer.
* Pests: Keep an eye out for pests like aphids or spider mites. If you spot any, you can try spraying them with insecticidal soap or neem oil.
Tips for Success
Here are a few extra tips to help you succeed in growing celery indoors:
* Choose the Right Variety: Some celery varieties are better suited for indoor growing than others. Look for varieties that are compact and disease-resistant.
* Start with a Healthy Base: Choose a celery bunch with a firm, healthy base. Avoid bunches with brown or mushy bases.
* Be Patient: Growing celery from a base takes time and patience. Don’t get discouraged if you don’t see results immediately.
* Enjoy the Process: Growing your own celery can be a rewarding experience. Enjoy the process and don’t be afraid to experiment!
Growing celery indoors is a fun and rewarding project. With a little bit of care and attention, you can enjoy fresh, homegrown celery all year round. Happy gardening!
Conclusion
So, there you have it! Growing celery indoors might seem like a challenge, but with a little patience and the right approach, you can enjoy fresh, crisp celery right from your own home. This DIY trick isn’t just about saving money; it’s about connecting with your food, reducing your carbon footprint, and experiencing the satisfaction of nurturing something from start to finish.
Why is this a must-try? Because store-bought celery, while convenient, often lacks the vibrant flavor and freshness of homegrown. Plus, you have complete control over the growing process, ensuring it’s free from harmful pesticides and chemicals. Imagine the difference in your salads, soups, and snacks when you use celery that’s bursting with flavor and packed with nutrients.
Beyond the basic method, there are plenty of ways to customize your indoor celery growing experience. Consider experimenting with different celery varieties. ‘Utah Tall’ is a classic choice, but you might also try ‘Golden Self-Blanching’ for a milder flavor or ‘Redventure’ for a beautiful, colorful addition to your garden. You can also adjust the growing medium to suit your preferences. While soil works well, hydroponics can offer even faster growth and cleaner results.
Another variation to explore is companion planting. Growing herbs like parsley or chives alongside your celery can help deter pests and enhance the flavor of both plants. You can also use the celery leaves, which are often discarded, to make flavorful vegetable broth or add them to salads for an extra boost of nutrients. Don’t let any part of your homegrown celery go to waste!
Don’t be intimidated if you’ve never grown celery before. This DIY project is surprisingly forgiving, and even if you encounter a few bumps along the way, the rewards are well worth the effort. The process of regrowing celery from a stalk base is a fantastic way to reduce food waste and get a head start on your indoor garden.
We wholeheartedly encourage you to give this DIY trick a try. Start with a single celery stalk and see how it goes. Once you get the hang of it, you can expand your operation and enjoy a continuous supply of fresh celery throughout the year.
And most importantly, we want to hear about your experience! Share your tips, tricks, and triumphs in the comments below. Let us know what worked for you, what challenges you faced, and any variations you tried. Your feedback will not only help other readers but also contribute to a growing community of indoor celery enthusiasts. Let’s all learn together and discover the joys of growing celery indoors! Embrace the process, enjoy the journey, and savor the delicious results of your own homegrown celery. This is a simple, sustainable, and satisfying way to bring a little bit of the garden into your home.
Frequently Asked Questions (FAQ)
1. What kind of celery should I use to start growing indoors?
You can use any type of celery you buy from the grocery store, but organic celery is often recommended to avoid any potential pesticide residue. Look for a stalk that is firm, crisp, and has a healthy-looking base with intact roots. Avoid celery that is wilted, discolored, or has signs of rot. The fresher the celery, the better your chances of successful regrowth.
2. How long does it take to regrow celery from a base?
The time it takes to regrow celery from a base can vary depending on factors such as temperature, light, and humidity. Generally, you should start to see new growth within a week or two. It may take several weeks or even months to grow a full-sized celery stalk. Be patient and consistent with your watering and lighting, and you’ll eventually be rewarded with a harvest.
3. What kind of soil is best for growing celery indoors?
Celery prefers well-draining, nutrient-rich soil. A good potting mix that contains compost, peat moss, and perlite or vermiculite is ideal. You can also amend your existing potting mix with organic matter to improve its fertility and drainage. Avoid using heavy clay soil, as it can become waterlogged and inhibit root growth.
4. How much light does celery need to grow indoors?
Celery needs plenty of light to thrive. Aim for at least 6-8 hours of direct sunlight per day. If you don’t have a sunny window, you can supplement with artificial grow lights. Fluorescent or LED grow lights are a good option. Position the lights about 6-12 inches above the celery plants and keep them on for 12-16 hours per day.
5. How often should I water my indoor celery plants?
Celery needs consistent moisture to grow well. Water your plants regularly, keeping the soil consistently moist but not waterlogged. Check the soil moisture level daily and water when the top inch feels dry to the touch. Avoid letting the soil dry out completely, as this can stress the plants and stunt their growth.
6. What are some common problems when growing celery indoors, and how can I fix them?
Some common problems include yellowing leaves, stunted growth, and pest infestations. Yellowing leaves can be caused by overwatering, underwatering, or nutrient deficiencies. Adjust your watering schedule and fertilize your plants with a balanced liquid fertilizer. Stunted growth can be caused by insufficient light, poor soil, or overcrowding. Provide more light, transplant into a larger pot, or thin out the plants. Pests such as aphids and spider mites can be controlled with insecticidal soap or neem oil.
7. Can I grow celery from seed indoors?
Yes, you can grow celery from seed indoors, but it requires more patience and effort than regrowing from a base. Start the seeds indoors 10-12 weeks before the last expected frost. Sow the seeds thinly in a seed-starting mix and keep them moist. Germination can take up to two weeks. Once the seedlings are large enough to handle, transplant them into individual pots and grow them under grow lights until they are ready to be transplanted outdoors or into larger containers.
8. How do I harvest my indoor celery?
You can harvest your indoor celery when the stalks are at least 6-8 inches tall. Cut the outer stalks near the base of the plant, leaving the inner stalks to continue growing. This will allow you to harvest celery gradually over time. You can also harvest the celery leaves for use in salads, soups, or as a garnish.
9. Can I grow celery indoors year-round?
Yes, with the right conditions, you can grow celery indoors year-round. Provide adequate light, water, and nutrients, and protect your plants from extreme temperatures. You may need to adjust your growing practices depending on the season. For example, you may need to provide more supplemental light during the winter months.
10. Is growing celery indoors worth the effort?
Absolutely! Growing celery indoors is a rewarding experience that allows you to enjoy fresh, flavorful celery right from your own home. It’s also a sustainable way to reduce food waste and connect with your food. While it may require some initial effort, the benefits of homegrown celery are well worth it. Plus, you’ll gain valuable gardening skills and knowledge along the way. So, give it a try and see for yourself!


Leave a Comment